|
|
Post by Sirrob01 on Nov 6, 2011 2:44:12 GMT -9
~~~~~~~~~~~~~~~~~~~~~~~~~~~~~~~~~~~~~~~~~~~~
Download Links Added:
Main PDF (25mb)
sirrob01.files.wordpress.com/2011/11/ufo-mk1-final.pdf
Instruction PDF (5mb)
sirrob01.files.wordpress.com/2011/11/instructions-ufo-mk1.pdf
studio file, you'll need to rename the extension to .studio (.2 mb)
sirrob01.files.wordpress.com/2011/11/ufo-mark-one.odt
~~~~~~~~~~~~~~~~~~~~~~~~~~~~~~~~~~~~~~~~~~~~I think Gilius and I had the same idea to build some form of UFO thingy for Okums Space aliens. Anyways been tooling around with this design for the past 2 weeks, Didn't want to post anything until I finally had something that worked and was buildable. The first two prototypes ended up in the Bin due to an overly complex canopy (no way I could cut and score them at the small scale.) 3rd prototype: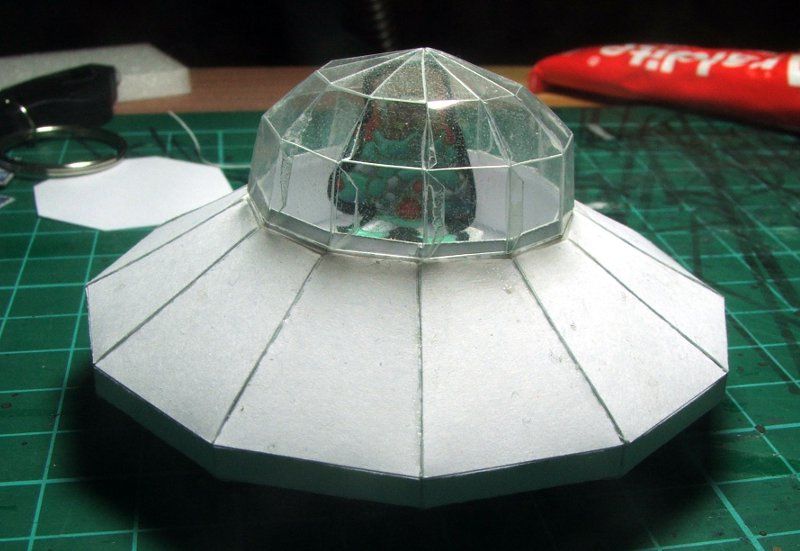 Canopy was a nightmare to cut out and score and due to all the folds is pretty hard to see through. 4th prototype: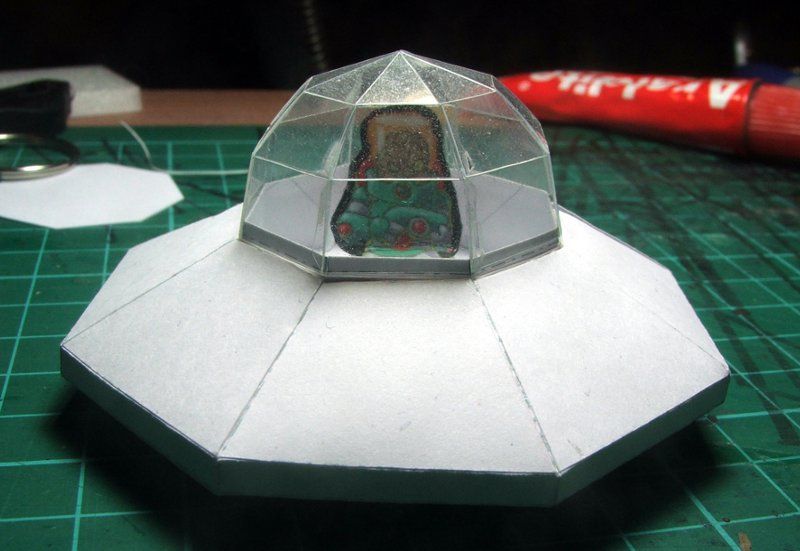 This one turned out okay although it was a bit squashed down. 5th prototype and hopefully last... 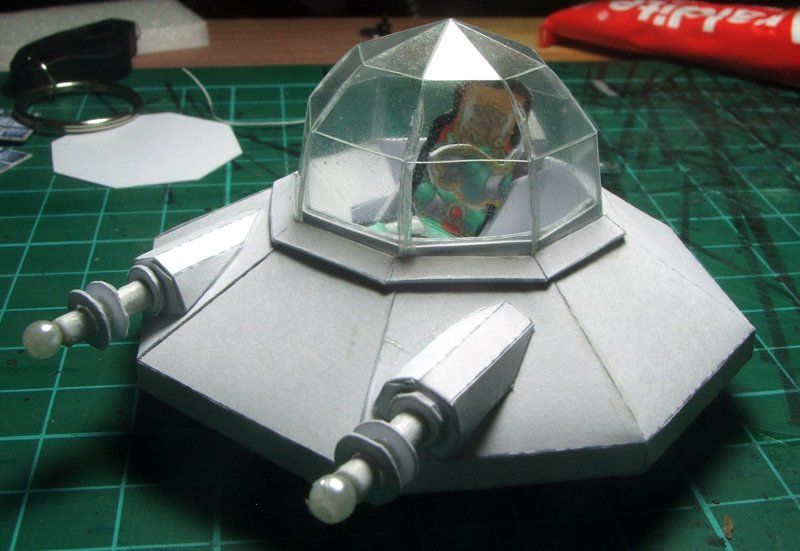 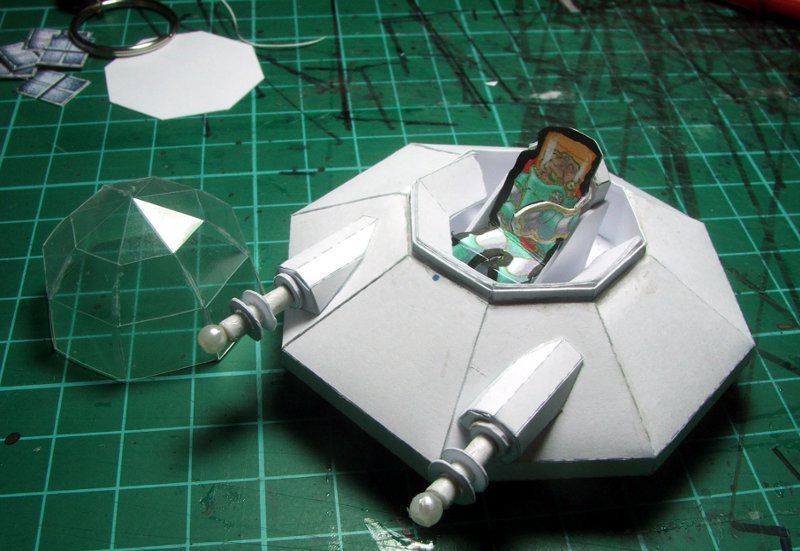 Stretched it a little vertically, got some guns built that looked good and were only ridiculously fiddly instead of impossibly fiddly to build, added control panel and chair to the cockpit. The little round things on the ends of the guns were me messing around with small plastic beads, not to sure how to replicate those in paper... Overall size is around 72mm across (just under 3inches), I'll see if I can get some textures laid down onto it as soon as I can, but I work pretty slow at the moment.... ;D
|
|
|
|
Post by dragnoz on Nov 6, 2011 2:45:47 GMT -9
LOVE it!
|
|
|
|
Post by Rhannon on Nov 6, 2011 2:54:01 GMT -9
Just WOW!!!!!!!!!!!!
( and bigger ufos ;D )
|
|
|
|
Post by kiladecus on Nov 6, 2011 4:33:49 GMT -9
How cool is THAT!  The guns remind me of something Ebble-ish... and the bead/pearly things... GENIUS! Great job! |
|
|
|
Post by Reivaj on Nov 6, 2011 4:44:31 GMT -9
Espectacular!! ;D Great Design Sirrob  |
|
|
|
Post by okumarts on Nov 6, 2011 9:28:57 GMT -9
This is made of so much win!
I love it!
|
|
|
|
Post by josedominguez on Nov 6, 2011 11:23:51 GMT -9
Aghhhhhh. the geometry, the terrifying geometry. That's awesome  |
|
|
|
Post by cowboyleland on Nov 6, 2011 18:17:08 GMT -9
WOW, just WOW ;D
|
|
|
|
Post by Sirrob01 on Nov 8, 2011 23:18:24 GMT -9
Thanks all, started on the texturing slowly. 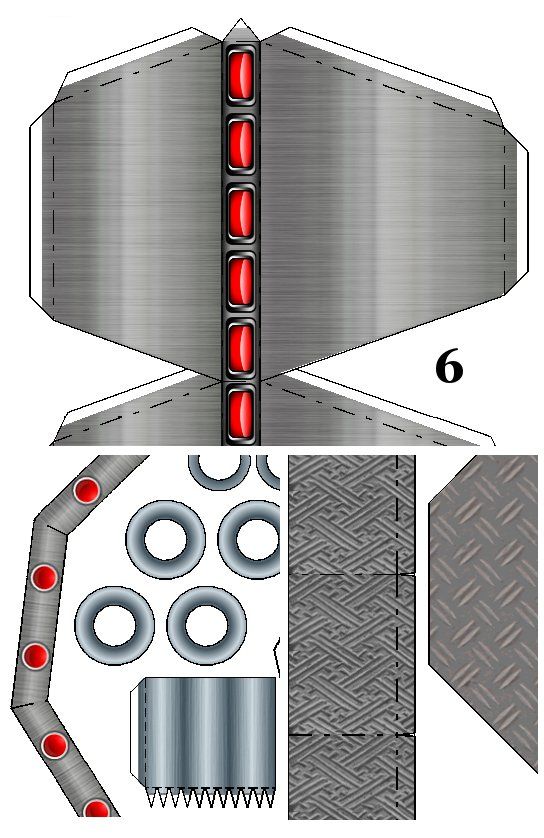 Top segment is the upper and lower hull with lights around the middle, I might do different light colours as an option. Lower Left is the upper ring and some gun components in a more blue titanium metal, Right lower is internal cockpit wall texture and internal cockpit floor texture. Trying for a metal look with some texture but hopefully not to rough. Plan on under laying a range of colours grey/blue/red/green etc...maybe some form of alien camo? Thoughts are welcome. |
|
|
|
Post by kiladecus on Nov 9, 2011 4:54:58 GMT -9
Thoughts?  HOLY CRAP that is AWESOME! I can see these swarming around as the primary attack craft of my Cier Empire! I will use Ebbles Invader Craft as a Command/Dropship! This is so stinkin' cool! |
|
|
|
Post by Vermin King on Nov 9, 2011 9:41:19 GMT -9
Did you end up edge-gluing the canopy? What glue was used to prevent clouding?
And the textures look great
|
|
|
|
Post by Sirrob01 on Nov 9, 2011 11:43:44 GMT -9
Canopy is tab glued 1mm tabs (1/64 th inch) I got very slight clouding using super glue on the tabs. I did try one edge were I cut them off and edge glued and it held up okay but was a lot more fiddly so to make things a little easier the tabs are there but if you like just slice them off and edge glue.
Next canopy I make I'm going to try 5min araldite. I'm guessing the best stuff to use would be the perspex glue Litko sell but I don't have any handy, some sort of traditional plastic model hobby glue might be an option as well.
My acetate is also not very clear as it's the inkjet stuff it has a rough side, I'm thinking of getting a print shop to print a canopy (or 3) off for me on laser overhead acetate (smooth both sides).
|
|
|
|
Post by gilius on Nov 9, 2011 15:23:13 GMT -9
Wow Sirrob this is awesome!
|
|
|
|
Post by Vermin King on Nov 9, 2011 18:06:43 GMT -9
Is it possible to also have a textured dome when you release this? With tacky porthole windows? I have every confidence in the world that I can totally mess up a clear dome ... alas and alack
|
|
|
|
Post by Sirrob01 on Nov 9, 2011 21:40:37 GMT -9
Never fear a solid dome with port holes will be an option |
|
|
|
Post by Sirrob01 on Nov 12, 2011 22:37:47 GMT -9
Control panel done...I probably over detailed it, some self drawn bits some from openclipart some modded etc. 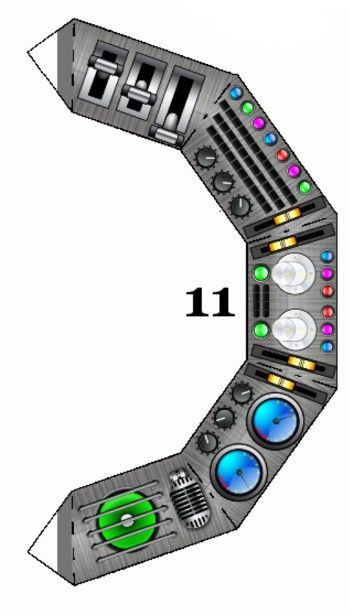 |
|
|
|
Post by kiladecus on Nov 13, 2011 3:53:55 GMT -9
Wow! Did I already say this was amazing?
|
|
|
|
Post by Sirrob01 on Nov 15, 2011 21:59:20 GMT -9
Getting close to finished, I've picked out about 11 colours as the base but if anyone has any other suggestions I'm happy to add them in, so far I have: 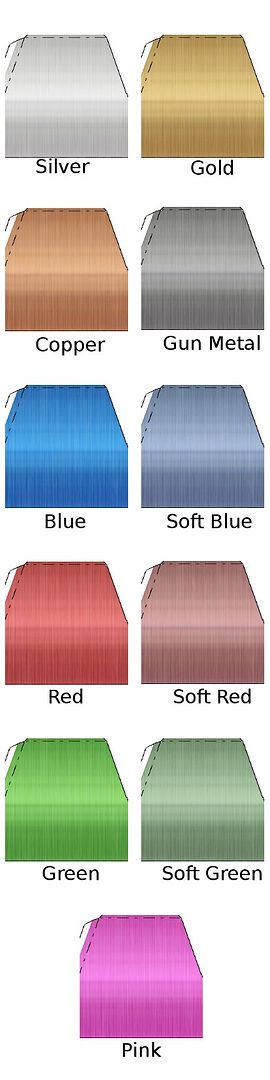 I've also added 5 different segment insignia's which can either be replicated onto one,four or all eight upper segments (3 of them below, sorry can't mix and match different insignia types):  The basic layout overview is below, the red fiery globe also has 5 different colours, I've done the solid dome in 3 colours red/blue/green, The lights can all be one colour red,yellow,blue,purple, green or as the below a random multi-colour version: 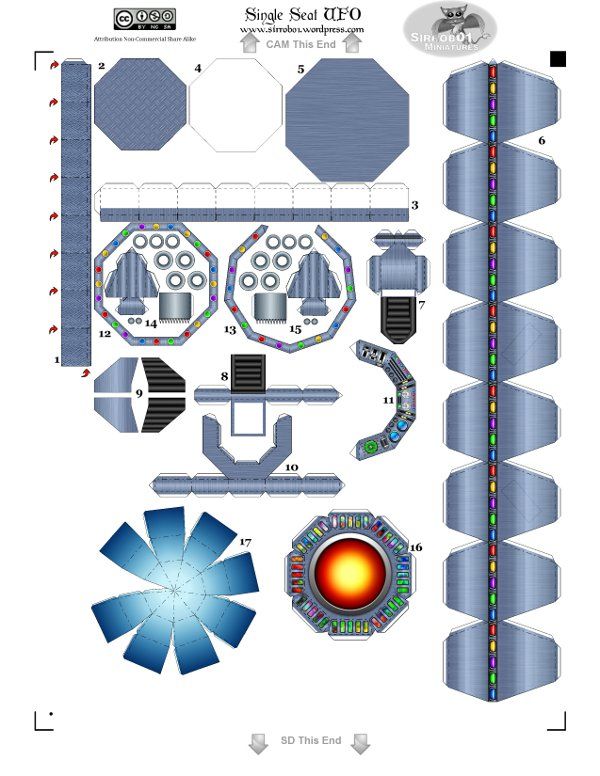 Any thoughts or comments are very welcome, I still have the cut files and instructions to make... |
|
|
|
Post by dragnoz on Nov 15, 2011 22:31:53 GMT -9
simply superb and sublime! bloody well done chap!
|
|
|
|
Post by kiladecus on Nov 16, 2011 5:52:47 GMT -9
Did I already mention this was AWESOME?! |
|
|
|
Post by Vermin King on Nov 16, 2011 9:52:13 GMT -9
Holy Sheep Dip, the dome is brilliant. Every dome I've built that uses petals has the bottom edges connected and then you get up to the intricate fiddly thin pieces and it is make-or-break time. It is a pain in the neck that way, but having the top connected makes so much sense and should result in a much better build.
This is going to be an amazing model. I am confused about part 1 and part 10. Part 10 looks like it might be an interior part that fits around the chair or under the console, maybe, but I am at a total loss on part 1, unless it is the interior wall... hmmm.
Color choices and layered details is one of those things you are known for. Thanks.
|
|
|
|
Post by Sirrob01 on Nov 16, 2011 13:36:26 GMT -9
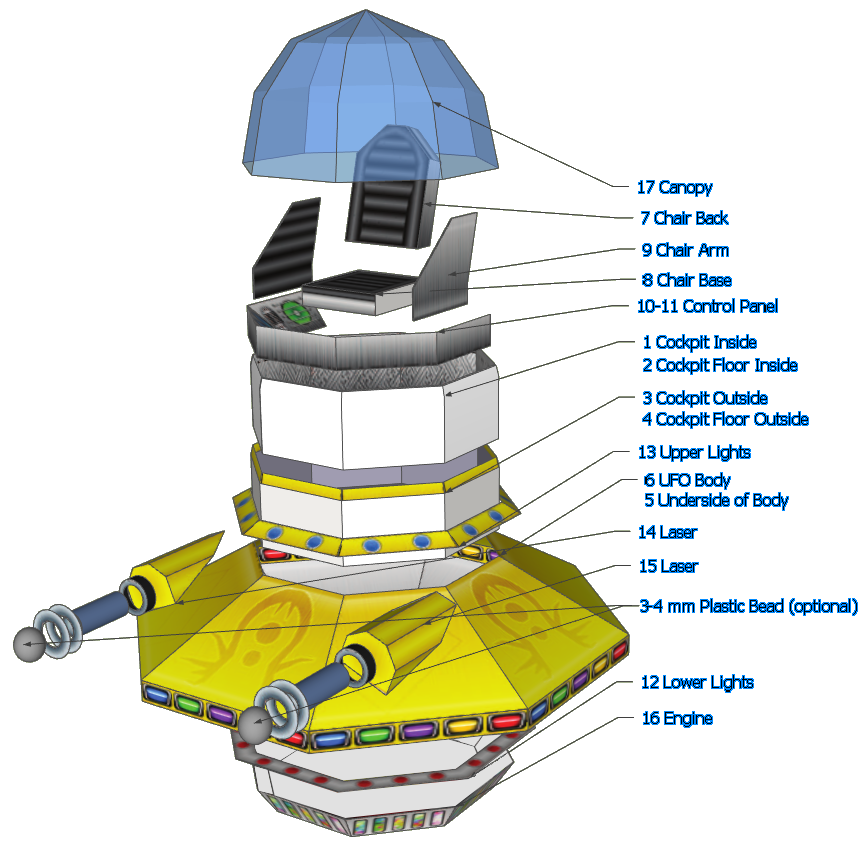
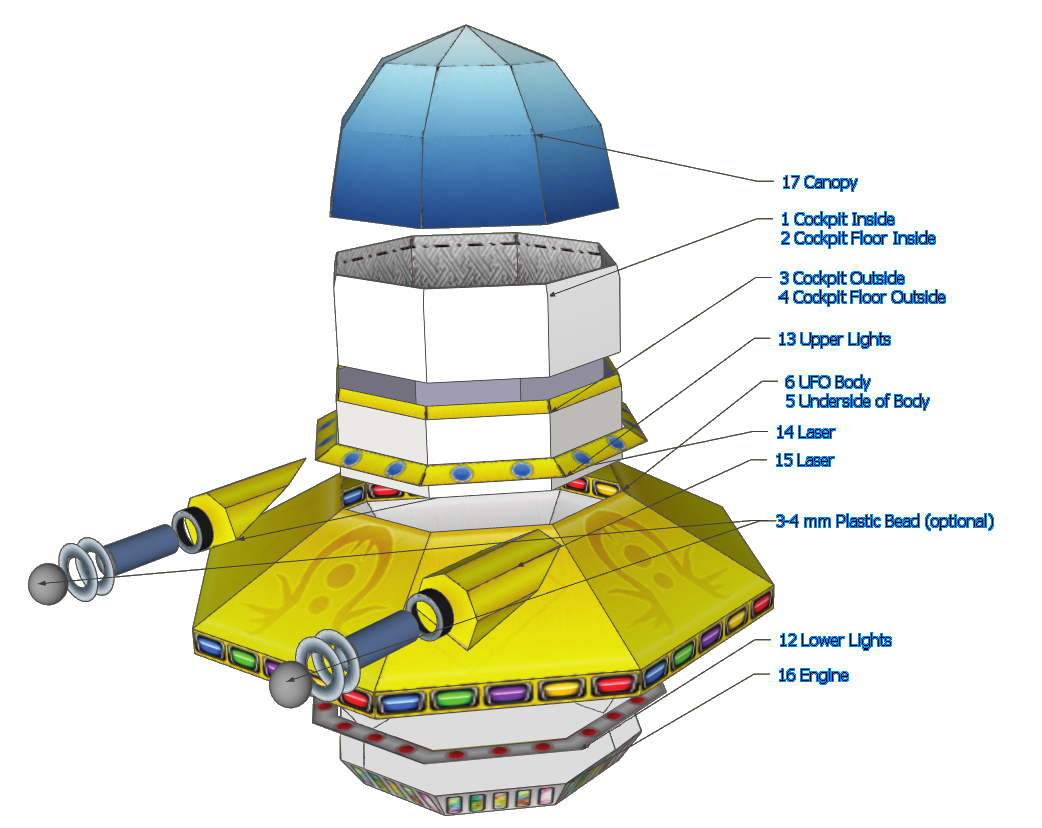
Thanks guys, no extra colour requests? I slipped pink in there Part 1 - Internal cockpit walls Part 10- Underside and rear wall of control panel (basically textured just in case, never know were someone might like to use it, myself included) The cockpit is built up as an outside tube and an inside tube (Octogon). The canopy edge actual fits between these two lips (yes it's a little fiddly) but helps hold the canopy in place and no exposed white/blackened backs of pieces...well less exposed. The photo's don't show this as I trimmed the lip off as I didn't want to permanently affix the canopies on the test builds. Hopefully I'll have this good to go by the end of the weekend (fingers crossed). |
|
|
|
Post by okumarts on Nov 16, 2011 14:34:39 GMT -9
Maybe like a two tone aqua and gray. This is really awesome. Can't wait to build it.
|
|
|
|
Post by Vermin King on Nov 16, 2011 14:52:22 GMT -9
I didn't realize you were doing color requests ... hmmm
Seriously, if you are taking requests, I'd like to see this in any of the colors without the brushed metal look, but that would probably be more trouble than worth. I was just remembering some of the old movie ships where they almost looked like they had an enamel paint job.
|
|
|
|
Post by Sirrob01 on Nov 16, 2011 16:47:07 GMT -9
I'll see what I can come up with |
|
|
|
Post by Sirrob01 on Nov 17, 2011 22:47:52 GMT -9
Something like this? 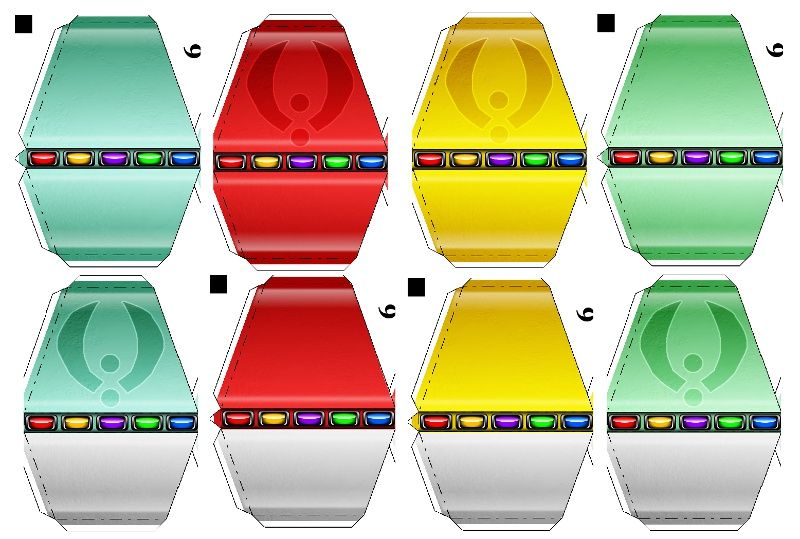 |
|
|
|
Post by Vermin King on Nov 18, 2011 7:20:59 GMT -9
Absolutely phenomenal. Those will definitely have the retro look. Bless you.
At another forum, someone was building an old Russian cathedral, and he was voicing frustration with the dome petals. Pointing out how you have the petals connected at the thin part was a good solution. He changed the way he was working. Connected the top petals first, then build down. Helped him tremendously.
|
|
|
|
Post by Sirrob01 on Nov 18, 2011 16:48:41 GMT -9
Glad the dome design was useful to someone else, not sure where I saw it originally...looked at a lot of foldup dome shapes... ;D
|
|
|
|
Post by Sirrob01 on Nov 21, 2011 0:21:06 GMT -9
|
|
|
|
Post by kiladecus on Nov 21, 2011 2:10:22 GMT -9
Fantastic instructions!
I trust the seat allows any 30mm figure to stand on it, or do you have to "modify" the pilot by making them in a "sitting" position?
|
|