|
|
Post by Vermin King on Mar 15, 2021 14:17:09 GMT -9
I still have an Altana project I am working on, as well as some Objective Markers that would be suitable for Venice, but folks are needing bridges. I had planned on doing Ponte de le Tette for a long time (when was it that I had you grab photos, monstersbtm?), and some time I will get back to Rialto, but there is a need for bridges. shep's bridges, cardboard-warriors.proboards.com/post/99305/thread , were what I planned to use to get a canal width associated with Carnevale. Most of the bridges in Venice are single-arch bridges, constructed of brick. Some of these have been stucco'd. Some have stonework. Many have walls on each side of the bridge. Some have railings. One has no railings at all (something that was more common centuries ago). From the Forum here, soaringraven's Ornamented Bridge could fit, cardboard-warriors.proboards.com/thread/8516/ornamented-bridgegrendelsmother64's Laketown Bridge could be used on narrow spots or modified, cardboard-warriors.proboards.com/post/42510/threadMentioned on the Forum, but no longer available on Deviantart is the MadunTwoSwords bridge. I really wanted to examine it, but it isn't on my backup drive. It was designed as two ends that could join, or you could put extensions in between. I think I need to do a few diverse bridges so that all the bridges on a table won't look alike. 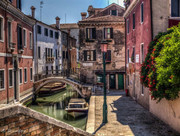      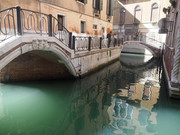   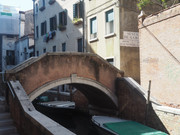 |
|
|
|
Post by Vermin King on Mar 16, 2021 17:19:18 GMT -9
|
|
|
|
Post by Vermin King on Mar 18, 2021 16:54:33 GMT -9
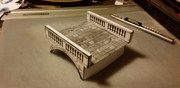
The third bridge up there is the Ponte de San Cristoforo, behind Ca Dario. gothique is needing a bridge between a two-inch riva behind his Ca Dario and a one-inch riva where his glennwilliams church will sit. So I whipped up a bridge based on San Cristoforo. 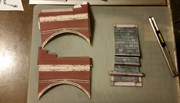 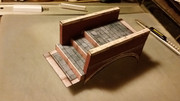 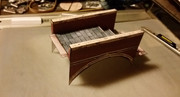 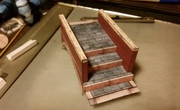 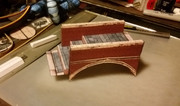 I had some brace pieces that really won't do the job, so I am going to add some U-shaped (or H-shaped) pieces which I would laminate to another layer of card, then slide from the bottom into the side walls to keep everything square. The pointy bits at the bottom should not be an issue since they will be suspended above the 'water'. The tiles on the two ends of the bridge will suspend it. Not a bad test build |
|
|
|
Post by gothique on Mar 19, 2021 0:15:44 GMT -9
That is looking great
|
|
|
|
Post by Vermin King on Mar 19, 2021 3:49:48 GMT -9
I didn't get the two skeleton structures done last night, but have the position and width of the uprights done. Once I get the positions inside the bridge worked out, I can figure how long they need to be and how large the rectangles at the bottom can be.
EDIT --
Should have the test on the structural elements done at lunch. Normally, when I have parts that are laminated together, I would glue them together and let them dry overnight before installing. I think that since these are really just to 'maintain shape' I can do a bit of a rush job on them
|
|
|
|
Post by Vermin King on Mar 19, 2021 6:19:46 GMT -9
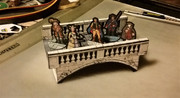
Well, when I built it last night, I wanted to show it with figures on it, but GrayC decided to help   After I add the supports, I will try again. During GrayC's nap |
|
|
|
Post by Vermin King on Mar 19, 2021 8:04:47 GMT -9
|
|
|
|
Post by Vermin King on Mar 19, 2021 8:12:29 GMT -9
  This was designed for a specific location, but if anyone wants one that is between level rivas, I could whip it out pretty quick |
|
|
|
Post by gothique on Mar 19, 2021 9:41:14 GMT -9
I love it. Looking forward to having it on my table
|
|
|
|
Post by Vermin King on Mar 20, 2021 13:58:34 GMT -9
Ponte dei Bareteri, the Hatters Bridge is the next one. This will be a fairly easy build if I am guessing correctly at this point, but when I finally get to the test build, I'll find out. Starting with this image 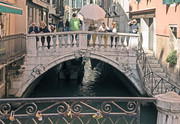 Here's where I am at  Now that I have the side done, it should go fairly quickly now. Well, not now, but when I come back to it |
|
|
|
Post by Vermin King on Mar 20, 2021 15:22:48 GMT -9
Figured I might as well finish it. Still need to do a test build  I really wanted to do this as a one-piece, but if someone might want to build it and has a cutter, I figured I should accommodate |
|
|
|
Post by Vermin King on Mar 20, 2021 18:24:36 GMT -9
And my new printer borked this up bad, but it is only a test build
|
|
|
|
Post by gothique on Mar 21, 2021 2:36:30 GMT -9
I can do a test build
|
|
|
|
Post by gothique on Mar 21, 2021 2:54:58 GMT -9
The only thing I would be tempted to do is put a tunnel piece under the arch. That being said,thickening the arches and walkway with mounting board could achieve the same result. I assume you will add a top on the rails, like you did for your balconies
|
|
|
|
Post by Vermin King on Mar 21, 2021 5:49:27 GMT -9
gothique's test build is better than mine. 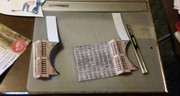 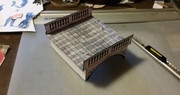 The definition of 'borked' in this case was the orangy-pink color and the striped pavement. gothique's is a bit lighter, but still pink tinged, so I will have to adjust that 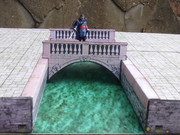 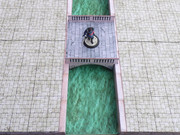
|
|
|
|
Post by Vermin King on Mar 21, 2021 14:27:42 GMT -9
Well, here's the two pages for doing a 3d railing on the color-adjusted 3d railing base bridge. My cheap printer/ expensive paper weight has now destroyed five pages of 110# (top and bottom edges), one page of 67#, one page of photopaper and won't feed 24# or 20# paper. Epson hates me. 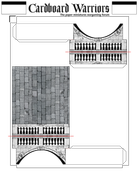 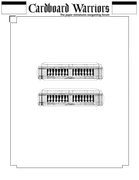 |
|
|
|
Post by Vermin King on Mar 21, 2021 16:31:50 GMT -9
The 'dead' old reliable Brother printer can still do Grayscale, so that will work on this one. No paper jams, no shredded cardstock, no screwy lines going across.
Hopefully Epson support can get the blasted paper weight working tomorrow, though
|
|
|
|
Post by Vermin King on Mar 21, 2021 18:11:46 GMT -9
  Hmmm, what else can I do in grayscale? I do think the 3d railings really add to the charm |
|
|
|
Post by monstersbtm on Mar 22, 2021 21:08:55 GMT -9
Those 3d railings are way better then the flat one. Totally worth the effort. Quick questions vk: does this bridge work only connecting 2" Rivas or can fit with 1" riva as well? What are the dimensions of it? (width and length)
|
|
|
|
Post by gothique on Mar 23, 2021 0:59:33 GMT -9
Those 3d railings are way better then the flat one. Totally worth the effort. Quick questions vk: does this bridge work only connecting 2" Rivas or can fit with 1" riva as well? What are the dimensions of it? (width and length) I can answer that. It was designed for 1" rivas on a narrow canal, the span is only 3". The walkway is 3.5" square with an overlap onto the rivas. This measurement is without the wider railings |
|
|
|
Post by Vermin King on Mar 23, 2021 3:47:28 GMT -9
Those 3d railings are way better then the flat one. Totally worth the effort. Quick questions vk: does this bridge work only connecting 2" Rivas or can fit with 1" riva as well? What are the dimensions of it? (width and length) I was thinking last night that I needed to do one of these as a 4-inch long bridge(structure underneath) and 2-inch wide (between the inner railings). I take it from your comment that I should. |
|
|
|
Post by monstersbtm on Mar 23, 2021 4:25:09 GMT -9
What about something modular? You bridges are excellent but they seem to require a lot of time to be designed. If you manage to design just the different elements (railings, walkway ecc) and then just alter the dimensions, the final user can customize each bridge for his specific needs. What's your opinion, vk?
|
|
|
|
Post by Vermin King on Mar 23, 2021 5:02:23 GMT -9
I am not sure how 'modular' would work. There are three types of bridges -- those that sit on the rivas, those that are built between canal walls, and hybrids of those. The first bridge, San Cristoforo, was a hybrid, sitting on the riva at one end and built against the other canal wall. Ponte dei Bareteri is definitely the second type shep's bridges are the first type. Right now, I have been working on design methods that can be carried over to other bridges. I really like the concept of having a simple bridge that can have bulked out railings as simple parts to glue on. Having a fold-over side from the simple version adds a lot of strength to the structure. The inner railing wall gives it better appearance. Now that I have a method worked out, I need to start doing some of the on-the-riva bridges. Then it will just be a matter of choosing which bridge face you want for your bridge. I can do the same thing with the Hatters' Bridge, so that there can be several faces of it, stucco or brick, etc. A basic hybrid can be also be done (like the bridge at San Zan, although, I think it may really be a canal-wall type, with the end designed to look like it sits on the riva. And none of these actually get me very close to doing Ponte de le Tette |
|
|
|
Post by Vermin King on Mar 23, 2021 14:06:34 GMT -9
Here is the Hatters Bridge for a 4-inch span with a 2-inch walkway 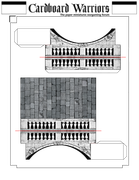 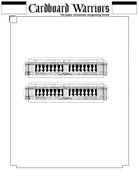 After I do a test build, hopefully tonight, I will do a Cristoforo texture on it EDIT -- And the printer worked! |
|
|
|
Post by Vermin King on Mar 24, 2021 4:19:34 GMT -9
 Prepped the parts last night and left the the fold-over sides to dry under weight overnight. I actually stacked some paperbacks on the inner bridge walls, too, just to keep them square (probably unnecessary) I really don't remember whose models I was doing early on, but fold line indicated folding over onto itself and fold marks at the side indicated fold, but not complete. I still follow that format. I always figured the builder would either take the easy road, like I did, and color over it, or they would cut it off and then edge. I just bring that up because I had a couple questions on that. |
|
|
|
Post by Vermin King on Mar 24, 2021 6:24:59 GMT -9
And I started the build while I am on a webinar, only to find out I made the lower bridge connectors 2 inches, not 2.5. Fixed  Inner railings remain the same  |
|
|
|
Post by Vermin King on Mar 24, 2021 7:51:21 GMT -9
What about something modular? You bridges are excellent but they seem to require a lot of time to be designed. If you manage to design just the different elements (railings, walkway ecc) and then just alter the dimensions, the final user can customize each bridge for his specific needs. What's your opinion, vk? During the webinar, I did get some progress made on a Bareteri Cristoforo hybrid. From the modular question, I have the feeling you would like to see something like this. 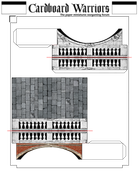 Having the face knocked out, getting the other parts done will be a simple matter of copy and paste |
|
|
|
Post by gothique on Mar 24, 2021 10:31:35 GMT -9
And I started the build while I am on a webinar, only to find out I made the lower bridge connectors 2 inches, not 2.5. Fixed Inner railings remain the same This could appear near Sortoportego San Antonio when start to expand my table |
|
|
|
Post by Vermin King on Mar 24, 2021 11:47:58 GMT -9
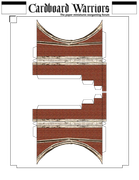
I need to come up with a good name for each type of bridge. Canal Wall, On Riva, and Hybrid will work for now, but they aren't very catchy names, and if you didn't know about the other types, you would have no clue what a Hybrid Bridge would be. Originally, I left the top of the keystone showing on the interior walls on the Hatters Bridge, but since I knocked it out of the Hatter/Cristoforo bridge, I thought I should fix it on the original. So, here are my 4X2 Canal Wall bridges so far  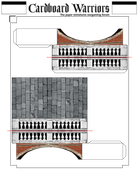 I will probably do a Canal Wall Cristoforo, just because it would be almost no effort. Then I am going to use those three Titles to divide my bridge images and files. Once things are more organized, I will decide what to do next. |
|
|
|
Post by Vermin King on Mar 24, 2021 14:40:38 GMT -9
 Time for artistic license. Using light colored Trachyte/Istria stone for edging steps and just for decoration can be found all over Venice. Just not on this bridge. I think I am going to use the edging around the walkway just to give it a little contrast and color. |
|


