|
|
Post by kiladecus on Sept 13, 2011 5:36:53 GMT -9
Ok, before I go any further, let me state for the record I am in NO way affiliated with PaperMakeiT! I simply am a guy that loves papercraft, and found a quick and easy program that allows me to make some ... interesting models. They fit the bill for what I want, and I guess that is all that matters.
I have dove back into papercraft after taking a few months while I underwent some horrific life changes. But, that is all behind me and I have some time again to devote to my game, figure and now model designs.
This thread isn't as much about how Shuffler works, but more about how I have learned to manipulate it.
This may be a good time to say that you can find it at papermakeit.com and to remind you that there are two versions, the actual program itself, and the demo version. The demo version is FREE to try. The actual version is not much more than the price of a couple models.
I will try to post more as time allows.
|
|
|
|
Post by kiladecus on Sept 13, 2011 8:51:43 GMT -9
Some key concepts to keep in mind are these: 1). The grid can not only be printed out in 25mm (1 inch) squares, but also 32mm (1 1/2 inch) and 15mm (1/2 inch). So, if you have downloaded Ken's 15mm Goblins, or Jose's 15mm Orcs, you can make maps, scenery and even 3D models for these. 2) the elements that you put on each tile are almost ALL able to be rotated 360 degrees. When you get into things like angles and such, you don't have to guess or measure, simply rotate the item and line it up with the item it will be next to. 3) every element can be resized! I have used his fan blade to not only be a fan blade, but have used it for my VAMPIRE BAT's jet exhaust, an intake on my jet fighter, even the spotlight for my Sentry Tower. 4) layers are the key! Every item is a layered element. Some have invisible properties to them, while others are solid. You stack the layers to each square just like you were making a sandwich. You throw down your base layer, then start adding things like lighting and so forth. This will allow your model to look like it is just off the showroom floor, or has been rusting in field for 100 years. Now, some people may think that Sci-Fi models, and maps don't interest them. There are MANY aspects to this program that I haven't tapped into yet. One of which is wood grains. Want a split-level log cabin instead of an alien hovercraft? Just do it! I am planning on doing a buckboard for my CRITTER VALLEY game... there are at least 7 different wood grains, I belive. I could make a VAMPIRE BAT made out of wood!  Like I said, I have SO MANY things in the works right now, it is difficult to find time to post everything... but I will try to keep posting things along this topic with pictures. I have sat down with an image in my head and in less than 2 hours had the actual model on the battlefield ready to play! Simple models (like walls) can be done start to finish in under 20 minutes! Please stay tuned... |
|
|
|
Post by gilius on Sept 13, 2011 16:14:26 GMT -9
Heh, you may not be affiliated to PaperMakeIt but you sold this to me. I was in the "map's don't interest me" crowd but I was intrigued by the models you've been doing. This post got me to take a closer look at the software's specifications and I can imagine some stuff I could do with it. The fact that, being a Flash file, it runs on Linux is another plus for me.
|
|
|
|
Post by kiladecus on Sept 14, 2011 17:03:58 GMT -9
Ok, I had less than an hour to do this... Since my focus is currently on WARDAGGER, I decided to make my first 15mm terrain and model. I haven't done this before so I wasn't sure how it would work. I drew up my Dwarven Dragon Wagon... yes, even in a Fantasy setting I have tanks with flame-throwers!  I wanted to do this, a hedge (low wall) and a concrete wall. This is the finished product... 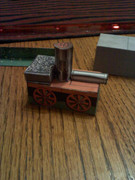 |
|
|
|
Post by kiladecus on Sept 14, 2011 17:10:03 GMT -9
This is what it looked like when I started... NOTE: Always remember to make sure you have cardstock in the printer and not plain paper...  Sometimes I am an idiot! I was short on time, so I had to use what I had. (I can make a cardboard one later). I will start with the hedge first because it is the easiest. I did my first low walls for ERA OF WAR, and this is the same thing only scaled down. 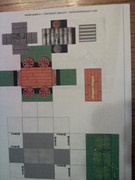 |
|
|
|
Post by kiladecus on Sept 14, 2011 17:13:46 GMT -9
First off, I used the grass tiles, and placed the hedge on top of them. I kept the same one inch scale, only I scaled it down by using the times and layering them. All items and tiles can be rotated as well as re-sized. This was easy. Score the lines for the underside, the ground and the hedge.  |
|
|
|
Post by kiladecus on Sept 14, 2011 17:15:13 GMT -9
Fold it up in the form of an upside-down "T," and there you have it.  |
|
|
|
Post by kiladecus on Sept 15, 2011 2:32:28 GMT -9
Next is the concrete wall. The little "valve" pieces are to show me where to cut the tiles. Since this is a mapping program, there is no tabs or flaps (unless you get the Plug-Ins module for a less than $5.00 USD. I got it, but I am trying to show what you can do with the program as-is. EVERY tile, every texture I post is 100% pure Shuffler "out of the box."). To make the tabs, I use the floor tiles called "Medical," and they are basically white with very little color (to represent a sterile floor). It is important to use these because if you leave any tiles on the gridded workspace empty, the grid doesn't print. It is just white space. When I do a square (retangle, or whatever) I try to have the tabs fold into one another. What I mean is I have tab "A" connect to the place it will, and tab "B" is the same way. It is hard to describe without being able to show you.... Think of a die. If you were putting a piece of tape over it, you would start with the six, and wrap the tape to cover the three. You tear off the tape. Then put a new piece of tape over the three, and wrap it over to the five... I don't know if this makes sense to anyone, it not then walk away and come back later after you forgot anything I just said. It is fairly simple, just hard to desribe. 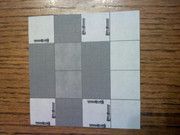 |
|
|
|
Post by kiladecus on Sept 15, 2011 2:41:25 GMT -9
The biggest problem I have with designing models is forgetting to incorporate a "box-lid," for lack of a better term. When you do a model, it is always a good ideal to have all of your tabs connect and to leave one flap (preferably on the botton of the model so as not to be seen) that once the whole model is build you can just fold over the "lid" and close it up. I keep forgetting this simple concept, but I have only been doing my own models since... well, you can see in my other threads... maybe a month? Ok, enough pointing out my imperfections... and there are a LOT (like I make my posts WAAAAAY to long). Ok. Simply glue one tab to the next and I work mine in a counter-clockwise direction. I put a layer of glue (using my gluestick) on the back of each tab. Simply line up two, give them a squeeze and grab another to add to that tab, the another to THAT tab... 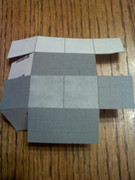 |
|
|
|
Post by kiladecus on Sept 15, 2011 2:48:22 GMT -9
Now you have a concrete wall. I used this as one of the principle ideas to my models. Make a box and glue stuff to it. If you go to my other Shuffler thread, you will see I would make something, expand on it... then try something different... sometimes it would work, sometimes... well, it would work, just not as well as I had hoped. Not because of the program, but because of me. If this happens, learn from it and keep going... You can make walls as tall or as deep as you would like. With 15mm, I could make some pillbox bunkers 3x3x2 all on one sheet of cardstock. That is a decent size building for that scale.  |
|
|
|
Post by kiladecus on Sept 15, 2011 2:59:02 GMT -9
I recently discovered that PMI's "steps" in Shuffler are exactly 1/3 of a tile. See, to give them the appearance of steps going down, he has three equal steps, each one a little darker than the first. When I did my Watchtower, I wanted a spotlight. I found that if you treat these tiles as "folds" then you can make shallower (or "more shallow") boxes. Here I took his steps, used one for each side, and one for each end. NOTE: I could have made this completly square, but chose to do a rectangle. To do this, I simply re-sized the ends down to the desired size. It is SO easy to do. Then I through the coal onto the top of the box. Keep in mind, I accidently used plain paper in my printer last night because I was in a hurry. The models would look a LOT better with cardstock... and I would have trimmed the edges (using a black or similar colored marker to cover the white of the cardstock). 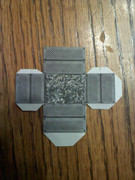 |
|
|
|
Post by kiladecus on Sept 15, 2011 3:00:09 GMT -9
Fold on the edges, and make a box... 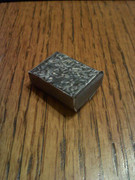 |
|
|
|
Post by kiladecus on Sept 15, 2011 3:10:47 GMT -9
Once again, it is a box! I used his wood grain and stretched it out to cover two tiles (squares) on the workspace. Using the wooden steps like I did above, slipped them under the "bed" to form sides giving the impression it was a solid wooden bed. On his "doors and access" panels, is a solid black square. I use the A LOT! It is great to throw under a lot of small parts so if there is even the slightest gap, it is filled in with black. (I do this with all of my weapons). In this case, I slipped it under the bed, and then added my wheels (I am sure Paper Make iT! Is laughing at this). It is his valve handle from his pipes, re-sized, and with a duplicate placed on top and turned 45 degrees. A liitle grass to give the appearance is in in high grass (because only in the movies is the battlefield freshly mowed). The a couple other details here and there... like the ladder rungs on the front and back of the wagon. 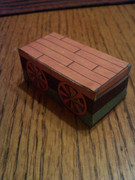 |
|
|
|
Post by kiladecus on Sept 15, 2011 3:25:31 GMT -9
Now for the pressure oven. The Dragon Wagon's purpose is to project large streams of flame onto the enemy. To do this you need something to burn... hence the oven. Using a few pieces of PMI's pipes, I laid the side by side. I then went to his "Outdoor set" and grabbed a sewer lid and a grate. The grate is the oven door, and the lids are the top and bottom of the stove. (I know, it is a "grate" idea). To make the stove look old, I used his "grunge" overlays, and kept throwing them on until I got the look I wanted. I also used some of his other things like grease splatters... The top looked too clean, even for a sewer cover, so it is time for my favorite FX, the highlight. You can have this project a halo of light in one ring, or half-ring or directional... in this case I highlighted the "top" sewer cover and chose a reddish-brown color (you have a color palette to make any color possible) to make it look rusty. Then to top it off with the same handle I used as the wheels. I cut it out, making sure to include the "teeth" tabs. I am sure if anyone here isn't familiar with this concept, you will learn it as soon as you make a tire for your first model. I just cut 45 degree angles from each fold-line. Make sure to score the fold-line first.  |
|
|
|
Post by kiladecus on Sept 15, 2011 3:27:59 GMT -9
Put some glue on the tab and wrap the body into a tube. Fold the "teeth" in and put glue on each of the lids. There you go... 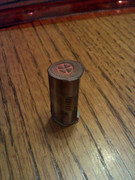 |
|
|
|
Post by kiladecus on Sept 15, 2011 3:35:58 GMT -9
For a simple gun barrel, treat it the same as you did the stove. I normally use things like pieces of pipe or floor tiles, and resize them for the end of the gun, and put bullet holes for the gun's port... in the case of my Auto-Cannons I used a lot more. I used either the sewer lid or the exhaust fan on that one to get the round endcap, and then just made the bullet holes a little larger, and threw on a handful. On this weapon, I didn't want to make it look like a traditional gunbarrel, so I left the end off. (Plus at this scale, it would have been fiddly to work with). So, I grabbed some wall piping, threw down 5 (4 sides and a tab), and added some "teeth" 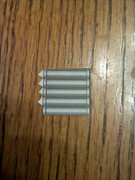 |
|
|
|
Post by kiladecus on Sept 15, 2011 3:39:20 GMT -9
Now, BEFORE you glue this tube together, make sure to color the other side of the cardstock with either grey or black marker. This will give the impression it has an inside. Slap some glue on the tab, and fold it into a tube. 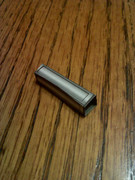 |
|
|
|
Post by kiladecus on Sept 15, 2011 3:40:58 GMT -9
Ok... the coal compartment goes on the back, the stove in the middle and the barrel on the front. And there you have it... |
|
|
|
Post by Adam Souza on Sept 15, 2011 8:35:36 GMT -9
Great Work !
It's interesting to see it put together step by step like that.
|
|
|
|
Post by cowboyleland on Sept 15, 2011 11:29:08 GMT -9
Nice work. It is fun to see it take shape.
|
|
|
|
Post by Reivaj on Sept 15, 2011 15:21:10 GMT -9
Great stuff you are doing!! ;D Do you use the full version of shuffler or the free one  |
|
|
|
Post by hackbarth on Sept 16, 2011 3:17:24 GMT -9
These simple tutorials are amazing! You really brought the program to the fullest. I must adapt somehow for shuffler to be in my next gaming budget. (I need some restraint so you all don't turn me poor, so a monthly gaming allowance is a fine way to deal with that).
You really changed my opinion on shuffler from "a curious tool for those who are afraid of GIMP/photoshop" to "a must have for any paper modeler"!
|
|
|
|
Post by kiladecus on Sept 16, 2011 3:32:53 GMT -9
It's funny to think the thing I am best known for is the ability to use someone else's program!  Ok. I use the actual program. The free one is great to try, but is says "DEMO" or something across the page, so in my opinion, it's worth the small price. As far as budgets go, I try to allow myself about $20.00 USD a month (unless Dave Okum releases something).  I picked up PMI's PILLBOXES AND CORRIDORS this week. That and the Plug-Ins for SHUFFLER. This way I can incorporate my own images into it. That is pretty cool to think of what I may be able to do then. Speaking of Pillboxes, I whipped this up last night in under an hour. It is just a cube, but the time came in decorating it. I also have a fountain I did last night will try to build and post it today. Here it the printout...  |
|
|
|
Post by kiladecus on Sept 16, 2011 3:34:56 GMT -9
Cut... fold... trim (use a black marker on the edges)...  |
|
|
|
Post by kiladecus on Sept 16, 2011 3:37:29 GMT -9
Glue it and go! 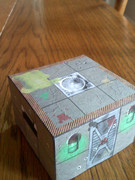 |
|
|
|
Post by kiladecus on Sept 16, 2011 3:42:43 GMT -9
I try to encourage myself to use pieces I haven't used before with every model. In this case, I used the pieces that form a hose, and I turned them into shell casings on the roof beside the ladder. I figured it there were THAT many bullet holes in the walls, someone must have fired back! And yes, EVERY element on this model is 100% PMI's work that comes with the program. It is just a matter of finding the right combinations. 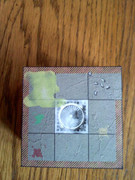 |
|
|
|
Post by gilius on Sept 16, 2011 5:01:51 GMT -9
It's funny to think the thing I am best known for is the ability to use someone else's program! I don't think it's that different from using other digital tools, like Photoshop, Gimp or 3D modelers. Different skill sets but you have to know how to use them, and use them creatively, to get good results. I wouldn't say that being well known for being creative is that bad  |
|
|
|
Post by kiladecus on Sept 16, 2011 9:51:40 GMT -9
Thanks, Gillius! I see your point.
I guess when I see Tommygun's stuff I don't say to myself, "wow, that Photoshop is some program!" I say look at what amazing things he can do.
Thanks for getting things back in perspective for me.
|
|
|
|
Post by kiladecus on Sept 22, 2011 11:21:02 GMT -9
Ok... new model. I started with a basic box. We'll use this later. 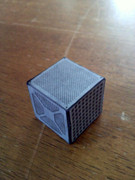 |
|
|
|
Post by kiladecus on Sept 22, 2011 11:23:42 GMT -9
Next, you take this basic piece (which I actually had to adjust to take in account the slopes). On the corner pieces, I scored these and marked them with little squares on an angle. This will help with the next step. 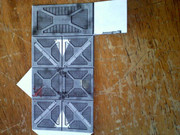 |
|


 Sometimes I am an idiot!


