|
|
Post by markem on Jun 19, 2013 22:21:52 GMT -9
I thought (at 2:00am in the morning) to write up a (hopefully) short entry on what I have been doing in my efforts to create a cheap way to create the floor tiles I'm using as well as the characters. I used to build models as a kid and went in for all kinds of model building including paper models. So when I found this site I was like "WOW! There are others who love to do this too!" :-)
Anyway - on with my story: After discovering this site I downloaded a lot of the free pieces and bought others. Then I looked at the files. I was a bit shocked to see that the figures were connected at the bottom of the images instead of at the top. Some years ago, when D&D first started, there were these things called "Cardboard Cutouts". The figures were connected at the top which allowed them to create the bases for the figures as part of the figures. I can see why these are done the way they are done though - it allows for various bases to be attached to them whereas the other method makes the base for you. I'm sure that a half circle could be put on as the base in the top version so different kinds of bases could then be attached. In any event though....
Using Photoshop I took apart one of the figures and then put the pieces back together so I could do double sided printing. This allowed me to print the front and the back together to form a single image. I used Royal Brite's Photo Matte paper because the matte is on both sides. I then used my laminator (Scotch brand TL901 laminator that is something like $25.00 on Amazon.com) to put a 3mil lamination onto the figures. Once I had done that I could then cut the pieces out - or could I? I ran into the problem of trying to hold the piece down and use the X-acto knife at the same time. Luckily - I still have all of my fingers! But my images were like something out of a horror film. To say they did not look all that great is a bit of an over statement.
So a few months went by while I just let my subconscious work at the problem. Eventually, after roaming through a lot of places - I wound up at Home Depot. They sell dirt cheap shelves there. It is some kind of particle board and comes in various sizes. I bought a 24" x 18" board. It cost about $2.00. I did not have any idea why I needed to buy this but decided it must just be some part of what my subconscious was trying to tell me. It wasn't until a month or so later when I was trying to cut things out again that I decided I needed a ruler. And not just any ruler - but a metal ruler. So back to Home Depot only to discover they do not sell metal rulers. They sell gigantic metal rulers - but not small ones. Eventually I wound up at Texas Art Supply and bought a nice 18" metal ruler which was fairly sturdy. Then I went back to Home Depot because I realized that I needed some small bolts, the nuts for the bolts, and some washers for the bolts. I took everything home, got out the drill, and drilled a hole into the board for the head and foot of the ruler (and drilled holes into the ruler itself as well). I attached the ruler to the board using the bolts, washers, and nuts to hold the ruler in place. So now - no more trying to hold the images in place. I just slide them under the ruler and the ruler holds them while I cut them. So no more jaggy, ugly figures. The tabs at the bottom of the figures are larger and I slightly cut the laminate so I can bend it. I also use the bases. The figures are pre-printed on both sides of the paper and the lamination gives the paper rigidity so something like the skeletal dragon stands up without any kind of a problem.
So then I turned my attention to trying to make floor tiles (or ground tiles). The first part was easy. I just printed them and then laminated the sheets just like for the figures. The problem came with what to use for the backing. I, like others, tried everything I could find. I even ordered special foamboard from ArtGraphix. None of it worked. Or it just kind-of worked. Then I remembered having to work on the windows of our house. The windows leaked a/c and heating. Our house was built in 1964 and the windows they used were not all that great. I'm sure they were for the time - but they leak. Anyway - I remembered having bought this stuff to put around the window and that it was sticky on one side but not on the other. So off I went to Home Depot and.....nothing. I couldn't find it. After a few weeks of me looking over everything Home Depot has to sell - I eventually wised-up and asked someone. They found it in a few minutes. The stuff is from a company called Frost King and is labeled as Rubber Foam WeatherSeal. It comes in various shapes and sizes. My recommendation is the 1.25"x3/16"x30FT roll that is used for campers. You get 30 FEET of this stuff. It is extremely easy to cut. All I have to do is to put the laminated picture next to the ruler on the board I bought, see how long of a piece I need, and then I pull that much off of the roll. Using the X-acto knife I easily cut the weatherseal to the right length and put it on to the back of the image. Depending upon the height and width of the image it may take two to four strips. I use the tip of my thumbs to put about a 1/8" gap between each strip I put down. When I am through there is a 3/16" thick padding under the floor tile which, if it becomes dirty or I just don't like it - I can peel the strip off (slowly strip it off that is!). This is (to me) the ideal way to create the floor tiles. Why? First, it is very cheap ($5.25 for the 30ft roll). Second, it can be applied quickly and easily. (All you have to do is to unstick your fingers from it once you have cut it!) Third, it is not messy. Fourth, the floor tiles appear to be nice and rigid. (That is - you can put things onto them and they won't bend.)
I am planning on taking a lot of pictures this weekend and will see about uploading examples of what I mean. For now though - it is off to bed because I have to be up and going early tomorrow. I hope this helps people out in their making of both figures and floor tiles. :-)
|
|
|
|
Post by markem on Jun 22, 2013 14:08:30 GMT -9
Ok - here are some of the pictures. At least - I hope everyone can see them! They are: 1. The shelf bought from Home Depot and the metal ruler with bolts holding it in place. 2. The Frost King plastic and a partially used roll of the 3/16" thick tape. 3. Floor Tile face up 4. Floor Tile face down. 7/16 backing 5. X-acto knife used to cut items out of lamination. 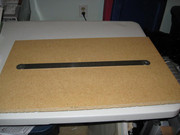 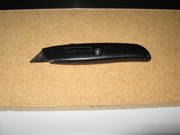 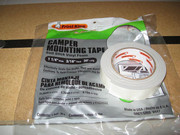 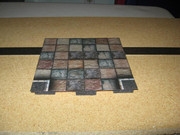 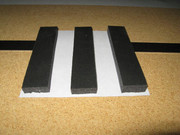 |
|
|
|
Post by markem on Jun 22, 2013 14:14:48 GMT -9
Er....I thought I had reduced these down a bit....guess not....  Here are a few more pictures. 1. Floor tile face up using 3/16 tape 2. Floor tile face down showing 3/16 tape. 3. A tile using a 2"x2" image of a corpse. Front view 3. Same tile back view. 4. Idea : The 7/16" tape makes it easy to create walls. Here I'm just standing up the tile to show that it can be used like a wall. (So you could make wall tiles and then stand them up this way.) 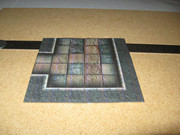 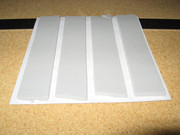 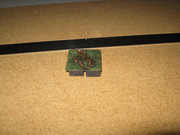 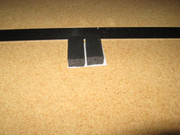 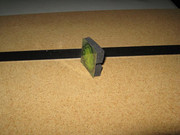 |
|
|
|
Post by markem on Jul 5, 2013 12:50:44 GMT -9
I realize that there is a section for new items that everyone can have/use but I want to expand upon this posting too. So I'm going to post some things here and then, later on, in the other location. I have been experimenting with different ways to use up 8.5"x11" paper to get the most out of each piece of paper. Here are some examples of what I am talking about. I'm also going to try to attach the Visio 2003 & PDF files of these things so people can print them out. 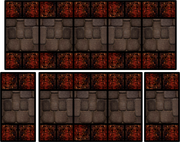 Ok. So I grabbed some free textures off of the Internet and went into Viso. The central (brown) area are the paving stones and the small red squares are nothing more than some bricks. I took the bricks and used Visio's picture editor to reduce the Gamma and then increase the Contrast so they were darker and redder than before. I also reduced the Gamma on the stones so they looked better. (They were a bit bleached out/faded.) I then made a single one of the sections, duplicated it, and then pasted in three and put them together (bottom row) and then did five together (top row). Since I had the space I put one more to the right of the three on the second row. So now I'm using up all of the 8.5"x11" paper and I am getting 2-1 squares, 1-3 squares, and 1-5 squares area. So why the smaller red bricked areas? Those are places to put characters who are on the walls. In this case the corridors are made like that. Large stones on the floor and brick along the walls. I'm including both the Visio file and the PDF file for these. Er....that is I WOULD put them in but they are too big (2MB => PDF, and 30MB => Visio). Wow. Never thought Visio would chew up that much space that quickly.  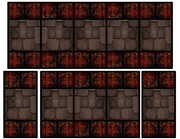 Oh hey! The "Add image to post" took the PDF!  Rats!  It won't take the Visio file. Darn it! Oh well - at least everyone can have the PDF file. Enjoy! :-) |
|
|
|
Post by markem on Jul 5, 2013 18:57:54 GMT -9
Well, I have this great PDF file with all sorts of room layouts - but I don't know how I am going to be able to upload the thing and until I get my DSL back up and running I can't just set the files onto my website and let people download them.  I guess everyone getting the complete dungeon set will have to wait until I have my website back up and running.  Ok! So it will take a few days for me to get the site back up and running again. Until then!  |
|
|
|
Post by old squirmydad on Jul 5, 2013 19:04:29 GMT -9
Try opening a drop.com account and uploading the files there. Then you can post the download links and not have to worry about file size so much. Looks good so far.  |
|
|
|
Post by markem on Jul 6, 2013 8:29:24 GMT -9
I decided that the colors were too dark so I raised the gamma back to 1.0 from the 0.5 I had it at. Here is what they look like now: 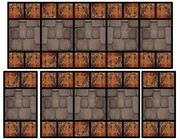 I went to drop.com and it says they are not open right now (coming soon!). So I'm going to concentrate on getting my DSL back and going from there. I'll upload some more later - Birthday lunch for my younger brother right now! Later!  |
|
|
|
Post by markem on Jul 6, 2013 9:00:29 GMT -9
Ok! I see where I made a mistake in how I created the Visio layouts. I had decided to just put in the images and to resize them however I needed to resize them - but that was a mistake! What I should have done is to create a single FLOOR fill texture and a single WALL fill texture and then just created my squares, triangles, etc... and filled them in that way. This would have made it simple for me to exchange the wall and/or floor textures and all of the created sections would have repopulated with the new textures and I could then just print them out. Also, I should have made one sheet for just 10'x10' areas with the walls on either side, then a sheet for 10'x30' corridors and a sheet for 10'x50' corridors. In this way, if someone needed just some more 10'x30' corridors (or 10'x50' corridors) they don't have to print out the 10'x10' pieces also. Oh well - live and learn. I'm going to remake everything tonight. I think I can get up to a 30'x50' area (or maybe I should just say a 3x5 unit area) with the wall pieces around it. So I am going to produce an entire PDF book of all pieces up to that point. I'll even do some unit pieces that do not have any walls on them so people can use them as floor fillers. Once laminated, either foam board (or the neat weatherseal tape) can be used as a backing. Speaking of laminating - I decided to try (with fingers crossed) setting the Scotch TL901 to 5+mil and sending the 3mil through the machine with that setting. I'd been sending the stuff to be laminated through three or four times at the 3mil setting because it wasn't hot enough to actually do the lamination. Well, I am happy to announce that if you set the Scotch TL901 to the 5+mil setting that you only have to send the 3mil lamination pouches through one time and they actually come out the way they should! It only took a few minutes to laminate everything instead of the hour or so I was having to do before. So I'm a happy camper now!  Can't wait to get my DSL back up and running! |
|
|
|
Post by markem on Jul 7, 2013 13:39:43 GMT -9
Ok! Here is a set of doors. These are made so that I can lay them down onto the boards and then remove them when the door is opened. Each square is one inch by one inch (1"x1"). You could put a backing on to these but I'm just laminating them with the 3mil lamination pouches. This makes them stiff. If you put a bit of spray stick onto the back they would stay in place (or maybe some rubber cement). I remember seeing something called Ticky-Tack(?) or just spray tack that just makes a surface not glue itself to a surface but to become kind of tacky (if that is the right word). So when you lay it down it stays in place. Anyway, however you want to use these - here they are: 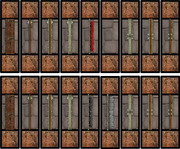 This is from my new Visio file I am creating where I will be able to just change the FLOOR and WALL images and all of the images will re-populate using the new textures. This will make it extremely easy for me to create an entire set of dungeon tiles in less than 10 minutes. Of course - then there is still the laminating and cutting - but to create the entire set in just a few minutes is really awesome!  Enjoy! BTW: The images of the curtains and doors comes from Campaign Cartographer. The software comes with a notification that you can use the images in anything you want including games and the like. So I am using a few here to make these. The rest of the images are going to just use the floor and wall textures which I got off of the internet for free and are listed as free for whoever wants to use them. I found these by just going to Google and clicking on the Images tab and putting in "stone floor" (if I remember correctly) and then scrolling through the images. There are a lot of photos out there that are copyright now but there are still a few which are free. The bricks and stone wall textures are two that are free. Argh! Forgot to say - the first set of doors are SECRET DOORS. So to represent that I just used the wall texture and then overlaid it with a partially transparent rectangle so it darkened down the texture a bit. After all - a secret door should look like the wall somewhat and I figured the difference in color would make do. You could just use a regular wall in one of the rooms but maybe you'd like to do that and then when they find the secret door you could lay the slice on top of it. Don't ask me - I'm just making these things right now.  I may also get rid of the overlaid transparency if the color is too dark when I print it. The indentation of the door would still show that it is a secret door after all.  |
|
|
|
Post by spaceranger42 on Jul 7, 2013 15:01:55 GMT -9
Best base for floor tiles, in my opinion is extruded PVC. Often sold under the brand name of Sintra. Plastics suppliers and sign shops will sell it to you. At my local Tap Plastics I buy scraps that are about a foot square by the pound. Use spray mount to mount your printed tiles, cut with a heavy utility knife and a steel ruler. Voila! I would post a pic but my wife is doing home work at the dinner table right now.
|
|
|
|
Post by WaffleM on Jul 10, 2013 5:25:05 GMT -9
Best base for floor tiles, in my opinion is extruded PVC. Often sold under the brand name of Sintra. Plastics suppliers and sign shops will sell it to you. At my local Tap Plastics I buy scraps that are about a foot square by the pound. Use spray mount to mount your printed tiles, cut with a heavy utility knife and a steel ruler. Voila! I would post a pic but my wife is doing home work at the dinner table right now. Another brand of Sintra is Komatex. I use it a lot at work and it's really easy to work with, especially if you have some basic wood working tools. It's really easy to glue with pvc plumbing cement and you can clean up the edges with a little Methyl Ethyl Ketone (MEK). Both the cement and MEK are available at hardware stores, but definitely use latex gloves (not vinyl gloves as they will melt) and a well ventilated area. I actually wear a respirator and try to work outside, because the MEK is especially nasty. |
|
|
|
Post by markem on Jul 10, 2013 20:05:54 GMT -9
Er...... The weatherseal stuff is fairly cheap, doesn't require gloves or ventilation, and can be removed if you make a mistake. The sealant is really strong though so you have to peel it off a little at a time going along the long edge of the strip. Since it is fairly cheap though - if you tear the strip - you can always cut more. Because it is in strips, the laminated surface is flexible in that you can store things in a tube if you want. But it is good enough where when you take it back out of the tube - it will lay flat. Also, it provides rigidity on the overall surface of the tile. However, I will look in to these two materials the two of you have mentioned. I want something that is very light because I will be having to take everything in a box over to other people's houses and I don't want to have to carry a lot of stuff around that is heavy. :-) Update: Well, I have run in to a problem with Visio 2003. It keeps everything in memory. The problem with this is that if you are using high resolution images (like I am) they tend to eat up a lot of memory if the program is not smart enough to know to just duplicate the single image. My first attempt I just copy/pasted the images over and over again and that resulted in Visio giving out of memory quickly. So I made a fill texture and used that. I thought that Visio would just use the single instance - but no. It still ran out of memory. Took longer but it chewed up 2GB of memory with 40 pages. Compare this to Photoshop 6 which can handle any size image and an infinite number of layers so long as you have disk drive space to handle it. (Yeah, I use older sofware. Visio 2013 does the same thing at work so it isn't like they've improved it a lot.) Anyway, what I am doing presently is to separate out the various parts I was working on. So now there's a "Doors", "Halls", "Floors", "Rooms", and "Open" sets. These are, in order of their appearance: doorways, hallways, floors (no walls), rooms (floors with walls around them), and open (floors with walls on only one side so you can create open areas). I'm thinking I need to make another file called Special for things like triangular rooms, circular rooms, etc.... Or I might just name the room files Rooms_Square, Rooms_Triangular, Rooms_Circular, etc.... I found out about Visio's limitations the hard way. I went to print everything out and Visio crashed. It sucked up all 2GB of memeory and 4GB of memory on the hard drive's page file trying to print everything. So now - smaller files. I also have figured out how to fix my problem of getting my static ip addresses back. Basically, I'm going with a company called mystaticipaddress.com. What they do is to rent you a static ip address and then have you download/install OpenVPN. In this way, they can open a channel to whatever computer you want, encrypt the transmission, and forwards any request they receive directly to your computer and you gain a static IP address. $20.00 a month for unlimited bandwidth. Not bad. More expensive than a standard static IP address but you don't have to pay the $45.00 a month for the DSL line. So all-in-all you come out ahead by $35.00. (At least - in my case I do.) Since I am disconnecting our land lines one after the other I am estimating that I will be saving somewhere around $1,500.00 a year by not having the land lines and DSL. (Although we are still paying for our internet connection via Clear.) I plan to set everything up this weekend which means I should be able to set up a web page for people to be able to download the PDF files by Sunday night. Back to Visio: So why use Visio? Because, as I wrote before, I made two fill textures. I called them FLOORS and WALLS. So now, if I want to change what all of the walls look like on all of the pages - I can use change the texture in that one fill texture and TA-DA! All of the pages are changed at one time. Same with the floors. Sort of like the old Burger King ad - "Special orders don't upset us - all we ask is that you let us - serve it your way!" What is really neat is - outside areas that are built can be done by just putting in grass as the WALLS texture. If I want stone pathways I just change the FLOORS texture and - that's it. All of the pages will automatically update to the new textures. I just print them out and TA-DA! (Yes - again) I've got an outdoor set of path tiles. (Truth to tell - they would probably need a bit of work to make them look right, but the majority of the work would already have been done by Visio.) Ok - it is after midnight and I need to get some sleep - later folks!  |
|
|
|
Post by markem on Jul 12, 2013 12:18:33 GMT -9
More on Visio 2003 (and maybe 2007/2010): If you go to the Visio Guy's website (www.visioguy.com if I remember correctly) you can find a write-up on how to make Visio use several images randomly when you use them as fill patterns. This makes it really neat and easy to create trails through forests or paths. I'm hoping to use this feature to create some outdoor tiles that people can download and use.
Just about through separating out everything and I'm hoping tomorrow to get everything set up again for my website. It will probably take a few hours for everything to propagate out over the internet but I will post here when I get the whole thing set up. Nothing fancy mind you - just a web page with the files that can be downloaded.
|
|
|
|
Post by markem on Jul 14, 2013 14:24:07 GMT -9
Well that was weird. I tried to go to this site and got an error from Cloud Flare. Luckily - it cleared up the second time I tried to get here. :-) Anyway - I'm finally getting the website up and running again. If you want to download the ZIP files (I zipped the PDF files) you can do so by going to: 72.251.38.182:8443/svn/tilesThe username is anonymous (or it should just let you read the files). There should not be a password on the account and you should be able to see all of the images. If you do not want to go that route - try: tiles.sim1.us72.251.38.182/tilesThis should bring you to the website. I haven't settled on colors yet so if they look a bit bizzare - just go with it. I've only got one set up right now because I just finished getting everything up and running. GoDaddy changed how some things worked and I had to adjust all of my settings and setups so they work too. But at least for right now - everything is up and running. Have fun! I'll be adding in a lot more zip files fairly quickly. So check back about once a week. For now - it is off to work out as I am greatly in need of doing so since most of last year I was either in the hospital or recovering at home. |
|
|
|
Post by markem on Jul 15, 2013 3:45:47 GMT -9
I now have hallways at 10ft by whatever, hallways at 5ft by whatever, and the doors file uploaded. Update: 7/16/2013 Uploaded hallways 20ft by whatever. Modified 7/17/2013 Uploaded hallways 30ft by whatever. Modified 7/18/2013 Uploaded hallways 40ft by whatever. Modified 7/18/2013 Uploaded All Rooms. Modified 7/19/2013 Uploaded the new Doors. Modified 7/29/2013 Uploaded the Splinters. Original 7/29/2013 If you download and use - let me know what you think of them.  |
|
|
|
Post by markem on Jul 16, 2013 13:07:03 GMT -9
Well, I did a really dumb thing yesterday. I came home and the city had trimmed our tree. There were a few branches left hanging down on top of my wife's truck so I got the trimmer, climbed into the back of the truck and trimmed the branches back. Then I went to get out. It had been raining and the concrete was slick and I jumped down on to the driveway right where it sloped down the most to the street. My feet shot out from under me and I went down. I slammed into the concrete with my right hip, flipped over and slammed my left knee into the concrete. Then I rolled down the driveway and out into the street. Luckily no one was coming. Picked myself up, got the trimmer, and went inside. I should change my name to "The Gimp" because I'm hobbling around today.  Luckily I didn't hear anything pop or crack and although it is a bit painful to walk around - I can do so without too much of a problem. I should be able to post the 20ftx### PDF file tonight as well as the 30ftx###, and 40ftx### PDF files. Then I have to start posting the room files (ie: 10ftx###, etc...). I came to realize that I need to make a PDF where the halls and rooms go from one size to another (like 10ftx### to 20ftx###) so you can expand/shrink the hallways and rooms as needed and I also need to make a quick strange hall and room file (so you can have hallways that expand/collapse in short areas, curved areas for statues to go in, circular rooms, triangular rooms, and so on. I'll probably get to those files this weekend. As of now - it is off to get some supper! Later! |
|
|
|
Post by markem on Jul 19, 2013 20:35:57 GMT -9
I'm doing a lot of printing and cutting. I went to Anchor Box and bought one of those accounting boxes to carry everything around in. Even though it is about 1/4 full it still feels like there isn't anything in the box. I'm thinking of buying some gallon sized freezer bags to store the larger pieces in and maybe quart sized bags for the smaller items. Does anyone have suggestions on how to store these things other than in one large box? Also, has anyone just printed and played with the printouts without putting a backing on them? I'm beginning to wonder if that isn't a better way to go. Especially with the lamination. The only problem with laminating the printouts is that they become slick. I was testing out various types of tape the other day and duct tape really does work pretty well with laminated printouts. Duct tape has these fibers running across the tape and they help to keep the laminated printout from moving. It is also the thinnest stuff I can find that isn't sticky (so the pieces stick together) but still helps to keep the piece from moving around a lot. Double-sided tape actually winds up making everything stick to it. Backing such as felt pads are either too thick or allow the piece to move around a lot. The weatherseal is perfect in that it is only 3/16 of an inch thick and helps to prevent the printout from moving. It is sticky only on one side, allows the laminated piece to flex when not laying on the table (so the pieces can be rolled up if need be). I'm still looking around for the thinnest stuff I can find that will do the same kind of thing as the weatherseal. I also like the weatherseal stuff because it can be worked with anywhere, is easily cut, and won't kill you if you just happen to breath in the vapors. (The stuff does have a smell when you open the plastic bag but that dissipates after a few seconds.)
Anyway, any ideas on how to store things would be appreciated. :-)
|
|
|
|
Post by Vermin King on Jul 20, 2013 5:27:19 GMT -9
There is the question of the ages
|
|
|
|
Post by old squirmydad on Jul 20, 2013 8:02:02 GMT -9
I use small plastic shoebox sized tubs for props, doors, halls, flat things. And bigger tubs for bigger items. I always use clear tubs so I can see what's inside and no enormous tubs or things just get lost. Then I keep them all on a shelf so I can find them easily.
One thought, if all you are dealing with is flat items, could be to use those clear plastic sheet holders in three-ring binders. Insert pieces in back to back so as you flip through you can see everything.
|
|
|
|
Post by markem on Jul 23, 2013 13:02:27 GMT -9
Vermin King : Yeah. :-P
Squirmydad : Not a bad idea.
I got some gallon sized freezer storage bags. They are just ok. Ziploc reduced the length of the gallon sized bags by a little and instead put in a fold. So the five square(5) length strips really won't fit (ie: 10 inches long). I'm looking around for some kind of bag to put them in to. I like your idea of the plastic shoe boxes. However, I am also looking for something that I can carry to other people's houses easily. Thus the accounting box. Maybe I should look at Anchor box for some flat boxes that will fit inside of the accounting box.
Something for everyone to know is that Frost King has a competitor named MD. The differences between the 1.25"x3/16"x30ft camper weatherseal from Frost King and the same thing from MD is that MD's version is really slightly thinner (so I'd say it was 2.5/16" rather than 3/16") and MD's version is also slightly darker grey. If you give MD's tape a bit of time it will expand a bit more to almost 3/16" - but it actually is just slightly thinner. So MD is trying to cut corners IMHO. MD is found at Lowe's while Frost King is at Home Depot. They cost the same though.
I have also decided to try using just a pair of scissors. I bought a new pair and they work very well on the 3mil laminated images. This surprised me because I had tried scissors on the 7mil laminate. They did not want to cut the 7mil laminate at all and I ruined a couple of the images and had to re-print, and re-laminate them. But the 3mil laminate is easily cut via scissors.
I still have to upload the open floor tiles, and the room tiles (10x10 thru 40x50). I've also done some special rooms (like U shaped rooms, S shaped rooms, and rooms with columns in them). I am looking at doing some rooms in Campaign Cartographer and then exporting the images so I can put them in to Photoshop and take them apart. (So walls are one image and the floors are another.) Also, I want to exchange the floor texture with grass and the wall texture with bushes so I can produce an outdoor group of tiles. Finally, I want to take some of the free files and re-arrange the images so they will print front-to-back so I can make double-sided printouts. That will give me some images I can use in games.
More later - and thanks to you goth for your ideas! :-)
|
|
|
|
Post by markem on Jul 28, 2013 16:07:39 GMT -9
Uploading the Splinters file. This file contains things that did not fit into the other categories and are also parts that you can use to do things like 45 degree angles to expand a room. Sort of like:
--+
...\
....\
.....>
..../
.../
--+
(If you have ever done ASCII text graphics you will be able to see it is a partial hexagonal room. :-) )
Anyway - uploading the file.
|
|
|
|
Post by markem on Jul 30, 2013 3:37:55 GMT -9
Now comes the powerful part about Visio. I am going to change everything so it is an outdoor area by just changing the two textures. I'm going to use grass for the floor and vines for the walls. I'll see if I can't find a texture with some bare ground also. Update : 7/31/2013: Heh. Yeah! The power of Visio! Except I crashed and burned. Sorry - still recovering from my ordeals with Staph and Strep infections. I also got my memory upgrade for my laptop. I've now got 8 GIGABYTES OR RAM! Woot! Visio pops up like crazy fast now! :-) I also found and bought on eBay Adobe's Master Collection version CS3 for $210.00. Now I've just got my fingers crossed that the person is not a rip-off artist and that I really DO have the Master Collection software. If so - I may switch over to using Illustrator. I can use Illustrator to download and colorize some of those drawings I saw on another of the boards here. The drawings looked amazing but no one has colored them in. With Illustrator that shouldn't take all that long. Maybe a year or two....just joking! :-) Still, it would be nice to have Illustrator. There is a lot I can do with it. (In case you don't know - the people who made Visio first made it so they could have a cheap alternative to Illustrator which was expensive even back in the 1990s.) Anyway, I'm going to be putting up the new tiles here in a few. Again, you can get them from 72.251.38.182/tiles. (Still working on trying to get the tiles.sim1.us to work.) Ok! Well....KIND-OF got the site back up. For unknown reasons I had to use tiles.sim1.biz (my business site). Don't ask me why - this works and the other doesn't. I've also added in two new files for walls. Ok! Hold the presses! I FINALLY got tiles.sim1.us to come up and work! It turned out that GoDaddy had, when AT&T turned everything off, had reverted everything to pointing to THEIR servers instead of mine. It took me almost four weeks to get them to tell me this. All this time I've been terribly frustrated just trying to figure this problem out. AND NOW I HAVE! So again - tiles.sim1.us is now working properly. Happy-happy-joy-joy!  |
|
|
|
Post by markem on Aug 14, 2013 9:15:34 GMT -9
Just when you think there is nothing to do so you can concentrate on making things - along comes a customer who sucks all of your available time out of you. :-) Finally finished working on two computers that died. The customer wanted to all of their photos which were on the hard drive. It took a while but together we got the systems back up and running. Then the customer panic'd when one of the two systems froze once. So she wiped the entire computer system which meant I had to start over on that system. Over all though this was a very intelligent lady who knew what she wanted and worked towards that end. Everyone makes mistakes and she learned from wiping out the one system. She aided greatly in the rebuilding of that system and last night we finished getting both systems back up and running. I showed her how to use TightVNC (and how to install it) and she said she was going to install it on to her other computers. So overall it was a great experience working on her systems and I think I've made a friend too.
I also got my laser cutter. I haven't set it up yet because I am still working on scanning in all of my books. I got past the two 3,000 page books I had scanned in (really tedious and you can only have 1,000 pages in a PDF document so I'm only putting in 750 pages to give me some leeway). I'm hoping to use the laser cutter to be able to cut out figures and to use Illustrator to make and color some images I'd like to create. I've got to clean the scanner because there is so much dust on the book's pages because they just sat on the bookshelf for years.
Anyway, I am going to try to get some rough sketches uploaded. Remember that I play "Simulacron I" (pronounced sim-u-la-kron one) so these will not be D&D monsters although I might take a whack at drawing some D&D monsters too. I may get out my small etch-a-sketch tablet to do the drawings or I might just use a pencil and then scan in the images at something like 600dpi.
More as I have time to post.
|
|
|
|
Post by markem on Aug 29, 2013 12:20:17 GMT -9
Well, my wife came down with pneumonia a few months back
(like the end of May). She was in the hospital for a
week, came home, got sick again, took more meds, and then
decided to fly out to see her mom & dad. We live about
20ft above sea level. They live 8578ft above sea level.
Can you say "You're gonna get sick again if you go?"
I knew you could! So now she is back and sick again.
Not to mention that she is a teacher and has to get up
around 5:00am every day to go to work. I predict that by
December she will be back in the hospital if she doesn't
take better care of herself. :-(
Anyway, I was looking for onemonk.com for a while, finally
talked to one of the guys at RPGNow, they directed me back
over to here. So I'm back! :-) I have been working like
crazy on a customer's computers. Finally got those back up
and running, then a different customer's computers started
having problems. I THINK I get those fixed. I've also
been scanning in my books still (over a 1,000 pages books).
Trying to go completely digital. Which means after I am
through I'm going to have to get a multi-terabyte disk
drive to back everything I've done up so just in case....
My next project is two fold: One, I'd like to take some
of these free figures and set them up to be able to do
two-sided (duplex) printing of them. This will make
it so you don't have to glue them together. Two, I am
thinking of buying one of the Silhouette CAMEO cutters so
I can make the cutter files. And yeah, I have my laser
cutter now, but it is really, really big so I am having
to wait on setting it up until I have finished clearing
out all of the books that are now stacked up in the room.
I'm thinking....three or four more months. I have that
many books and I haven't even pulled out the boxes of books
I have in the attic. But I really do want to get that
done as quickly as I can. The more stuff I can digitize -
the less we will have to pack up when we go to demolish
our house.
What? What's that you say? Oh! Yes! Our house is fast
becoming filled with black mold. We are in the process of
suing our insurance company because they refuse to repair
the house. Once that is over we have been told that the
house has to be torn down and rebuilt because the mold is
that bad. So one of the reasons I am working so hard on
getting all of my thousands of books digitized - is so I
don't have to pack them up and move them all. I bought
a Fujitsu S1500 scanner. It is a really good scanner -
now that they've fixed it. Originally the scanner didn't
work all that well. Turns out the glass was not set into
the machine correctly so it stuck out just a little.
This made the paper jamb really badly. Now though -
it works like a charm. Very happy with it now. :-)
Anyway, maybe tonight I will be able to start on the
drawings and can scan and then upload one or two. :-)
Later!
|
|
|
|
Post by Vermin King on Aug 29, 2013 12:30:09 GMT -9
Good luck with all that
|
|
|
|
Post by markem on Sept 3, 2013 13:28:26 GMT -9
Well, this weekend was extremely hectic with me running around doing a lot of things but very little drawing. Most of the drawings I did looked like Humpty-Dumpty after he fell. I have troubles drawing eyes in the right place for some reason. I think I will get out Poser and try using that to make my initial figures and then I'll change it over to cartoon-like images. I can describe the character very well: He is part plant - part humanoid. Skinny like a young tree with leaves strategically placed about the waist, a few on his chest, and for hair. His eyes are large and lidless, almost no nose except some slits, and an almost circular mouth. In his right hand is a root with a few tendrils hanging down. The roots grow out of his body when he needs to fight. He likes the nighttime more than daylight (and thus the eyes that look lidless). He is a Grogan (not Gorgon - but like "Grow"-"Gan"). Other than the leaves - he is without clothing. His limbs are thin but very strong - like vines. And if he leans against a tree - he looks like a part of the tree itself (like a branch growing off of the tree). In D&D terms he has standard, human stats and his hit points range from 3d8 to 10d8 depending upon how old he is. Also, the older the Grogan - the faster he can produce the roots (10% chance per level per round that the Grogan will create a root) which are used like daggers (so throw/stab). If the roots hit someone they begin to immediately grow into what they are stuck into. The growing causes immense pain which makes whatever is struck have to begin making saving throws against pain with no penalty the 1st round, -1 2nd round, -2 3rd round, etc.... Add the penalty on to the constitution of the character each round. (ie: Not "I have a constitution of 15 so it is 15, 14, 12, 9..." BUT "I have a constitution of 15 so I last 15 rounds going 15, 14, 13, 12, 11,...".) Once the constitution reaches zero - the character is dead and the character's body is used as fertilizer for the root to grow into a tree. The Grogan are peaceful but their appearance makes them look like an undead creature. Thus, most characters will attack them outright (at least in my games they tend to do so). A bless will cause the root to disengage and fall out of the host body. A cure does nothing so long as the root is embedded into the character's body. (To put the above into context: If the party already has a bless going - it will not do anything to the root. You have to do a bless AFTER the root has become embedded into the body of a character. This is usually not a problem with a group who has a cleric as Bless, the spell, is one of the early, easy to take, spells. Now - figuring out what needs to be done is another thing.) Normally, the characters beat a hasty retreat back to the nearest church. Also, once combat is over the reduction in constitution becomes turns instead of rounds because they are not exterting themselves as much. Grogan are also solitary creatures. If more than one are found together - then they are a family unit. I'll see what I can do tonight about using Poser to make the figure.
|
|
|
|
Post by markem on Sept 4, 2013 7:21:50 GMT -9
Well, drew something - trashed it. Tried again - trashed it. Got out my old Champions outline characters (free to use to draw superheros). Worked using that. Made something that looks totally human. Kind of nice but not what I wanted. Trashed it. Tried using Poser - frustrating - trashed it. Tried using Visio. Still working on it. The Visio image doesn't look all that bad. Think I'm going to try Illustrator tonight. I'd have more control over the vector images. Spent about six hours on this. Didn't realize my drawing capabilities had degenerated so badly!!! Gack!
Just had a thought - maybe I should try Greenfish's icon editor. It would give me pixel by pixel editing capabilities. It works a bit differently than other programs. Don't know. I'll have to give it a try when I get home.
|
|
|
|
Post by markem on Sept 10, 2013 11:53:53 GMT -9
Well, tried Illustrator and it looked bad - really bad. Trashed it. May try using it again. The Visio image I'm still looking at and trying to make it look more like I want it to look. Visio is like Illustrator. The problem is trying to get the vectors to go the way I want them to go. They tend to - er - bounce(?). Not sure that is the right word to use or not. Basically, if I go too far trying to move something like a curve - it tends to turn inside out. Don't know why - but that is what it is doing. Tried the Greenfish editor. Kind-of worked but wound up trashing the image.
I ordered a Staedtler(spelling?) mechanical pencil and 4B lead. The pencil came but the lead is coming all the way from Japan and won't be here until October! I went "Say what?" and contacted the sellor. I thought he meant he had bought the lead from Japan but had it on hand. The answer is - no. It has to be ordered from Japan. I like Staedlter pencils because 4B lead is very very soft so I can do a lot of work easily. It also sharpens up nicely. The lead that comes with the pencil is very hard and very hard to use. If you sharpen the pencil you can easily poke holes into any type of surface.
I noticed that the Silhouette CAMEO cutter actually also comes with pens so you can use it to draw things with. One of the things I have always wanted to do was to be able to use canvas, send it through a printer, and make drawn images via a printer. I realize I've gotten off of the topic - but I was pleasantly surprised to find out the CAMEO can do this.
Anyway - I'm kind of in a holding pattern on drawing my figures and creating some free images until I get the 4B lead. I'm going to have to go back over all of the different types of pencils I have and see if I can find one with the type of lead I like in them. Otherwise - I'm probably going to have to go to Texas Art Supply this weekend and look around at what they have. Maybe I can find what I'm looking for there.
On other fronts: I went to Small Claims court today and got a judgement in my favor. A lady who didn't have insurance slammed into the side of my truck a few months ago. She has basically run off. Which isn't too surprising when this happens. But my insurance company is supposed to only charge me $250.00 for uninsured people. Because they could not determine if she was uninsured they made me pay $500.00 as the deductible. Now I can go back and get my $250.00 from them because it has now been established that she was uninsured.
|
|
|
|
Post by bravesirkevin on Sept 10, 2013 12:37:57 GMT -9
I ordered a Staedtler(spelling?) mechanical pencil and 4B lead. The pencil came but the lead is coming all the way from Japan and won't be here until October! I went "Say what?" and contacted the sellor. I thought he meant he had bought the lead from Japan but had it on hand. The answer is - no. It has to be ordered from Japan. I like Staedlter pencils because 4B lead is very very soft so I can do a lot of work easily. It also sharpens up nicely. The lead that comes with the pencil is very hard and very hard to use. If you sharpen the pencil you can easily poke holes into any type of surface. As a professional illustrator, I regularly use all variety of mechanical pencils but I do find it a little odd that you'd use a 4B in a lead holder. It's a very unorthodox thing to do, which is probably why they had to import it for you. Not saying that you're doing it wrong - everyone has their own way of handling things, and art is a very personal thing... It's more that I'm surprised by your approach there.  Personally, I've always used the lead holders and mechanical pencils for more technical work, and the main reason I own them is because I do a ton of work with harder leads (4H being my preference) and the volume of work quickly reduces a wood-clinched pencil to a short impractical stump that's difficult to hold and work with. With soft leads (B and up) my preference is the opposite however... I always use them in the wood-clinched form and the fact that they eventually get short and stumpy is actually beneficial. I mostly use the softer leads in one of two ways: Either to sketch my roughs (because they don't dent the page if I brush them softly over the surface of the paper, so the lines erase very easily), or to lay in really dark shadows. In either case, I'm usually holding the pencil at such a low angle that's almost parallel to the page. I don't often sharpen a soft lead to a fine point because it never stays sharp for very long anyway, and the softness of the lead makes it very prone to smudging, so it's not really great for drawing detailed line work. |
|
|
|
Post by markem on Sept 12, 2013 12:37:48 GMT -9
When I took art classes (a LONG time ago) they made me give up my first mechanical pencil. I never was happy about that and would use my Staedler pencil at home and on projects at home. I love the very very soft leads because instead of having to put a lot of pressure onto the page/canvas/whatever - I can just gently stroke over the paper and still get a fine line. It is true that the 4B lead can just about be crushed to pieces with enough pressure - but that is how I learned. The hard leads always seemed to me to be too hard to get any kind of an image to appear. I got away from drawing when I went to NASA (starting in 1986). I went whole heartedly in to computer graphics on SGI systems. So it has been quite a while since I last did any kind of real drawing. I started practicing at work in meetings. I'm doing lots of really bad faces, dogs, cats, houses, trees, etc.... My boss, after the first three months here, looked at the notepad I use to take notes from the meetings and said "Is that what you do in the meetings?" I said "Yes. While I am waiting my turn to say what I'm working on." Of everyone in the meeting - my time usually takes less than two minutes to say what I am working on for the day.
Back to drawing - I learned to draw and paint as a small child. One of my aunts did painting and drawing as a side job. She got me in to drawing and then into painting. I went through a lot of #2 pencils but never liked the fact that drawing dark areas was a pain. For years I had no idea that there were other kinds of pencils until I got to college. (My family is not very wealthy. Father was in the Air Force and never made it past Tech Sergent. Mom didn't work. She came from that era where women stayed home.) Anyway - I found the archecture area, found the mechanical pencils, bought a complete set, and lots of different types of leads. Tried them all out. Decided I liked the 4B leads the most - and that is all I wanted to buy. I was learning how to be a computer programmer (I self taught myself Basic in high school on a teletype) and went in that direction. So drawing became less and less important to me although I still painted. My brothers both have a painting by me as well as some other family members. I went to work at the UofH, stayed there until 1980, left, went in to the oil industry as a computer operator, left there, went to NASA, left there in 2001, went into the medical field, left there and now I'm at the Houston Chronicle. Got in to photography while at NASA. Did 3D graphics at NASA. So still working as a programmer and working on some different things. In the past ten years I have been forced to do a lot of reading on the law and taking various companies to court over various things they have done to me or my wife. I've won all court cases so far. Just finished one over an uninsured motorist who ran into me a few months back. Got a judgement in my favor to recover the uninsured motorist deduction. So a lot of things keep happening and driving me away from doing drawing, painting, or even computer graphics now. Even so - like I said - my ability to draw have REALLY gone downhill. Forty years of typing has made my signature look like M-rL M---i-g (substitute a straight line for the dashes). I even got cramps from just trying to draw for about an hour. So now I'm doing tennis ball exercises to strengthen my hands.
At least I finally found the bag where I have my new mechanical pencil. I put the bag into the box with the geomorphs I have been making. When I found it I went "DOH!" What can I say? After a few months of drawing at least my faces are beginning to actually look like faces instead of some kind of a nightmare. Dogs are looking more like dogs, cats more like cats (and not just some nameless creature). I'm hoping my drawings get a lot better a lot faster or this might be a long project. :-) As soon as I can get the lead I plan on bringing my pencil to work and use it to draw rather than a pen.
So - to wrap this up - I learned to first draw with a regular pencil but since college I have used a mechanical pencil with very soft lead. It is just what I am used to using. :-)
|
|


 Here are a few more pictures.


 Rats!
Rats!  It won't take the Visio file. Darn it! Oh well - at least everyone can have the PDF file. Enjoy! :-)


