|
|
Post by BlackCat13 on Jun 25, 2014 20:29:44 GMT -9
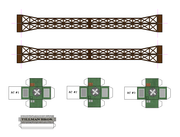
Wind him up and watch him go! BlackCat13 decides to get his feet wet in the paper miniatures and models hobby.  |
|
|
|
Post by BlackCat13 on Jun 25, 2014 21:18:12 GMT -9
Here are some miniatures to get this started...   |
|
|
|
Post by WackyAnne on Jun 25, 2014 23:10:10 GMT -9
These look terrific, @blackcat13 ! And thanks for whiting out the overlapped area, it'll make for less confusion as my son & I assemble a few over the next week.  |
|
|
|
Post by Vermin King on Jun 26, 2014 4:05:59 GMT -9
Some oceanic bases would come in handy, or are there some on the One Monk site?
|
|
|
|
Post by WackyAnne on Jun 26, 2014 6:48:37 GMT -9
There are 3 textures on One Monk - Jim's water texture, and two from WorldWorks Games, from the Atlantis and Skull Cove sets. |
|
|
|
Post by BlackCat13 on Nov 19, 2014 11:56:56 GMT -9
Here is an ambulance I use with my modern games, Champions in particular. Created in Paint on an 8x10.5 inch image, print at 100% size with a .25 inch margin on all sides. Have fun! 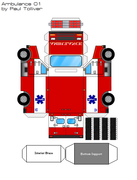 |
|
|
|
Post by Vermin King on Nov 19, 2014 13:36:31 GMT -9
Oo, oo, it even has the 3d wheel illusion. I think that really adds to the look without being fiddly. Thanks
|
|
|
|
Post by BlackCat13 on Nov 19, 2014 16:57:41 GMT -9
I'm still working on the wheels, thanks. They start curling and have a tendency to bend the outside wheel inwards. I think that if I make a bridge piece connecting the two ends with a tab to attach it to the inside of the model, that will correct the situation.
|
|
|
|
Post by Vermin King on Nov 19, 2014 17:32:57 GMT -9
That is correct. There are several Eastern European modelers that do wheels that way. They do it with a fold-over piece, like an axle with tabs that fold out like the hub for the wheel. Makes for a very solid construction and maintains the correct alignment on the wheels. And you have room on the sheet to do it.
|
|
|
|
Post by BlackCat13 on Nov 19, 2014 18:15:59 GMT -9
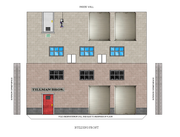
Remember Miniatures In Paper Showcase #8, The SF Special Ops Compilation? If you do, you might remember a super-ez HMMV model that was included, but never credited. Well, I needed tough and reliable vehicles for my Champions campaign that were easy to knock out, easy to build, and pretty tough, too. So I took that hummer, made a few mods, and here is what I came up with. These were created in Paint on 10.5x8 inch pages and can be printed at 100% with the margins set at 0.25 inches. You might have to make some adjustments for your printer. 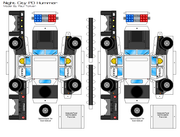 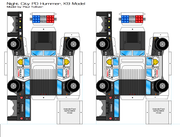 |
|
|
|
Post by BlackCat13 on Nov 19, 2014 18:21:30 GMT -9
Oh, I also have the K9 hummer in ASPCA colors, but I'm not sure about posting it because it includes their logo.
|
|
|
|
Post by BlackCat13 on Nov 19, 2014 18:29:17 GMT -9
To finish off the Police models I've prepared so far, here are some Police Cruisers... 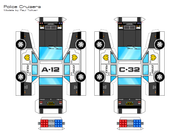 |
|
|
|
Post by colonelshofer on Nov 21, 2014 6:27:09 GMT -9
lovely TY - always need more cops and cop vehicles  CS |
|
|
|
Post by aleks on Nov 27, 2014 23:33:32 GMT -9
nice police cars... I'll build some.
|
|
|
|
Post by BlackCat13 on Dec 3, 2014 1:49:41 GMT -9
Okay, I did a little work on the wheels of the original ambulance design and then made a second version of the ambulance that will be easier on the ink cartridges. Both were created on paint as 8in x 10.5in images, but I saved them as png files this time. Best results are achieved by printing the file at 100% with a 0.25in margin on all sides. Some printers are a bit finicky though, so you might have to trim the image a little or make the margins smaller. 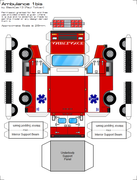  |
|
|
|
Post by BlackCat13 on Aug 23, 2015 18:52:44 GMT -9
|
|
|
|
Post by BlackCat13 on Aug 23, 2015 19:30:28 GMT -9
|
|
|
|
Post by Vermin King on Aug 24, 2015 4:32:34 GMT -9
Like I always say about my agents. You can't get a second case from a guy who hasn't written his first.
I remember finding an old paper I wrote for school once, and realized how much my style had improved. And found the occasional 'genius' in it that I may not have had currently. Sometimes re-visiting the past is a good thing
|
|
|
|
Post by BlackCat13 on Sept 11, 2016 14:36:49 GMT -9
Been a while since I posted anything and I didn't want you guys to think I've been sitting on my hands. This is a work in progress for my FASA Star Trek Role Playing Game Campaign that will be starting pretty soon. FASA's game was very counter heavy and lent itself to the use of miniatures very well. I don't own the images I made these figures from so for now they are not for redistribution until I can track down more info. They both came from internet pages displaying video game art, so I imagine they belong to the respective video game companies that produced the games they came from. I know one is a Malboro from on of the Final Fantasy games, but I don't know which one, and the other is Biollante from some Godzilla game, but the page was in Japanese. The figures are for an adventure where the crew of the USS Vigilant has to perform a survey on an unusual M-Class planet where plants are the dominate life form. The setting is Pre-TAS, so there are no intelligent plants. The Biollante is basically the planet's version of a plant T-Rex and is scaled for a 50mm base. The Malboro is a smaller, quicker predator scaled for a 30mm base. I will also be making some smaller mobile and immobile plants and a lot of bugs. I plan on using some of the great existing miniatures from the Hoards and some of the Ebbles bugs, too. It will bequite a project, but much of the scenery and critters will be reusable and I have to make the crew already. Anyway, here are the two predators: 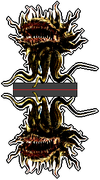 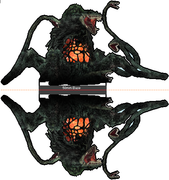 |
|
|
|
Post by chiefasaur on Sept 11, 2016 14:48:04 GMT -9
The top monster is from Final Fantasy.
|
|
|
|
Post by BlackCat13 on Sept 12, 2016 16:01:16 GMT -9
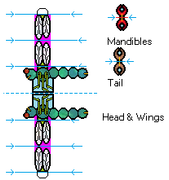 This is one of the things those plant predators on planet BG-1127 munch on. I know it isn't a great piece of art, but at least it is all home grown. I have another version I'm going to post, too. This one is simple, if a bit tricky to cut out due to small parts. All blue lines are mountain folds. Cut out the dragonfly body & wing part first. Fold and glue each wing together. Cut a small slit between the dragonfly's feet right down the middle of the fold line. A real small one. Fold and glue the body together, tucking in the tabs from the wings. Stick the small end of a flat toothpick in the slit between the dragonfly's feet. You can color the toothpick if you wish. You can cut it to the height you wish and mount it in a paper base or a piece of foam board once the figure is complete. After the figure has dried, cut out the mandibles and the tail as carefully as you can. Leave the blue centers in place for strength. Lightly score them, fold them, and then glue them together. When they have set well, trim around them to clean them up and cut that orange slit out of each of them. Cut the orange slits out of the head and tail of the dragonfly. Lightly glue the mandibles and tail in place. wait until that is well set or dry and carefully cutaway the obnoxious pink filler away from the wings and body. I know that you probably didn't need the directions, but I needed the practice writing them. I haven't built a test of this figure yet, so I don't know how well it is going to come out. I plan on doing one tomorrow on regular paper since I am out of card stock. |
|
|
|
Post by BlackCat13 on Sept 12, 2016 18:12:28 GMT -9
Here is version two. I'll be test printing it tomorrow, too. I'm pretty sure it doesn't need directions, but if you want them, I'll write them. Both versions of this critter are for my Star Trek game which is played on a 1 inch grid. They are meant to be used with 25mm round bases. 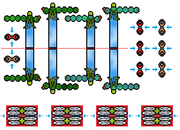 |
|
|
|
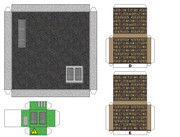
Post by BlackCat13 on Sept 14, 2016 20:33:03 GMT -9
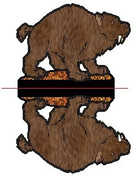  Okay, first let me say I am so sorry for posting that first sehlat. On my old computer with its 96dpi he appeared to be large enough and according to it's scale, he was. I compared him to another miniature, though, and ouch! Too small. I did a test print on regular paper (I'm out of card stock) and the dark brown came out black. Here is something a little better. It is in PNG and JPG format, 96dpi, and scaled for a 40mm base. |
|
|
|
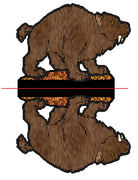
Post by BlackCat13 on Sept 14, 2016 21:09:21 GMT -9
|
|
|
|
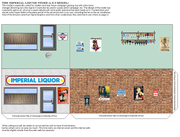
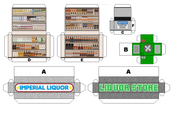
Post by BlackCat13 on Sept 14, 2016 21:14:40 GMT -9
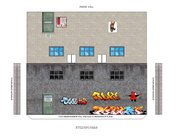
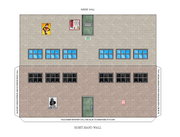
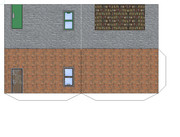
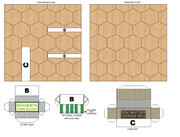
Oh, just a word from game play with the Imperial Liquor Store, adding a thin strip of invisible tape to the outside corners of the edge of the roof can be helpful. These definitely wear out quicker than the rest of the model due to game play and wear and tear. It is an fix and worth it.
|
|
|
|
Post by cowboyleland on Sept 15, 2016 3:35:04 GMT -9
Transparent tape is a good tip for many kinds of models. Thanks!
|
|
|
|
Post by Vermin King on Nov 8, 2016 14:36:24 GMT -9
|
|
|
|
Post by BlackCat13 on Dec 21, 2016 0:14:59 GMT -9
Wow! I better get busy and post some new work, or some of the stuff I've already got!
|
|
|
|
Post by Vermin King on Dec 21, 2016 5:15:21 GMT -9
There's always the Procrastinator's Hoard...
|
|
|
|
Post by BlackCat13 on Dec 24, 2016 14:22:51 GMT -9
Yikes! I goofed! Sorry, page two of the Herman Tank has a glaring error. The tie-downs are upside-down. I'll just fix that right here. Err, or not. Now this entry won't let me enter images. I'll re-post. Sorry again!
|
|