|
|
Post by lightning on Nov 9, 2016 11:37:25 GMT -9
Finished the outside build. Now I need to work on some interior details. that will take some time   |
|
|
|
Post by Vermin King on Nov 9, 2016 12:14:56 GMT -9
That deserves a toast  |
|
|
|
Post by chiefasaur on Nov 9, 2016 14:14:37 GMT -9
I don't even know how to handle this. My suggestion: Draw some minis to go with it  Guess I need to whip up a yokai set. Need some kappa and tengu to lurk on those beautiful roofs. |
|
|
|
Post by lightning on Nov 9, 2016 21:16:49 GMT -9
... Need some kappa and tengu to lurk on those beautiful roofs. That reminds me, I need to make these roof thingies to put minis on! |
|
|
|
Post by chiefasaur on Nov 9, 2016 21:41:00 GMT -9
... Need some kappa and tengu to lurk on those beautiful roofs. That reminds me, I need to make these roof thingies to put minis on! The most important part of the roof is the thingies. |
|
|
|
Post by lightning on Nov 11, 2016 8:31:20 GMT -9
So, roof thingies then First try on the right. Works fine but just allows for one base to be attached to roof. With the wide roof I needed something allowing at least two minis to be placed. The second version on the left is chainable. One module can be hooked to the other or to the inner roof frame. Also if the mini would need a more level base there is that insert piece.  First try on the top roof. The second try on the bottom. The female mini (Arwen) is hooked to the roof and without the level base insert. The wizard (Gandalf) base is hooked onto the previous one and has the level base. 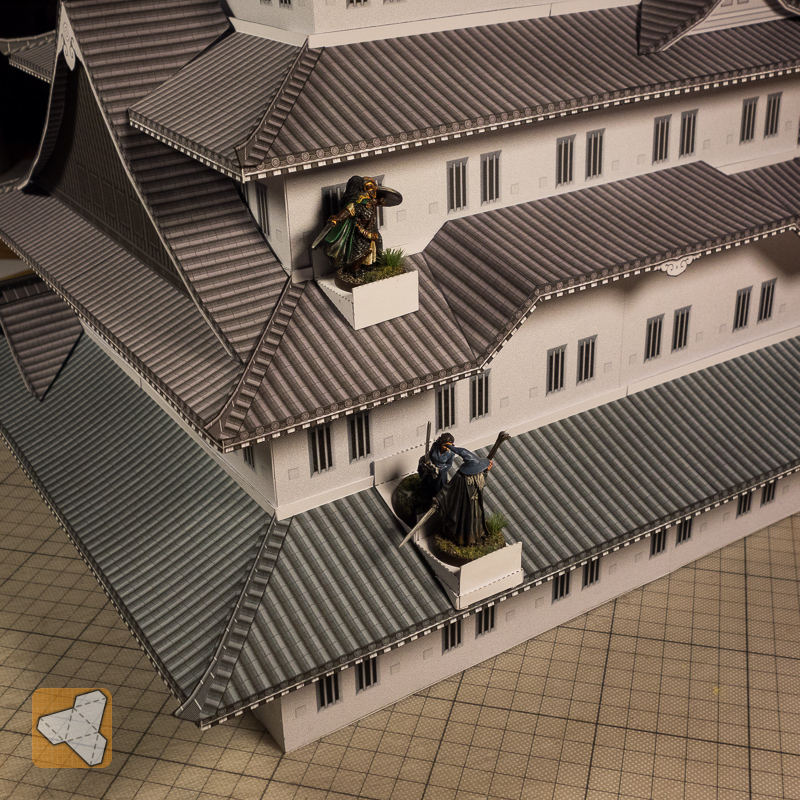 Looks good? Need to make one more version for the top roof due to the different geometry and then I can start texturing, slapping on some roof so that it does not stand out like this. |
|
|
|
Post by Vermin King on Nov 11, 2016 8:36:41 GMT -9
Can the 'clippable' second one attach to the first somehow? I like the looks of the top one (realizing there are no textures) because it looks more simple to build. Something that simple, but still can clip together would be great
|
|
|
|
Post by lightning on Nov 11, 2016 9:47:57 GMT -9
good idea, but the first version frame is higher, so no on first thought. I could try to add a slot to the front end of it and see if that holds the second one. might be an easier version to build ...
|
|
|
|
Post by lightning on Nov 12, 2016 6:53:24 GMT -9
short intermezzo: fotobombed by catzilla!  |
|
|
|
Post by lightning on Nov 18, 2016 6:13:38 GMT -9
Next are the entrances for the castle. Until I make a proper stone foundation extension, you can use these and place them anywhere at the bottom wall where you need them. As usual there are a couple of texture variations and I will make an equivalent piece for the interior. I made them easier with side filler texture. So if you want you can cut out to only have the wood frame or leave it like this for fast build. I separated the door texture from the wall as there would be too many possible locations to place them. With this module you can just put the door wherever you need it!    |
|
|
|
Post by jeffgeorge on Nov 20, 2016 19:23:16 GMT -9
Next are the entrances for the castle. Until I make a proper stone foundation extension, you can use these and place them anywhere at the bottom wall where you need them. I separated the door texture from the wall as there would be too many possible locations to place them. With this module you can just put the door wherever you need it! This is a really good idea. If someone really wanted to lock the door location down, he could just glue it in place. But for the rest of us, we could put the doors wherever we want. Brilliant! |
|
|
|
Post by lightning on Dec 19, 2016 23:31:04 GMT -9
The story continues. Starting the interior of the castle ... 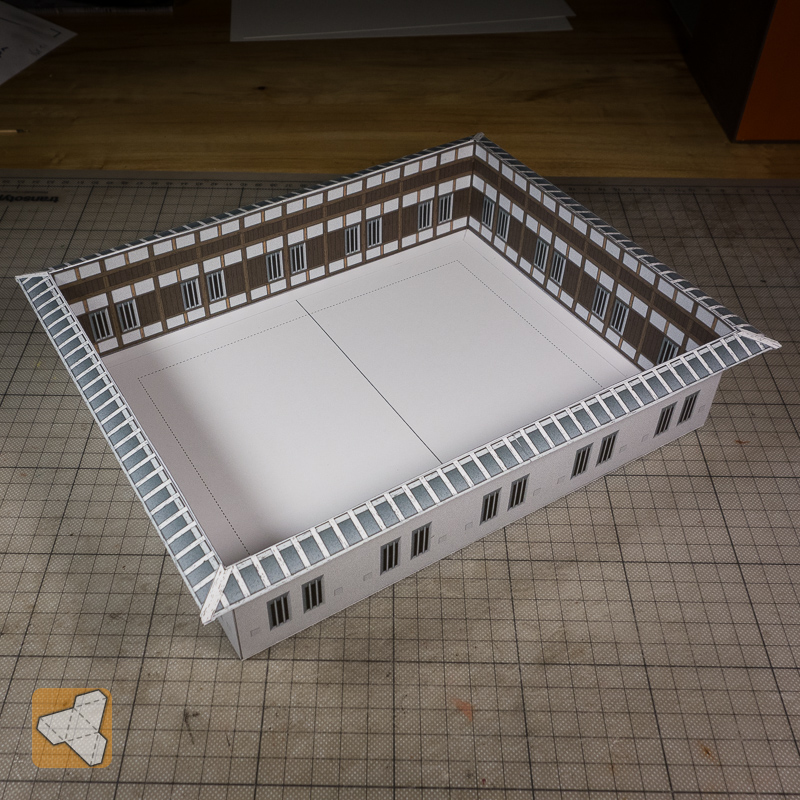 |
|
|
|
Post by lightning on Dec 22, 2016 5:47:16 GMT -9
Almost finished working on the inner walls. After this test build of the 10x8" level I found I need to improve the contrast of some of the details, but you get the picture There will be a couple of variations for the inner walls. This is the simplest version. 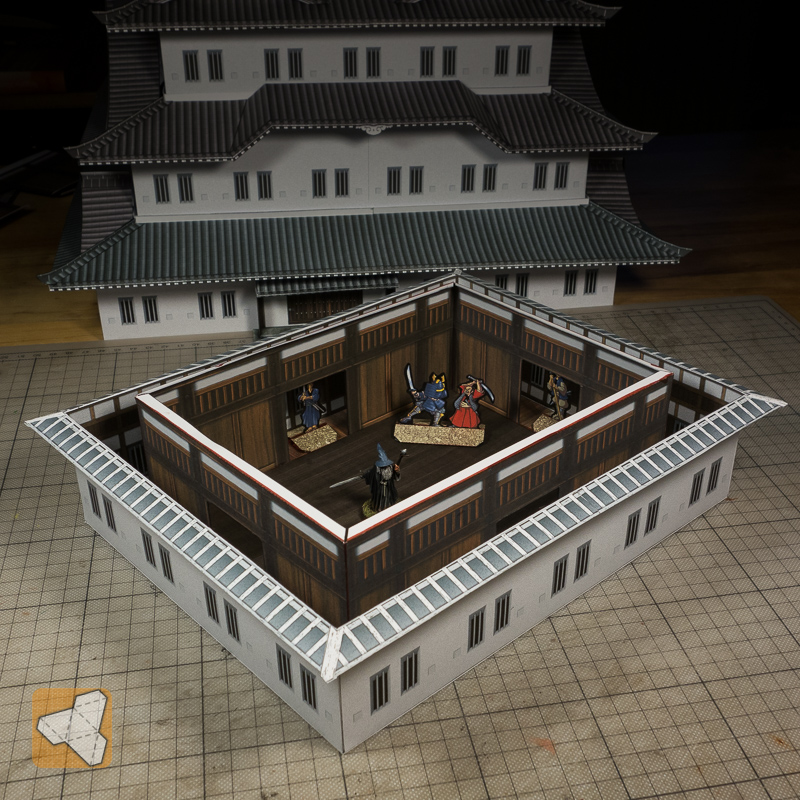 |
|
|
|
Post by lightning on Dec 28, 2016 8:12:52 GMT -9
Due to the sad news I was only able to finish the finetuning of the wall texture details. Will continue with a test build of the large bottom level once I have incorporated the fold-flat pieces. In the meantime have a look at what chiefasaur sent me for christmas. Is it a little sneak peek of an upcoming set for feudal Japan paper minis? Enter: the Oni!!! 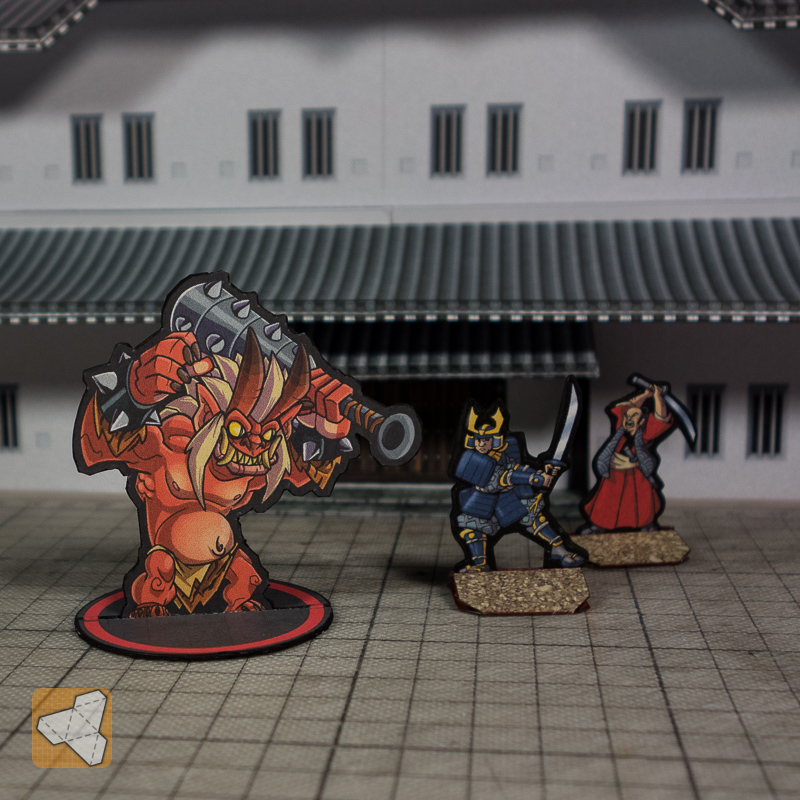 Cannot wait to see what other minis will look like! |
|
|
|
Post by chiefasaur on Dec 28, 2016 10:15:00 GMT -9
YES! Thanks for testing out that oni. He looks right at home |
|
|
|
Post by lightning on Dec 28, 2016 22:19:55 GMT -9
You can almost hear the "AAAAARRRRRGGGGGGHHHHHHHH" |
|
|
|
Post by lightning on Dec 30, 2016 6:52:51 GMT -9
Testing the fold flat version of parts. So far the floor assembly. The perimeter walk on the larger levels is wide enough for 2" base minis ... or in this case an full grown Oni!  A little mishap with the assembly though. The center area should resemble a cross shape pattern. I glued it wrong  |
|
|
|
Post by marzman on Dec 31, 2016 11:53:43 GMT -9
That actually looks good, I can just see the Shogun at the right end with his retainers flanking the walkway. I'd like to see a raised platform too. Keep up the Good work!
|
|
|
|
Post by lightning on Jan 2, 2017 6:57:09 GMT -9
I think you could do a raised platform easily with some 5mm foamcore. I will add a tatami texture sheet for modders.
|
|
|
|
Post by cowboyleland on Jan 3, 2017 19:31:53 GMT -9
lightning, are you at liberty to discuss the walker I can see in the background two pictures up? Did you already mention it and I forgot?
|
|
|
|
Post by Punkrabbitt on Jan 3, 2017 23:19:55 GMT -9
lightning, are you at liberty to discuss the walker I can see in the background two pictures up? Did you already mention it and I forgot? ^ this |
|
|
|
Post by lightning on Jan 3, 2017 23:58:02 GMT -9
lightning , are you at liberty to discuss the walker I can see in the background two pictures up? Did you already mention it and I forgot? Haha, well spotted. Yes, I can talk about it. I am working on my version of it. Although due to the castle I have not made any progress. I need to test the hinges that connect the legs to the main body. If that was made real it would be a material challenge I think. I made the AT ST by Shunichi Makino and although I like the model for its simplicity I wanted to see if I can make a version that is not so daunting to build like UHU yet poseable (during building, then glued. So not moveable). My goal is to be able to get poses you see when they are walking. Raising legs, main body base slanted etc. But for now I need to focus on the castle. Have planned to update you with this once it is more advance! I really got infected with the Star Wars bug since Rogue One. X-Wing, Y-Wing and Millenium Falcon are all on the list in compatible scale.  |
|
|
|
Post by lightning on Jan 6, 2017 7:10:33 GMT -9
Back to (feudal Japanese) business I have finished the rebuild of the floor for the fold flat modules. Due to the three layers (outside, fold-flat and interior) the modules are very sturdy and the assembly/disassembly works perfectly. 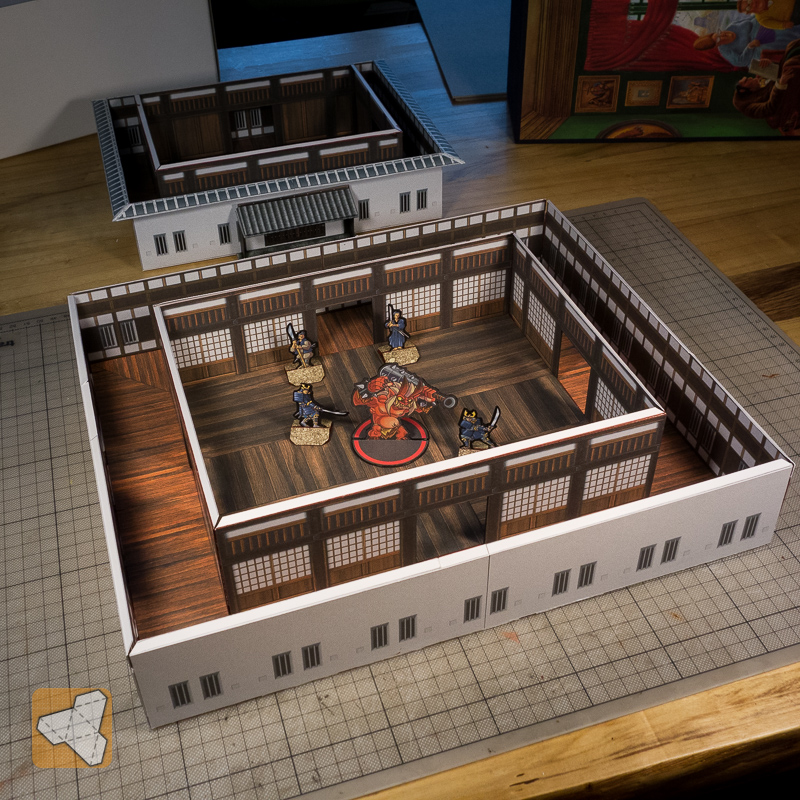 Does not take up much space ...  I wish I could find a way to make the roof elements fold-flat too. Putting thinking cap on! |
|
|
|
Post by lightning on Jan 10, 2017 0:57:52 GMT -9
When I saw the big level built I instantly remembered the scene (and the room) in the Shogun mini series where the Anjin was introduced to Toranaga. So I wanted to do a version of that for the castle set. I collected all the reference pics I could find and then started to cut and paste and sample and adjust and this is what I have created. I hope the spirits of the excellent art I have mashed up here to fit my needs will forgive my almost sacrilegious workflow but I am very happy with the result. Now I am very excited to build it! Textures for the long wall. I have changed the wood bars to a lighter tone (due to the original reference)  And the short wall  |
|
|
|
Post by Vermin King on Jan 10, 2017 5:23:40 GMT -9
Giving it a 'thumbs up' just isn't enough. Absolutely wonderful
|
|
|
|
Post by oldschooldm on Jan 10, 2017 7:52:39 GMT -9
The brightness gives that feeling of paper-translucency. Very nice.
|
|
|
|
Post by lightning on Jan 10, 2017 21:26:46 GMT -9
Thanks you guys! I have to admit this hall was a nice little experiment. Love the result. Here it is, the great ohiroma!!! I have built it with one "official" entrance and some hidden doors on the side.   I think with the parts I have now, one can kitbash even a huge Samurai Castle interior dungeon crawler |
|
|
|
Post by marzman on Jan 11, 2017 16:33:31 GMT -9
Beautiful Walls . . .
|
|
|
|
Post by lightning on Jan 12, 2017 1:39:21 GMT -9
I know we kind of agreed to have the floors and walls fold flat-able and the roofs we would just stack, but it has been bugging me that I cannot come up with a solution for the roofs. So tonight I woke up with an idea (I know I need a life ) and sketched it in Illustrator. Today I then went to build a first prototype. Looking good. I just need the bottom layer to have flaps in the other direction (vs the middle layer) so that the corner ornament part can hold it all together. Also I need to tweak the flap shapes for better insertion. Looks like a regular roof assembly ... 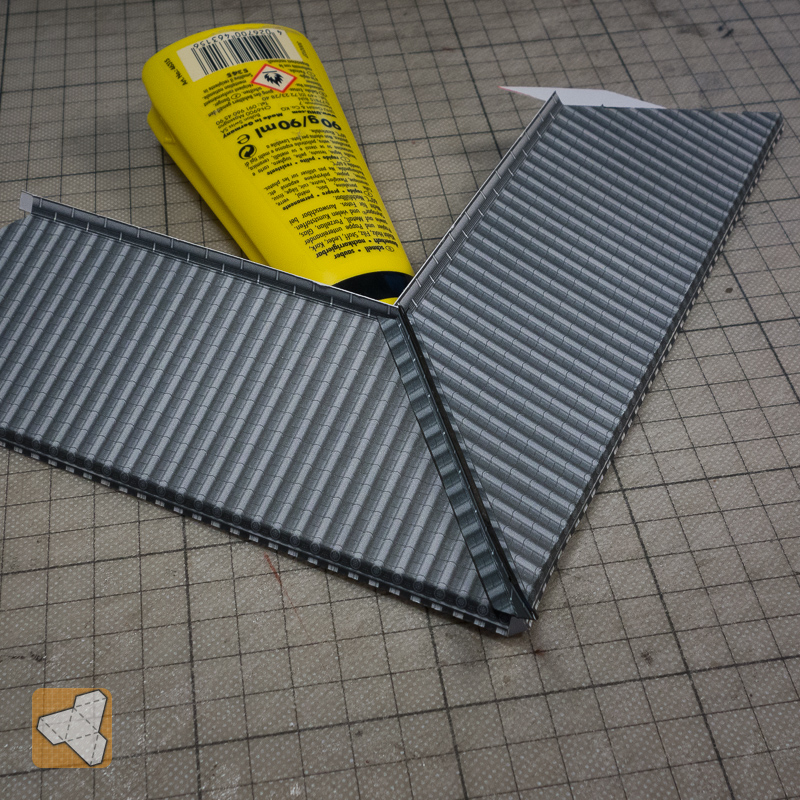 ... and voila! 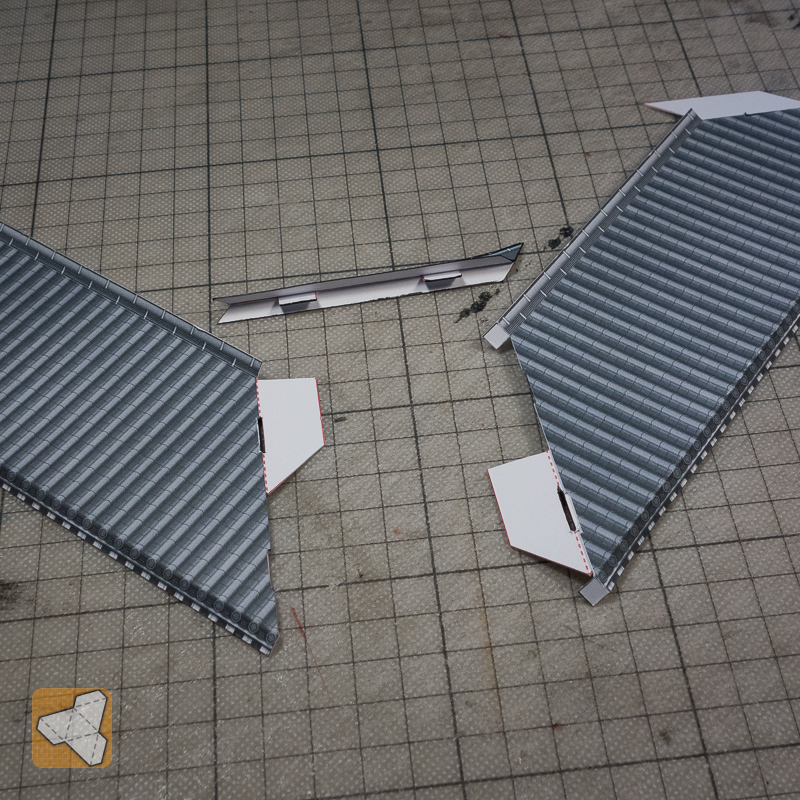 oldschooldm oldschooldm what do you say to this? |
|
|
|
Post by oldschooldm on Jan 12, 2017 19:31:37 GMT -9
Oh! That's a locking bar! Very nice! That deals with the thing that would have concerned me - The roof needs to be strong at holding to the base of the upper floor without spreading.
Very elegant! I can't wait to try it.
What a great innovation to improve fold-flat-corners that are under pressure to split!
|
|


