|
|
Post by aaron on Jul 25, 2016 16:31:40 GMT -9
Sorry i'm late to the party as usual, but EBBLES IS BACK!!!!!!!!!!!! oh ya!!! can't wait to see what you come up with!! so Exciting!!
|
|
|
|
Post by Christopher Roe on Jul 30, 2016 11:23:07 GMT -9
 Me too! There's a ton of stuff I'd like to do, and I'm figuring out what I want to do during the first year and how to sequence the releases. Once that's done, I'll post an update and let you guys know what the plan is.
|
|
|
|
Post by uptrainfan89 on Jul 30, 2016 12:42:09 GMT -9
Definitely excited to hear what's coming up on the workbench!!!  |
|
|
|
Post by Christopher Roe on Aug 27, 2016 10:34:37 GMT -9
Update time!
I keep finding more and more interesting ways to use my new tools. I'm going through another phase like the one I went through in 2005, after I upgraded from Paint Shop Pro 7 to Photoshop CS5. That was a fun period of time, and is the reason why the 2006 model archive is, um, a bit eclectic compared to the rest. I mean, an UFO, a giant stompie, alien bugs, and a starship trooper? I'd like to say there was a method behind that madness, but it was really just me trying out a whole bunch of things.
I'm tentatively targeting a January 2017 "grand opening" in order to give me some time to build up the new catalog a bit. The archived models don't count as new products because they're going to remain free and stay right where they are.
Workbench stuff like blog posts and live streams will start rolling after I've completed one model with the new workflow and ironed out any kinks.
The themes I want to target, to start with:
-I'd like to revisit the Noir 2520 setting (the Podtel, Brio, Interceptor, and HL 300 were part of that setting) and flesh it out some more. The nice thing about the kind of models in that setting is that many of them are 1 or 2 pages and don't have wheels, so they're quick and fun builds that all gel together well visually. I'm also looking forward to doing new scenery for that setting, since the Podtel was a lot of fun and just plain looks more interesting than a stack of boxes.
-I'd like to pick up where I left off with the Offworld setting and give it a visual refresh, starting with the spaceport stuff. It's now connected to the Noir 2520 setting thematically, but focuses more on the seedy frontier aspect and less on the neon cyberpunk aspect.
-I'd like to be able to start including some figures with models, or do complementary figure packs, whichever makes more sense.
-I'd also like to dip my toe a little in other genres, like fantasy, modern, and historical. This will probably happen after I'm satisfied with the size of the new sci-fi category.
Aesthetically, I want to incorporate more curvy lines in my new models and move away from the angular faceted aesthetic a bit, but only where it won't make them harder to build. I find that carefully designed curves are both simple to build and add a lot of strength to parts, so it's a win all around.
I'm also planning out ways to offer professionally printed and cut models. I've made arrangements to outsource the printing to a digital printing shop for now, and will be handling the cutting myself on commercial grade equipment after we move somewhere with a little bit more breathing room. I will also be acquiring a commercial grade printer at some point in the future to bring it all in-house. Models in that format make nice gifts, convention sale items, and retail consignment pieces, plus there's a number of people who simply prefer not to deal with printer hassles or cutting out stuff by hand, and this gives them a way to enjoy my models. The thing I'm the most stoked about is being able to completely eliminate visible cut/fold lines on the prints, which makes for significantly cleaner and sexier looking builds when coupled with color-matched edging.
On that note, I'll also likely begin stocking curated sets of Tombow edging markers containing the most common color matches for my models, which will probably work out cheaper than buying the full 96 color set or buying the pens individually from multiple vendors online. Also, a free PVA glue pen or two will most likely be tossed in with each order.
In addition to the printed and cut models, I'll also be looking into short-run production of CD/DVD sets as holiday gifts, for gift recipients who prefer to print and cut their own stuff themselves. I will also be bringing that in-house in the future so I can offer per-order CD/DVD fulfillment as an option.
There will also be a change in format where cutfiles are concerned. After being burned by the registration mark change for the Cameo a few years ago, and considering how weird Silhouette America is being about .studio file format distribution rights, I'm just going to include PNG frames and DXF cutting paths that are pre-registered to overlap perfectly when imported into whatever cutting software you're using. I realize this is probably a bit inconvenient, but it's a lot more convenient than what you'd have to go through if Silhouette America decided that next year's registration marks are going to be a heart and 3 curlicues! Plus, you wouldn't be limited to using a Silhouette machine to cut stuff out with, and you'd only have to do the frame setup once and then save it in the format your cutter uses.
I think that's covered everything, but if I remember something I didn't cover above, I'll just post it in a follow-up.
|
|
|
|
Post by greypilgrim on Aug 28, 2016 14:17:20 GMT -9
Chris, this sounds great! Can't wait for the new year and the new stuff to start rolling out!
|
|
|
|
Post by uptrainfan89 on Aug 28, 2016 14:35:49 GMT -9
Agreed! Excited to see what the new year brings!!! |
|
|
|
Post by aaron on Aug 28, 2016 20:11:47 GMT -9
your skills are unmatched ! so what ever you do is going to be AWESOME!!!
|
|
|
|
Post by Christopher Roe on Sept 1, 2016 23:59:44 GMT -9
I acquired some more stuff for the papercraft side of things! I've been waiting for the Silhouette Cameo 3 for a few months now, and scored one for $249. Looks sleeker than than the previous models. 
Touchpad display is under the cover. 
Dual tool carriage! No more changing blades or blade depths between cut conditions. 
Pull-out tool drawers. Neat feature, since it comes with a roll slitter and some kind of widget for adjusting ratchet blades. 
Tool caddies! I've wished my old Craft ROBO had something like that many times. 
The Cameo 3 has Bluetooth and USB flash drive support, which are important to me because I don't want it tethered to my PC. I'm looking forward to giving it a proper test this weekend. I also got a nice eBay deal on a pre-loved Daige Speedcote 1215 wax coater. It normally retails for $750 direct from the manufacturer, but I got mine for $200 and free shipping. Plus, it came with 23 bars of BB9 wax in addition to what was already in the machine, AND I found another seller selling a box of 60 wax bars for $19.99 plus $17 shipping, which came out to 36 bucks. A box of 60 bars normally goes for 86 bucks, so that was a pretty good deal.  I'm using the waxer to make backing sheets for the Cameo as well as making restickable tile textures and wall facings for prototyping. I had to fabricate a new cover retention pin with my Dremel, clean up the insides a little bit, make some minor adjustments, feed the hungry waxer a few bars to get it back up to its ideal fill level, but once all that was done, it worked beautifully! 
Yes, I stuck those sheets on my wall for science. I also tested a waxed backing sheet with my Olfa knife and it worked just as well as I'd hoped. No more stinky Krylon sprays or chasing errant backing sheets around the backyard on windy days! I also have a 40" Logan mat cutter and accessories for cutting large sheets of 1.3mm chipboard (dirt cheap direct from johnny-o Blick, the scrapbooking places gouge you on the smaller sheets). For marking templates on chipboard, I've got a Silhouette sketch pen set, so I can lay stuff out on 15" wide trimmed chipboard sheets. I've never liked foam board much, and would rather deal with mat board or chipboard. I've got a couple more shipments incoming before all of my prototyping gear is fully up and running. It should save me quite a bit of extra time and let me make the most of whatever time I can allocate to this hobby.
|
|
|
|
Post by uptrainfan89 on Sept 2, 2016 4:29:56 GMT -9
Wow looks like you brought in a big haul of neat goodies! I keep wanting to get a robocutter just to increase my model building, how long do the blades last tho and the cutting sheets? I'll have to try some mat board or chipboard too, I'm also not fond of foam board lol! |
|
|
|
Post by mproteau (Paper Realms) on Sept 2, 2016 5:37:58 GMT -9
I've been running on the same blade for... hundreds of pages of minis? I can't remember the last time I changed my blade. I'm cutting heavy matte photo paper. The blades aren't *terribly* expensive ($12-$15?), but I haven't priced them in a long time. I usually put them on my birthday wish list so my wife can get me something I'll use. Some folks HATE the cutting mats that come with the machine. I use mine. Out-of-the-box they are WAY TOO STICKY and will probably ruin some paper. It's really silly how sticky they are. I've had two cutters in heavy use over the last several years. I've only ever had two cutting mats. I occasionally (rarely) clean the mats with warm soapy water, and I occasionally (more frequently than the cleaning!) spray them with some 3M spray mount (NOT super77 spray GLUE). I tried using homemade cutting mats, and I wasn't getting any better use out of them. My old Silhouette SD had some issues with small margins being read, and I didn't have that problem with a full sized cutting mat. Some folks use plastic/coated material from old folders, or cardstock, etc. Some folks like to have a bunch so they can mount and cut a bunch of pages. Personally, the cutter is so much faster than my ability to edge and glue that I find it gets so far ahead of me that I prefer to give the machine a rest so I can keep pace. I don't care for having a huge backlog of pieces sitting on my desk that I may or may not get to right away - I use that space for work AND crafting... I *love* my cutter for cutting minis. I enjoy cutting buildings by hand. Gives me the best of both worlds. |
|
|
|
Post by uptrainfan89 on Sept 2, 2016 6:48:45 GMT -9
Nice, that's not too bad either for blade life span! One of the biggest reasons I'd love to pick one up at some point is for cutting minis and models on 110lb Cardstock (especially the hybrids lol) for GunCrawl, maybe look into making reg-marks for the GunCrawl sets (if I got really ambitious lol), it would also probably motivate me to do bigger games too especially since it would help me turn out bigger things quicker like vehicles and buildings that give me hand cramps after a while lol!
|
|
|
|
Post by squirmydad on Sept 3, 2016 7:25:42 GMT -9
I must confess to having waxer envy. Nice looking setup. |
|
|
|
Post by Christopher Roe on Sept 3, 2016 8:26:09 GMT -9
uptrainfan89: Blade life for me is kind of variable. Some blades I've had last a really long time, some of them go dull or break fairly quickly. This was the old blade setup with my old Craft ROBO, mind you, and I don't know yet how long the fancypants automatic blades that work with the Cameo 3 last yet.
mproteau: Oh yeah, the ridiculous amount of tack is exactly what grinds my gears about the standard carrier mat. I've seen permanent glue with less bite. I make my own backing sheets for speed and convenience, but the Cameo 3 definitely seems to do better with a more rigid carrier. I'm going to be making a few 8.5x11 waxed chipboard carriers today to see if they do a better job keeping cut sheets flat between the rollers.
squirmydad: I can relate, I've been lusting after one of those waxers since I discovered them in 2008.
I had a chance to play with the Cameo 3 a bit last night. Some observations:
-If you want one for the Bluetooth support, wait a while for Silhouette to finish fixing it first. They're still working on the firmware and software, and it's not exactly what I would call stable right now.
-If you do a lot of cutting from an USB drive, don't use the automatic blade until Silhouette makes the machine recognize it when loading a job from the USB drive.
-The machine works great if you plug it directly into your PC. Don't use USB extension cables, even active ones--it couldn't detect the Cameo over my active USB3 extension cable, but picks it up fine when using the USB cable that comes with the machine. Yes, my active extension is good, it's the same one I use for my workbench webcam.
-Tangential emulation and user selectable line sorting is a thing now! I guess they finally took my "This software makes my machine cut stupid!" rant to heart somewhere during the Studio V3 cycle.
-It seems to be considerably more accurate with curved shapes than my Craft ROBO was. The Craft ROBO used to act as if the spirit of Salvador Dali possessed it every time it came across a page of wheels and stuff, but as far as I can tell, Cameo 3 curves are spot on. Time will tell if this is a lasting thing.
-Auto Blades are nifty when they work. Currently, they only work properly when the Cameo 3 is plugged into the PC directly or connected over Bluetooth. It's fun watching the machine yoink the tool head over to the side and then go tappity tappity tap to adjust the blade depth.
More to come later. I have to rearrange my office tables today to bring the Cameo closer to my PC until Silhouette's done fixing the Bluetooth functionality.
|
|
|
|
Post by Christopher Roe on Sept 3, 2016 11:51:16 GMT -9
Filing this under the Duh column: the tool drawers on the Cameo 3 double as a media slide and have flip-up support rails as well. Apparently you're supposed to pull them out and then flip out the rails before loading media.
I made 4 rigid chipboard carriers and will be waxing them later today. They're going to serve the same basic purpose as the terrible carrier mat that came with the machine, except without the destructive Sovereign Glue layer. I marked out a 8.5x11 template, notched the center of one short edge to make peeling stuff off it after cutting even easier, sliced it out, then traced it 3 times and cut out a total of 4 carriers. Took something like 15-20 minutes tops.
I love the Logan mat cutting equipment, it made slitting down the full size sheets into manageable chunks easy, and the Model 500 mat knife is surprisingly easy on my wrists when doing smaller cuts. It only takes 2-3 light cuts with it to cut 1.3mm chipboard sheets. My little Olfa SVR-2 would've taken 8-10 cuts to do the same thing. I need to go dig out my trusty old Alumicutter straightedge to go with it, and I'm gonna need a cheap 4 foot wide plastic shelf to manage clutter on the cutting table. It gets kinda cramped on there with all that stuff on the table at the same time.
|
|
|
|
Post by Christopher Roe on Sept 24, 2016 16:31:49 GMT -9
I spent today tuning the cut settings on my Cameo and building some of the stuff that I'd been modeling.  My thoughts during the build process, in no particular order: - I need glasses.
- I have approximately 8 more thumbs than I thought.
- I don't remember this glue being so terrible to work with.
- I miss you, Mr. Tweezers. One day, we shall be reunited. I just need to work up the motivation to toss the garage. Promise. I wouldn't lie to you, Mr. Tweezers, would I? Oh, up yours.
- The tolerance on several of these parts is off. Calipers. What happened to my calipers? I had calipers, didn't I? Maybe the moving monster ate them. Or they're hanging out with the missing socks.
- Wow, this glue likes to get everywhere except on the model itself.
- Glasses. Definitely glasses. Note to self, find optometrist.
- How the hell did I just glue the whole model to my thumb?
- I'm done. Yes! Uh...did that part just fall off? Damn glue.
- Now I'm done. Yay!
- Uh. Um...honey, I've glued my left hand to the desk. Honey? Where are you? Help. Bring the pry bar.
|
|
|
|
Post by Punkrabbitt on Sept 24, 2016 17:08:48 GMT -9
Hello, Chris. It's good to see you online again.
Sausage Stuffed Zucchini Boats has made it's way into my "To Be Printed" folder, I am sure they will make it to the gallery forum at some point.
|
|
|
|
Post by aaron on Sept 24, 2016 18:10:15 GMT -9
this is really exciting stuff I can't wait to see how the saga ends... will Chris get his hand unglued from the desk??!! will his wife come back in time to save his sandwich from the cat!!?? Will this model get texturing before Mr. tweezers pokes out one of Chris's eyes!!  stay tuned , same bat time same bat channel!! |
|
|
|
Post by greypilgrim on Sept 25, 2016 7:42:31 GMT -9
I will assume this is a grav version for the vehicle based on the outboard geometries. Looks good. I like!
|
|
|
|
Post by Christopher Roe on Sept 25, 2016 12:36:58 GMT -9
Yup, kinda-sorta the same approach as the floaty cars I did when I was at WWG. I didn't like how that build went together so I'm gonna try something a bit different to simplify the lifter pod assemblies.
|
|
|
|
Post by Christopher Roe on Sept 25, 2016 15:50:28 GMT -9
Wow...ok. I reran the math and turns out the tolerances would have been correct for 31 mil thick paper, but I'm using 8.5 mil thick paper and normally shoot for a middle ground of 10 mils with a cushion of 2-3 mils in both directions to allow for variance in printing stock. Looks like I mentally underestimated the actual size of the model and made the tolerances about 3x as loose as they should've been. This is what caused the pickup bed to warp and throw off the build of the back half.
The bottom was also a mess to build. Each lifter pod had 3 pieces (the outer ones shaped like fat fenders, plus a couple of bottom blending pieces) and were kind of un-fun to assemble.
I'm currently tightening up these tolerances and redesigning the bottom to require fewer parts while still looking interesting to look at. On the vehicles I did when I was at WWG, the front and rear lifters were full width across the bottom, which was easier to build but didn't necessarily look very interesting. I want to break up the silhouette a bit and have a nice inner slope on each side, but with fewer parts. So, I'm doing the same full-width thing as those WWG vehicles, but cutting them out in the middle at an angle. This means that instead of 12 lifter parts total, there would only be 4 lifters and 2 extra bottom pieces to fill in the hole between the lifters. If that looks good and is easier to build, then I'll adopt that approach.
|
|
|
|
Post by Punkrabbitt on Oct 15, 2016 10:26:45 GMT -9
Pictures later of Sausage Vikings In Zuccini Boats, but initial thoughts are as follows:
1) these are 54mm? Oh gods why? Next tme I must print at 50%.
2) they are mirrored instead of having proper fronts and backs? The "back" side has thicker outlining but looks the sane as the front? I will see if I can fix that for you... I have a silly plan!
|
|
|
|
Post by Christopher Roe on Oct 15, 2016 14:29:44 GMT -9
Yeah, it was just something I did as a quickie joke item when Squirmydad said he was waiting for models of sausage stuffed zucchini boats, plus it was an opportunity to take my pen tablet for a test drive. So, I wasn't worried about scale or utility.
I did opt for a side profile to make it go quicker, since my personal preference for figures whose primary plane of interest is one of the side orientations (cavalry, bikes, etc) is to mirror the front and back anyway so it looks good from wherever I'm sitting. The back outline is thicker for the same reason it's thicker on Jim's stuff--it makes sloppy cuts from the front side less noticeable on the backside.
|
|
|
|
Post by Punkrabbitt on Oct 15, 2016 14:58:33 GMT -9
Dude, my comments were totally in jest! Except for the silly plan of making proper sides. But I did love the model, I am in the middle of moving and my tools that are currently available are a new pounce wheel (never used it before for papercrafting,) glue sticks, scissors, and a steak knife. So the larger size and ease of assembly were very good for my limited resources.
EDIT: Incidentally there would be nothing wrong with doing a whole little set of Sausage Vikings in 54mm... and if we could get some complete hulls on the Zucchini Boats instead of waterline, the could be made onto aeriel stands as Flying Zucchini Boats. I am imagining an entire army of Sausage Vikings...
|
|
|
|
Post by Punkrabbitt on Oct 15, 2016 19:34:53 GMT -9
|
|
|
|
Post by Vermin King on Oct 16, 2016 16:36:42 GMT -9
Might I suggest Medieval Sausage Vikings...
|
|
|
|
Post by Punkrabbitt on Oct 22, 2016 14:30:59 GMT -9
I made some Sausage Viking Infantry, using my usual "dust cloud covering the missing bottom section" technique. 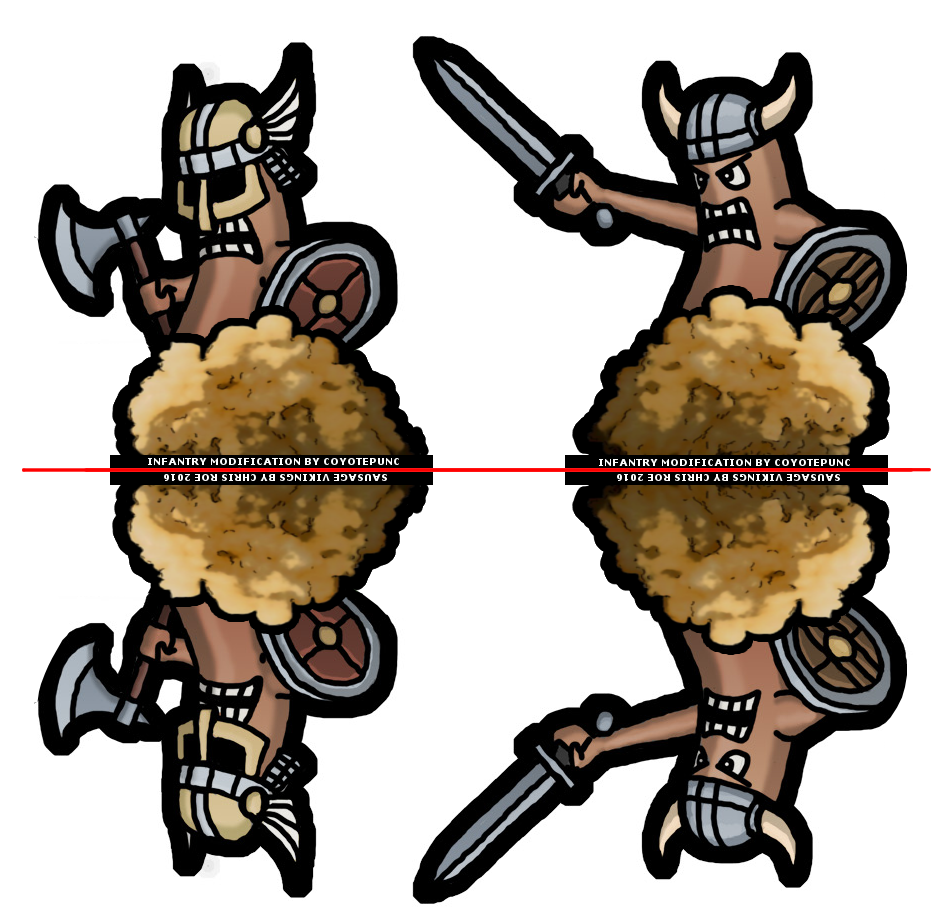 Also submitted for this month's Medieval Mayhem Hoard |
|
|
|
Post by Punkrabbitt on Oct 22, 2016 20:21:59 GMT -9
As threatened, I have made Flying Sausage Vikings In Zucchini Boats:  Also submitted for this month's Medieval Mayhem Hoard |
|
|
|
Post by alloydog on Oct 24, 2016 1:13:13 GMT -9
|
|
|
|
Post by Christopher Roe on Nov 7, 2016 0:17:50 GMT -9
Heh, you found the inspiration for dressing the sausages up as Vikings! When I was mulling over how to fit the theme of "sausages in zucchini boats" into a paper mini context, I remembered that video from years ago, and rolled with it. While I'm here, I might as well post an update! I spent quite a bit of time experimenting with different ways of bringing the artistic style of my figures and vehicles closer together. I learned quite a bit about why I wasn't a big fan of the 3D rendered look for figures, but it took a 100-year old book by Harold Speed ( The Practice and Science of Drawing ) to finally put my finger on one of the biggest reasons I disliked that style. In that book, Speed describes something called "dither", which basically boils down to subtle imperfections and deviations from reality that make a composition look artistically correct, rather than just mechanically correct. Put simply, well-done hand drawn figures tend to have an artistic life to them that makes them read as more alive and characterful than a sterile 3D composition. That "dither" was the one thing missing from all of my test compositions, even with all the other tricks I'd experimented with to make the renders look and feel like actual painted miniatures rather than tiny photorealistic people. For example, I modeled some test mannequins with 28mm proportions and even wrote a hybrid photorealistic/non-photorealistic shader that simulated both layered dark/mid/light paint tones and a stylized lighting model, but that only got me 80% of the way there. I suspect that the remaining 20% consists of introducing that "dither" and experimenting with camera settings further. This is something I continue to experiment with while I bone up on classical drawing skills. On the subject of vehicles and scenery, one element of the new artistic workflow is that a high-resolution, fully detailed 3D model is created first, then a lower-resolution version of that model suitable for unfolding is created. The high-resolution detail is then baked into the low-resolution model's textures. It occurred to me that the high resolution model could do double duty as a 3D printable mesh, so I decided to check the current state of home 3D printing to find out if there were any worthwhile printers available for $200 or less in 2016. For years, $200 was the magic number for me, because that price point is within spitting distance of an upper mid-end consumer inkjet/laser printer, and I'd always maintained that once there were credible contenders in that price range, I'd look at branching out into 3D printed content, and Mrs E has been nudging me into going there for a few years now. Lo and behold, I discovered the Malyan M200 and its Monoprice rebrand, the Maker Select Mini, which sells for $199 and seems to punch above its weight class in several respects. I snapped up a Maker Select Mini on sale for $187 while doing some holiday shopping for Mrs E and my Secret Santa recipient at work. I'm excited to see what 3D printing is like and find out what I can make it do. It would be really cool to offer 3D printable and papercraft versions of the same model, for one thing. The other impetus for getting into 3D printing is the fact that my day job involves virtual reality, and I'm waiting with strained patience for Oculus VR to release its virtual reality sculpting tool, Medium. I've always liked to sculpt things out of clay, but don't miss the mess. The thought of being able to virtually sculpt a high resolution mesh for 3D printing, then retopologize and bake it for papercraft...well, it's exactly the kind of crazy Buck Rogers future stuff that I've been waiting for since the days of Popular Mechanics lying to me about atomic jet packs and stylish foil jumpsuits being commonplace by 2000. So, that's the news for now! |
|
|
|
Post by Vermin King on Nov 7, 2016 5:33:37 GMT -9
How's the 'Shape other than round' project going?
|
|


 stay tuned , same bat time same bat channel!!


