|
|
Post by jeffgeorge on Sept 24, 2016 0:32:17 GMT -9
Here's the link to the most current build-test version of my Dungeons of Olde printable modular tile system, Development version 2.5c! And here's the link to a separate PDF with a matching Dungeons of Olde staircase that can be assembled as fold-flat or fixed! 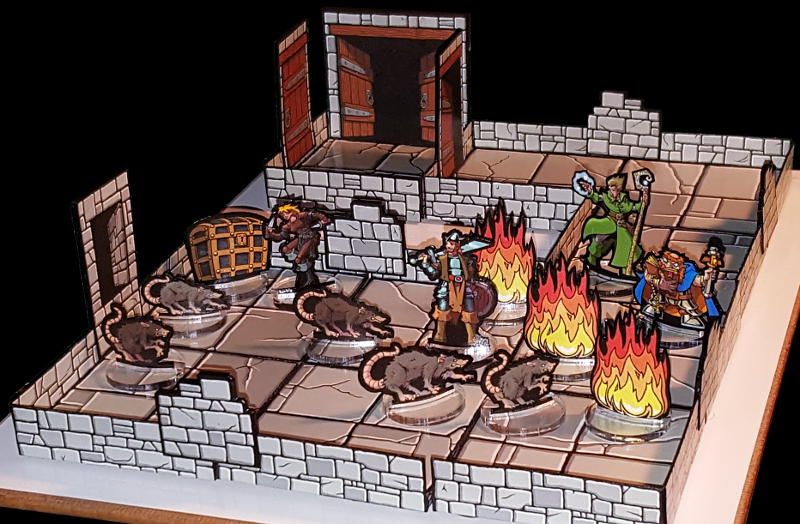 The set consists of 2-space-by-2-space modular tiles that may be arranged to form an infinite variety of dungeons. The tiles may be printed full size for a 1.25" grid (my personal preference), or at 80% for a 1" grid; the tiles have cut and fold lines for both sizes.  The set includes: The set includes:- Tiles with every possible wall configuration from no walls to walls all around
- 5 out of the 6 tile configurations have two flagstone patterns on their floors
- Clips to connect tiles to guard against bumps and nudges
- Single, double, and secret doors which clip onto the walls at any point for maximum flexibility; open and closed versions of all doors are included
- Stand-up miniature chests in two colors and two sizes (that means four different chests, in case you weren't sure!)
- Stand-up miniature fires in two sizes (bonfire and campfire)
- 20mm and 40mm paper miniature bases textured to match the Dungeons of Olde flagstone floors
Separate Stairs
You can also download these stairs as a separate .pdf:
 Feedback wanted Feedback wantedI'm still refining the .pdf, but I believe it's ready enough for experienced papercrafters like the Cardboard Warriors to try building the tiles and accessories. I think the models are pretty solid, but I'd appreciate feedback from other papercrafters. I'm still working on the instructions; the text is all there (though it needs massive streamlining), but more illustrations are probably called for. Thanks in advance to everyone who downloads the .pdf, tries the tiles out, and especially offers their comments, critiques, and advice, either in this thread or through direct messages. Cheers! --Jeff |
|
|
|
Post by bravesirkevin on Sept 24, 2016 0:45:04 GMT -9
That's awesome! reminds me a little of Inked Adventures Style  |
|
|
|
Post by Vermin King on Sept 24, 2016 4:44:04 GMT -9
Looks very nice. I would think half-walls would be very useful, except when there is something that needs a full wall, but that can be put between tiles.
Your previous experience shows through
|
|
|
|
Post by chiefasaur on Sept 24, 2016 5:16:41 GMT -9
Really loving the look of these! I like how well the wall clips are integrated.
|
|
|
|
Post by jeffgeorge on Sept 24, 2016 7:55:07 GMT -9
Looks very nice. I would think half-walls would be very useful, except when there is something that needs a full wall, but that can be put between tiles. Your previous experience shows through Thanks, guys. One of the coolest parts of the design, from my perspective, is that if you need to show something on a wall--like a torch in a sconce, a rune, a ladder, splatter of blood, a stained-glass window, whatever--you make a clip-on piece of full-height wall of the minimum necessary width, and put it wherever its needed in the current room. This gives the set almost infinite reconfigurability. The only downside to the clip-on concept is that because these pieces clip over the walls, they can't have open cut-outs below wall height. For example, the clip-on open doors show a black rectangle in the middle, not a cut-out space. I experimented with a door design that stood on its own base in a sort of inverted capital "T", which allowed the doors to be cut out on three sides to let them swing open, but that design felt too floppy where the vertical section met the base. It also required a permanent three-dimensional structure, which violated my concept that everything that could store flat, would store flat. I may include a form of the inverted-T door as an alternative in the larger set, if I can find a way to make it a little more stable without having to go to an elaborate, 3D build. In fact, the clip-on secret doors are raised off the floor so that they could be cut open without exposing the wall they are clipped onto. When I changed the non-secret doors to clip-ons from inverted-T's, and added the flat open-door version, I added an open version of the secret door for consistency. I didn't think to change the outline of the secret door, now that it didn't have to clear the tile wall...that's something I should do in the next version of the file. |
|
|
|
Post by jeffgeorge on Sept 24, 2016 8:01:02 GMT -9
Really loving the look of these! I like how well the wall clips are integrated. Thanks. The concept of the wall clips are one of a small handful engineering elements that made me think the general concept was interesting enough to share with other people. They started out simply as a method to connect adjacent tiles to stabilize the layout, but when I realized you could print anything onto them, I believed I had an idea with legs. |
|
|
|
Post by chiefasaur on Sept 24, 2016 8:46:09 GMT -9
It def stands out next to all the tile sets you just set down and hope nobody shakes the table.
|
|
|
|
Post by wyvern on Sept 24, 2016 9:49:10 GMT -9
Only downside I can see is having to use foamboard for all the tile bases. Personally, I'm not a fan of foamboard for this, and have long preferred thick cardboard (mountboard aka matboard), because it gives a little more weight than foamboard (which also tends to skitter across smooth surfaces at the least touch; almost like a form of ground-effect/hover sometimes it seems), and is much more robust (that is, you can't accidentally crush it by grabbing the tile when it's just about to slide onto the floor!).
Nice-looking textures and ideas for the half-walls though.
|
|
|
|
Post by Christopher Roe on Sept 24, 2016 11:04:17 GMT -9
I really, really like the way this set is designed, and I particularly like how well the artistic style works with it.
The only thing giving me pause is the requirement for foamcore, for two reasons. First, with a 2x2 base size, there's no reason not to engineer paper reinforcements for the interior. Second, I already find cutting out 6x6 tiles and whatnot tedious without a mat cutter, and the mere thought of hogging out a far larger number of 2x2s makes my right wrist spontaneously cramp up. I find myself mounting tiles on matboard or chipboard instead, 'cause it only takes one pass of a beefy knife versus multiple passes per cut on foamcore. Even so, that's still something of a last resort for me because I bought a hobby cutter to save my wrists and time, and anything that doesn't fit in the hobby cutter makes me feel like I've defeated the purpose of owning a hobby cutter. *grin*
So, if you tossed in one sheet containing some kind of optional paper reinforcement so people could opt out of using foamcore, that would make this set basically perfect in my book.
|
|
|
|
Post by senkosmos on Sept 24, 2016 12:07:33 GMT -9
Really beautiful, and the assembly system is quite elegant. Great work!
|
|
|
|
Post by jeffgeorge on Sept 24, 2016 14:38:01 GMT -9
Only downside I can see is having to use foamboard for all the tile bases. Personally, I'm not a fan of foamboard for this, and have long preferred thick cardboard (mountboard aka matboard), because it gives a little more weight than foamboard (which also tends to skitter across smooth surfaces at the least touch; almost like a form of ground-effect/hover sometimes it seems), and is much more robust (that is, you can't accidentally crush it by grabbing the tile when it's just about to slide onto the floor!). Nice-looking textures and ideas for the half-walls though. The set has lines for 4mm and 5mm (3/16") basing material...you could use matte board or corrugated at those thicknesses just as well. Adding folds for thinner board would be trivial, for me or for the user, for that matter. Please suggest what thicknesses would be best. I like dollar store foam core because it's cheaper and more easily available than new, clean corrugated, and cleaner, more convenient and easier to cut than salvaged corrugated. Matte and poster boards don't have the thickness necessary to separate the floor panel of the cardstock from the tabs on the back by enough to make the sidewalls rigid, perpendicular, and stable. As for the weight, many of the 3D crafters are gluing pennies to the underside of their tiles to make them heavier. I've tried that, and it worked fine though it looks unfinished when you see the bottoms of the tiles. I've also tried using works of 3mm thick cork, which adds weight and non-skid properties; you can buy it in rolls at Michaels for a reasonable price, or cut up the cork placemats from Ikea, which are even cheaper. The set I'm actually using, though, has four little magnet feet at the corners of each tile. These come from Lakeshore Learning, and are $8 for 300 magnets. I have magnetic whiteboard painted satin black that I use as a play surface that my magnetic tiles stick to; between the magnets and the clips, nothing moves on accident. (These same magnets can be ordered in Canada from Wintergreen teachers' supply.) Even so, if you use the clips to connect up four or more tiles, the dungeon is stable through the most violent of bumps or sneezes, with no special backing at all. With the clips in place, you really can lift up an amazingly large assembled room and have it hold together. In any case, I hear people's reservations about foam core, and am open to hearing about alternate basing materials the set should support. Thanks to the whole community for the input, advice, and encouragement. |
|
|
|
Post by jeffgeorge on Sept 24, 2016 22:55:27 GMT -9
I really, really like the way this set is designed, and I particularly like how well the artistic style works with it. The only thing giving me pause is the requirement for foamcore, for two reasons. First, with a 2x2 base size, there's no reason not to engineer paper reinforcements for the interior. Second, I already find cutting out 6x6 tiles and whatnot tedious without a mat cutter, and the mere thought of hogging out a far larger number of 2x2s makes my right wrist spontaneously cramp up. I find myself mounting tiles on matboard or chipboard instead, 'cause it only takes one pass of a beefy knife versus multiple passes per cut on foamcore. Even so, that's still something of a last resort for me because I bought a hobby cutter to save my wrists and time, and anything that doesn't fit in the hobby cutter makes me feel like I've defeated the purpose of owning a hobby cutter. *grin* So, if you tossed in one sheet containing some kind of optional paper reinforcement so people could opt out of using foamcore, that would make this set basically perfect in my book. Wanted to respond to your comments earlier, Christopher, but I only had my Kindle with me today, and the response just above this one took all the patience I had for typing on a tablet. Sorry not to get back to you sooner. You raise interesting points, and really set me to thinking while I was assembling bookcases all day. Part of why I built with a foamcore square inside the base was because dollar-store foamcore is really easy to work with. The better-quality stuff from Michael's or Staples, which has thicker foam as well as much heavier, coated paper on the faces, can take a few passes with a craft knife to cut, but the dollar-store stuff, which is thinner and has a rather flimsy sheet of uncoated paper on each face, cuts easily with a single pass of a not-too-sharp #11 craft blade. I find I can cut out a dozen of these squares in just a few minutes with nothing but a metal-edged ruler, a standard X-acto knife, and a cutting board. In my experience, matte board is much denser and harder to cut. I didn't even consider chipboard for these tiles, because they need a few millimeters of thickness between the top and bottom faces--what makes the walls stand up straight and strong is the fact that they are anchored at two points (top and bottom of the foamcore base core) that are several millimeters apart. Can you tell me more about what you mean by "engineer paper reinforcements for the interior"? Are you talking about some kind of triangle-based pseudo-corrugation between the upper and lower faces of the tile? Is there a model you can point me toward that has something similar to what you're describing? I'm having trouble imagining a way to build any kind of thickness into the base of the tile that doesn't significantly complicate the build process. As for needing a "far larger number of 2x2s", part of the appeal of a modular system based on relatively small tiles is that the tiles go together in a mind-boggling number of different arrangements, so you don't really need all that many tiles or tile configurations. I was originally trying to build the system on a 4x4 grid, but I needed so many different tile configurations to handle situations like 10' corridors running through the middle of 4x4 tiles, with corners, and intersections; as well as 20' room tiles with doorways in varying positions, fitting with one another in wide variety of ways. If all you're doing is printing out flat floor sheets and laminating them to a base material, you can knock a bunch out quickly, but when you want to have stand-up walls, the builds for larger tiles get prohibitively complicated, and you need LOTS of different, specific wall configurations because the larger grid is less flexible than a 2x2. I originally thought that a Dungeons of Olde user would need to make about 8 of each the six tiles to have a set large enough to be useful, for a total of 48 tiles, but having played with them a bit, I think that's a bit more than is necessary. Certain tiles--field tiles and sealed chambers especially--just don't get used that much. Assuming you're not trying to lay out the entire large dungeon at once, but are instead playing it in chunks a couple of feet square at a time, you can get by with a tile inventory like this: - 4 field tiles (no walls)
- 6 side tiles (1 wall)
- 10 corridor tiles (2 walls on opposite sides)
- 10 corner tiles (2 walls meeting at one corner)
- 4 dead-end tiles (3 walls)
- 2 sealed-chamber tiles (4 walls)
Total: 36 tiles
Those thirty-six tiles will lay out almost any combination of dungeon chambers that fill a 2x3' play surface at the center of the gaming table, and because the build process is so simple (one piece of cardstock, one piece of base core material, be it foamcore or cardboard), you could knock out a full set out in a couple of evenings. To cover as many potential dungeon designs with larger tiles would take a LOT more individual tile configurations, and therefore a lot more tiles.
Maybe some time in the next couple of days, I'll just lay out bunch of different dungeon floor plans with the tile inventory I listed above, just to see how much variation you can get out of a relatively small number of tiles. I'll photograph several as examples and post them back here. My point is, though, that you may need a large number of 2x2 tiles to make any given layout, those tiles are so flexible that you can use the same tiles over and over to make a huge number of different layouts, so you don't need to make as many tiles that handle very specific, edge-casey type situations, that you only use once a month or once a year.
Christopher, I really appreciate your kind words and support, and I am eager to learn more about engineering with paper. I'm sorry to have gone on so long in response to your post, but the points you've raised have made me think things through and better organize my understanding of my own system. I'm eager to learn more about engineering with paper or cardstock, especially if it can be done in a way that doesn't complicate the tile-building process. With very little practice, these tiles can go from the printer to the game table in about 5 minutes apiece (not counting drying time!), which is a large part of their appeal. If the build time goes up to 10 or 15 minutes or more per tile, you're getting to the point that you might as well order some Hirst Arts molds and start casting tiles in resin... 
|
|
|
|
Post by oldschooldm on Sept 25, 2016 6:46:03 GMT -9
...you can get by with a tile inventory like this: - 4 field tiles (no walls)
- 6 side tiles (1 wall)
- 10 corridor tiles (2 walls on opposite sides)
- 10 corner tiles (2 walls meeting at one corner)
- 4 dead-end tiles (3 walls)
- 2 sealed-chamber tiles (4 walls)
Total: 36 tiles
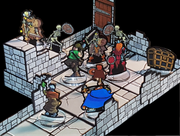
In my experience with 2x2 tiles (using the Dwarven Forge Kickstarter sets) - this is no where near enough to build typical dungeon/cave setups as described by just about any D&D printed adventure (or Adventure League). First you're going to need *dozens* of 2x2 "field tiles" - or better yet build some 4x4 to save a lot of construction time. Good news is that those are the easiest. Here's an example build of a simple dungeon that fits on a sheet of paper I did last week. (BTW, I shrunk it probably 25% because I ran out of floor-tiles!): 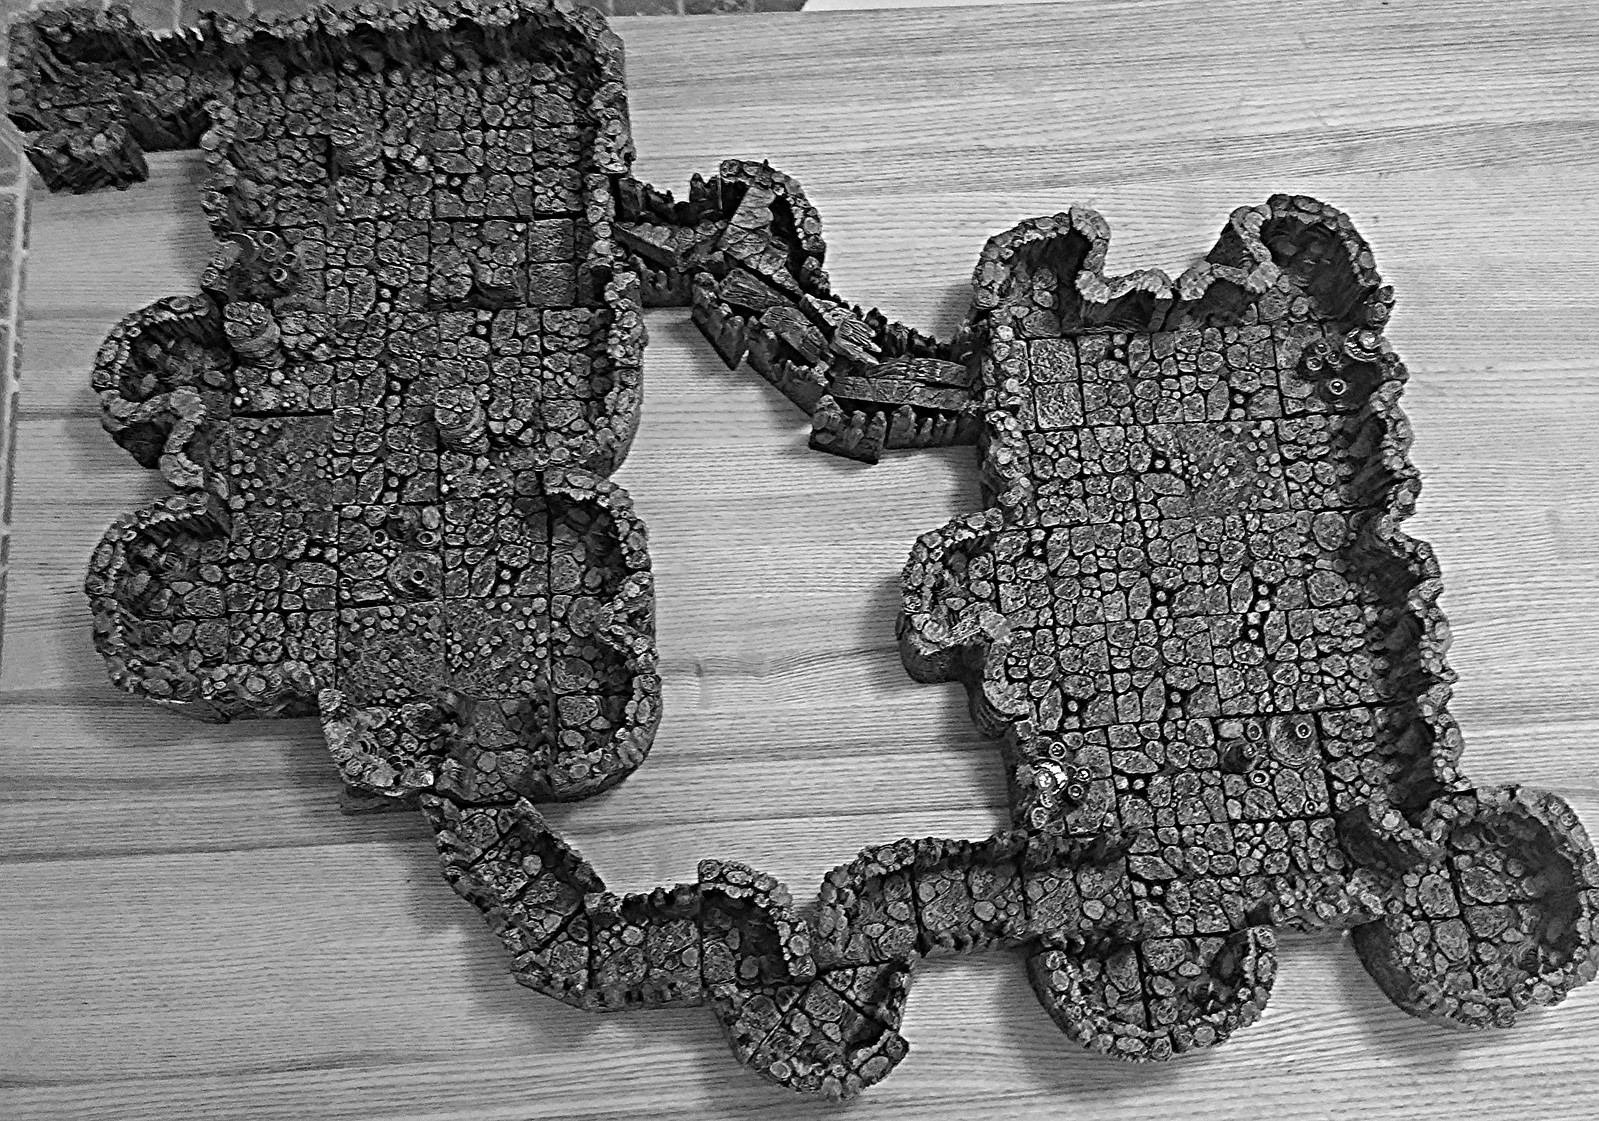 Encounter 1 Map Encounter 1 Map by Oracle Omega, on Flickr The one advantage your set has over DF tiles is you get 2 full squares per "wall" and "corner" tile, so it won't be this bad... Anyway, I think your design looks great - don't take this as discouragement, just pointing out that modern dungeon builds are huge! I do a lot of these, and there are NEVER enough tiles. |
|
|
|
Post by nolabert on Sept 25, 2016 10:09:08 GMT -9
I'll have to give these a shot at some point. jeffgeorge have you tried Fat Dragon Games EZ Dungeons? That's what I've used. Now I have a large number of walls built and ground tiles that I think I'm pretty set with dungeon layouts. But part of what a DM needs depends on philosophy of builds. This is why I was asking oldschooldm what he does for his builds because I haven't decided that a complete dungeon build is needed in a game. At least for me, I don't need the entire dungeon built on a table at one time. I play D&D in a relatively small room in my basement. I have a folding 8' banquet table to play on (folding because my wife and I use the space for other things so can't have a permanent table). To keep the playable space maximized, I use three 2' x 2' plywood handi panels that I've glued felt to for paper terrain. That way I can have parts of a dungeon built and ready to go on a side table and can move it to the game table as needed. I got this idea from Hankerin' at Drunkens and Dragons. I loved the idea of his movable game space, but I just went simpler. I've seen some really awesome builds in the galleries at the FDG forum but for some of them, I can't figure how players can actually sit at the table, roll dice, check character sheets, etc. I watch pretty much all of the same Youtube channels as you do jeffgeorge, except I haven't watched a lot of Wyloch's or DMGinfo. I watch every DM's Craft and Drunkens and Dragons. I also watch lots of Nerdarchy (not a terrain or crafting channel--they just discuss lots of different aspects of D&D). I'm very much a hybridist when it comes to my builds. I use pewter minis, paper minis, some crafted bits (based on DM Scotty), and different sets of paper terrain (mostly FDG but also Kev's Lounge--I own some other ones, but just haven't built them yet). I know that DM Scotty doesn't like 3D because of playability issues, but I haven't found that to be a real problem in game play. At worst, you might have to stand occasionally--given that games of D&D last multiple hours it's probably a good thing for people to stand occasionally. |
|
|
|
Post by wyvern on Sept 25, 2016 10:15:39 GMT -9
jeffgeorge: To follow-up re the foamboard points (and also some of the other proprietary brands you've mentioned), these tips are probably fine for folks in the US, but here in the UK, and I'd guess other parts of the world too, they don't apply so easily. None of our dollar-store equivalents routinely carry foamboard, for example, so I'd have to go to a specialist artist material store instead, where it's neither especially cheap, nor so readily available, for example. By contrast, mountboard is much more easily obtained here, and the cost is usually significantly less than an equivalent area of foamboard. For the other points - like tiny magnets and cork basing - they too are more specialist items here in general, so aren't particularly cheap or available either. This isn't to say they're not good options, just don't assume your advice will always be so easy to follow away from home! I'd never use corrugated card for modelling projects like this; it just hasn't the strength in all directions I'd want. Mountboard/matboard is a much more robust material. I don't think the answer is adding extra fold lines (liable to confuse less experienced modellers, and probably some of us older hands too!), as the potential range of card/other basing material thicknesses can't be so easily defined. I'd imagine some might even prefer wood - thin ply or MDF, for example - over card, while others might prefer the option of greyboard or cereal box card (too thin and acidic for me). The design is so tied in to using foamboard, it seems pointless to try to accommodate other materials, as I think you're right to suggest it won't work so well without that particular degree of base thickness. Anyone needing other options would either have to make their own arrangements, or (perhaps more likely) look elsewhere.
|
|
|
|
Post by Christopher Roe on Sept 25, 2016 12:25:53 GMT -9
Wanted to respond to your comments earlier, Christopher, but I only had my Kindle with me today, and the response just above this one took all the patience I had for typing on a tablet. Sorry not to get back to you sooner. You raise interesting points, and really set me to thinking while I was assembling bookcases all day. Part of why I built with a foamcore square inside the base was because dollar-store foamcore is really easy to work with. The better-quality stuff from Michael's or Staples, which has thicker foam as well as much heavier, coated paper on the faces, can take a few passes with a craft knife to cut, but the dollar-store stuff, which is thinner and has a rather flimsy sheet of uncoated paper on each face, cuts easily with a single pass of a not-too-sharp #11 craft blade. I find I can cut out a dozen of these squares in just a few minutes with nothing but a metal-edged ruler, a standard X-acto knife, and a cutting board. In my experience, matte board is much denser and harder to cut. I didn't even consider chipboard for these tiles, because they need a few millimeters of thickness between the top and bottom faces--what makes the walls stand up straight and strong is the fact that they are anchored at two points (top and bottom of the foamcore base core) that are several millimeters apart. Yep, I was thinking of the good stuff rather than the dollar store stuff. Back when I did this professionally, my material selection process was based on domestic and international availability, in order of most preferable to least preferable: - Local retail availability
- Online availability from Amazon or Blick
- Online availability from specialist vendor
I had to do the sourcing process for the following regions: - United States
- Canada
- Mexico
- South America
- United Kingdom
- European Union
- Australia
- Japan
My findings generally were that the more exotic the material, the more difficult it was to find internationally in the correct size and at a good price. Everybody has access to US Letter or A4 paper, but there's no such thing as dollar store foamcore outside of a few select markets, and things like magnets are even harder to find. Cereal board, mat board, chipboard, and stuff like that is a bit more readily available, but still not something you can just duck into the nearest Wal-Mart for. In the case of foamcore, the internationally available options tended to be of a different thickness, more comparable to the expensive good stuff, and decidedly not cheap. So, I tried to either restrict my materials list to just paper/ink/glue or engineered my stuff to be more or less agnostic of whatever substrate it was attached to, and anything fancy like magnets or transparencies I tried to keep firmly in the "optional" column. There are a number of approaches. You could do a sheet of simple 4mm tall strips with flaps that glue together into a trapezoidal "joist" assembly with the cross section of an I-beam and pack those into the base before closing it up, for example. Or do a 4mm tall strip that glues into a square that you can place in the middle of a tile, although I would recommend 2-4 of the trapezoidal ones instead. There's also the donut approach, where you have a square ring, and the inside of the ring is simply a sliced X and concentric score lines, and you just fold them downwards and outwards into a 3D square donut that you can drop in neatly. Both options aren't complicated to build at all, but the trapezoidal joists have the additional advantage that they can be ganged up very tightly on a sheet in a manner where they all share cut lines and a small number of score lines. Basically, it's "score one and get 10 free" and then slit them apart. One 6x6 tile contains 9 2x2 areas. One 8x8 tile contains 16 2x2 areas. If you had just one dragon lair that was a 8x16 or a 16x16 area, you're gonna need a lot of tiles. One of the use cases for a dungeon set is to build 3D versions of pre-designed map layouts, many of which weren't designed with the end goal of "make life easy for people who want to build this layout in 3D" so it's entirely possible that you're going to need to make a ton of 2x2s even for a modestly sized layout. I'd recommend looking at popular RPG adventure modules to get a feel for the type of map layouts your users would want to replicate. I haven't played fantasy RPGs in a while, but just off the top of my head, I'd probably need more than 36 tiles for some of the adventures I've played--especially ones where the party has to split up, which makes recycling tiles more difficult. That's a great idea! It'll give people a better idea of the possibilities.  I don't know if it's that linear in practice...for example, it takes less time to just lay out 9 flat 6x6 tiles on a single sheet of foamcore to make a 18x18 boss fight chamber than it would to produce the equivalent real estate in 2x2 tiles. I'd say the advantage of this system lies more in its versatility rather than just the build speed, and its friendliness to physical kitbashing. I generally know I'm going to need a bunch of corridor pieces and a bunch of small-medium-large rooms, so I'd probably end up physically kitbashing the printed pieces to reduce the amount of cuts I need to make in foamcore. For example, I'd cut out 2x8 foamcore strips for corridors and a few 6x6s, 6x9s, maybe one or two 12x12 areas, and then slice up the 2x2 printouts as needed to cover them. That way, the most common sizes I need would already be prepped and whatever 2x2s I have left over would be used for the oddball rooms that come up once or twice a year. Of course, that's just me. *grin* |
|
|
|
Post by jeffgeorge on Sept 25, 2016 12:54:16 GMT -9
Note: I started this response to oldschooldm earlier today, and was called away before I could finish it. When I finally got back, I finished and posted it before I'd seen the posts from wyvern and christopher Roe. They've both raised interesting points and issues, especially about material availability around the world, I want to digest their comments before responding to. I just wanted to point out that when I wrote this post, I hadn't read wyvern's and Christopher's comments yet, so folks didn't think I was ignoring them. Thanks again to everyone for taking the time to educate me and broaden my horizons!In my experience with 2x2 tiles (using the Dwarven Forge Kickstarter sets) - this is no where near enough to build typical dungeon/cave setups as described by just about any D&D printed adventure (or Adventure League). First you're going to need *dozens* of 2x2 "field tiles" - or better yet build some 4x4 to save a lot of construction time. Good news is that those are the easiest. I totally agree. I didn't think that would be enough tiles to build the full dungeon complex from a large module at once--just that it would be enough to build a boardgame-sized layout representing a small portion of the larger dungeon. You'd need TONS of tiles to lay out an entire dungeon drawn out at 10' per square on a full sheet of graph paper. The good news is, I had 4x4 tiles of the six basic wall configurations (field, side, corridor, corner, 3-wall and 4-wall) before the inflexibility of 4x4 tiles to render narrow corridors and small rooms led me to convert the entire set to 2x2. If I am going to release these tiles for sale, I plan to keep Set 0 as a free introductory set; it sounds like I should include at least the 4x4 field tiles, and maybe more 4x4s with the full Set 1: Classic Dungeons. The 4x4 single-wall and corners are probably ok, even with margins that allow for cut files. But when you get to the three- and four-walled 4x4 tiles, they barely fit on a letter-size page, and come much too close to the edges for cut files; they would be even harder to fit on an A4 page. 6x6's are right out; I might be able to fit a 4x6 field tile, but I don't think walled 4x6's would fit on a single page, even if you didn't care about cut files. You raise a good point about the wall thickness in traditional resin-cast or DIY-crafted 3D tile sets. They lose the use of the spaces along the wall, so to get a 4x4 playable space in a room, you'd need 4 corner tiles, 4 side tiles, and a field tile--9 tiles in all! With the effectively zero-thickness walls in this set, you only need 4 corner tiles to make a 4x4 playable space. With every tile having 4 full spaces, you get a lot more mileage out of the walled tiles, not to mention the table-space you save. Thanks very much for sharing your experience. I wasn't discouraged at all by your post--I am excited by your interest and input (and everyone's, to be sure). I wasn't sure if the 4x4 tiles were worth adding to the full set, but your comment makes me think that including at least some of them (field, side, corner, at the very least) would be worthwhile. The more I hear from everyone, the better the set will be. Thanks again!
|
|
|
|
Post by jeffgeorge on Sept 26, 2016 10:07:04 GMT -9
I've just uploaded a new version of the Dungeons of Olde tile set, Development 2.4. This version includes a few minor edits, and the following significant additions or modifications: - Added photographs to illustrate assembly of remaining models, including multi-wall tiles, clips and clip-on doors, stand-up minis, and bases.
- Numbered the wall-side tabs on multi-walled models to help builders assemble walls in the correct order.
- Shaded and marked as "No glue" appropriate portions of interior faces of clip-on items.
If you are thinking of building the tile set, please be sure to download development version 2.4 before you begin. The changes from 2.3 are minor, but should help crafters building the set for the first time better understand the build procedure.
Going forward, I will always edit links to new versions into the original post in this thread, as well as further down in the thread where they chronologically occur, to be sure it's always easy to find the latest version.
Thanks for all the continuing input and support from the Cardboard Warriors family!
|
|
|
|
Post by jeffgeorge on Sept 26, 2016 14:04:38 GMT -9
Chris--thanks so much for your long, detailed and very informative post. I wound up taking a long time to consider everything you shared before I responded, but now that I've digested it all, I wanted to let you know where my head is at. Thanks for pushing me to think deeper and harder about my project, btw! Yep, I was thinking of the good stuff [foamcore] rather than the dollar store stuff. Back when I did this professionally, my material selection process was based on domestic and international availability... My findings generally were that the more exotic the material, the more difficult it was to find internationally in the correct size and at a good price. Everybody has access to US Letter or A4 paper, but there's no such thing as dollar store foamcore outside of a few select markets, and things like magnets are even harder to find. Cereal board, mat board, chipboard, and stuff like that is a bit more readily available, but still not something you can just duck into the nearest Wal-Mart for. In the case of foamcore, the internationally available options tended to be of a different thickness, more comparable to the expensive good stuff, and decidedly not cheap. So, I tried to either restrict my materials list to just paper/ink/glue or engineered my stuff to be more or less agnostic of whatever substrate it was attached to, and anything fancy like magnets or transparencies I tried to keep firmly in the "optional" column. Until you brought it up, I hadn't even considered the difficulties crafters outside the US might have in sourcing materials that are readily available here. Of course people in other countries with other systems of standards are going to have different materials available to them--I simply hadn't thought about it. Since virtually all the 3D crafting channels on YouTube make heavy use of dollar-store foamcore, due to its inexpensiveness, ready US availability, and the handy flimsiness and peelability of it's paper faces, I didn't think twice about using it myself in my own design. At the same time, however, your comment worries me that what's available to a crafter in South Africa may be entirely different than what's available in Europe, the UK, or Australia, just to name a few, making it almost impossible to anticipate and plan for all the possible thicknesses of basing materials. Unfortunately, since the thickness of the base is critical to the design of these tiles, it's almost impossible to adapt the basic design to be material agnostic. If I could nail down a small handful (3-4, tops) suitable basing materials that are readily available in different parts of the world, I could move the cut and fold lines to separate layers, so users could print only the lines they need--but even that level of standardization may not be feasible. If that's the case, then the best thing to do for folks who can't get or afford either the dollar-store or better-quality foamcore that the kit already handles is to follow your advice and design a core for the bases that can be assembled out of folded cardstock...which leads us to your next point. I've given the challenge of creating 4mm-thick bases out of engineered cardstock some thought now, based on your suggestions, and I have a couple of ideas that might work. I'll try drafting and building them out this week, and report back. If I get something that strikes a workable balance between ease of building and structural strength, I'll post it here, and if it makes sense to other people, I'll include it in the PDF. Your observations about ganging up rectangular nets for faster cutting has applications beyond the inner structure of the bases, of course. It occurred to me, for example, that I should remove the white space between the doors in the set as well, since they are simple rectangles. They should be butted right up against one another, separated by a single cut line, the way the bases are laid out. I did think to align the four door shapes on the page so that you can score them together, but there's no benefit to leaving white space between them, and I might even get another single door on the page if I squish them together a bit. In the paid set, I'll include entire pages of nothing but clips, nothing but single doors, nothing but double doors, etc., laid out in solid rectangles with no white space in between, so that they share fold and cut lines. As you say, "score one and get 10 free." That way, users can print exactly the pieces they need or want, without having to turn off undesired pieces. You've exposed the bias inherent in my assumption that people using the tiles would be using them the same way I do. The whole idea for the Dungeons of Olde tile set grew out of wanting cool-looking terrain for the rules-light RPG of the same name that I was noodling around with in my spare time--something light, fun and fast, sort of like Hero Quest, Hero Kids or Darkfast Dungeons, but with a little more flexibility and the option of playing with a gamemaster or without. So my original concept was focused on setting up relatively small dungeons made up of relatively small rooms, following either a small graph-paper map or a deck of dungeon cards. As the set developed, and as I became more aware of the 3D and papercraft RPG terrain modeling communities, I began to think that the tile set might have appeal for traditional RPG players as well, who might enjoy something nicer than a dry-erase battlemat, but didn't have the time or skill for fancy 3D modelling or the space or budget to order Dwarven Forge sets. Still, the 16x16 dragon lair was a scenario that hadn't occurred to me--up till now, my thinking was limited to complexes of rooms in the 2x2 to 6x6 range. As I mentioned in my reply to oldschooldm above, though, the good news is that larger tiles are not only possible, but some of them actually already exist. I'd made a full set of 4x4 tiles before I changed to the 2x2 standard, so 4x4 tiles are easy. Anything bigger than 4x6 will take more than one sheet of paper, which complicates the build slightly--a trade-off between ease of construction and convenience in play will have to be weighed. But having certain very common tiles in larger sizes--like 2x4 or 2x6 corridors, for example, as well as 4x4 and possibly 4x6 field tiles--is a very good idea, and something that I will definitely include in the full, paid Set 1: Classic Dungeons version of the set. I guess build simplicity is more important to me than build speed, when you get down to brass tacks. I want this set to be something that someone who has never tried a paper model can succeed with on the very first try, and in a single work session, be able to build out enough tiles to be useful in a variety of situations. I see this set as a bridge between printable gridded battle maps--which there are a million of on DriveThruRPG--and more elaborate papercraft modeled terrain or 3D terrain. I think one of the strongest selling points of this set to that market is the fact that each tile is made from a single printed piece and a single square of base material--they are simple to assemble. This simplicity has the happy side-effect that they are also generally pretty quick to make. Your point that it takes less build-time to cover the same area if you're using larger tiles is well made. Having made both 2x2 and 4x4 tiles using the basic Dungeons of Olde design, you're exactly right--the 4x4 tiles take no longer to assemble than the 2x2, and they cover four times as much ground (at the cost of being less versatile, as you point out). At the risk of sounding like a broken record, this is just one more reason for me to include those 4x4 nets in the final version of the set. I'm hesitant to include any designs that won't fit on a single letter-size/A4 page, because I don't want to violate my one-piece design principle, but you and everyone else here has convinced me that I should include larger tiles up to the biggest I can fit on a single page. Anyone sophisticated enough to want single tiles bigger than I can fit on a single page (4x4 or 4x6, most likely) is also sophisticated enough to effectively kitbash what they want. Now that I think about it, you could do an 8x8 by field tile simply printing four 4x4 field tiles, trimming the side panel tabs off of two sides of each one, and gluing each one to one quarter of a single 10x10" hunk of foamcore--no Photoshopping required! Kitbashers, start your engines! Bottom line--thanks so much for sharing your experience and viewpoints. You and the rest of the Cardboard Warriors are making this project infinitely better and more appealing. For people who don't even know me, to take the amount of time that you all have to share your expertise is really amazing. I hope some day to be in a position to pay all this kindness and effort forward. |
|
|
|
Post by wyvern on Sept 28, 2016 2:13:44 GMT -9
...I see this set as a bridge between printable gridded battle maps--which there are a million of on DriveThruRPG--and more elaborate papercraft modeled terrain or 3D terrain. I think one of the strongest selling points of this set to that market is the fact that each tile is made from a single printed piece and a single square of base material--they are simple to assemble. This simplicity has the happy side-effect that they are also generally pretty quick to make. Worth noting though that there is also a goodly number of tile sets (geomorphic and others) which bridge this same gap, and these are still easier and quicker to make up, because it's just a case of print and cut (and glue to a base if you wish) only. Some of those have features like free-standing door pieces as well, and flat tokens/counters as markers for objects on the floors, stairways, etc., for those who want something a little more complex/realistic. Tiles have the huge advantage too that you can have irregular-shaped rooms, and most notably geomorphic cave pieces, without worrying about fitting walls to them. |
|
|
|
Post by jeffgeorge on Sept 28, 2016 18:55:21 GMT -9
...I see this set as a bridge between printable gridded battle maps--which there are a million of on DriveThruRPG--and more elaborate papercraft modeled terrain or 3D terrain. I think one of the strongest selling points of this set to that market is the fact that each tile is made from a single printed piece and a single square of base material--they are simple to assemble. This simplicity has the happy side-effect that they are also generally pretty quick to make. Worth noting though that there is also a goodly number of tile sets (geomorphic and others) which bridge this same gap, and these are still easier and quicker to make up, because it's just a case of print and cut (and glue to a base if you wish) only. Some of those have features like free-standing door pieces as well, and flat tokens/counters as markers for objects on the floors, stairways, etc., for those who want something a little more complex/realistic. Tiles have the huge advantage too that you can have irregular-shaped rooms, and most notably geomorphic cave pieces, without worrying about fitting walls to them. The "goodly number of tile sets (geomorphic and others)" you're referring to are the exact ones I meant when I said "printable gridded battle maps." I'm sorry that I wasn't clear about that. So I'm imagining a niche between those and 3D terrain. Maybe this is a non-existent niche-between-niches, and the market for it consists of me and me alone. If that's the case, oh well...at least I got a cool set of 2.5D modular dungeon tiles out of it, which is more than I had before. That being said, I do think there is an under-served niche of gamers who would love to have Dwarven Forge, Hirst Arts, or DMScotty/Wyloch-style terrain, but don't have the money to buy them or the time or crafting experience to make them. For those folks, Dungeons of Olde would let them invest less than $30 (covering a modestly-priced pdf, some cardstock and printer ink, a sheet of $1 foamcore, and a bottle of Elmer's) and 2-3 evenings of time, and have a very serviceable and flexible set of modular dungeon tiles which they could expand at any time for virtually nothing. I think there are people out there who'd like that, but I could be wrong. |
|
|
|
Post by jeffgeorge on Sept 29, 2016 1:02:10 GMT -9
More simulated play with the tile set (especially when not using magnetic tiles and play surface) led me made me decide that straight clips weren't enough for dungeon stability. So I pulled an all-nighter to engineer corner clips: 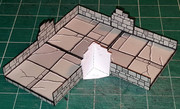 Like almost everything else in the system so far the corner clip is folded and cut from a single piece of cardstock, so assembly is super easy. I was pleased to find that once clipped together, multi-tile units become very strong. Here's a shot of me lifting a 3-tile corridor bend off the table with just two fingers at one end. The tiles are all about three inches off the table in the shot (I wanted to show the shadow, or I'd have lifted it further for the shot), and there's nothing holding them together but the three clips you can see in the shot. I am quite confident I'd have gotten tired of holding the tiles up long before the clips would lose purchase and drop a tile. 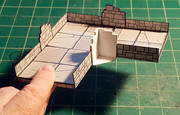 I still don't think you need to clip every single tile to all of its neighbors for the complex to be stable enough for play (assuming you don't plan to lift it unsupported into thin air), but having the ability to clip around corners really improves the tiles on the table. I'll work on texturing an inside clip and add it to the next version of the development set. |
|
|
|
Post by wyvern on Sept 29, 2016 10:29:50 GMT -9
Worth noting though that there is also a goodly number of tile sets (geomorphic and others) which bridge this same gap, and these are still easier and quicker to make up, because it's just a case of print and cut (and glue to a base if you wish) only. Some of those have features like free-standing door pieces as well, and flat tokens/counters as markers for objects on the floors, stairways, etc., for those who want something a little more complex/realistic. Tiles have the huge advantage too that you can have irregular-shaped rooms, and most notably geomorphic cave pieces, without worrying about fitting walls to them. The "goodly number of tile sets (geomorphic and others)" you're referring to are the exact ones I meant when I said "printable gridded battle maps." I'm sorry that I wasn't clear about that. So I'm imagining a niche between those and 3D terrain. Maybe this is a non-existent niche-between-niches, and the market for it consists of me and me alone. If that's the case, oh well...at least I got a cool set of 2.5D modular dungeon tiles out of it, which is more than I had before. That being said, I do think there is an under-served niche of gamers who would love to have Dwarven Forge, Hirst Arts, or DMScotty/Wyloch-style terrain, but don't have the money to buy them or the time or crafting experience to make them. For those folks, Dungeons of Olde would let them invest less than $30 (covering a modestly-priced pdf, some cardstock and printer ink, a sheet of $1 foamcore, and a bottle of Elmer's) and 2-3 evenings of time, and have a very serviceable and flexible set of modular dungeon tiles which they could expand at any time for virtually nothing. I think there are people out there who'd like that, but I could be wrong. Right. With you now. I tend to think of the gridded battle maps as specific one-location set-pieces. You can cut some of them up to be pseudo-geomorphic, but they rarely work well this way. The niche between 2.5D and 3D paper RPG terrain may be small. However, I think it's clear from the comments here that at least it's not just you! Dungeons of Olde is certainly an interesting concept in this respect. As someone who succumbed to several Dwarven Forge sets way back when they still had bow-tie connectors (so they don't fit now with any of the more recent releases...), they certainly have their uses too, although in terms of relative affordability and ease of production, it may be difficult to compete in the longer term with 3D printed plastic components. While 3D print technology isn't really there yet (it's not particularly cheap, and it seems rarely to be problem-free in operation - aside from the hundreds to thousands of hours of continuous operation to print enough to create a modest-sized tabletop dungeon layout), I think we've all seen enough in recent decades of how quickly technologies can change, improve and reduce in cost to know this won't be the case for ever. And that's aside from the 3D laser-cut wood models, some of which are now coming pre-painted. Not being a huge fan of laser-cut wood models (great way to gain a kipper-scented home...), I'm certainly far happier to see fresh paper and card alternatives being developed |
|
|
|
Post by nolabert on Sept 29, 2016 11:34:26 GMT -9
Are Dwarven Forge sets 3-D printed or manufactured?
One advantage I see of paper sets over plastic, besides the ones you pointed out regarding technical issues and print times and painting (Fat Dragon Games Forum has essentially just become a 3-D printing technical issues forum), is that you can get some strikingly different styles. FDG terrain looks different than Dungeons of Olde for example. In comparison, the plastic terrain looks pretty much the same to me (Dwarven Forge looks like FDG). This isn't to knock plastic terrain. I think it looks pretty cool. While I don't foresee buying a 3-D printer anytime soon, I'm not particularly averse to eventually obtaining a set of plastic terrain.
The other benefit of paper is that I feel like having a paper printer has multiple functions in my life: printing documents or files as well as papercraft for rpgs (not to mention that my wife uses it too). A 3-D printer would have only one function for just me: to print terrain and minis. I find that harder to justify to myself in terms of both money and space (with space being the bigger concern).
|
|
|
|
Post by kgstanley81 on Sept 29, 2016 18:20:34 GMT -9
Read the whole thing, will have to make a stop at the dollar store on my way home and try them out over the weekend
|
|
|
|
Post by jeffgeorge on Sept 29, 2016 20:44:33 GMT -9
The niche between 2.5D and 3D paper RPG terrain may be small. However, I think it's clear from the comments here that at least it's not just you! Dungeons of Olde is certainly an interesting concept in this respect. I don't see anything quite like Dungeons of Olde available, at least not so far. The two closest are the cardstock-printable dungeon sets from OkumArts and Fat Dragon, but of these lines are trying to do full-height walls just like Hirst or Dwarven Forge. This carries over the disadvantages of those general designs--specifically, lack of visibility and difficulty of access to the figures during play. On the plus-side, Okum's dungeons fold flat, which is cool for storage. I need to build a few of Okum's dungeon pieces, to see how I like them, and to find out how easy or difficult they are to assemble and use. The cardstock-printable dungeons from Fat Dragon look like pretty complex models to build (at least considering how many you'd need to layout even a couple of square feet of dungeon), but they do an amazing job of capturing the same feel as the cast 3D sets like Hirst and Dwarven Forge. And I notice that both Okum and Fat Dragon use very painterly or photo-realistic textures, which look nice with 3D painted figures. But as different as they are from one another, I feel like OkumArts and Fat Dragon's cardstock printable dungeons have more in common with each other than either of them do with Dungeons of Olde. For me, they are both trying to hard to emulate resin- or plaster-cast 3D systems, and missing opportunities to improve over them. For example, the low-wall design I borrowed from DMScotty's 2.5D concept addresses the visibility and accessibility problems both OkumArts and Fat Dragon both carry over from traditional 3D terrain systems. And as papercraft designs, they both look much more complicated to assemble than Dungeons of Olde--though I haven't actually attempted to build either set to test this theory. Also, the texture style for Dungeons of Olde is also more comic-book/manga/cartoony, which to me at least, looks more stylistically compatible with most paper miniature figures. That being said, both the OkumArts and Fat Dragon printable terrain systems are great lines in their own ways, and if I weren't a DIY-tinkerer by nature, I'd probably have just picked one or the other and built a full set. Even so, I think Dungeons of Olde is different enough from what's already out there that it's not directly competitive with anything that currently exists. At the very least, I'm coming up with different answers to the same questions. Whether I can make other people understand what I see as Dungeons of Olde's advantages is an open marketing question. As cool as they obviously are, I could never justify investing several hundred dollars in Dwarven Forge sets. I find myself watching a lot of videos about casting Hirst Arts terrain lately, and I may eventually break down and try that out. I agree that hobbyist-level 3D printers haven't gotten good enough or cheap enough yet for me to take that plunge. I expect that in 3-5 years, the machines and the materials will become quite a bit cheaper, and the products produced by 3D printers priced for consumers will reach a level of quality that I can accept. But they aren't there yet, and I'm not going to lay down $1000 in a system that produces pieces that I'm not happy with. I saw a Kickstarter for a freaking amazing 3D laser cutter a few weeks ago, and I was sorely tempted...but the Kickstarter order price for the machine was well over $2000, and the expected retail price was just shy of $3000. That being said, the products it was producing were beautiful, and the first thing I thought about when I saw it was how to use it to make terrain. I have no problem with painted wooden terrain pieces, but I do have a problem with a $2000+ machine to produce them...not to mention the 9+ months to wait for the machine to actually be available. |
|
|
|
Post by jeffgeorge on Sept 29, 2016 21:27:34 GMT -9
Read the whole thing, will have to make a stop at the dollar store on my way home and try them out over the weekend Thanks very much! You're probably the first person--other than me--to make them. I'll probably have a newer version up by bedtime tomorrow that will include the corner clips. I'm also working on a pure-cardstock solution to the tile bases that would replace the foamcore for people who can't get it--but if you can get dollar-store foamcore, it's much, much simpler and faster to make the tiles that way. I won't be changing the tile models at all in this version, though, so you can dive right in building those from version 2.4 of the PDF without fear of being outdated. I'm very eager to hear feedback from people actually building the tiles. I'll be on the computer and lurking around the forum Friday and Sunday, so if you have questions, shoot me a PM or post it here. (I have a family event on Saturday, and won't be online until late that night.) Good luck! |
|
|
|
Post by jeffgeorge on Sept 29, 2016 21:47:22 GMT -9
Are Dwarven Forge sets 3-D printed or manufactured? One advantage I see of paper sets over plastic, besides the ones you pointed out regarding technical issues and print times and painting (Fat Dragon Games Forum has essentially just become a 3-D printing technical issues forum), is that you can get some strikingly different styles. FDG terrain looks different than Dungeons of Olde for example. In comparison, the plastic terrain looks pretty much the same to me (Dwarven Forge looks like FDG). This isn't to knock plastic terrain. I think it looks pretty cool. While I don't foresee buying a 3-D printer anytime soon, I'm not particularly averse to eventually obtaining a set of plastic terrain. The other benefit of paper is that I feel like having a paper printer has multiple functions in my life: printing documents or files as well as papercraft for rpgs (not to mention that my wife uses it too). A 3-D printer would have only one function for just me: to print terrain and minis. I find that harder to justify to myself in terms of both money and space (with space being the bigger concern). The Dwarven Forge sets are cast with some kind of proprietary resin; I am pretty sure they only sell cast pieces, either painted or unpainted. The Dwarven Forge stuff is gorgeous, but spendy. Hirst Arts sells silicone molds that you use to cast your own pieces, which is more trouble but ultimately much cheaper. Fat Dragon and Wyloch are both selling dungeon terrain files for 3D printers, and I'm sure there are others. I feel about 3D printed terrain about like you do--it's interesting, though the various lines do tend to look a lot alike. (I think there's more potential for creating your own look if you have the time and talent to paint 3D terrain yourself, regardless of whether its cast or printed.) And it's really hard to justify the financial investment for a machine that has no other purpose, as you say. The capacity of printed cardstock terrain to look different is really cool. In the full set of Dungeons of Olde, I'll probably add beige/brown and greenish recolors of all pieces as additional layers. I deliberately made the original version neutral gray to make it fast and easy to recolor (kitbashers, take note...). And once I have the geometry of the tiles worked out, I can reskin them (relatively) quickly, producing other sets with different looks, such as Egyptian and Mayan, Dwarven Halls and Mines, Temples and Mausoleums, etc. I also want to make a set of medieval building interiors with the tile set, so that when your players enter one of the tricky papercraft models you've built and put on your exterior battle terrain, you can quickly lay out the interior of the building with modular Dungeons of Olde interior tiles. |
|
|
|
Post by jeffgeorge on Sept 30, 2016 10:49:43 GMT -9
I have a workable design for a cardstock-only core for the tile bases, eliminating the need for the dollar-store foamcore. It's quite a bit more work than just slicing apart foamcore squares, or squares of 4mm or 3/16" board of some other sort, but it does make it possible for anyone who can print the set to build it with nothing but cardstock and glue. It follows a corrugated sort of design. Here it is with the corrugation glued to the bottom face: 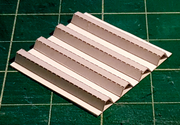 And here it is mostly assembled, with both faces of the base core attached, and a field tile skin partially attached: 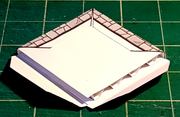 I'm working on v 2.5 of the PDF now, which will include this no-foamcore base core, as well as a textured version of the corner clip. Look for that before bedtime tonight. (Fingers crossed.) |
|
|
|
Post by Vermin King on Sept 30, 2016 12:43:47 GMT -9
I think I like this better as my personal preference
|
|