|
|
Post by wyvern on Sept 30, 2016 13:35:37 GMT -9
nolabert: Dwarven Forge started out twenty years back with all resin-cast hand-painted terrain models. That material was called "polystone". The newer pieces, now their complete range, are cast in a type of robust plastic, called "Dwarvenite". The current items come either hand-painted or unpainted (unpainted is somewhat cheaper, naturally). You can find details on the Dwarven Forge website or their 2016 KickStarter page, should you need more info. jeffgeorge: Yeah, when I bought my Dwarven Forge sets, around 1999-2000, there wasn't much else about, other than cast resin or plaster models you had to paint yourself (Fat Dragon Games started up only in 2005, for example). They were just SO innovative at the time, and SO VERY, VERY PRETTY...  In making comparisons for Dungeons of Olde, you may want to investigate other manufacturers, as well as looking further at some of those you've mentioned. Okumarts for instance gives the option of finishing the walls at full or half height, aside from a variety of wall and floor textures, plus similarly-styled 3D furniture and standee minis. Fat Dragon also do geomorphic tiles, while both can have their 3D sets used as tiles simply by leaving off the walls. In terms of construction, I've found both to be really straightforward, but as a very long-standing model-maker, I'm likely not the best judge of what's easy and what's not, compared to a novice. Huge advantage of tiles and some of the more complex-seeming Fat Dragon 3D paper builds, for example (plus naturally the cast 3D models), is they can accommodate irregular caverns, curved and other non-rectilinear walls more easily than in the DoO concept as shown so far. But not everyone would want or need those options. As mentioned among the postings above, Inked Adventures (DTRPG webpage link) are quite close in overall style to that used in your designs, and there've been experiments with 3D block walls for those over time, including for wood-and-plaster medieval interior styles. While very modular in concept, those block walls have some interesting possibilities for varying both wall height and floor levels within rooms, simply by using rectangular blocks in different configurations, including stacking. Downside compared to DoO is that you'd have to glue them to prevent sliding about, of course. However, Inked Adventures also use various floor styles, standee door types and textures, and have a host of flat counters/markers available. To be honest though, I'm not sure you really need to be making such comparisons at all, since as you said, your ideas stand up (sorry...) on their own. Not sure about the corrugated under-floor support structure so far. It should be fine for paper minis, but some of the larger metal-cast minis especially would be likely too heavy, I suspect.
|
|
|
|
Post by jeffgeorge on Sept 30, 2016 15:18:20 GMT -9
Thanks for the continuing input, wyvern. In making comparisons for Dungeons of Olde, you may want to investigate other manufacturers, as well as looking further at some of those you've mentioned. Okumarts for instance gives the option of finishing the walls at full or half height, aside from a variety of wall and floor textures, plus similarly-styled 3D furniture and standee minis. Fat Dragon also do geomorphic tiles, while both can have their 3D sets used as tiles simply by leaving off the walls. In terms of construction, I've found both to be really straightforward, but as a very long-standing model-maker, I'm likely not the best judge of what's easy and what's not, compared to a novice. I definitely need to build Okum's and Fat Dragon's dungeon tiles. I was initially hesitant to do so, because I didn't want them to influence my design, even subconsciously. Now that the Dungeons of Olde basic engineering and design are firmed up, I can go ahead and investigate other systems without fear of being inadvertently derivative. Maybe I'll build a few pieces of each over the weekend, as a break. I have plans for curved walls (to make 2-tile-by-2-tile round rooms, for example) as well as walls at a 45-degree angle that will fit on 2x2 tiles that should not be significantly harder to assemble than the square designs. Everything in the development set I've posted is intended to be included in a free Set 0, so I have no fear of posting them here; the trickier geometries will be restricted to larger, paid Set 1 version. When I have them ready for testing, I'll put out a call for volunteers here, and email the files directly to a few people--I don't intend to post very many of them for free anywhere, unless I give up entirely on selling the set. Irregular caverns are a slightly trickier problem, but I have some ideas. They'd be a separate set, though. I'm obviously well aware of the similarity of the Inked Adventures style to my own. I'm a pen-and-ink cartoonist by nature, not a painter, so the "compatibility" is not surprising. I love the old-school aesthetic of the Inked Adventures stuff. I am not at all familiar with their 3D line, though I have seen their flat counters, standee doors, and other accessories. I definitely plan to release dungeon decorations for Dungeons of Olde, as well. The items that are included in the tile sets will mostly be the clip-on decorations and perhaps flat markers; I'll package the stand-alone/standee items similar in format to the chests and fires in Set 0 separately, so that people who want them don't have to buy the whole tile set to get them. Thanks. I hope the comparisons aren't too close, and that my system is sufficiently unique to be its own thing. I'd rather sell to new people and get them interested in papercraft terrain, than try to take bites out of existing publishers' markets. When constructed of 110 lb. cardstock, they are similar in strength and stiffness to the foamcore-based tiles. They stand up very well to several pounds of even pressure applied by hand, based on totally non-scientific tests. I put four full stacks of coins ($2 nickels or $10 quarters) on one of them, one stack per square, all at once, and it held up fine, so I'm quite confident they'll hold up any metal mini that is set upon them with a level of gentleness that's appropriate to hand-painted minis anyway. If you slam down something hard with an edge on them, I'm sure you could scar/mark/dent them, of course, but that's true of anything short of MDF or (maybe) dense mat board. Thanks again for the continuing input and encouragement! |
|
|
|
Post by nolabert on Sept 30, 2016 15:56:31 GMT -9
wyvern , I didn't realize that Dwarven Forge has been around that long. The reason I asked about whether their tiles were manufactured is because their website says they are sold out of sample pieces and they don't clearly indicate when they are getting more. I like the hybrid or mix and match approach. I do that with minis using both painted metal (and I enjoy the painting process) and paper minis. Metal minis I use are Ral Partha/Iron Wind Metals and Reaper. I don't care that the two are different scales with Ral Partha more closely to traditional 25 mm and Reaper to 28-30 mm (or 25 heroic as they call it). Likewise I have and use interchangeably paper mini sets from Permes, One Monk/MIP, Brave Adventures, Pigmi Games, Kev's Lounge, Sanity Studios, Pasiphilio, Okum arts, and Reivaj. My least favorite style of all of them is the Manga look (not to knock Okum--I have the Nandals set which I really think looks better than any primitive human in paper mini or metal form). It's just that I'm not as much of a fan of Manga. I mostly use FDG terrain. This gives you a sense of how much I've built to date: 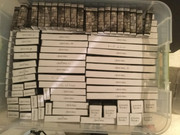 For my next adventure I plan on using FDG's 2D cavern set, mainly because the adventure will include a sprawling cavern and I'm taking a tip from afet on the FDG Forums that narrow caverns have playability problems in full 3D. I will use 3D elements with the 2D terrain like Stalagmites. I'm also using the 2D set because it's an easier build (I have built a few of the cavern walls from the mines set, but don't want to do that for large sprawling cavern crawl). I think I will use a mix of 3D and 2D for the future depending on the size of the dungeons/space. Smaller 4-5 room dungeons will go the full 3D route and larger ones I'll do a more geomorphic style. I also really love the look of the Inked Adventures tiles and plan on using some of those in future adventures. Likewise for Black Scroll Games. I'm not stuck on my scenery all looking exactly the same from adventure to adventure. oldschooldm has inspired me here with his varied builds (both terrain and minis), although I don't know how often he does the 2D with 3D elements mix. At some point, I'll make use of these Dungeons of Olde sets from jeffgeorge . I think this forum should come with some type of warning about addiction to paper craft!
|
|
|
|
Post by jeffgeorge on Sept 30, 2016 16:35:47 GMT -9
This kind of personal user story is a great help to me, nolabert. Thanks for sharing it. I look forward to hearing how the Dungeons of Olde tiles work out for you when you get a chance to build them and use them. Pics of them in play would be an extra bonus!  |
|
|
|
Post by jeffgeorge on Sept 30, 2016 22:32:08 GMT -9
Despite my best efforts, there will be no update tonight. I got all the pieces ready (the corner clip proved to be very tricky to finalize), but it's too late for me to put them in the PDF tonight. Won't get back to it until tomorrow evening or some time Sunday. Sorry gang. As I said, though, none of the existing models will change in the next version--it's just adding the all-cardstock bases and the corner clips--so it's safe to build from version 2.4 if you like.
Thanks, and sorry.
--Jeff
|
|
|
|
Post by wyvern on Oct 1, 2016 4:34:49 GMT -9
When constructed of 110 lb. cardstock, they are similar in strength and stiffness to the foamcore-based tiles. They stand up very well to several pounds of even pressure applied by hand, based on totally non-scientific tests. I put four full stacks of coins ($2 nickels or $10 quarters) on one of them, one stack per square, all at once, and it held up fine, so I'm quite confident they'll hold up any metal mini that is set upon them with a level of gentleness that's appropriate to hand-painted minis anyway. If you slam down something hard with an edge on them, I'm sure you could scar/mark/dent them, of course, but that's true of anything short of MDF or (maybe) dense mat board. I was thinking more of how well-supported a mini would be when placed on a floor panel directly over one of the "valleys", but looking again at your photo (the cutting mat grid squares are perhaps one-inch?), those "gaps" probably aren't large enough to be so problematic after all. I didn't realize that Dwarven Forge has been around that long. The reason I asked about whether their tiles were manufactured is because their website says they are sold out of sample pieces and they don't clearly indicate when they are getting more. I think all their manufacturing is still done in China (it certainly was for many years, if not), and I know that's often created problems in the past, both for items going out of stock, and for there being no expected restock date given, because everything is tied to shipping times (literally - seaborne container vessels), and then getting the items cleared through customs after arrival. Both can add weeks to months of extra delay. Sometimes you can find more information on their Forum pages (also check the separate Dwarven Forge Europe website and Forum, as they may have additional details, though obviously more applicable for delivery to Europe than the States). I like the hybrid or mix and match approach. ...minis...both painted metal and paper... Quite agree, though mostly because I've collected so much stuff over the decades it's a shame not to use it! I do sometimes design gaming scenarios based on specific models or tile sets I have; it's quite fun to use that as a limitation, and even more so if you opt to have no single piece be duplicated in the final layout ( SkeletonKey Games - DTRPG link - are particularly helpful if you want to try this route with tiles, as they have a large range in a consistent style, and all of the different variants come with linking tiles too, often as freebie extras). I like that approach, because each dungeon, if real, would have had its own builders, and different geologies create different cave systems, so you'd expect each one to have a certain degree of uniqueness. I think this forum should come with some type of warning about addiction to paper craft! As if you didn't know that already  jeffgeorge jeffgeorge: One new thing. It's really helpful to have a single page in the final PDF product giving a thumbnail of every finished tile/piece in the set, so when you're planning a build, you can work out in advance how many items you'll need of each printable page. Adding the SkeletonKey link reminded me, because a lot of their products have one of those pages, and it sped up my own "large cavern" tile build from their products earlier this year. |
|
|
|
Post by nolabert on Oct 1, 2016 5:04:53 GMT -9
Thanks wyvern. Didn't know about Skeleton Key Games tile sets. See what I said about this forum feeding the addiction! They're a little pricey for their pdfs though. And their links to publisher's previews no longer work. But they're now on my list to follow. Do you have any pics of game play using these tile sets? And do you mix in 3D elements? I really like the mix of 2D with 3D elements (besides just the minis). |
|
|
|
Post by wyvern on Oct 1, 2016 5:59:27 GMT -9
Didn't know about Skeleton Key Games tile sets. ... They're a little pricey for their pdfs though. And their links to publisher's previews no longer work. Yes, both facets are real irritations. I contacted Ed Bourelle about the broken links over a year ago, but had no response. If you want some idea of what the style in different sets is like, you could spend (quite a lot of) time trawling the SkeletonKey website and pick up all the freebie one-off extra tiles. From memory - again at least a year or more back - I think most of the PDF links still work for those. There are a few free sets on the OBS site as well. As for the pricey pricing, there are occasional sales (30% to 75% off - see the Facebook page, although it's a year since even that was updated now), particularly during September, the company's anniversary - sadly not including September 2016, as far as I'm aware. Or you just have to bite the bullet... Do you have any pics of game play using these tile sets? And do you mix in 3D elements? No, and Yes! I don't do a lot of imaging generally, so I'm not geared up with a suitable dropbox-style host to post images at to be featured on sites like this which need a URL link for images, unfortunately. The large cavern build I mentioned in my earlier posting today included a number of standees, treasure counters and other markers, plus one of the Fat Dragon 3D treasure piles with the embedded treasure chest. I'd intended to do more 3D items, but time ran out, so I just stuck with the markers instead. |
|
|
|
Post by jeffgeorge on Oct 1, 2016 8:00:51 GMT -9
I was thinking more of how well-supported a mini would be when placed on a floor panel directly over one of the "valleys", but looking again at your photo (the cutting mat grid squares are perhaps one-inch?), those "gaps" probably aren't large enough to be so problematic after all. The tile you're looking at in that shot is 2.5" square (as is every tile in the set so far), so a single-space mini would be sitting on not one but two of the trapezoidal support structures, which should be more than enough to support it. You'd have to really press down hard on purpose to crush the tile. That's a good thing to point out explicitly. I pretty much almost did that by accident in the current PDF--there's a single shot of all six tile configurations in the set, at least. I didn't include a shot with all the accessories, though--the doors, the clips, the chests and fires. I'll definitely add that before I finalize the PDF for OBS. Thanks for the idea. |
|
|
|
Post by jeffgeorge on Oct 1, 2016 22:39:19 GMT -9
Here's a new version of the Dungeons of Olde tile set PDF, developmental version 2.5a. This set adds the pieces for the alternative, cardstock-only tile-base solution, as well as a new type of tile clip for joining walls at 90-degree angles. As a bonus, the skull pile I created for the Halloween Hoard is also included with the corner clips. Unfortunately, I spent all of today's work time ironing out imperfections in the corner clip that didn't become apparent until it was textured and I was trying to add cut and fold lines for publication. So there are no instructions for the new pieces in the 2.5a version of the PDF. I'll get instructions and illos added as soon as I can, probably within 24 hours. In the meantime, I think everyone at this forum is enough of a papercrafter to figure out how to cut, fold and glue these two simple pieces without instructions, and I wanted to make the new version available before the weekend ended. Thanks for your continuing interest! |
|
|
|
Post by Vermin King on Oct 2, 2016 4:28:49 GMT -9
I either need to be more awake or will at least need to see an image of a partially completed clip to check it out
|
|
|
|
Post by jeffgeorge on Oct 2, 2016 10:03:10 GMT -9
I either need to be more awake or will at least need to see an image of a partially completed clip to check it out Ask and ye shall receive. Corner clip, cut out and pre-folded: 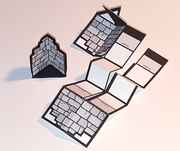 Corner clip in "play": 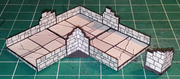 While trimming this one out this morning, I discovered a tiny misalignment in the fold lines, which I will correct in the next update. The fold line that is out of place is the dashed fold line above the inner stone face panel (the horizontal, sticky-outy bit of the overall "L" shape). To score that fold, just align your ruler with the fold line below the panel, which extends to become the cut line between the two triangles that form the structural connector between the two stone sides of the clip. The upper fold line is about a half a millimeter too close to the vertical part of the overall "L" shape of the piece. My apologies for the error; this is why we go through a testing process, of course.
Update:I have fixed the misaligned fold line in the corner clip (it had been drawn on the wrong guideline in GIMP), and uploaded a new version of the PDF, Dungeons of Olde Development version 2.5b. Fixing this fold line is the only change between this version and the previous, 2.5a. |
|
|
|
Post by Vermin King on Oct 2, 2016 10:27:49 GMT -9
Thank you, sir
|
|
|
|
Post by jeffgeorge on Oct 2, 2016 11:03:12 GMT -9
|
|
|
|
Post by Vermin King on Oct 2, 2016 11:23:48 GMT -9
As I no longer have a group for gaming, I have another motive ... I'm thinking that the clips and short walls might be adapted to railings, fences, and ruins.
|
|
|
|
Post by jeffgeorge on Oct 2, 2016 12:58:33 GMT -9
As I no longer have a group for gaming, I have another motive ... I'm thinking that the clips and short walls might be adapted to railings, fences, and ruins. OK, I'm curious. I would have thought the clips are only useful if you need to reconfigure your walls or fences on a regular basis, as part of a modular set. What non-gaming application have you come up with for clippable terrain elements? If you're doing dioramas or vignettes, why not just make the wall or fence as long as you need it, and glue it in place wherever it goes? |
|
|
|
Post by Vermin King on Oct 2, 2016 13:09:17 GMT -9
Storage.
Like all the folks who like fold-flat, this would possibly be a way of connecting fencing, railings, ruins that can break down for storage.
At least its an idea
|
|
|
|
Post by jeffgeorge on Oct 2, 2016 19:47:29 GMT -9
I've just uploaded Development version 2.5c of the Dungeons of Olde pdf to Dropbox. At this point, I'm locking down the features--nothing else will be added to the set without a really compelling reason. I've completed a (very wordy) draft of the instructions for all models in the set, so anyone willing should be able to build them now. I'm going to let this version sit out there for you guys to comment on for a week or so before making any further changes. I eagerly await any and all input. I anticipate that the main remaining task on the set before wider release is to go after the instruction text like the Texas Chainsaw Editor. After that, I'll consider doing a graphical redesign on the document (the text and layout, not the pieces of the set), and then decide if its ready for OBS. Continuing thanks to everyone who's commented, critiqued, advised, and enthused about this project. Your guidance and support is very much appreciated! --Jeff |
|
|
|
Post by sunraven01 on Oct 11, 2016 4:14:25 GMT -9
Hey Jeff, As someone who just spent two solid days of making a pretty nice encounter piece of Wyloch-style modular tiles for a one-shot game, I wish I had seen this earlier. I will be experimenting with your designs today.  Do you have any shots of a larger build (rather than two-or-three tiles. I'm curious how the thickness of the folded card stock walls affects grid alignment over a 20-30 piece build. Edit -- scratch that. I just built a few test tiles and answered my own question. The folded card stock wall is only a double layer above the tile (and a single layer at tile-side level, due to the wrapper) so there is no mathing error to be propagated. It's a very pretty "finished" look with the wrapper, but it does add time to the tile construction. I do like this design, a lot! |
|
|
|
Post by jeffgeorge on Oct 11, 2016 13:28:04 GMT -9
Hey Jeff, As someone who just spent two solid days of making a pretty nice encounter piece of Wyloch-style modular tiles for a one-shot game, I wish I had seen this earlier. I will be experimenting with your designs today. Do you have any shots of a larger build (rather than two-or-three tiles. I'm curious how the thickness of the folded card stock walls affects grid alignment over a 20-30 piece build. Edit -- scratch that. I just built a few test tiles and answered my own question. The folded card stock wall is only a double layer above the tile (and a single layer at tile-side level, due to the wrapper) so there is no mathing error to be propagated. It's a very pretty "finished" look with the wrapper, but it does add time to the tile construction. I do like this design, a lot! So glad to hear they're working for you. I hadn't thought about them being directly compatible with Wyloch tiles to the point of being able to put them on the table together in a single set-up, but I can't see why they wouldn't work together physically. The stylistic difference would be a matter of taste, of course. Now that I've got the system down, I can assemble a tile in about five to eight minutes, depending on how many walled sides the tile has. This doesn't include printing time, or prepping the foamcore squares or the optional labels (which I do about 10-12 at a time to make it faster) but does include cutting out with an X-acto, scoring for folds, and gluing in place. That might sound like a lot, but I do it with YouTube gaming vids streaming, and by the end of an episode of Drunkens and Dragons or Critical Role, you've accumulated a respectable stack of tiles. I've set up layouts that involve 20-30 tiles, and I have found the thickness of the cardstock wrapper to be negligible. I don't imagine that it would be any more of a problem if you covered a whole table top with them. In the medium to long term, I plan to set up a table specifically for photography, with good flash equipment and a "real" camera. When I do that, I'll be setting up a variety of layouts, so show the versatility of the set. Incidentally, the pics I've posted and used in the PDF to date were shot with my phone on my desk, which worked much better than I expected, but aren't really good enough for promotion or illustration in a version I plan to charge money for. I've got a staircase almost ready for release, which will ultimately be included in the fold-flat stair collection oldschooldm is putting together. I'll post it here for the Cardboard Warriors as well, though I don't plan to include it in the free Basic Dungeon set when it's released. Instead, it will be part of the larger Classic Dungeon set, which will also include angled walls, curved walls, pits, single-space passages, and a few larger tiles (such as double-length corridors and 4-space-square field tiles). If I don't post the staircase in this thread, I'll edit a link to it in this post. If you have any questions or comments on the set, please post them here, or send me a direct message through the forum. In the meantime, enjoy! PS: Literally nothing would thrill me more than seeing a pic or two of Dungeons of Olde tiles that someone else has assembled, or better yet, is actually using in play. Just saying... |
|
|
|
Post by jeffgeorge on Oct 11, 2016 23:26:44 GMT -9
After a painful struggle against Scribus, here (I hope) is a working PDF of a set of stairs for the Dungeons of Olde tile set. Here you can see them in play: 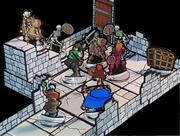 These were created for the Stone Soup Stairs project by oldschooldm , and are offered here for any of the Cardboard Warriors community who are trying out the tile set. They won't be included in the official free Basic Dungeon set when it's released, but will be part of the larger Classic Dungeon set, which I hope to sell for a modest price at OBS. |
|
|
|
Post by sunraven01 on Oct 12, 2016 3:00:00 GMT -9
Hey Jeff, As someone who just spent two solid days of making a pretty nice encounter piece of Wyloch-style modular tiles for a one-shot game, I wish I had seen this earlier. I will be experimenting with your designs today. Do you have any shots of a larger build (rather than two-or-three tiles. I'm curious how the thickness of the folded card stock walls affects grid alignment over a 20-30 piece build. Edit -- scratch that. I just built a few test tiles and answered my own question. The folded card stock wall is only a double layer above the tile (and a single layer at tile-side level, due to the wrapper) so there is no mathing error to be propagated. It's a very pretty "finished" look with the wrapper, but it does add time to the tile construction. I do like this design, a lot! So glad to hear they're working for you. I hadn't thought about them being directly compatible with Wyloch tiles to the point of being able to put them on the table together in a single set-up, but I can't see why they wouldn't work together physically. The stylistic difference would be a matter of taste, of course. Now that I've got the system down, I can assemble a tile in about five to eight minutes, depending on how many walled sides the tile has. This doesn't include printing time, or prepping the foamcore squares or the optional labels (which I do about 10-12 at a time to make it faster) but does include cutting out with an X-acto, scoring for folds, and gluing in place. That might sound like a lot, but I do it with YouTube gaming vids streaming, and by the end of an episode of Drunkens and Dragons or Critical Role, you've accumulated a respectable stack of tiles. I've set up layouts that involve 20-30 tiles, and I have found the thickness of the cardstock wrapper to be negligible. I don't imagine that it would be any more of a problem if you covered a whole table top with them. In the medium to long term, I plan to set up a table specifically for photography, with good flash equipment and a "real" camera. When I do that, I'll be setting up a variety of layouts, so show the versatility of the set. Incidentally, the pics I've posted and used in the PDF to date were shot with my phone on my desk, which worked much better than I expected, but aren't really good enough for promotion or illustration in a version I plan to charge money for. I've got a staircase almost ready for release, which will ultimately be included in the fold-flat stair collection oldschooldm is putting together. I'll post it here for the Cardboard Warriors as well, though I don't plan to include it in the free Basic Dungeon set when it's released. Instead, it will be part of the larger Classic Dungeon set, which will also include angled walls, curved walls, pits, single-space passages, and a few larger tiles (such as double-length corridors and 4-space-square field tiles). If I don't post the staircase in this thread, I'll edit a link to it in this post. If you have any questions or comments on the set, please post them here, or send me a direct message through the forum. In the meantime, enjoy! PS: Literally nothing would thrill me more than seeing a pic or two of Dungeons of Olde tiles that someone else has assembled, or better yet, is actually using in play. Just saying... Well, here's what I can tell you as an experienced papercrafter, terrain assembler and DM: I can print and cut out Wyloch-style tiles and get six tiles out of a single sheet of paper. Something like this, where I used foam core for the base, and 1/4 inch balsa wood sticks for the walls, but I can only get that many if I don't do side wall texturing. I've left it black, as I would have if I had made the walls out of a single thick mess of foam core.  Your system fits at most two tiles per sheet of paper, and if I need to make a bunch of walled tiles, not field tiles, then it's one per sheet. That isn't necessarily a deal breaker -- it puts you on par with WWG or FDG, and I've certainly spent enough money on their products hahah! It is something I think about though because I prefer to use photo paper rather than card stock. What I prefer about your approach to the Wyloch-style is the "zero thickness" walls, which is why I preferred TLX to FDG walls as well. I will confess that your art is not to my taste, but it's easy enough for me to replace it in Photoshop with the WWG textures that I prefer. I've already made a few templates for myself. The clip on walls and connectors are quite clever. This is a big mark in the "pro" column for me. Finally, you should be aware that where your system will break down is on 1 square = 5 feet maps. It's impossible to creat a 15-foot wide room or corridor without adding 1-square wide pieces. This is not a deal breaker at all, but something for you to keep in mind as the system creator. |
|
|
|
Post by jeffgeorge on Oct 12, 2016 10:36:36 GMT -9
sunraven01 , thanks for your feedback. Your system fits at most two tiles per sheet of paper, and if I need to make a bunch of walled tiles, not field tiles, then it's one per sheet. That isn't necessarily a deal breaker -- it puts you on par with WWG or FDG, and I've certainly spent enough money on their products hahah! It is something I think about though because I prefer to use photo paper rather than card stock. I get what you're saying about 1-2 tiles per sheet of paper, and there's not much I can do about that so long as the system involves double-thick cardstock walls. Frankly, those walls--and the clip-on system that works with them--is what makes Dungeons of Olde something other than just another set of flat printable gridded game maps. If you cut out the walls, you can get lots of tiles on a sheet, but if that's what you want, Inked Adventures has a full line of beautiful flat terrain with a similar art style. I hear what you're saying about photo paper, and I can see using photo paper for figures, but for terrain, it's just too expensive for my budget. I find printing on the 110 lb. white cardstock--which is a very smooth stock, though not coated in any way--gives very good results, especially if you give them a light coat of satin or glossy clear sealant once they're assembled. Modular dungeon tiles are likely to get used pretty hard anyway, manipulated with greasy, Dorito-dusted fingers, and spilled or dripped on with a variety of beverages, so going with less expensive cardstock and waterproofing it with sealant seems like a reasonable approach to me. What I have tried to do is lay out the pages so that even though it's not possible to print more than one or two tiles per page, there is at least something useful to print in the margins, so the paper isn't wasted. Wherever possible, the margin items are clips. If you start to lay out very many dungeons with these tiles, you quickly find that you just can't have too many of the straight clips--you don't need them at every single joint, but the more you use, the more stable the dungeon becomes. I figured that kitbashing would eventually happen. I can certainly try working with more photorealistic textures, if there seems to be demand for it. For the first round of development, however, I wanted the tiles to be visually compatible with the paper minis from so many of the artists in the Cardboard Warriors community (too many to name here!), and a pen-and-ink, comic-booky look seemed to fit best--not to mention the fact that I own these original textures outright, without having to worry about rights. I can see how it might look a bit odd with traditional 3D metal or plastic minis, especially painted ones. Thanks. As I mentioned above, the clips and clip-on accessories, along with the zero-thickness walls, are the defining features of the system in my mind. Of course, if you are printing tiles without walls, or gluing untextured balsa or cardboard walls to the sides, you're making your own tiles with DoO textures, not making DoO tiles. This isn't so much a "break down" as a "more to come." The six tile configurations in this beta-build set are intended to handle graph-paper maps drawn at 1 square = 10 feet, obviously. Previous posters have called for larger tiles (4 squares by 4, most commonly), and while you're the first that's asked for smaller tiles, it's an issue I've considered as well. Making 1 x 2 tiles is obviously only an issue of cutting out two squares from the existing designs, though it does introduce a lot of potential new wall configurations that have to be dealt with--more than are necessary with 2x2 tiles, since a single-wall tile with a wall on the long side is different from one with a wall on the short side, for example. Also, when tiles this lightweight get that small, they get pretty vulnerable to player sneezes. I have tile designs that put two dungeon squares and two blacked-out impassable squares on a single 2x2 tile, with walls to make either a single-square-wide corridor (walls on either side), or with a single wall down the middle of the tile, to make a room 1 square wider (making a 15-foot-wide room possible). With layered PDFs, it would be easy to make one layer offer passable dungeon tiles on both sides of a wall down the middle of a 2x2 square tile, making it possible to put back-to-back 15-foot-wide rooms in your dungeon. I think this will work better with the overall 2x2 configuration of the system, and possible require fewer extra tile configurations, but I need to build some tiles and experiment with them on the table to see what works, and what's worth the effort for the user to assemble. In any case, as I've mentioned, the set that you can currently download will eventually be a sort of free introductory pack, with just the six core 2x2 tile configurations. A full set, which users would need to pay for, would include many more tile configurations, including tiles for 5'/single-space needs. Thanks again for the valuable input. I'll continue to mull over what you've said, and try to come up with more ideas to address the issues and needs you've raised.
|
|
|
|
Post by sunraven01 on Oct 12, 2016 12:47:49 GMT -9
I definitely disagree with you about the quality of cardstock prints. I use 110lb card stock for test builds or terrain given away as a gift. The difference in print quality between the card stock and matte photo paper is night and day. You say "very good;" I say adequate.  Card stock on the top; Epson Premium Presentation Paper Matte on the bottom. Kitbashing was going to happen anyway, even if I wasn't replacing your textures. You wrap your stone texture around to the bottom of the tile, which is a waste of printer ink for something no one will see and can't be used in play. I also magnetize my tiles, so while your clever clip design will get plenty of use for doors, traps, and things like wall torches, I don't need to print clips on the pages for keeping segments together. It also got removed to save printer ink. Reconfiguring the layout also gave me the ability to fit 3 field tiles on a page, super useful for surface streets. I would certainly characterize my test builds as DoO tiles, since they use your geometry. It sounds like you mis-read or misunderstood what I wrote previously. |
|
|
|
Post by jeffgeorge on Oct 12, 2016 14:14:53 GMT -9
sunraven01 : Your tiles look great. I'm glad the design is helpful to you. Regarding the difference between cardstock and photo paper, I see what you mean, but I get a pretty similar "upgrade" to the cardstock tiles by spraying them with a glossy sealant, with the added benefit of at least partial waterproofing. Maybe the difference matters more with a photorealistic or painterly texture than with the pen-and-ink style texture I've used, but to each his own. I'll seriously consider reducing how far the texture wraps to the underside of the tile--I take your point about wasting ink on the side no one will see during play. With your kitbash, you have the luxury of knowing exactly how thick your base core material is going to be. I'm trying to allow for foamcore or other materials of varying thickness, so I can't be quite as precise or efficient as you have been--but I may well be able alter the underside texture coverage and still have a margin for error in base thickness. Regarding whether they are DoO-style tiles--I guess I misread your post. I thought you were doing away with the upright, half-height, zero-thickness walls, along with the clip-on accessories they support, and replacing them with walls of a different design. If you keep the walls and clip-ons, they definitely are DoO style tiles. The other component of the eventual "full" set of Dungeons of Olde tiles--aside from additional tile configurations and sizes--is an array of clip-on accessories, including doors of different sizes and designs, torches in sconces, manacles attached to the walls, runes on the walls, alcoves with items, cracks or holes in the walls, collapsed stonework, all the typical dungeon tropes. So yes, I plan to fully exploit the clip-on design to make the set worth paying for, and those items will be sprinkled about on the pages in the spaces where a full tile won't fit. Again, thanks for your suggestions, and for your picture. I'm continuing to think and work on the set.
|
|
|
|
Post by nolabert on Oct 13, 2016 5:09:33 GMT -9
sunraven01 sometimes I think this forum causes me more stress than I need I just did a print using Epson Matte Paper of bravesirkevin 's latest minis "A Touch of Darkness" and yes the Epson paper is significantly brighter and more vibrant (I used Kev's minis because his minis have so much detail) than cheap cardstock. But I'm thinking of this from a cost-benefit analysis. I've been making paper craft since Feb. for gaming, specifically for DMing my D&D 5E campaign. Since that time, I've used 1.5 packs of cheap 110 lb Staples cardstock for making my terrain and minis. That's about 375 sheets (some of those sheets is because my wife also uses the paper for making paper automaton models--the reason we have the Epson Matte Paper to begin with). The Epson paper is signficantly more expensive than the 110 lb cardstock (only 50 sheets per pack rather than 250). I haven't built up the minis I printed on the Epson paper, but since it's thinner, I'm a little concerned about it's durability as compared to the 110 lb cardstock. I know some people add an additional layer to their paper minis. But I'm not going to do that because it would take too much time--I cut by hand using an X-acto knife. I've been hoping to try out Krylon Satin Finish on my cheap cardstock prints, but we've been really humid where I live since August (ideal conditions as stated on the can is 70-80 F with low humidity--there may be one month out of the year that we have conditions like that here--I'm not doing all my paper craft in that one month). I'd rather dull prints than frosted prints. I'm also thinking about my use of paper craft from a cost-benefit analysis. I do this for gaming. I don't build dioramas or models that go on my shelves. I play with a good group of players with two others who regularly DM (so we alternate our campaigns to prevent burn-out). I'm the only one that uses paper terrain or terrain of any sort. The other two use the standard Chessex tan battlemat that they draw on with wet erase markers. One of them sometimes gets lazy and doesn't even bother to use minis (which he does own) during encounters, instead using tokens because it's easier. My players definitely love the paper terrain--encounters regularly produce Wow! Responses from them. I'm not against theater of the mind but it's no comparison to terrain to help accentuate the imagination. So, what I'm saying is that I'm going to stick with the cheap 110 lb Staples cardstock, at least for terrain. If the Epson paper seems durable enough for minis, maybe I'll switch to that for the minis.
|
|
|
|
Post by Vermin King on Oct 13, 2016 5:25:29 GMT -9
I definitely understand the humidity issue, which is one of the reasons why I use the clear coat. I have my projects laid out on what I am going to spray. Then I give the can 120 shakes. Go outside and give it an upside down spray to make sure the nozzle is clear. Go in and give another 20 or 30 shakes and grab the first page I plan to give a light spray. Outside time is just a few seconds.
It is often humid in KC, too, and I've noticed that when it is really humid (dew point above 70 degrees), card gets fuzzy when you do the cuts, unless I have clear coated.
And I stick with cheap to medium grade cardstock, too. During the summer, when it is really humid, I switch to the medium grade, to limit the fuzzy cuts and delamination issues.
|
|
|
|
Post by sunraven01 on Oct 13, 2016 5:35:46 GMT -9
The Epson paper is signficantly more expensive than the 110 lb cardstock (only 50 sheets per pack rather than 250). I haven't built up the minis I printed on the Epson paper, but since it's thinner, I'm a little concerned about it's durability as compared to the 110 lb cardstock. I know some people add an additional layer to their paper minis. But I'm not going to do that because it would take too much time--I cut by hand using an X-acto knife. I've been hoping to try out Krylon Satin Finish on my cheap cardstock prints, but we've been really humid where I live since August (ideal conditions as stated on the can is 70-80 F with low humidity--there may be one month out of the year that we have conditions like that here--I'm not doing all my paper craft in that one month). I'd rather dull prints than frosted prints. Hey Nolabert! I've been using the Epson paper (with both OEM Epson ink and 3rd party ink) for ... years. I could tell you how many years, but the WWG forums are down so I can't say when I subbed over there, but it's at least four years, and probably more like six. I've used it for FDG-style 3D box walls, I've used it for TLX builds, I've used it for miniatures, I've used it for FDG Ravenfell buildings, I've used it for everything. I can unequivocally tell you it does not suffer for durability, and I don't use varnishes or sprays. My players are adults, and we eat at the gaming table (though I admit it's more baked brie and crackers with wine than Doritos with Mt. Dew), so I don't have to worry about little kids or messy hands. For gamers with that challenge, I bet the varnishes make a whole lot of sense. I, also, do not have a paper cutter. Everything I've done in 4 years, and I have done a LOT of terrain, has been done by hand. As for cost, I don't remember the last time I bought the Epson paper at Staples and it WASN'T on sale at 2-for-1, including this weekend when I bought two new packs. That brings the cost down significantly, to an average of 13 US cents per page. Still more expensive than the 250-pack of card stock (which I also have on hand), but it's not like I'm printing this stuff on gold leaf, at least. |
|
|
|
Post by wisdomknight on Oct 13, 2016 9:38:13 GMT -9
Wow this system is great! i love what you came up with to connect the tiles!
And the stylized art is top notch man! congrats
|
|
|
|
Post by nolabert on Oct 13, 2016 9:41:15 GMT -9
sunraven01 ok. You've convinced me to give the Epson paper more of a go. And thanks for cluing me in to the regular sales at Staples of Epson papers.
|
|


 Do you have any shots of a larger build (rather than two-or-three tiles. I'm curious how the thickness of the folded card stock walls affects grid alignment over a 20-30 piece build.

