|
|
Post by jeffgeorge on Oct 13, 2016 14:48:13 GMT -9
Wow this system is great! i love what you came up with to connect the tiles! And the stylized art is top notch man! congrats Thanks! Enjoy them, and if you're actually using them, check back from time to time--I'll post more bits and pieces along the way as the full set develops. |
|
|
|
Post by wisdomknight on Oct 13, 2016 15:59:02 GMT -9
looking forward to them Jeff  |
|
|
|
Post by sunraven01 on Dec 23, 2016 6:01:32 GMT -9
Hey Jeff -- I'm back to playing with your tiles again (yay, paper crafting time over the holidays) and I have to tell you there is so much I love about your design. The more I tinker with them, the more I appreciate how brilliant it is. Have you put these up for sale somewhere yet? I want to throw some money at you!
|
|
|
|
Post by jeffgeorge on Dec 24, 2016 14:11:57 GMT -9
Wow, thanks for the kind words, sunraven01 ! I got a bit stuck trying to decide which way to go with them--stick with the pen-and-ink look, or shift to a more painterly or photo-realistic style--and then back-burnered them while I pondered. I suppose I could do a multi-layer PDF with both pen-and-ink and photorealistic textures, but I wasn't sure if the extra work would increase the appeal enough to justify the effort. I was also thinking about what should be included in a more complete set. There seemed to be some interest in having some larger pieces, and I was considering adding a 4x4 field tile (when I say 4x4, i mean 4 spaces by 4 spaces), a 2x4 field tile, a 2x4 single-wall tile, and a 2x4 corridor tile (walls on the long sides, of course). I also have plans or prototypes for 45-degree walls (from corner to corner on a 2x2 tile), quarter-circles on 2x2 tiles, and half-circle corridor ends on 2x2 tiles. I'd want to add more clip-on accessories, too, including additional door varieties, holes in the wall, spider webs, ladders, shelves or alcoves on the walls (to hold an urn, for example). I have made stairs going up already--I think those are linked in this thread somewhere--and I have an idea of how to do stairs going down, as well as pits in the floor, where the base core would be cut away to allow there to be a depression to represent the pit or stairwell. I think I'd want to keep the core set under $5, and then add small expansions for $2-3. (I personally find the $10-$15 price points for the admittedly larger Fat Dragon EZ Dungeon sets to be a barrier to entry into their system--I'm not saying there isn't enough in their kit to merit the price, but that $15 for the core set is too much to expect someone to pay for their first purchase into the system.) My plan had been to offer the basic set, with the same pieces in the PDF I shared here, as a free intro, with a more elaborate and complete set for sale for something like $5. The question is, how much more should be included with the $5 "full set" in order for buyers to feel like they'd gotten a good value? Or do I give the basic set for free, and blow off the "complete set" entirely? In this plan, I'd keep the basic set very basic--just the pieces in the Cardboard Warriors download--and put the larger pieces, special tiles (curves and diagonals), stairs up and down, and a wide variety of clip-on and stand-up scenery, as a series of $3 add-on packs? Eventually, I'd want to add sets with different textures, too--sewers, caverns, Egyptian, building interiors, etc.-- all of which would be expansion sets. Any thoughts or suggestions as to how to configure the sets to best appeal to RPGNow/DriveThru customers, anyone? |
|
|
|
Post by sunraven01 on Dec 24, 2016 14:20:22 GMT -9
I would want the pieces necessary to do both 1sq=5ft or 1sq=10ft at a bare minimum. That means 1x1, 1x2, and 2x2, with field, one wall, two wall, corner, dead-ends, and L-walls (corners with one short leg).
I would use YOUR art, and if people want to kitbash for another style, let them do that work for themselves.
You don't have to be everything to everyone and WWG didn't offer cartoony graphics just because some people liked it. They had their own style and went with that. They standardized on a 3" and 6" size for TLX, and only added diagonal and curved walls late in the game.
|
|
|
|
Post by cowboyleland on Dec 26, 2016 6:56:50 GMT -9
Any thoughts or suggestions as to how to configure the sets to best appeal to RPGNow/DriveThru customers, anyone? I am super cheap and therefore am currently enthusiastic about super cheap tiles that I make myself with pencil on scraps of cardstock so I am not actually a potential customer, but I would guess that a layer that was not obviously cartoony would about double the appeal of your system. Lots of people like the cartoony look but I think most are looking for something more realistic to match the broadly available minis and props. Also, maybe a very basic "pay what you want" starter set is an option. Lots up people may take it for free, but those who want to encourage you to expand your offerings can easily give you a monetary incentive. Just my two cents (and I'm so cheap, that's probably all you're gettin.'  ) |
|
|
|
Post by whisper31 on Dec 26, 2016 21:47:18 GMT -9
IMHO, I would go with what you have for a free intro set, then you can do the multi-layer pdf's for the $5 price. I think a few extra "props" might be included in the pay set. This way, if they don't want to pay for your work, they can have the set that you have already produced and distributed. If they would like to get the pumped up set, they can part with a small amount of cash for your efforts. I would put the angled tiles and the circle tiles in an expansion and add a few tiles that would allow for a larger, circular room (say maybe 6 space diameter). You can always throw in a page or two of accessories with each expansion as well for a rounded out expansion. As your basic set is, I wouldn't have a problem dropping $1.50 - $2.99 for it. As stated above, the purchased core set could include the better layers for the tiles and clip-ons, and maybe the larger tileset that you mentioned. You should probably add a few more choices for stairs as well. Then go on and add on your extra tilesets for $1.99 - $2.99 depending on the amount of time and size of the expansion. As for some future expansions, it looks to me like this system could also be useful in the Sci-Fi/Near Future genre with just a little tweaking (replace the stone floor with catwalk grating and the walls with brick or paneling). Something like this: 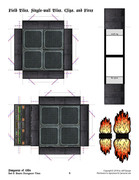 I did this in about 5 minutes with GIMP and borrowing from Christopher Roe's GunCrawl set Your work looks really great, man! Keep up the good work and good luck to you with the selling aspect! |
|
|
|
Post by jeffgeorge on Dec 28, 2016 7:27:51 GMT -9
Thanks for the responses, gang. Sorry to be so long responding--the holidays and all. I'll reply to each post individually, since you all raise good points and ideas.
|
|
|
|
Post by jeffgeorge on Dec 28, 2016 7:45:47 GMT -9
I would want the pieces necessary to do both 1sq=5ft or 1sq=10ft at a bare minimum. That means 1x1, 1x2, and 2x2, with field, one wall, two wall, corner, dead-ends, and L-walls (corners with one short leg). The standard scale for the tile set as it stands is roughly 5 feet per square, with each tile (so far) being 2 squares by 2 squares. Are you asking for tiles that let you do 5-foot-wide corridors? I feel like in order to keep to the 2.5" tile size, tiles that represent 5-foot-wide corridors should be still be made 2 squares by 2 squares--smaller squares would get really light and fiddly on the table. That complicates the tile configurations a bit, because the simple tile shapes in the basic set (field, single-wall, corridor and corner, three-walls and four-walls) are no longer sufficient for all possible connections. In fact, I shifted from the original tile size of 4 squares on a side to 2 squares because of the complications representing 10-foot corridors on 4-square tiles. That being said, I think a simple set of 5-foot corridors on 2-square-by-2-square tiles would be sufficient for most situations. The three tiles you'd need would be a straight corridor (a tile with two corridor spaces and two impassible, solid-rock spaces), a "tight-L" (one open corridor space and three solid-rock spaces), and a "wide-L" (three open corridor spaces, and one solid-rock space). Since these tiles could be rotated, you could handle corridors on either the right or left side of the tile, as well as turns to the right and to the left. I think I'd leave the ends open, and figure people could butt them up to walled 10-foot tiles to hold the clip-on doors and such. I might also include standee versions of doors and wall sections, so people can add them where necessary. That's a new thought, so let me ponder it... In any case, would this address your interest in "1sq=5ft" tiles? Or am I misunderstanding what you're looking for? I appreciate your support of the "artist's vision" here, but I fear that most potential buyers on DTRPG are not nearly as likely to kitbash and customize as the members of this forum. I do think there may be added appeal in including a more photorealistic texture option. Whether that's a layer on the existing set, or a separate product, I'm not sure. This is good advice, regardless of what I just said. I have a really hard time keeping the perfect from becoming the enemy of the good. |
|
|
|
Post by Vermin King on Dec 28, 2016 8:17:18 GMT -9
Every designer that I have spoken with says perfect is never going to happen. They come up with 'acceptable', and get it to 'happy with' and call it good. Those two phrases actually came from a conversation I was having with someone, but I don't remember who. I wish I could remember so I could give them credit
|
|
|
|
Post by sunraven01 on Dec 28, 2016 12:18:56 GMT -9
The standard scale for the tile set as it stands is roughly 5 feet per square, with each tile (so far) being 2 squares by 2 squares. The standard scale for this style of tile set, based on Wyloch's 1.25" grid tiles, is that one map square = 10 feet, as seen here. This allows for faithful reproduction of any map where 1 square = 10 feet. However, modern map scales, particularly for fantasy RPG games, are based on 1 map square = 5 feet. That means the 2x2 Wyloch tiles cannot be used to faithfully reproduce maps at that scale, without the introduction of 1x1 and 1x2 tile pieces, which is a limitation he acknowledges in his introductory video, starting at 7:30m. If I'm going to have to make interpretation maps to use the 2x2 Wyloch tiles with a 1 square = 5 foot map scale, then I'm just going to continue to use the 3" and 6" WWG pieces I have already invested crafting time in creating, rather than moving to a new terrain system that ALSO doesn't allow me to faithfully recreate modern maps. |
|
|
|
Post by jeffgeorge on Dec 28, 2016 15:12:09 GMT -9
I am super cheap and therefore am currently enthusiastic about super cheap tiles that I make myself with pencil on scraps of cardstock so I am not actually a potential customer, but I would guess that a layer that was not obviously cartoony would about double the appeal of your system. Lots of people like the cartoony look but I think most are looking for something more realistic to match the broadly available minis and props. I think you are possibly quite right about this...but pen-and-ink is the art style I have close to ready to go, and that I am most comfortable with already for future expansion. So I may go with the current style for early releases, and add more "realistic" textures as additional layers in an updated version of the set(s), or as a separate product. A free or PWYW starter set was always my plan. My sense is, someone who downloads the basic set for free, and never buys anything else, wasn't going to buy the starter set if it cost money, so I haven't lost a sale...and maybe one of his friends will see the tiles on his table, and get interested. So, free starter sets are cheap marketing, really. The concern I have is that someone who sees the "free" set as PWYW might hesitate to download it for free, and then not get drawn into the rest of the line. The only question is whether its better to list the basic set as officially, only free, and give up whatever money that PWYW might have brought in, or list as PWYW, and lose some downloads by people who don't feel like they should download it for free if you list it so that they could pay an optional price for it. I'd love to hear anyone's thoughts on that topic... Your two cents are very valuable. Thanks for sharing them! |
|
|
|
Post by chiefasaur on Dec 28, 2016 16:17:18 GMT -9
I dig the illustrative style of these, but, that's because it lines up well with my style, so, I'm biased  |
|
|
|
Post by jeffgeorge on Dec 28, 2016 16:18:46 GMT -9
The standard scale for the tile set as it stands is roughly 5 feet per square, with each tile (so far) being 2 squares by 2 squares. The standard scale for this style of tile set, based on Wyloch's 1.25" grid tiles, is that one map square = 10 feet, as seen here. This allows for faithful reproduction of any map where 1 square = 10 feet. However, modern map scales, particularly for fantasy RPG games, are based on 1 map square = 5 feet. That means the 2x2 Wyloch tiles cannot be used to faithfully reproduce maps at that scale, without the introduction of 1x1 and 1x2 tile pieces, which is a limitation he acknowledges in his introductory video, starting at 7:30m. I went back and re-watched the Wyloch video you linked, and you're right, he does list the scale as 10' to a "square"...but I'm pretty sure he's talking about 10' to a square on graph paper for the DM's map, which was definitely the standard in early D&D products. At about 2:45 in this video, he references Dwarven Forge and Hirst Arts terrain, demonstrating how each 2-inch-square terrain tile represents 10 feet on a side, holding four 5-foot-square game spaces. His discussion continues, making it clear (to me, at least, though I could be mistaken) that each tile is 10' on a side, and each space is 5' on a side. At 7:50 or so, he mentions a "narrow, one-square-wide hallway." In this case, he's using "square" to mean a 5'x5' game space, not a 10'x10' tile or GM map square--I can tell because he's talking about losing 1/4" of wall thickness on each side of the 1-space-wide corridor, leaving just 3/4" between the walls, which won't fit most modern miniatures. (I mentioned how I'd handle 5-foot-wide corridors in a recent post, placing single-space-wide corridors on 2x2 tiles, with straight, tight-L and wide-L tiles handling almost all of the possible dungeon configurations.) On page 192 of the D&D 5e Players' Handbook, in the box titled "Variant: Playing on a Grid," the rules clearly state, " Squares: Each square on the grid represents 5 feet." This has been the case for D&D tactical maps as long as I've been around the game, since about 1979--the scale on the GM's dungeon map was usually 10' to the square, but on the tactical battle map, each square space was 5 feet on a side. This tactical scale is roughly consistent with 25-30mm miniatures. I'm confident that Wyloch, DM Scotty, and the rest of the YouTube crafting crew are working at this scale, with 5 feet to the space on the tactical map. I am pretty sure the confusion here is coming from all of us--including Wyloch himself--using the word "square" in more than one way. Whether you're talking about Wyloch, Dwarven Forge, Hirst Arts, or Dungeons of Olde, they are all working on the same system, with square tiles that are 10' on a side, and square game spaces that are 5' on a side. Each tile consists of a 2x2 grid of game spaces. After going to the WWG site (which appears to be operational at the moment, fortunately) specifically to look at their scale, it looks to me for all the world that they are using the same 1 game space = 5 feet scale that is common throughout D&D-derived roleplaying. Yes, their tiles hold a different number of spaces than do those of Dwarven Forge/Hirst Arts--6x6 spaces or 3x3 spaces, vs. 2x2 spaces for DF and HA--but the basic scale of 5 feet per space is consistent. Where you run into conflict between most systems--including WWG, Fat Dragon, Dwarven Forge and Hirst Arts--and Wyloch's 1.25" grid is that Wyloch's tiles are incompatible with everyone else's--his 1.25" grid doesn't match up with the other systems' 1" grid. The number of feet per space is the same, but the actual size of each space on the table is different. Admittedly, I've set up the Dungeons of Olde tiles to print out at Wyloch's 1.25" per space scale, instead of the more standard 1" per space size. But if you are interested in using Dungeons of Olde tiles with tiles from other systems you already own, you can make them compatible by printing the DoO tiles at 80%. This turns them into 1-inch-per-space, 2-space-by-2-space tiles which should mesh perfectly with tiles from WWG, Fat Dragon, Dwarven Forge, Hirst Arts, DM Scotty, DMG Info, etc. This is mentioned in the instructions in the DoO PDF file, though perhaps it needs to be more prominent. I hope I've understood your point, and addressed it in a meaningful way. It is my intention that the Dungeons of Olde tiles be printable at either 1.25" or 1" per space, whichever suits each customer's needs better. Thanks very much for your continuing input on the development of the Dungeons of Olde tiles! |
|
|
|
Post by jeffgeorge on Dec 28, 2016 16:36:49 GMT -9
IMHO, I would go with what you have for a free intro set, then you can do the multi-layer pdf's for the $5 price. I think a few extra "props" might be included in the pay set. This way, if they don't want to pay for your work, they can have the set that you have already produced and distributed. If they would like to get the pumped up set, they can part with a small amount of cash for your efforts. This makes a lot of sense, and has the added appeal of being fairly easy to accomplish from where I am currently. Yeah, a curves-and-angles expansion is a good idea. As for the big circular room, I already know how to do 2x2 quarter circles, which combined with some single-wall tiles would make a 6x6 room that was sort of a circle with slightly flattened sides. A true, full 6x6 circle, however, would have to be created as a single tile, which can't be created within the printable area on a letter-sized sheet of paper. I've discovered that at my default 1.25" scale, the very largest tile that can be printed as a single piece on a letter-sized sheet is a 4x4, three- or four-wall tile, and that's really pushing the limits of the printable area on most printers. Anything bigger than that would have to be printed as pieces and assembled, which complicates the build. Maybe this big, round room would be included in an expansion of big room tiles...thanks for suggesting it! This is useful information, and encouraging too. Thanks. At this point, I'm starting to think that maybe I'll give the existing set--or something very like it--as a free/PWYW introduction, and then have everything else be a series of very inexpensive ($2-$3) expansions: Angles and Curves; Big Rooms; Stairs and Pits; Ten Traps; Narrow passages; etc. Great idea! Love your kit bash, too! Thanks for the support and the advice! Everyone's input, including yours, has been very helpful! |
|
|
|
Post by jeffgeorge on Dec 28, 2016 16:41:06 GMT -9
I dig the illustrative style of these, but, that's because it lines up well with my style, so, I'm biased Thanks, Chief. I love how your minis look on my tiles, too. Over the past few months, I've grown increasingly fond of manga/cartoon/comic-style paper minis, with yours, okumarts, and 8rad's being excellent examples of the general style. |
|
|
|
Post by jeffgeorge on Dec 28, 2016 16:43:33 GMT -9
Every designer that I have spoken with says perfect is never going to happen. They come up with 'acceptable', and get it to 'happy with' and call it good. Those two phrases actually came from a conversation I was having with someone, but I don't remember who. I wish I could remember so I could give them credit I'm happy enough with the look of the tiles as they stand, though I realize the pen-and-ink style isn't to everyone's taste. I just need to figure out how to put together packages that will appeal to potential customers. |
|
|
|
Post by sunraven01 on Dec 28, 2016 17:01:31 GMT -9
You basically missed my point entirely, and I can't tell if it's because of what I wrote or because you don't understand what Wyloch was explaining in his videos. What is clear to me is you don't grasp the difference between map scales, and until you do, you won't understand the need for more than 2x2 tiles.
You can't make a 15' by 15' room (or any size room that does not end in a zero) using 2x2 tiles, because your minimum tile size is 10' on a side. The only way to make a 15' by 15' room is to have a 1x2 or two 1x1 tiles.
On a map using 1 square = 10 feet, this problem doesn't exist, because all dimensions are a multiple of 10. However, in maps using a scale of 1 square = 5 feet, the 2x2 tile system breaks down any time you have a room dimension that is a multiple of 5 instead of 10. That's basic math.
|
|
|
|
Post by jeffgeorge on Dec 28, 2016 20:06:20 GMT -9
You basically missed my point entirely, and I can't tell if it's because of what I wrote or because you don't understand what Wyloch was explaining in his videos. What is clear to me is you don't grasp the difference between map scales, and until you do, you won't understand the need for more than 2x2 tiles. You can't make a 15' by 15' room (or any size room that does not end in a zero) using 2x2 tiles, because your minimum tile size is 10' on a side. The only way to make a 15' by 15' room is to have a 1x2 or two 1x1 tiles. On a map using 1 square = 10 feet, this problem doesn't exist, because all dimensions are a multiple of 10. However, in maps using a scale of 1 square = 5 feet, the 2x2 tile system breaks down any time you have a room dimension that is a multiple of 5 instead of 10. That's basic math. Yes, going back and rereading the entire exchange, I did misunderstand the point you were making, though I think it's pretty obvious from the text of my response that I understood what Wyloch was saying perfectly well. I see now that when you said "I would want the pieces necessary to do both 1sq=5ft or 1sq=10ft", you were referring to the squares on the maps in published gaming materials, or on the GM's own map, not the squares on the tabletop. The problem was not that I "clearly don't grasp the difference between map scales," it's that I couldn't tell that when you were talking about map scales, you intended to be raising a concern that a terrain set with a standardized tile size lacked the flexibility to handle certain room dimensions. I did not understand that to be your point until your most recent post, in which you make it explicitly. I do understand that you can't make a 15' room with 10' tiles; as you point out, "that's basic math." I was working on the assumption, however, that when someone buys into a terrain system standardized on 2x2 tiles, they are accepting the trade-off that while certain room dimensions will not be possible, the tile grid will always fit together smoothly, because all the tiles are the same size. Introducing odd-size tiles into the middle of the tactical map can easily throw the tile grid off, so that the tiles in one area no longer align with the tiles on the rest of the map. The only exception to room dimensions based on 10'x10' tiles that I had previously considered worth addressing were single-space-wide corridors, which I intend to handle with tiles that are partly passable, and partly impassable, as I explained in a previous post. So your point had nothing to do with map scales, but everything to do with how rigidly the tile system should stick to the 2x2 standard. That it's important to you that a tile system handle rooms with dimensions in multiples of 5 feet, instead of just multiples of 10 feet, is useful information, and I thank you for sharing it. There are several ways that I could address this issue without violating the 2x2 standard tile size, which is a priority for me, though. The simplest approach would be the inclusion of standee wall sections that could be placed to block off one, two, or three spaces of a field tile to make partial tiles, thus allowing for rooms with dimensions of 15', 25', etc. Alternatively, I could design 2x2 tiles that have permanent walls through the middle, dividing them into passable and impassible squares, though it would take several wall patterns to handle all the possible configurations of odd-sized and odd-shaped rooms. I'll certainly give the topic some serious thought, and I can easily imagine an expansion set that handled narrow corridors and partial-room tiles. Your point is a valid one, and well worth considering. I'm sorry if my failure to grasp it frustrated you, or if my misdirected responses gave offense. I infer from your tone that you were upset with me for one of these reasons, or perhaps another reason that hasn't occurred to me. My apologies for upsetting you. |
|
|
|
Post by jeffgeorge on Mar 30, 2017 16:43:52 GMT -9
Been doing some thinking about my tiles, and finally got around to making a prototype for a diagonal-wall tile: 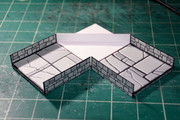 This still made from a single piece of cardstock--it's just a field tile with a diagonal fold across the middle. When finished, it will have two versions: one with flagstone on both sides of the wall, and one with flagstone on one side and blackness on the other. That way, you could put a clip-on door on the version with flagstone on both sides, and have a door in an angled wall. Now that this one is done, I have a plan in mind for a quarter-circle tile, but that one will almost certainly take two separate pieces. Even so, I don't think it will be a very difficult build. I also have ideas for how to do pits and culverts (water running across the tile, or along an edge, like you'd find in a sewer), once I have the round-room tiles ready. Stay tuned... |
|
|
|
Post by jeffgeorge on Mar 30, 2017 21:08:16 GMT -9
Okay, I have prototypes for a 2x2 quarter circle, and a 2x2 45-degree-angle tile. Here they are together, along with the existing corridor tile. (You've already seen the 45-degree tile in a post above.) The blue-shaded area on each tile would be colored black, to indicate that it's solid rock and impassable (although I would include a passable-on-both-sides version of at least the 45-degree tile in the final set; not sure about quarter-circle). 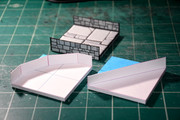 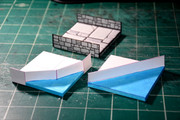 Here are a few views of the quarter-circle tile, clipped into a sample layout with the existing tileset. As you see, it's really a quarter-dodecagon, rather than a circle. 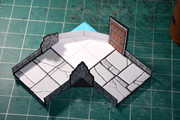 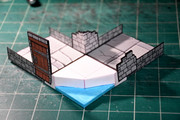 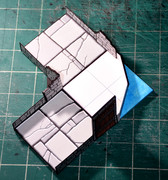 Because it is actually a polygon, this tile can be made with only two pieces of cardstock--one on the inside, to which the walls are attached, and one on the outside, which will be black. I know how to do a smooth circle, but it shares the same problem of any smooth-curve design crafted in paper--at least one more part (for a total of three), lots of tiny tabs, and a tricky build step when you'd glue a smoothly curving wall strip over tabs sticking up from one or both of the floor pieces. I *think* that's more trouble than most people will want to mess with--it would involve 2 or 3 times as many cuts, at least doubling build time. My sense at the moment is that 12 sides is "round enough." (Heck, in World of Warcraft, wagon wheels have 7 sides, or at least they did the last time I played, before the big graphics upgrade a year or so ago.) Any thoughts? |
|
|
|
Post by Parduz on Mar 30, 2017 23:30:59 GMT -9
Because it is actually a polygon, this tile can be made with only two pieces of cardstock--one on the inside, to which the walls are attached, and one on the outside, which will be black. I know how to do a smooth circle, but it shares the same problem of any smooth-curve design crafted in paper--at least one more part (for a total of three), lots of tiny tabs, and a tricky build step when you'd glue a smoothly curving wall strip over tabs sticking up from one or both of the floor pieces. I *think* that's more trouble than most people will want to mess with--it would involve 2 or 3 times as many cuts, at least doubling build time. My sense at the moment is that 12 sides is "round enough." (Heck, in World of Warcraft, wagon wheels have 7 sides, or at least they did the last time I played, before the big graphics upgrade a year or so ago.) Any thoughts? I think you could let the builder decide. To me, you could just design the wall at the "perfect quarter-circle" length, and add three markers: "cut here and here and fold here to make an angled wall"... Tabs, instead, could be designed for the angled wall, and let the builder do the cuts to reduce two big tabs to a number he feels appropriate (I don't get why the curved wall will need one more piece.... ) |
|
|
|
Post by jeffgeorge on Mar 31, 2017 1:47:44 GMT -9
I think you could let the builder decide. I could do that, but it takes two completely separate models to do offer the option. The quarter-dodecagon version shown involves just two pieces of cardstock--one for the interior of the room, which has the floor texture, and one for the "exterior" section of the room (the impassible solid rock). The four wall sections are tabs attached to the floor part, folded over so they are textured on both sides; there are tabs on the sides of three of the walls, which get glued inside the neighboring wall section, making the whole thing quite strong. The outer two wall sections wrap around the foamcore base, and glue to the bottom of the tile, just like the open sides; the middle two wall sections have tabs that fold out flat and get glued down on the top of the foamcore, and are then covered by the black floor piece. It sounds more complicated than it is--it's a really easy build. Well, for the curved-wall model, the wall itself would be only one piece...but you've got to have two more pieces for the floor sections. The main floor section would have to be a quarter-circle of floor texture (flagstone at the moment), edged with a row of LOTS of 1/8" (3mm) wide tabs, which get cut out and folded up for the wall to attach to. The exterior floor section (the impassible solid rock) has a convex quarter-circle cut into it, so that it mates with the flagstone portion. Then the wall section would be a long strip of wall texture, double-high, which you fold over and glue over the tabs--which is awkward, because you're bending a folded-over piece of cardstock that nonetheless has to be opened up enough along its entire length so that the tabs from the floor section can be inserted inside along its entire length. So, with the polygonal version, the wall is broken into sections that can remain attached to the main floor piece, but to make a smooth, circular wall, the wall has to be a separate, continuous piece of its own, the floor needs many more tabs, which are much smaller, meaning lots more cutting time, and a bunch of fiddly little tabs to glue, while wrangling an uncooperative, folded-over strip of cardstock onto them. I haven't drafted the model for the true curved version yet, because I'm pretty sure that most users will find it to be not enough better looking to be worth all the extra trouble to assemble...but maybe I'll give it a shot, and see if it's really as hard to manage as I imagine it will. Keeping the models simple to assemble is a major priority for me on this set; once you have the rhythm down, you can put these things together in less than 10 minutes per tile--way less than the Fat Dragon papercraft dungeon line, for examplt. This curved-wall tile (no matter which version you choose) will be the first one in the line that isn't a single piece of cardstock, and my general tendency is to prioritize ease of assembly over geometric perfection. No matter how it turns out, thanks for the input! |
|
|
|
Post by sunraven01 on Apr 1, 2017 5:47:02 GMT -9
That high pitched sound you hear is me going "squeeeeee!" over the curved tile. That is some CLEVER thinking right there.
I cannot WAIT for you to get this set up for sale.
|
|
|
|
Post by jeffgeorge on Apr 2, 2017 4:38:45 GMT -9
That high pitched sound you hear is me going "squeeeeee!" over the curved tile. That is some CLEVER thinking right there. I cannot WAIT for you to get this set up for sale. Do you mean the true curved-wall tile, or the dodecagon version in the pictures? In any case, for better or worse, this project has bubbled back up near the top of my priority list. I started by extracting textureless nets for the basic tiles from the existing pieces--once you have a net for a field tile and a 4-wall tile, you can very easily make the others by cutting and pasting sides. I also have nets for the diagonal-wall tile and the dodecagon, both shown above. I'm currently working on a revised set of dungeon textures, which should be more painterly, rather than pen-and-inky. Here's a sample of the work as it stands: 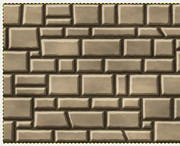 This is just the basic stone wall, without any detailing yet, but it gives a suggestion of the direction I'm going. I'm thinking that I'll offer the basic set of tiles in two versions--the brown stone you see here, and a grey version evocative of the original textures. |
|
|
|
Post by sunraven01 on Apr 2, 2017 5:23:31 GMT -9
Do you mean the true curved-wall tile, or the dodecagon version in the pictures? The dodecagon. Anything to save myself the trouble of hand-cutting a million tiny saw-tooth tabs, as I don't have a cutter. |
|
|
|
Post by jeffgeorge on Apr 2, 2017 6:27:10 GMT -9
Do you mean the true curved-wall tile, or the dodecagon version in the pictures? The dodecagon. Anything to save myself the trouble of hand-cutting a million tiny saw-tooth tabs, as I don't have a cutter. Good answer! I may do the million-tabs version some day just to prove I can, but for now, it's a low priority. Thanks for the continuing support, btw. |
|
|
|
Post by jeffgeorge on Apr 3, 2017 2:35:32 GMT -9
Augh. After spending about 20 hours working on a new, more painterly wall texture and floor texture, watching YouTube texture-painting tutorials, and straining my eyes and my patience, I applied the new textures to one of the existing tile designs and the result for all this effort was resoundingly....ok. 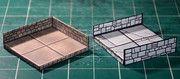 You could argue that the new texture looks better, or not, depending on your taste. It certainly falls more closely in line with the papercraft terrain that currently exists on the market, which means that conventional wisdom suggests that it is better in the eyes of the existing marketplace...maybe. What I can tell you is that actually applying these new textures to the nets is a LOT more work than the old ones. As currently constructed, these textures exist as four layers--a base texture that provides the stone background, and three layers that convey the brick outlines, two set to multiply and one to screen. I haven't even tried to apply any of the details that would make the walls and floor look "lived-in," like nicks, cracks, raised or recessed blocks, etc., all of which would require additional layers set to multiply and screen. Now, if I could just flatten the texture and copy it into the net file as a single layer, all those layers in the original texture file would be great...but I can't. This is because I can't just slap the textures as-is onto the faces of the net. Once they are in place on the net, I have to nudge, tweak, and customize them to meet the needs of that particular tile. And to do that in a way that looks decent, I have to do that tweaking in the same way that I created the original texture, using all those layers. GAH! I simply don't have that kind of patience, even if I had the time. But I do hear the input from the many people who have suggested that the grayscale, pen-and-ink style of the original textures is likely to appeal only to a very niche-of-a-niche audience. The old textures were relatively easy to tweak and modify for specific tile configurations--they only involved a handful of shades of gray (iirc, it's black, a very dark gray for shadow edges, very light gray for highlighted edges, and three middling shades of gray for the faces of the blocks). I need to find a way to make the new look--which is arguably better and almost certainly more marketable--work with the old technique--which took about 25% as many man-hours to apply to individual models. So, here--I think--is my plan. I'm going to save the base stone textures (they are, in fact, different for the walls and floor)--they can be easily laid onto the nets and trimmed to fit, since I don't have to worry about them being seamless, the way I would in a video game. But all those multiply and screen layers used to outline the blocks and provide additional detail are wasted effort; first, they make it very difficult to apply the texture to new files, and second, when you actually print them out at the resolutions and viewing distances that apply to tabletop gaming, you can't tell they aren't just solid colors. So I'll just do the details the way I did before, as solid colors, so they can be easily adapted to the net for each tile. I learned a lot this weekend about texture-painting techniques, but everything on YouTube focuses on creating textures for use in 3d video games, where the textures have to work on large objects very close to the camera, seen on bright, high-resolution screens, delivered by the most powerful computer processors available to private citizens. As it turns out, that is a very different use case than tabletop papercraft terrain (who knew?), and while there are some things that can be borrowed from video-game artists, there are some things that definitely do not apply to our purpose. But most of you probably already knew that... |
|
|
|
Post by cowboyleland on Apr 3, 2017 4:41:41 GMT -9
Cheer up jeffgeorge. I have usually found that when I learn a new skill or new information I end up applying it in situations I never would have imagined it would apply. For what it is worth, I think it is probable you learned more than "this isn`t worth it." |
|
|
|
Post by jeffgeorge on Apr 3, 2017 5:20:59 GMT -9
Cheer up jeffgeorge . I have usually found that when I learn a new skill or new information I end up applying it in situations I never would have imagined it would apply. For what it is worth, I think it is probable you learned more than "this isn`t worth it." Oh, I learned a lot this weekend--just not a lot that applies to my current problem. I did learn a bit that applies to what I'm doing--I will use what I learned about making the base stone texture. But I also learned that there's a limit to the level of detail that can be seen in textures that are going to be printed on home inkjet printers at 28mm scale, and I have a much better sense of where the line falls that separates meaningful enhancement and wasted effort. So that's all good...I just wish I could have figured it out in 4 hours instead of 20. |
|


 )
)


