|
|
Post by chiefasaur on Apr 3, 2017 20:14:46 GMT -9
Eh, I run into soooo many critics that don't like the ol' Saturday Morning Cartoon style. Those critics can line up and eat 1,000 orc wangs literally EVERYTHING else is in that classic semi-real, textured dungeon-punk style, they can use that.
If you've landed on an appealing style that you like, embrace it. There's no reason to make MORE of the same-looking stuff.
|
|
|
|
Post by whisper31 on Apr 3, 2017 20:32:56 GMT -9
Eh, I run into soooo many critics that don't like the ol' Saturday Morning Cartoon style. Those critics can line up and eat 1,000 orc wangs literally EVERYTHING else is in that classic semi-real, textured dungeon-punk style, they can use that. If you've landed on an appealing style that you like, embrace it. There's no reason to make MORE of the same-looking stuff. I'll agree with that. You are doing this because YOU want to do it. Since you are quite generously sharing your time, energy, and skills with the rest of us poor schmoes that are unable to do something like this, tell them to start throwing money at you and then you'll listen to them. If they had commissioned you to do this, then they have a right to have things done their way. Don't change your style because a few brainwashed gits decide that they have to have everything in the "full-color-3d-living-breathing-dungeon" style and can't appreciate the enjoyment you are having in creating the "cartoonish" style. Don't change a thing dude!!! |
|
|
|
Post by jeffgeorge on Apr 4, 2017 2:09:18 GMT -9
Thanks, chiefasaur and whisper31. You make an excellent point. I'll make the changes I want to make, and nothing else, and then publish. In the words of a great philosopher, "The players gonna play, play, play, play, play...," which is all we want--for players to play with the stuff we create. The philosopher also said "The haters gonna hate, hate, hate, hate, hate." Nothing you can do about that. So I'll follow the philosopher's advice: "I'm just gonna shake it off, shake it off." I think that was Sun Tzu, right? Or maybe Nietzche? I don't remember... |
|
|
|
Post by sunraven01 on Apr 4, 2017 2:43:30 GMT -9
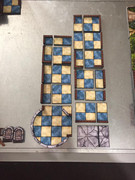
I'm just noodling some noodle thoughts right now ... If there was a tile with a wall down the center (rather than aligned to the edge), wouldn't that fix the 5ft/10ft problem while still maintaining the overall 2x2 geometry? I got to thinking about it while looking at your curved tile, which will have the outside edge. With the wall-in-the-middle, half the tile would be "outside" the dungeon, and half inside.
Does that make sense?
|
|
|
|
Post by jeffgeorge on Apr 4, 2017 3:05:39 GMT -9
I'm just noodling some noodle thoughts right now ... If there was a tile with a wall down the center (rather than aligned to the edge), wouldn't that fix the 5ft/10ft problem while still maintaining the overall 2x2 geometry? I got to thinking about it while looking at your curved tile, which will have the outside edge. With the wall-in-the-middle, half the tile would be "outside" the dungeon, and half inside. Does that make sense? Exactly. That tile with the 45-degree diagonal wall makes diagonal corridors possible, as well as rooms with 45-degree corners. If you put four of them together, you'd make a square room at a 45-degree angle to the grid, and if you used four of them with one field tile and four single-wall tiles, you would make a 6x6 octagonal room. I'll include a floor-on-one-side-of-the-wall version of this tile, as well as a floor-on-both-sides version, to allow rooms attached directly to the diagonal corridor. (Remember, doors clip onto walls.) Re: "converter" tiles that adapt a passage from 10' to 5'--yes, that would use very similar tiles. You'd need a tile with a diagonal wall that runs across the middle of the tile, from one corner to the center-point on the opposite side. I can see offering this tile in both a corridor configuration (with a straight wall on the opposite side), and an otherwise open-sided version, so you could also use them to make a room or corridor with walls at a 22.5-degree angle. These will be simple tiles to make, but I'll need left and right versions of each, since they aren't symmetrical. They would probably be part of a separate, "narrow-corridors" expansion set, rather than being included in the free basic set. |
|
|
|
Post by sunraven01 on Apr 4, 2017 4:01:40 GMT -9
We are talking past each other again. I'm talking about solving the 15' x 15' problem. 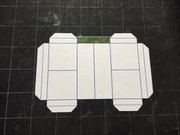  |
|
|
|
Post by jeffgeorge on Apr 4, 2017 5:47:18 GMT -9
Oh, sure, yes, I see what you're talking about. That exact tile was always in the long-term plan...it's a by-product of a series of tiles that I thought of mainly as addressing the demand for 5-foot-corridors, but which--without the outer wall--also handles the X5' room problem. The tile you show is essentially a 5-foot corridor tile, with the wall along the edge of the tile removed. The can of worms that you open when you start addressing odd-sized (X5') rooms, this is that you need LOTS of these part-room tiles to handle all possible wall configurations. When you are making tiles that have walls across the middle, with passable and impassable spaces in the same tile, there are a lot of permutations. It's much easier to describe these variations with diagrams than words, so here is a quick rundown of the tiles I can see needing, which I hadn't shared previously: 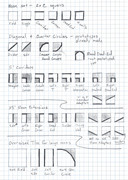 The "side" and "divider" tiles in the X5' Room Extensions section is the tile you've shown. In that series, I've included corners and dea-ends for the passable/impassable "side" version, but not for the passable/passable "divider" version, on the theory that you can use the "closing wall" tile to make close the ends on rooms that are divided using the "divider" tile. All those configurations are exactly why I shifted from 20'x20' tiles (4x4) to 10'x10' (2x2) as the default grid size very early in the development process. 10'x10' is a compromise between the convenience of large (20'x20') tiles and the infinite flexibility of tiny (5'x5') tiles. I can't help but notice that both the Hirst and Dwarven Forge lines are both built on a 10'x10 standard--both companies must have chosen that standard very carefully before investing so heavily in it. Also, I want the basic set--which is 2x2--to easily handle a graph-paper dungeon, where 10' per square is the most common scale. If people want larger tiles for convenience, or "smaller" tiles to handle narrow corridors and odd sizes, they can opt to include those tiles in the set they assemble, but the can play the game without those optional pieces. Some time, I'll take photos of the odd-ball tiles I made back in the beginning, trying to make a 20'x20' grid the standard. I had some really goofy ideas, which led to tiles that were really complicated to assemble...but they kind of look cool, even if they aren't practical! |
|
|
|
Post by sunraven01 on Apr 4, 2017 8:22:37 GMT -9
|
|
|
|
Post by jeffgeorge on Apr 4, 2017 8:36:02 GMT -9
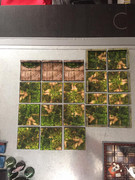
Don't I know it. I did this immediately AFTER finding Wyloch tiles, but immediately BEFORE seeing your DoO tiles, and I prefer your cardstock walls to his. (Images) Those use a foam core base for the tile, but 1/4 inch balsa sticks for the walls, painted black on the sides and a texture strip applied to the top. You can see on the room breakouts how many different pieces I needed, and in what shapes, to accurately re-create the map for that location. Those are great. I'd be thrilled to play on a table that featured those tiles. I would definitely follow your adaptation if I were going to make tiles using Wyloch's design, using foamcore and balsa instead of corrugated cardboard and all the flashing that requires. Your showing this set makes me wonder if I ought to offer a set of blank nets for the tiles, to make it easier for those so inclined to apply textures from other sources to my models...either as a layer in the sets I've already imagined, or as a separate product. Hmmm... |
|
|
|
Post by sunraven01 on Apr 4, 2017 8:47:23 GMT -9
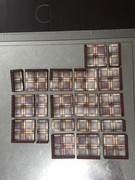
The balsa stick walls were ... okay. They're only 1/4 inch tall, though, and in play I found my players had a hard time seeing them on the table. The wall height you use is much, much better for gameplay. One thing I have experimented with is making clip-on walls, but it uses a lot of paper. It was a test to see if I could make full-height modular walls. Stock DoO on the left, full-height clip-on wall to the right. 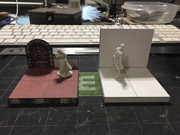 |
|
|
|
Post by jeffgeorge on Apr 4, 2017 9:44:24 GMT -9
Those look great--thanks for sharing them. Interestingly, I didn't choose the height of the DoO walls. That was originally determined by the maximum printable area of an inkjet printer, allowing 4x4 tile with walls on all four sides. As I was working this weekend, I realized that now that the system grid size is 2x2, that old restriction no longer applies. I'm currently creating/deriving blank nets for all the tile configurations from the existing tiles, and as I do that, I'm making the walls slightly taller. The original walls were 1/2" above the floor surface of the base tile; the new ones are 3/4" above the floor. I think that height will read better on the table, being more obviously walls, without being so tall that they interfere with access to the minis. They are now about waist-high on a typical 30mm mini (don't forget the base usually adds a few mm to the mini's overall height); before, they only came up to mid-thigh. Here are the new prototypes of the base set, with the 3/4" walls. The figures are from a variety of artists. 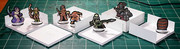 These were assembled in the default configuration: dollar-store 4mm foamcore, printed at 100% for a 1.25" grid. I'll test a few with the alternate configurations soon. |
|
|
|
Post by sunraven01 on Apr 4, 2017 18:18:59 GMT -9
The 3/4" walls look great!
|
|
|
|
Post by chiefasaur on Apr 4, 2017 19:21:40 GMT -9
Hey jeffgeorge can I share that prototype pic you just posted. I like the lineup of all the minis. |
|
|
|
Post by jeffgeorge on Apr 4, 2017 20:11:18 GMT -9
Hey jeffgeorge can I share that prototype pic you just posted. I like the lineup of all the minis. Ordinarily, I'd be happy to give permission for sharing a photo of minis in use, but I'm a bit hesitant to widely distribute a photo of the tiles while they are in development and before I've finished them to a point that I can release them on RPBNow/DriveThru. I'd rather not spread these prototype pics beyond this forum until I've released at least the first set for real. I'd be happy to shoot a pic of your minis, or a mix of various artists, on a more attractive background...even on the existing DoO tiles with the gray stone texture. If you want to PM me with what you need, I'll help if I possibly can. I have literally hundreds of minis by many artists finished and ready to be photographed, so just let me know what you need. |
|
|
|
Post by sunraven01 on May 15, 2017 5:35:19 GMT -9
So, I did some major brain noodling this weekend in anticipation for the release of this set (I'm dying for your expansion curved and diagonal walls, btw ... have you thought about how to do irregularly shaped walls for caverns yet? Please say yes ...). Most importantly, what I was looking at was going 1" grid vs 1.25" grid, and after mocking up my play surface in PS and mapping out how many 2x2 tiles would fit, I ended up deciding to use 1" grid. The primary reasons were thus:
I got more squares with a 1" grid, which allows greater flexibility for game area layout. Your cardstock walls are effectively zero thickness, which alleviates the problem Wyloch was solving with his .25" thickness walls, so there's no need for the larger grid size, other than the slightly larger squares makes more room for fingers and minis. And, finally, staying at a 1" grid allowed backwards compatibility with the items I've already built in my pretty expansive collection of terrain. Using a 1" grid also meant I could fit more tile wrappers on a single sheet of letter-sized paper (four field tiles, two corner tiles, three single-wall tiles), with plenty of room to stay inside the safe cutting zone with default Cameo registration marks.
Last night I made my first six DoO tiles, on photo paper instead of my cardstock test pieces, and created the cutting files for them as well. So far I've only made files for the field tile, corner tile, and single wall tile (I ran out of time and needed to get to bed). Because I magnetize my terrain, I added a piece of hardware cloth under the wrapper to act as a magnetically receptive surface, and I put small disk magnets into the sides of the tiles to make them snap together. I'll get photos up for you today, but I cannot give you enough praise on how clever I think this system is, and how excited I am about using it. Truly, this is a great system.
Now, release the set (and the expansion). My first big project is going to be building out Tomb of Horrors -- my brother is coming to visit in mid-June and I'm going to run it for him. I started last night with the initial hallway and the mosaic floor. It looks fantastic, it's going to store beautifully, it's very playable with the 3/4" walls, and it goes down on the table like a dream.
|
|
|
|
Post by sunraven01 on May 15, 2017 10:20:02 GMT -9
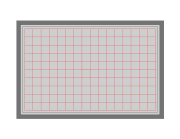 That's my sheet metal play surface with 2" tiles marked in red. It's a 24" x 36" piece of cheap sheet metal from Lower, and the dark gray band around the outside is where I've wrapped duct tape around the edges to keep me from cutting my hands on it.  And that's the 2.5" tiles. You can see it's a pretty marked difference in area for gaming. |
|
|
|
Post by jeffgeorge on May 20, 2017 9:59:59 GMT -9
... have you thought about how to do irregularly shaped walls for caverns yet? Please say yes ...). Yes, I've come up with at least two ways to handle irregular walls, based at least partly on how the quarter-circle works. The only trick is that tiles like the quarter circle can't be made out of a single piece of cardstock--they take two pieces to handle walls meeting in corners that aren't at the corner of the tile, but I've managed to come up with a way to configure those two pieces so that they aren't complicated to assemble. Keeping the tiles easy to assemble has always been a top priority for the system, in case that hasn't been clear. I completely get every point you make here. A 1" grid allows 25% more territory to be presented in the same amount of table space, and it allows backwards compatibility for users who already have terrain collections. I see very good reasons for people to prefer a 1" grid standard, and that's why I've tried as hard as I can to make the tile set handle both 1.25" and 1" grid. In general, I think it causes fewer problems to set up the files with 1.25" as the default, and reduce them to 1", than to use 1" as the default, and have people who prefer 1.25" scale them up. The one thing I can't address without making totally separate products is the fact that you can fit more tiles on a printed page at 1" than 1.25". Unlike you, I didn't have an existing terrain collection when I discovered Wyloch's 1.25" grid, though, and even though paper-thin walls handle the problem of walls eating space needed by figures, I personally find that the 1.25" grid looks better to my eye with the modern, 32mm minis. And of course, there's the fat-finger issue...1" grid terrain with 32mm minis doesn't leave much room for manipulating things on the map. The way you're magnetizing your tiles is really clever, and I might try it myself if I ever get the time. I think it's the kind of thing that is best suited to a kitbash tutorial video--it's very much a graduate-level terrain crafting project. And thanks so much for your continuing support and kind words about the tiles--your encouragement helps me push thru the hard parts of the project. |
|