|
|
Post by Papercraft Warrior on Dec 29, 2016 6:17:50 GMT -9
I was wandering are there any internal reinforcers available for the 6x6 APV, like the ones for the 4x4 GPV?
I will possibly go to the print shop tomorrow, and it seems much more affordable to print model and additional reinforcers on plain paper, than to open up for the thick paper (it comes out like that if you print grayscale).
|
|
|
|
Post by Vermin King on Dec 29, 2016 6:26:32 GMT -9
I don't see that it ever had the reinforcing boxes. I've only made one of these, and I did the paper 'X' to give it a little strength, but not enough. I bet Chris could whip this out faster than I can, but maybe I can whip some out, but it won't be until next week at the earliest
|
|
|
|
Post by Papercraft Warrior on Dec 29, 2016 6:44:11 GMT -9
Thank you for the fast reply.
Could you elaborate about the "paper X"? Is it a cube, or two pieces of cardboard sandwiched like a flat Czech hedgehog (those metal dragon teeth from ww2)?
|
|
|
|
Post by Vermin King on Dec 29, 2016 6:49:37 GMT -9
I was trying to find an example photo here. It was a trick I picked up from oldschooldmI might just have to whip one up at lunch and post a photo Actually, my time would probably be better spent just making some reinforcing boxes. |
|
|
|
Post by Vermin King on Dec 29, 2016 8:41:05 GMT -9
Here you go. I just took the back plate as my template, and took the widths of the wider spot between the wheels and the narrow back piece, made the blocks and reduced to 95% to allow for any errors and paper width. Quick and dirty, but should work  EDIT-- In thinking about this, the tail end is fairly strong already, I should make a second wide one with notches cut out for the rear wheel wells, if it can wait until after I get off work |
|
|
|
Post by Papercraft Warrior on Dec 29, 2016 9:07:42 GMT -9
Thank you.
No problem, I can wait as long as it takes, you are doing it out of your own free time.
Is the larger insert for between the front and back wheels?
|
|
|
|
Post by Vermin King on Dec 29, 2016 9:21:40 GMT -9
Yes, it is. My current thought is to do another of the same width, but with notches cut out of the bottom to allow for the wheel wells, to be placed between the rear four wheels. That should allow for enough reinforcement. If you are in a hurry, the small one could be printed out and you could manually cut out a notch for the wheel wells.
I am a little hesitant to be doing this without a test build, but I think the logic behind what I did is correct. The 95% reduction should allow it to fit without creating issues, but still preventing inadvertent squishing
|
|
|
|
Post by Papercraft Warrior on Dec 29, 2016 10:06:34 GMT -9
Thank you for being helpful. I will try to be productive and make the rear wheel reinforcer myself. Enjoy the festivities.
P.S. When I make the remaining reinforcers, should I post them separately, or combine them with yours and put a single .pdf here?
|
|
|
|
Post by Vermin King on Dec 29, 2016 10:51:48 GMT -9
That is totally up to you. I was just being helpful
|
|
|
|
Post by Papercraft Warrior on Dec 30, 2016 0:36:56 GMT -9
I finished them. If someone had told me yesterday that it will take many hours I would not be sure was he serious. Consider them "beta stage", I still need to print them and make a model, 99% chance that they are good enough. When I build them, I will report my findings, if they fit Chris can include them in 6x6 APV archive if he wants. Attachments:6x6 APV reinforcers.pdf (463.57 KB)
|
|
|
|
Post by Christopher Roe on Dec 30, 2016 18:05:19 GMT -9
I thought I had a set of those rattling around in my Dropbox but they're not there anymore, so I'm glad you guys stepped in! I'll be happy to add them to the model ZIP file when they're done.
So weird, I was 99.99% sure I'd done some since I remember doing a set for the GPV and the Reaver.
|
|
|
|
Post by Papercraft Warrior on Dec 31, 2016 5:06:11 GMT -9
I came home from the print shop and have them on hand. Just to build them manually now. It has been a long time since last I assembled something. Wish me luck.
|
|
|
|
Post by Vermin King on Dec 31, 2016 5:30:19 GMT -9
Good luck
|
|
|
|
Post by Papercraft Warrior on Dec 31, 2016 7:39:50 GMT -9
Found the old stick of glue and a ruler. Even scissors appeared. Oh my.
As usual, when I trace the fold lines with the old pen and score them, the paint (color/print) cracks. Not too much, but it is not continuous anymore. It is possibly result of grayscale printing on 80 gsm paper.
Any tips for clean fold lines?
|
|
|
|
Post by Christopher Roe on Dec 31, 2016 14:08:03 GMT -9
I usually just cut fold lines very lightly with a knife (when hand cutting) and color-match the edges with a Tombow marker. When I let the machine cut for me, I like perforated fold lines because they fold up crisply without compromising the strength as much as cut-scoring.
That said, flaking toner is a printer problem where the toner isn't being fused to the paper well. I had a Brother laser once that didn't flake at all, but I've seen some professional copy places deliver prints that flaked when folded. The only real solution to prints that flake when folded is to cut-score them, since the stress of the folding is what's causing the toner to delaminate from the paper. With cut-scoring, the fold stress is transferred away from the printed layer to the lower layers and the backside of the paper instead, so the delamination doesn't occur as readily.
|
|
|
|
Post by Papercraft Warrior on Jan 1, 2017 13:04:47 GMT -9
I expected to have finished it by now. Three wheels and four shock absorbers remaining. It will have to wait until tomorrow. On the bright side, the internal reinforcements seem to have worked out fine. Sweaty palms do not help with papercraft modeling. If not for the internal reinforcements I think the model would look like Spunge Bob by now. The model is a pleasure to work with. With the thicker paper and a stick of good glue, it would be a heavenly experience. Some pictures of reinforcements and the model's front facing: 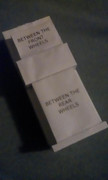 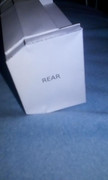  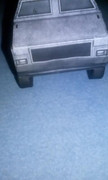 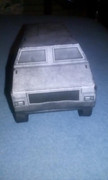 |
|
|
|
Post by Papercraft Warrior on Jan 2, 2017 14:02:46 GMT -9
Local manufactorium has churned out a new armored vehicle today. I am happy with how it turned out. It also felt good to my eyes, to do something else than stare at the computer screen. The reinforcements served their purpose, whomever has sweaty palms and thin paper should use them. On the finished model's looks, the good parts are thanks to Chris, the shabby ones are due to my shoddy workmanship and sub par materials. A fun model to build. 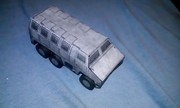 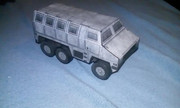 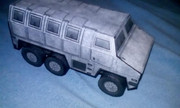 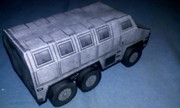 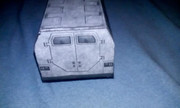 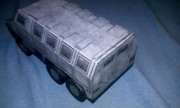 P.S. If anyone is interested in paper modeling, but has budgetary limits, you do not need much. A grayscale printer at a local copyshop, a cheap stick of glue, the scissors and some spare time. It may not turn out as nice as with better materials and tools, but it is still a thing to experience. When the situation improves, you can always upgrade to better stuff. The low budget time can be considered as practice. And the gray models still look nice. Tell people it is a "thematic decision". |
|
|
|
Post by Vermin King on Jan 2, 2017 14:29:26 GMT -9
Looks good. Having been the owner of a Brother Laser Printer when I entered this hobby, I can verify how good it was for paper models. As far as printing grayscale, it was a BW Laser Printer.
Looks good
|
|


