|
|
Post by sunraven01 on May 16, 2017 3:11:36 GMT -9
My brother is coming to visit mid-June and loves D&D, so I've promised to run a game for him. I haven't told him he'll be doing Tomb of Horrors (in a stripped down, less lethal grinder version because it will only be two players and over two nights). At the same time, I've been looking at converting some of my old terrain to modular dungeon tiles and it's pretty obvious by now I love jeffgeorge's take on the modular tile system, so this seemed like a perfect opportunity to chronicle my build and really give the modular tile system a workout. 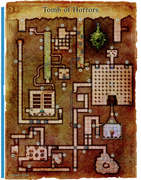 Except for the small area of caverns at the bottom right of the map, everything in the dungeon is rectilinear, so it should play nicely with the dungeon tiles, and the map is conveniently in a 1 square = 10 feet scale. Perfect, no half-tiles needed. 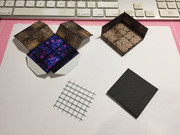 I have made some quality of life adjustments to my tiles over the stock build: the first one is to make the surface magnetically receptive. This is accomplished with a piece of 23-guage quarter-inch hardware cloth (available at any hardware store). The tile surface isn't strongly receptive due to the relatively low metal surface area, but it's just enough to keep a paper mini in place even if you hold the tile vertically, so it will provide a little resistance to being bumped on the table, which is all I need. This also, conveniently, brings the height of the tile up to one-quarter-inch, so the tile wrappers line up perfectly around the tile. 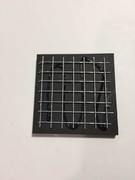 Next, I've also added rare-earth magnets and one-inch ring shank panel board nails to the sides of the tiles, making them snap together on the table, to make it faster to build. I'm not going to try and fit the whole dungeon on the table at once, just the encounter area the players are currently in, so being able to slap down tiles quickly is needed to keep the momentum going. I threw together a quick little card stock jig to make my placement consistent at a half-inch in from each edge, and as long as I'm careful and consistent to follow this pattern, magnet polarity is irrelevant, because the magnets are always meeting with a metal receptor. 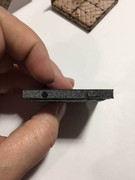 And, finally, there's gonna be a whole lot of Photoshopping to go along with the build. The dungeon is full of traps, and things like floor and wall appearances are important clues to the players. So, that said, here's the first 20 feet into the Tomb of Horrors, where a mosaic path begins to wend down the hallway. The stock image of the floor is that the path is red, but I have changed it to purple. The walls and brick floor are from World Works Games, the tiles themselves are Dungeons of Olde, the purple mosaic is from Glen McClune's Serpent Caverns, and the skeleton mini is from Printable Heroes. 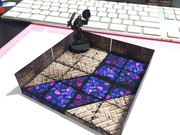 |
|
|
|
Post by sunraven01 on May 16, 2017 5:59:55 GMT -9
 The first clip-on feature. It was really important to me to get this right, because this particular dungeon feature is for most people (myself included) THE iconic image associated with the Tomb of Horrors. The original illustration from the 70s was a horned demon's face, but I couldn't find an appropriately high res image to 'shop down, so I searched for Green Man images instead. This particular one I think came from a light switch cover. Ha! |
|
|
|
Post by Vermin King on May 16, 2017 7:03:59 GMT -9
Looks great. You could add horns, but I don't think it is necessary
|
|
|
|
Post by sunraven01 on May 19, 2017 9:08:26 GMT -9
  Still plugging away at making the tiles for the first hallway, which is going more slowly than I anticipated thanks to real life. One more tile to go before I finish, but I took a small break today to make some pit traps. These are made from three layers of card to give them some thickness, and they have some magnets on the bottom to stop them from sliding around on the tiles. |
|
|
|
Post by sunraven01 on May 19, 2017 10:42:50 GMT -9
 The whole hallway, with pit traps revealed. I could t fit the whole thing in frame without also exposing my desk, ha! The meandering inlaid floor is wider than described in the module, but that's ultimately irrelevant to game play, since the path's purpose doesn't have anything to do with its representation on the table. |
|
|
|
Post by jeffgeorge on May 19, 2017 11:10:17 GMT -9
Pit traps and other flat pieces are definitely on the list of things to do for the "official" DoO tiles. I really love what you're doing with them, btw! Thanks for sharing!
|
|
|
|
Post by chiefasaur on May 19, 2017 16:18:20 GMT -9
I'm really enjoying watching this project develop. Your players are so lucky!
|
|
|
|
Post by sunraven01 on May 19, 2017 17:17:36 GMT -9
Adding a new tile style for the parts of the Tomb that are not covered in frescoes. This introduces my single doors as well.  Moving to a more generic tile texture also will speed up construction, because I don't have to 'shop tiles for the inlaid floor; I can just print, cut, and glue. |
|
|
|
Post by jeffgeorge on May 19, 2017 18:18:49 GMT -9
How come you're so much faster at producing my tiles than I am?
|
|
|
|
Post by sunraven01 on May 19, 2017 18:26:22 GMT -9
Because you did the hard work of developing the geometry, and you're creating your own artwork.  I'm re-using textures mostly from World Works Games. This marble is from their Atlantis set. I just open the PDF in Photoshop, select the area I want to use, then paste it into my tile templates. Export to PNG, open the PNG in Silhouette Studio, merge my cutfile, then send to the Cameo. While one page is cutting, I'm printing the next one, and gluing together tiles. My biggest time consumer is making the tile blanks. Cutting the foam board, cutting the hardware cloth, piercing the tile sides with nailed and gluing in disk magnets really takes a while. I make 10 blanks at a time, then go back to printing, cutting, and gluing. Also, I have a deadline for this: the brother arrives in 3 weeks. |
|
|
|
Post by jeffgeorge on May 19, 2017 19:56:46 GMT -9
Because you did the hard work of developing the geometry, and you're creating your own artwork. I'm re-using textures mostly from World Works Games. This marble is from their Atlantis set. I just open the PDF in Photoshop, select the area I want to use, then paste it into my tile templates. Export to PNG, open the PNG in Silhouette Studio, merge my cutfile, then send to the Cameo. While one page is cutting, I'm printing the next one, and gluing together tiles. My biggest time consumer is making the tile blanks. Cutting the foam board, cutting the hardware cloth, piercing the tile sides with nailed and gluing in disk magnets really takes a while. I make 10 blanks at a time, then go back to printing, cutting, and gluing. Also, I have a deadline for this: the brother arrives in 3 weeks. Okay, I feel a little better now. I also have to put the tiles together into a PDF that anyone can use, relying on nothing but the written instructions I have to write, edit and illustrate. Hopefully, once the basic set PDF is ready for release, most of that overhead work will be done, and I can concentrate on reskinning them for different environments. (Well, I've got a few more tile configurations to add for the full set, but after that, it should be pretty cost-effective to do reskins.) |
|
|
|
Post by sunraven01 on May 20, 2017 5:11:56 GMT -9
Exactly. I only have to make things for me, and I'm an experienced paper crafter (I did scrapbooking before starting to make terrain for my D&D games), so I not only have a huge range of paper crafting tools and adhesives, but I don't need to write instructions for what I'm making. I know how my files work.
|
|
|
|
Post by Vermin King on May 20, 2017 6:45:01 GMT -9
This is exactly what I deal with on my models. I mostly build for me and make things available. I know how my files work, so instructions are difficult. In the course of double-, triple- and quadruple-checking things, I see changes that I feel I need to make, which have to be double-, triple- and quadruple-checked.
And then instructions.
Good luck, Jeff
|
|
|
|
Post by sunraven01 on May 20, 2017 8:52:08 GMT -9
This is Area 1 on the map, which is a false entrance. Two of my Frostgrave mouslings have volunteered to pose for photos. I think this marble works fine, although the cracks between the tiles is pretty dark. I experimented with lightening it, but ultimately decided to just leave it as is. I haven't made a double door yet, so this uses two single doors.   |
|
|
|
Post by sunraven01 on May 21, 2017 2:26:36 GMT -9
 Whoooops. Ran out of magnets last night. I have another batch ordered, but in the mean time, I won't be able to make tiles. So, I made a storage box for the tiles I've made so far. This is an IKEA TJENA box with a custom foam core tray inside. (Living 20 minutes from IKEA has its benefits.). This one box probably definitely won't be enough for every tile I'll need for the dungeon, but it does get the stacks of tiles off the edge of my desk so I can have some room back. I have 40 tiles assembled, enough blanks left to make 9 more tiles, and enough magnets ordered to make another 75 more after that. Since I'm not building out the whole dungeon at once, I will be able to reuse tiles from room to room, but Area 25 is really big: 121 tiles in area if I stuck to a 2x2 format. I am planning on reducing that number significantly by creating some 6x6 field tiles for the center of the room, which leaves me at needing a mere 40 tiles to create the outer perimeter, 33 of which will be single wall tiles. In the meantime until my magnets arrive, I'm working on printing and cutting the wrappers still, and making tile blanks, so when the new magnets get here, I'll have a big pile of bits ready for assembly. |
|
|
|
Post by sunraven01 on May 22, 2017 10:52:21 GMT -9
 Okay, last room until my magnet order arrives. This is Area 2 on the map, another false entrance to the tomb. The side alcove will not be visible to the players until After they discover that there is a stone block trap there, set to close off half the hall while they are investigating the fake doors. |
|
|
|
Post by sunraven01 on May 26, 2017 10:21:17 GMT -9
 Finally worked out something to use for the mist filled archway at the southern end of Area 3. So, this is the entire end of the hall, with the giant face, magical archway, and put trap. It's pretty nifty. The archway is a prop from the World Works Games Pharaoh's Descent set. |
|
|
|
Post by sunraven01 on May 26, 2017 10:33:14 GMT -9
 And this is the completed sliding block trap at the north end of Area 2. I used the wall texture for the block because it's supposed to not be discernible without careful inspection; the entire trap won't be placed on the table to the players' view until after they trigger the trap. |
|
|
|
Post by sunraven01 on May 27, 2017 9:15:53 GMT -9
 If the players can discover the hidden door near the north end of Area 3, they find a short hallway that leads into Area 8, which has a large open space and a warren of smaller chambers. |
|
|
|
Post by sunraven01 on May 27, 2017 9:18:41 GMT -9
  Another secret door will lead the players into Area 9, a hallway with several more secret doors. The secret door design is straight up cribbed from jeffgeorge, in the Dungeons of Olde set. I had never used the skew and perspective actions in Photoshop before, but I'm super stoked how this came out. |
|
|
|
Post by sunraven01 on May 27, 2017 9:20:49 GMT -9
Also, it took about a million 2-wall corners to make those two areas. Hopefully I have enough on hand now to make most of the rooms in the rest of the Tomb.
|
|
|
|
Post by jeffgeorge on May 28, 2017 8:36:37 GMT -9
Also, it took about a million 2-wall corners to make those two areas. Hopefully I have enough on hand now to make most of the rooms in the rest of the Tomb. Yeah. Corners, sides, and corridors seem to be the most important pieces by far. Field tiles, dead-ends (3 walls) and sealed chambers (4 walls) are much less in demand in most layouts I've tried. If I were creating a generic set of tiles, I'd suggest a ratio of roughly 1:2:4:8:8:12, broken down like this: Sealed chambers: 1 Fields: 2 Dead ends: 4 Corridors: 8 Sides: 8 Corners: 12 Of course, your mileage may vary, but in general, the one- and two-wall tiles get used a lot more than the other configurations. Eventually, once the freebie basic set is out, I'll make 2x4-square, 4x4 square, and 6x4 square field tiles available, as well as double- and triple-length corridor tiles. You won't need those to make a dungeon, which is why they aren't in the freebie set, but they'll make it faster to set up a layout, and more stable in play. |
|
|
|
Post by sunraven01 on May 28, 2017 15:40:00 GMT -9
 A test piece for Area 10. Like Area 3, this room has an inlaid tile door, and the walls are covered in frescoes, but I wanted it to be visually different from Area 3. The frescoes are supposed to depict figures holding colored spheres, but I was going to have a hell of a time doing that on a 3/4 inch high wall, so I just went for some colorful images for look-and-feel. The floor and walls in this room are from the WWG Cathedrae Noctis set. Now I get to go drive myself insane making the tile floor repeat correctly across the entire hall. |
|
|
|
Post by sunraven01 on May 30, 2017 11:07:02 GMT -9
Shhhhiiiiit. My XP-810 died. And Epson, of course, does not make that model any longer. doody doody doody.
|
|
|
|
Post by sunraven01 on May 30, 2017 11:07:49 GMT -9
Also, "doody" is definitely not the word I typed. That's not cool.
|
|
|
|
Post by cowboyleland on May 30, 2017 12:05:37 GMT -9
For a brief time on this site "passion" was automatically changed to something like "p-mule-ion." We've come a long way, baby.
|
|
|
|
Post by ignatious on May 30, 2017 12:30:29 GMT -9
There is something hopeful (for now) for the human race that a machine can't tell whether it has stepped in shhhiiiiit or doody.
|
|
|
|
Post by sunraven01 on May 30, 2017 13:18:42 GMT -9
Fortunately I was able to find an XP-520 on Amazon, which uses the same ink and carts as the 810, so any color shift should be minimal.
|
|
|
|
Post by Vermin King on May 30, 2017 16:03:01 GMT -9
Best of luck on that. I think most of us have had the issue of a printer dying mid-project. 'Doody' just doesn't quite express the feeling
EDIT-- I just did a quick speed read of this. Did I miss the type of cardstock you are using?
|
|
|
|
Post by sunraven01 on May 30, 2017 18:38:57 GMT -9
Best of luck on that. I think most of us have had the issue of a printer dying mid-project. 'Doody' just doesn't quite express the feeling EDIT-- I just did a quick speed read of this. Did I miss the type of cardstock you are using? I use Epson Premium Presentation Matte Paper, because it makes better prints than cardstock. If you search my post history you can find some side-by-side comparison photos with matte photo paper and card stock. |
|


 I'm re-using textures mostly from World Works Games.


