|
|
Post by cowboyleland on Feb 4, 2018 7:38:46 GMT -9
Please include a tutorial on how to drill paper in your next post. You have mad skills!
|
|
|
|
Post by missileer on Feb 7, 2018 16:03:51 GMT -9
Cowboyleland asked that I provide a tutorial on drilling paper. I have never done this before, so please be kind.  First off, I only have two hands (I have never been able to hold anything with my toes), so cannot hold the paper and a tool and the camera at the same time. So we begin (I am including all who read this, so that I can spread the blame). The first photo shows my paper drilling kit. The glue is a thin CA penetrating formula. Then we have a curved dental pic, followed by a set of drill bits covering #s 33 through 80. Below that is a Japanese screw drill with six bits. On the far right is a medium sized hand twist drill. The second photo shows the drill base that I use. It is a balsa plank that I bought on sale (three for $1USD). I use balsa to extend the life of the drill bit and cushion the paper. 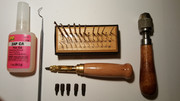 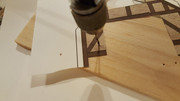 I will brake this up into several posts. |
|
|
|
Post by missileer on Feb 7, 2018 16:21:08 GMT -9
|
|
|
|
Post by missileer on Feb 7, 2018 16:53:58 GMT -9
|
|
|
|
Post by Vermin King on Feb 7, 2018 17:10:50 GMT -9
Wow, John, that is a very good tutorial
|
|
|
|
Post by missileer on Feb 7, 2018 17:11:38 GMT -9
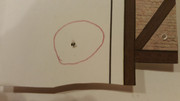
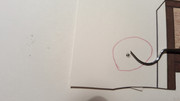
Now, if everything works the way it is supposed to, the whole will look like this (photo1). One additional warning about the glue. USE IT SPARINGLY! Photo 2 shows how the glue will spread quickly and may discolor the surrounding area. On the left, a drop of glue was placed on the tip of the pic and then placed in the hole. On the right, the tip of the pic was placed in the neck of the glue bottle as shown in the text. BIG difference in the spread pattern. I would suggest some trials to get the hang of how much glue to use. If you can use the screw punch, then all you will have to do is harden the hole with the glue. That is really the main reason for the glue step; harden the hole, so that it retains its' shape. When using drill bits, it also glues all the loose stuff back on the paper. 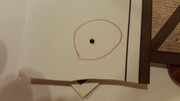 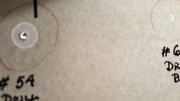 |
|
|
|
Post by missileer on Feb 7, 2018 17:22:58 GMT -9
VK,
Thanks, I hope it helps someone. I know it sounds like a lot of effort for such a small return, but it is the way I do it. I would not mind if others use this thread to provide an alternative.
|
|
|
|
Post by missileer on Feb 7, 2018 17:37:25 GMT -9
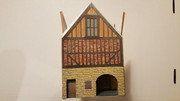
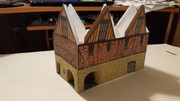
The aforementioned two walls are now finished. The angled view shows off the bay windows a bit better. Hope to have some more time tomorrow. 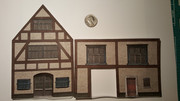 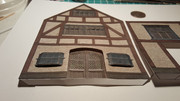 |
|
|
|
Post by cowboyleland on Feb 7, 2018 19:46:30 GMT -9
Thanks for the tutorial! Fantastic job!
|
|
|
|
Post by missileer on Feb 7, 2018 21:37:20 GMT -9
Cowboyleland,
You are welcome; I enjoyed putting it together. And thank you for the feedback.
|
|
|
|
Post by missileer on Feb 14, 2018 16:37:56 GMT -9
|
|
|
|
Post by missileer on Feb 20, 2018 18:38:37 GMT -9
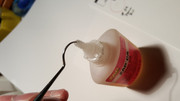
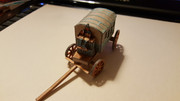
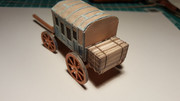
Well, you know the old saying that "tomorrow never comes". It took a bit, but tomorrow has finally arrived and I have finished the coach. The first photo shows the method I use for making my "rope" (and other things like hand rails, etc.). I take rigging line (lower right corner) and soak it with ZAP Thin CA and wipe off the excess with a dental tool. I use wax paper under the line to confine the excess glue and provide a place for the line to dry overnight, without adhering to any surface. I use pins on a board to keep the line straight while gluing (or sometimes I just use a weight on each end of the piece of line). You can see the stiff line lying over the bottle of glue. That stiff piece of line will now be used to simulate the ropes holding a stack of lumber to the back of the coach. The second photo shows the "ropes" installed on the lumber stack with the ends that will be wrapped and glued to the bottom of the coach (which is shown in the last photo). I know, the ends are not even (I am lazy), but this coach will be glued on to a diorama base, so that no one will ever see the bottom of that coach (unless they have an inspection mirror) 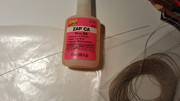  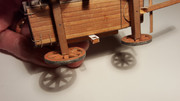 |
|
|
|
Post by missileer on Feb 20, 2018 18:42:08 GMT -9
|
|
|
|
Post by missileer on Feb 22, 2018 19:02:35 GMT -9
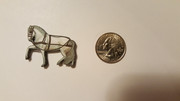
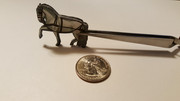
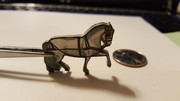
I want to use some fancier horses for a couple of the coaches. At his scale, the legs are extremely thin and trying to cut them out of cardboard or even foam core board is impossible for my skill level with a knife or scissors (I tried). So I am going to use the same method that I used on the carriage wheels. I will cut out 12 or 14 individual silhouettes of the horse glued together in a stack, with a full colored horse on either side of the stack. It will take some time, but I figure I only have to make 4 horses. I ran a short prototype test (photo below) and it looks like it will work well. Lots of snacks and cups of tea and I will muddle through. I forgot to put a scale comparison item in the photo, so imagine the horse about 1/8 of an inch taller then the diameter of a US quarter. 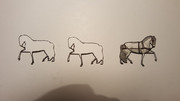 |
|
|
|
Post by Vermin King on Feb 22, 2018 19:26:41 GMT -9
Wow! I'm not sure how you were able to cut out one horse's spindly legs without mangling it, much less several of them.
And multiple times to get ONE horse. Amazing
|
|
|
|
Post by missileer on Feb 22, 2018 19:46:48 GMT -9
VK, thanks. Cutting paper keeps this inmate docile.  Actually, it is a stress reliever for me. I can really relax, cutting details. Assembling, now that is STRESS. |
|
|
|
Post by missileer on Feb 26, 2018 20:46:13 GMT -9
OK, folks, I have cut out my "kits" for assembling the first horse and the front wall of the connecting building between the Inn and the Hall. I hope to assemble them tomorrow night. 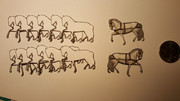  |
|
|
|
Post by missileer on Feb 28, 2018 16:17:03 GMT -9
|
|
|
|
Post by Vermin King on Feb 28, 2018 17:05:28 GMT -9
A noble steed indeed
|
|
|
|
Post by missileer on Feb 28, 2018 19:21:03 GMT -9
Thanks, VK.
|
|
|
|
Post by missileer on Mar 3, 2018 16:29:13 GMT -9
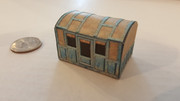
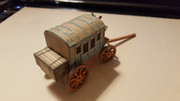
VK's talent has caused a change in plans. He recently took a vintage coach (high class), recolored it, modified it slightly and generally cleaned it up. I decided to use that one as my fancy coach with white horses. It took me a day or two to decide how I was going to detail it. I have the side panel "kits" cut out and I have included a picture. I included a copy of the wheels; those will be built in stack format, like my other wheels. I haven't yet decided on the details for the rest of the coach. Once I assemble the side detail, I will cut the windows out on the plain base unit. I will then glue the back plate on and cut the windows out in it (you can see a couple of punch holes in the back plate), Then I will glue the window panel to the back plate. Theoretically, it should work.  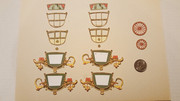 |
|
|
|
Post by Vermin King on Mar 4, 2018 17:20:22 GMT -9
I hope it works...
|
|
|
|
Post by missileer on Mar 4, 2018 19:50:22 GMT -9
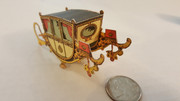
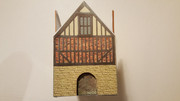
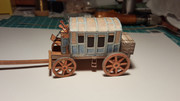
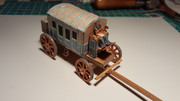
Progress on two fronts. Got the wall completed and assembled the side of the coach. I had a little problem with the wall and learned something important. The sheets that I used for the overlays were all printed on a HP Photo type printer. The sheet containing the door and the windows that I glued on the back of the wall were printed on larger HP machine that takes both A3 and A4 paper, because my Photo machine went belly-up. It turns out that all printers, even those manufactured by the same company do not have necessarily have the same default print size settings. The A3/A4 printer default size is just a hair smaller then the Photosmart. Over a page, it becomes a noticeable difference. Instead of just being able to glue the block of windows with the small door to the back, I had to separate the door and the windows above the door from the other windows, If I had left them connected, the door and widow set would not have aligned properly. By separating the two sections, I was able to center the individual sections, so that the slight size difference is not noticeable (unfortunately, I still know the error is still there). On the brighter side, the coach did not turn out too badly and I was able to cut the fringe on the end of the drivers seat. It only shows if you tilt the coach side (photo 2), but once, again, I know it is there. And now the photos:  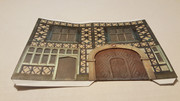 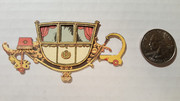 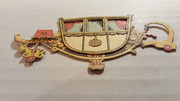 |
|
|
|
Post by Vermin King on Mar 4, 2018 19:58:48 GMT -9
OMG! You have done miracles with the coach
|
|
|
|
Post by missileer on Mar 4, 2018 20:04:42 GMT -9
Thanks, VK!
|
|
|
|
Post by Vermin King on Mar 5, 2018 9:54:22 GMT -9
The revised file for the coach should make this project a bit easier. Trying to line the long center strip on the original model was a major pain.
|
|
|
|
Post by missileer on Mar 13, 2018 11:51:33 GMT -9
|
|
|
|
Post by missileer on Mar 13, 2018 11:53:30 GMT -9
|
|
|
|
Post by Vermin King on Mar 13, 2018 12:32:43 GMT -9
Very nice work, sir.
Hey, John, as I was reading about Washington's carriage, four horses was normal, six were for show.
Political posturing was a big deal back then, too. According to Jefferson, 'George Washington is the finest horseman I know, and is much more comfortable riding a horse than by being pulled by one.'
And judging by contemporary illustrations, he showed up at the inauguration in a carriage, but went to the receptions riding a horse.
|
|
|
|
Post by lightning on Mar 18, 2018 21:19:49 GMT -9
Love your carriages! Beautifully done!!!
|
|


 First off, I only have two hands (I have never been able to hold anything with my toes), so cannot hold the paper and a tool and the camera at the same time. So we begin (I am including all who read this, so that I can spread the blame). The first photo shows my paper drilling kit. The glue is a thin CA penetrating formula. Then we have a curved dental pic, followed by a set of drill bits covering #s 33 through 80. Below that is a Japanese screw drill with six bits. On the far right is a medium sized hand twist drill. The second photo shows the drill base that I use. It is a balsa plank that I bought on sale (three for $1USD). I use balsa to extend the life of the drill bit and cushion the paper.
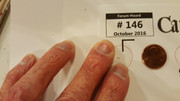


 Actually, it is a stress reliever for me. I can really relax, cutting details. Assembling, now that is STRESS.