


Making your own seamless textures
Sept 10, 2017 13:36:02 GMT -9
squirmydad, Dominic, and 4 more like this
Post by nullpointer on Sept 10, 2017 13:36:02 GMT -9
Here's how to easily take a texture that you found or made and make it repeat seamlessly. This works best with things like rock that are just equally irregular all over but it still works with things like wood planks, you'll just have to be more careful with the cloning.
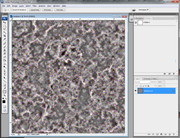
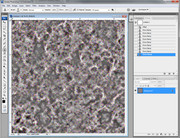
Step 1: Find your texture. I made this texture myself in Photoshop, but you could do just about anything; I can make a tutorial on generating your own textures if you guys are interested.
Keep in mind that an image where one part of the picture has a different feel than another part, be it lighter/darker, scale differences, or differences in focus, these will manifest as large unsightly striations when the texture is repeated multiple times. It is best to start with an image that is as uniform as possible unless you only plan on repeating the texture in one direction (like using the grass or rock examples but only repeating the texture horizontally).
Also, for most of our purposes designing cardboard models, your textures probably don't need to be very big at all. a 100x100 px canvas with be plenty for all but the largest figures and even on large terrain projects I doubt you need more than 1000x1000 if you are successful in making it tile seamlessly.
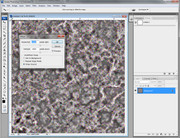
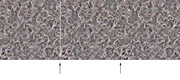
Step 2: I used the Offset Filter, found in Photoshop under Filters>Other>Offset or in GIMP by going to Layer>Transform>Offset. Make sure to option is selected to Wrap the image around, so that any portion that disappears off-page is carried over to the other side of the canvass.

Step 3: Make sure the offset distance makes the old edges and the seams we hope to get rid of appear approximately in the middle of the canvas so they're easy to work with. For textures that tile along just one axis, you only need to offset along that axis. I offset mine along both. For this 1000x1000 px canvas, an offset of 600 px in each direction puts the seams nicely around the center.
Step 4: Find your clone stamp tool. Make sure the brush for the stamp has a soft edge and is pretty large compared to the canvas size. I'm using a 100 px wide soft brush for this 1000 px wide canvas.
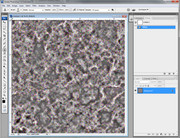
Step 5: Begin to clone portions of the unadulterated texture over onto the seams. If your texture has large recognizable features like shiny round pebbles, you will have to have a little more finesse in your cloning so you don't have rocks ghosting into eachother. Try different techniques like switching to a hard edge brush, or using your selection tools to copy entire sections of image on top of the seams.
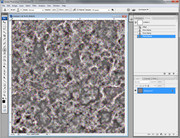
Step 6: As much as possible try to make your close work get close to the edges without going off the edge, or else you're just generating new short seams out there. You can still clean these up by offsetting the canvas again and removing them, but that's just extra steps. A little bit of leftover seam line will probably not be noticeable in a chaotic texture. Remember to use the crop to and crop the image to the edges of the canvas (turn snapping on), this will snip off any overpaint that escaped off the edge of the frame. Saving it as a JPEG, closing the file, and opening it again will also ensure those unwanted pixels are discarded.
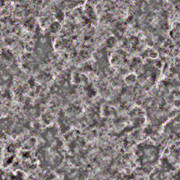
DONE! Check it out, the seams between the pattern tiles just disappears! Now your texture is ready to be used to fill a shape. You can offset it back to the original layout if you wish, but since we've made it seamless you should be able to offset it by any random about and never see seams. You can make a pattern fill out of it by selecting the canvas and going to Edit>Define Pattern in Photoshop or in GIMP by selecting File>Export As and export your image as a Gimp pattern (.pat) file.
Remember, if you resize the pattern by using the transform tool, it may make a strip of pixels along the edge with partial opacity because the size of the original rarely gets scaled by a perfect whole number of pixels, so the program tries to figure out the difference the best it can by making the new edge become partially transparent. To avoid this, size your texture on its own canvas using the image scaling options before dragging it onto your project's working space, thus it will always keep those edge pixels at 100% fill.
If you're interested, here's the final texture that was generated from this tutorial.
Step 1: Find your texture. I made this texture myself in Photoshop, but you could do just about anything; I can make a tutorial on generating your own textures if you guys are interested.
Keep in mind that an image where one part of the picture has a different feel than another part, be it lighter/darker, scale differences, or differences in focus, these will manifest as large unsightly striations when the texture is repeated multiple times. It is best to start with an image that is as uniform as possible unless you only plan on repeating the texture in one direction (like using the grass or rock examples but only repeating the texture horizontally).
Also, for most of our purposes designing cardboard models, your textures probably don't need to be very big at all. a 100x100 px canvas with be plenty for all but the largest figures and even on large terrain projects I doubt you need more than 1000x1000 if you are successful in making it tile seamlessly.
Step 2: I used the Offset Filter, found in Photoshop under Filters>Other>Offset or in GIMP by going to Layer>Transform>Offset. Make sure to option is selected to Wrap the image around, so that any portion that disappears off-page is carried over to the other side of the canvass.
Step 3: Make sure the offset distance makes the old edges and the seams we hope to get rid of appear approximately in the middle of the canvas so they're easy to work with. For textures that tile along just one axis, you only need to offset along that axis. I offset mine along both. For this 1000x1000 px canvas, an offset of 600 px in each direction puts the seams nicely around the center.
Step 4: Find your clone stamp tool. Make sure the brush for the stamp has a soft edge and is pretty large compared to the canvas size. I'm using a 100 px wide soft brush for this 1000 px wide canvas.
Step 5: Begin to clone portions of the unadulterated texture over onto the seams. If your texture has large recognizable features like shiny round pebbles, you will have to have a little more finesse in your cloning so you don't have rocks ghosting into eachother. Try different techniques like switching to a hard edge brush, or using your selection tools to copy entire sections of image on top of the seams.
Step 6: As much as possible try to make your close work get close to the edges without going off the edge, or else you're just generating new short seams out there. You can still clean these up by offsetting the canvas again and removing them, but that's just extra steps. A little bit of leftover seam line will probably not be noticeable in a chaotic texture. Remember to use the crop to and crop the image to the edges of the canvas (turn snapping on), this will snip off any overpaint that escaped off the edge of the frame. Saving it as a JPEG, closing the file, and opening it again will also ensure those unwanted pixels are discarded.
DONE! Check it out, the seams between the pattern tiles just disappears! Now your texture is ready to be used to fill a shape. You can offset it back to the original layout if you wish, but since we've made it seamless you should be able to offset it by any random about and never see seams. You can make a pattern fill out of it by selecting the canvas and going to Edit>Define Pattern in Photoshop or in GIMP by selecting File>Export As and export your image as a Gimp pattern (.pat) file.
Remember, if you resize the pattern by using the transform tool, it may make a strip of pixels along the edge with partial opacity because the size of the original rarely gets scaled by a perfect whole number of pixels, so the program tries to figure out the difference the best it can by making the new edge become partially transparent. To avoid this, size your texture on its own canvas using the image scaling options before dragging it onto your project's working space, thus it will always keep those edge pixels at 100% fill.
If you're interested, here's the final texture that was generated from this tutorial.

