|
|
Post by Vermin King on Oct 24, 2017 17:53:47 GMT -9
|
|
|
|
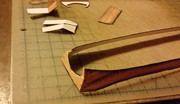
Post by Vermin King on Oct 26, 2017 15:19:50 GMT -9
Even at 15mm, it isn't really 'little'  Time to work on the superstructure, but I need to knock out Dave's Humvee tonight. He was hoping that someone would build it by Friday, the next date for a release I have mentioned before that I always try to do a Ravensblight model and a Ray Keim model for Halloween and I realized I didn't do anything from Haunted Dimensions this year, so the sekibune is going to have to wait until I get back in town. |
|
|
|
Post by Vermin King on Nov 1, 2017 7:00:15 GMT -9
Razzum frazzum! I had a bit of a question on something, and had it figured out, I think, before I got sidetracked. Now I'm back to being confused. I'll either be working on this tonight or figuring things out again
|
|
|
|
Post by Vermin King on Dec 7, 2017 16:45:11 GMT -9
|
|
|
|
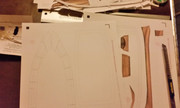
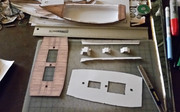
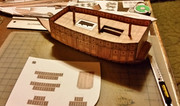
Post by Vermin King on Dec 8, 2017 12:22:20 GMT -9
I originally started building without instructions, and had to start over. You may have noticed a lot of scrap parts sitting next to my work area throughout.   I had an issue with the hull bowing out that caused the top side of the hull to be lower to the waterline than it should be, creating a bit of a gap between the hull and superstructure. So I took the spare top former for the hull that was left over from my first build and glued a piece of scrap across. Trimmed it fit and glued to the top of the former already placed, and voila, much better. |
|
|
|
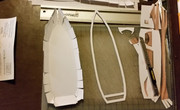
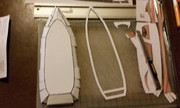
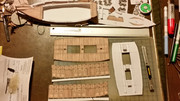
Post by Vermin King on Dec 8, 2017 16:57:20 GMT -9
 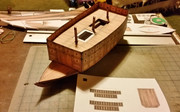 Coming together |
|
|
|
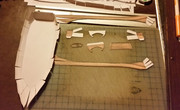
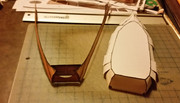
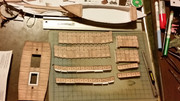
Post by Vermin King on Dec 11, 2017 16:18:55 GMT -9
Long skinny things with folds down the middle are a pain, so I skipped the mast assembly until now. Mast holders are glued in and I built and mounted the on-deck crow's nest thing, and came back to the masts. Each half of the mast is composed of three parts. After these pieces are glued and dry (under weight to keep them straight), the six parts are glued together, three and three. These will be again dried under weight. When dry and straight, we will have to have a snug fit in the mast holders. I'm thinking one to two layers of scrap should shim them nicely for a good fit. 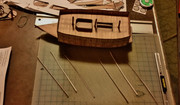 I'm going to be building this 'under full sail', so I've been reading up on various methods of rigging. I'm leaning toward using thin tan thread. One guy who builds ships at a much smaller scale than this normally, did a large scale sailing ship once and had an issue with his rigging sagging. His solution was to remove the rigging and then re-rig it with enriched thread. He enriched the thread with pva glue. He used a wire hangar and clothes pins and glue. Cut the thread into strips longer than you need. Clip them to the hangar and clip clothes pins onto the bottom end of each thread. That will keep the threads straight. Work the pva into each thread and let them hang dry. Hopefully, I'll end up with stiff straight thin tan 'wires' to cut to length and glue into place. In a perfect world... |
|
|
|
Post by Vermin King on Dec 11, 2017 18:20:14 GMT -9
Well, using 110 lb cardstock, only had to use one half of the mast. Shimming might be necessary on the 28mm scale mast, but not on the 15mm scale mast. Kind of a pain to edge. Not my best work. Should be fine with the sail in place, though. When I build the atakebune, I'll just glue layers of card together, and glue one mast face onto the stack and cut out. I'll just use Chris's wood texture for the bottom of the stack. That way I'll only have to cut out one thick part
|
|
|
|
Post by Vermin King on Dec 14, 2017 15:50:04 GMT -9
I thought about brushing pva on the thread, then I thought 'why not just clear coat?'  |
|
|
|
Post by cowboyleland on Dec 15, 2017 8:04:04 GMT -9
Looking forward to seeing how the threads work out.
|
|
|
|
Post by Vermin King on Dec 15, 2017 8:07:57 GMT -9
Not as stiff as I would like
|
|
|
|
Post by cowboyleland on Dec 15, 2017 8:11:57 GMT -9
Noted.
|
|
|
|
Post by Vermin King on Dec 15, 2017 8:29:56 GMT -9
It yielded a smoother surface. Somewhat more stiff, but I was hoping for something like uncooked spaghetti. Should work fine
|
|
|
|
Post by Vermin King on Dec 17, 2017 18:22:11 GMT -9
Okay, I had a little struggle. On the 15mm version, don't use 110 lb cardstock for the sails. This time I used 67 lb for the front and the sail former, and the sail reverse is done on heavy paper. Much better result so far. In the upper right hand corner, I have the piece that goes across the front of the ship, where the grappling hooks go.  I should finish the sail reverse tonight. That leaves mounting and rigging, and I plan on doing two grappling hooks, with a whole week to finish |
|
|
|
Post by Vermin King on Dec 18, 2017 18:09:26 GMT -9
Clear coat thread does not work. Now I have to work out how to do the pva coated glue ...
|
|
|
|
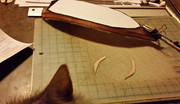
Post by Vermin King on Dec 19, 2017 9:34:11 GMT -9
Over lunch today, I made a less than satisfactory attempt to turn one of the lines into a semi rigid piece (not shown) So, while struggling with the mess, my brain was trying to come up with another solution. As I don't do ships usually, and few historic aircraft, my rigging skills are less than satisfactory. So, my struggles are less with the model than my own abilities. I decided that since I was going to use the optional flags, the rear flag holders could also be attachment points for the rigging. A totally fictitious way of doing it, but it should look cool, and unless an expert in sekibune ship construction views the model, I doubt anyone will notice. Out of the scrap I mentioned above, I also made three 'posts' to cover other attachment points. The mast support will be triangular. One of my posts centered at the front, and at the back, the flag holders. For the sail, top and bottom on each side will attach to my side posts, which will be placed above the rear side doors. By having secure anchor points on the hull, it will be easier to attach to the sail and mast, without putting too much strain on things. 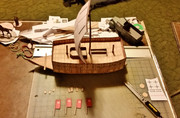 I should also mention that I made a 'bracket' between the mast and sail to hold the sail at a 'billowy' angle |
|
|
|
Post by Punkrabbitt on Dec 19, 2017 13:44:25 GMT -9
Hey! I see a truck in that picture! It looks really nice!
But seriously, you are doing some great work. Me, I'm not going to bother with the rigging because mine will be a gaming piece. I will be building the 28mm version, and I am very much looking forward to it.
|
|
|
|
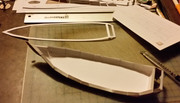
Post by Vermin King on Dec 19, 2017 15:22:50 GMT -9
I forget-- is it a stepped mast or an unstopped mast when you have it in the down position? I intentionally was doing this all decked out to see if there were any issues with the 'advanced' version. I think it is all good now. This one is getting given away, but when I make the atakebune, I was thinking of working out a printed set of rigging. Won't look as good as the thread, but gamers typically are 'not going to bother with the rigging' for a gaming piece.
My thought was to have printed ropes (wider than scale)that loop onto the top of the mast and glue to the middle of the front and the two rear corners, or slide into receivers, and v-shaped rope pieces that connect the sail to the sides. Probably more gamer-friendly. And the way I envision it is to have the hull connections set up to slide into 'posts' against the walls, so you can remove the rigging and sail for close-quarters battles. At least that's the idea
|
|
|
|
Post by Vermin King on Dec 20, 2017 14:50:37 GMT -9
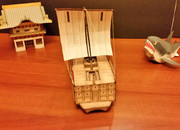
Yes, rigging is NOT my best technique.   Two grappling hooks and a little samurai, and it will be done |
|
|
|
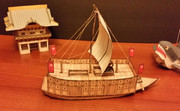
Post by Vermin King on Dec 20, 2017 18:29:48 GMT -9
|
|
|
|
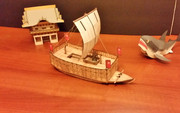
Post by lightning on Dec 29, 2017 11:37:25 GMT -9
WOW! I am very impressed! This looks awesome ... and all that at half scale!
|
|
|
|
Post by H_E_H on Feb 10, 2018 7:03:52 GMT -9
That's incredible. Nice work!
|
|
|
|
Post by Vermin King on Feb 12, 2018 5:30:26 GMT -9
Thanks. It's lightning's model. Give him all the credit. I had hoped to build the sister ship by now, but time isn't cooperating |
|
|
|
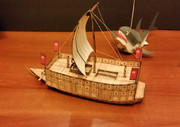
Post by Vermin King on Apr 23, 2021 18:08:13 GMT -9
|
|
|
|
Post by lightning on Apr 23, 2021 19:34:00 GMT -9
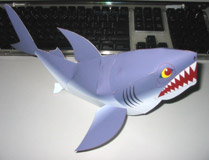
Great models. The shark is esp fun! |
|