|
|
Post by Vermin King on Jul 21, 2018 6:53:53 GMT -9
 Okay, I can deal with the odd way the tools are set up, but I'd like to go back to the old Tool Options set up I can deal with the stupid cursor, but what I can't deal with is no Color to Alpha. I use that a lot, and now when I select a color, Color to Alpha isn't available. Any ideas? |
|
|
|
Post by Vermin King on Jul 21, 2018 7:30:59 GMT -9
|
|
|
|
Post by Vermin King on Jul 21, 2018 7:42:13 GMT -9
Aha! Edit/Preferences/Image Import & Export/ Add an Alpha Channel to Imported Images
|
|
|
|
Post by Vermin King on Jul 23, 2018 17:30:46 GMT -9
Gotta be a settings thing, but if I copy/paste, the copy is not crisp and clean. I evidently don't know what I am looking for in settings...
|
|
|
|
Post by cowboyleland on Jul 23, 2018 20:04:46 GMT -9
This sounds like a disaster!
|
|
|
|
Post by mproteau (Paper Realms) on Jul 24, 2018 3:36:07 GMT -9
I've had a number of issues transitioning to 2.10.0, then 2.10.2, and now 2.10.4... I'm struggling with remapped key bindings and default setting changes - things that I would never think to look for because it was never something I explicitly set, but now it's different and I have to root around to figure out why. They also have a new model for how the transform dialogs work, which fights with my muscle memory, they have a million menu items with duplicate mnemonics, so my normal keystrokes don't do the right thing anymore, and even the free selection tool behaves differently now.
My biggest woe right now is that it is MUCH slower with my images with lots of layers than 2.8 was.
But, they've been responsive to bug reports. It's just a huge time sink to really track down a minimal scenario that demonstrates a problem.
|
|
|
|
Post by Vermin King on Jul 24, 2018 3:49:50 GMT -9
Any help would be appreciated
I had a perfect example last night. The Bull Leaper is separated from the bull to be repositioned. In Free Select you have to hit Box Select to activate it, then pasted it above. Then turned the Bull into a complete figure, but the eyes seemed fuzzier. Went to the leaper, and put borders around him, then copied the visible arm to create an arm to add to the 'hidden' arm. Copy/Paste, then Rotate, and pasted where it needed to be, and it looked like crap. Same arm, but totally lost resolution. It would have been a good example.
|
|
|
|
Post by Vermin King on Jul 24, 2018 12:06:04 GMT -9
Solved it, maybe. There's a thing called Dithering in Gimp which is an algorithm for smoothing images. Unclick it in Preferences, and Gimp stops screwing with pasted images.
Now I have to decide on whether to go back to my original image and start from scratch or try to fix my current image.
EDIT-- and from the Release Notes
|
|
|
|
Post by lightning on Jul 26, 2018 1:35:12 GMT -9
What is color to alpha?
What I use (maybe it is similar) is in the layers tab -> right click on layer
Add layer mask
Greyscale copy of layer
Does that help?
I have no clue what an alpha is vs. layer mask. I know in the photoshop world they only have alphas. In Blender an Alpha is called the transparency info. For me in Gimp this is the Layer Mask.
Maybe it is actually the same?!?
|
|
|
|
Post by mproteau (Paper Realms) on Jul 26, 2018 2:29:26 GMT -9
The alpha channel holds opacity information. When you create a layer mask, you're essentially editing the alpha channel for a layer, though in a non-destructive way (you can always turn off the layer mask and your original layer is unchanged). The color-to-alpha filter operates on any selected region in a layer (though apparently you can't use it on a layer mask). It uses the RGB value of a selected color to determine opacity of each pixel in the region. If the colors match, it's completely transparent. Partial matches become partially transparent. I haven't read up on the actual implementation to be able to describe exactly how it matches. I typically use it on greyscale images, where black stays black, grey becomes partially transparent, and white just goes away. That's how I convert my templates from Silhouette Studio cutfiles into layers in GIMP.
|
|
|
|
Post by Vermin King on Jul 26, 2018 4:01:04 GMT -9
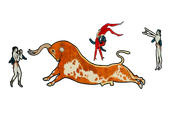
Color to Alpha allows you to delete background info, leaving only the parts on the page. That makes it a whole lot easier to move things around and create images from photos to be used as parts. You can delete the stuff you will never be using. I'll use the Bull-Leaper as an example. Here is the original view of the fresco and the png that I will be using to create the figures. 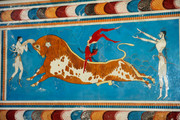 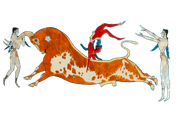 By getting all the mish-mash out of the way, I can then work on preparing the four figures. The last attempt at this was botched by that 'Dithering' thing that was built in. It made all the outlines and any of the dark lines in the figures fuzzy. Supposedly this allows a smoother transition in editing photos, but when you are making crisp parts, it screws things up. BTW, I tried using the two-step fuzzy select last night. It is two-steps now to allow you to adjust your points that mark the selection. Yes, you can adjust the points if you see one slightly off now. Extra step, but it eliminates having to start over when you get in a hurry and a selection point is off. |
|
|
|
Post by mproteau (Paper Realms) on Jul 26, 2018 4:37:29 GMT -9
Vermin King - I'm interested in knowing how you used color-to-alpha helped you in this case. I would have approached this by using the magic wand tool to select regions, and just deleting the stuff. Sometimes after fuzzy-selecting things, I'll grow the selection by a pixel and then shrink it by a pixel. If there were stray 1px spots that weren't selected, this will absorb them... Regarding the "two-step fuzzy select" process - do you mean the two-step freehand selection now? I hate the extra step... Knowing that you can, using modifier keys, quickly switch between adding to the selection or subtracting from the selection, I just incrementally shaped the selection using the freehand tool... There's always more than one workflow you can follow... I guess my old workflow lost out to a newer way. I'll adjust eventually!
|
|
|
|
Post by lightning on Jul 26, 2018 4:49:28 GMT -9
The alpha channel holds opacity information. When you create a layer mask, you're essentially editing the alpha channel for a layer, though in a non-destructive way (you can always turn off the layer mask and your original layer is unchanged). The color-to-alpha filter operates on any selected region in a layer (though apparently you can't use it on a layer mask). It uses the RGB value of a selected color to determine opacity of each pixel in the region. If the colors match, it's completely transparent. Partial matches become partially transparent. I haven't read up on the actual implementation to be able to describe exactly how it matches. I typically use it on greyscale images, where black stays black, grey becomes partially transparent, and white just goes away. That's how I convert my templates from Silhouette Studio cutfiles into layers in GIMP. But why have alpha functionality and layer mask functionality? Seems like the same thing. Is the alpha destructive? |
|
|
|
Post by mproteau (Paper Realms) on Jul 26, 2018 5:17:38 GMT -9
Sorry if I'm getting too basic in these explanations... Just trying to avoid confusion...
Having an alpha channel is no more destructive than having a Red, Green and Blue channel. You can modify those channels independently, or at the same time. Some operations are destructive, and some are not. For example, using the paintbrush tool directly on a layer changes the pixel values on that layer. That's a destructive operation on that layer. Changing the blend mode on a layer is a non-destructive operation. It's not changing the pixel values on the layer. GIMP is just smart enough to render the results of combining the pixels. Layer masks are a way of manipulating the alpha channel without changing pixel values on your layer. When you paint inside the layer mask, that's a destructive operation on the layer mask, but not on your layer.
When you say "alpha functionality" I assume you mean the "color-to-alpha" filter? Yes, color-to-alpha is destructive (currently). I don't know if in the future, as they add non-destructive layer filters, if this will change. It's simply an available tool, and it operates differently, and in conjunction with, layer masks.
I'll give you a couple examples of how I use similar tools differently.
1) When I make a template for some new geometry, I start by making the cutfiles. I adjust line styles and print to PDF from Silhouette Studio. I import the PDF into GIMP, and now I have a layer that has a white background and black (and sometimes colored) lines. I magic-wand select the interior of my geometry and grow the selection by a couple pixels. This selects all the white area that I need to texture, including the anti-aliased pixels around my lines. I use the color-to-alpha tool to turn white values into transparent pixels. This also makes the anti-aliased pixels semi-transparent. Now, I can put layers under this layer. Works great.
I could do this by using layer masks or deleting regions, but I think that would require more than one click and two menu selections, and I'm not sure it would result in the perfect removal of the solid white background that I need removed.
You need to be careful with color-to-alpha because it doesn't just do an exact match of colors, so you might end up with pixels becoming transparent that you didn't want.
2) Sometimes I pull in photos that I need to strip elements out of. I rectangle select around the thing I want and crop the layer to selection to minimize my work. Then, I add a layer mask with full opacity, then start painting with various brushes until I see only what I want. The layer mask lets me add or remove bits very nicely, in a non-destructive way. Once I've gotten the piece I want, I apply the layer mask.
I love layer masks for most of my workflows that require erasing a lot of pixels. Being non-destructive, it makes undoing mistakes a breeze. Color-to-alpha would be useless in this case.
3) Sometimes when I'm making promo pics, I don't bother with a layer mask because I can just free-select regions and delete stuff. It's not that it's better than using a layer mask. It just takes less work.
|
|
|
|
Post by Vermin King on Jul 26, 2018 5:55:43 GMT -9
Vermin King - I'm interested in knowing how you used color-to-alpha helped you in this case. I would have approached this by using the magic wand tool to select regions, and just deleting the stuff. Sometimes after fuzzy-selecting things, I'll grow the selection by a pixel and then shrink it by a pixel. If there were stray 1px spots that weren't selected, this will absorb them... Regarding the "two-step fuzzy select" process - do you mean the two-step freehand selection now? I hate the extra step... Knowing that you can, using modifier keys, quickly switch between adding to the selection or subtracting from the selection, I just incrementally shaped the selection using the freehand tool... There's always more than one workflow you can follow... I guess my old workflow lost out to a newer way. I'll adjust eventually! Well, I have not mastered layers. So I like to work on a transparent background. When you delete without 'Color to Alpha', you end up with white in the layer. By working on a transparent background, I don't have to be as exact in picking out what I want to move or mess with. Yes, I meant freehand select. The points can be moved now, which could be handy. There have been several times when I was doing a freehand select on a complex piece, and I botch one of my selection points. On the old system, I would have to start over. Now you can keep going and then adjust your points, if they need it before hitting Enter and locking it in. And, yes, I call this the sledgehammer approach, but it is part of how I do things. There are probably more elegant ways to do things, but this works for me. I am glad that I figured out that Dithering mess, or I'd have probably had to step away from things or go back to an old version of Gimp. |
|
|
|
Post by mproteau (Paper Realms) on Jul 26, 2018 6:08:09 GMT -9
Well, I have not mastered layers. So I like to work on a transparent background. When you delete without 'Color to Alpha', you end up with white in the layer. By working on a transparent background, I don't have to be as exact in picking out what I want to move or mess with. Aha. I think I see the disconnect. This is what makes GIMP hard - learning the language. When you bring in your image to work with, look at the layer it creates. You'll see the name is probably bold. This layer doesn't have an alpha channel, so it doesn't like transparent pixels. You can right-click on the layer and "add alpha channel" or something like that. It'll take the bold away from the label. When you erase now, you'll get transparent pixels. When you run the color-to-alpha filter on a layer that doesn't have an alpha channel, it'll add an alpha channel automagically for you. Yes, I meant freehand select. The points can be moved now, which could be handy. There have been several times when I was doing a freehand select on a complex piece, and I botch one of my selection points. On the old system, I would have to start over. Now you can keep going and then adjust your points, if they need it before hitting Enter and locking it in. Something you might like to try. With the freehand tool (or any selection tool, really) make a selection. Then, hold the CTRL key and make a selection that intersects with the first one. Now try that with the SHIFT key. I think the ALT key as well. Basically, you can add, subtract or intersect very quickly this way. And, yes, I call this the sledgehammer approach, but it is part of how I do things. There are probably more elegant ways to do things, but this works for me. I suspect this is what most people do with GIMP. I flail around until something works. Then I pray I can do it again. Then I try to make that muscle memory. Then I lament the GIMP team changing key bindings that render my poorly understood use of features broken.  |
|
|
|
Post by hackbarth on Jul 29, 2018 16:26:56 GMT -9
The alpha channel holds opacity information. When you create a layer mask, you're essentially editing the alpha channel for a layer, though in a non-destructive way (you can always turn off the layer mask and your original layer is unchanged). The color-to-alpha filter operates on any selected region in a layer (though apparently you can't use it on a layer mask). It uses the RGB value of a selected color to determine opacity of each pixel in the region. If the colors match, it's completely transparent. Partial matches become partially transparent. I haven't read up on the actual implementation to be able to describe exactly how it matches. I typically use it on greyscale images, where black stays black, grey becomes partially transparent, and white just goes away. That's how I convert my templates from Silhouette Studio cutfiles into layers in GIMP. But why have alpha functionality and layer mask functionality? Seems like the same thing. Is the alpha destructive? For one thing, you can save a PNG with the Alpha information, to make a icon, for example, and that is not an option working with layers. |
|
|
|
Post by Vermin King on Jul 29, 2018 16:38:04 GMT -9
On any of my vehicles I add nose art or graphics. By saving the png with transparency as the background, it is very easy to add the artwork
|
|
|
|
Post by lightning on Jul 30, 2018 5:52:32 GMT -9
But why have alpha functionality and layer mask functionality? Seems like the same thing. Is the alpha destructive? For one thing, you can save a PNG with the Alpha information, to make a icon, for example, and that is not an option working with layers. In Gimp it is! I can add layer masks, make transparent areas, export to PNG and then even import it into Adobe Illustrator.
I have been trying to solve this linguistic mystery for years, but have come to the conclusion that in the Adobe world this functionality is called Alpha (masks) and in Gimp it has been called layer mask where you can manipulate the Alpha channel.
|
|
|
|
Post by Vermin King on Jul 31, 2018 12:26:11 GMT -9
Other than being unuseable, this version of Gimp is great. Wish me luck on the uninstall and installing of an older version.
You can't do anything with this that doesn't screw up the resolution. I don't see how this is helpful for anyone
|
|
|
|
Post by mproteau (Paper Realms) on Jul 31, 2018 16:47:41 GMT -9
I'm having terrible performance problems. 30 seconds per image export is unacceptable. The lag on some simple operations demonstrates they have serious layering issues. I'm afraid I can't go back to 2.8 because my latest work is in 2.10 and the file formats are not compatible. NOT COMPATIBLE. I see no option to save into the older format.
So, I will continue to plug away. How expensive is Photoshop? My little slice of the papercrafting business barely covers the paper and ink I use to do all the test builds to release products, so I'm concerned about dropping even more money. Of course, I'd also love some real software for making PDFs, too.
|
|
|
|
Post by Vermin King on Jul 31, 2018 17:28:20 GMT -9
Can you export your work to png, and then you could go back to 2.8, maybe?
|
|
|
|
Post by mproteau (Paper Realms) on Jul 31, 2018 17:40:30 GMT -9
Can you export your work to png, and then you could go back to 2.8, maybe? I considered it, but I’ve got maybe 100 layers, many with opacity and blend modes... it will be a real pain... |
|
|
|
Post by Vermin King on Jul 31, 2018 18:33:50 GMT -9
I don't have anything helpful to add on that.
BTW -- I am so very thankful that I decided not to do anything on my two projects I am trying to decide between for Papercuts until I sorted Gimp out. I didn't mess up any of my previous work ... whew!
|
|
|
|
Post by lightning on Aug 2, 2018 5:36:11 GMT -9
I have been using only Version 2.10.2 and have not had any problems. That said, I am not working with 100 layers. Most of my layer work I do in Illustrator.
In any case, going back to 2.8 shouldn't be a problem. New releases are always a bit of russian roulette ...
|
|
|
|
Post by Vermin King on Aug 2, 2018 5:56:15 GMT -9
As I mentioned in other threads, I went back to 2.8 and it is such a relief.
I don't see how you can work in 2.10.2 (maybe it is better than 2.10.4). I have found no way to even have Copy/Paste lose resolution in 2.10.4, and if you rotate anything it is a disaster. After Papercuts, I might try 2.10.2, but I doubt it.
|
|
|
|
Post by lightning on Aug 2, 2018 7:33:56 GMT -9
Yes, Gimp 2.8 was my work beast for the last years. If I get enough Patreons I will try Photoshop just because it integrates so well with Illustrator. But I think there are a couple of plugins in Gimp that I have not found in Photoshop.
In any case happy you are relived :-)
|
|
|
|
Post by mproteau (Paper Realms) on Aug 2, 2018 15:45:27 GMT -9
Vermin King - do you have an image I can try to rotate and send you the result, to see if it replicates your miserable experience? I think I found the settings that might yield results like in 2.8, but I'd like to see if you think it's a lot better, or if I'm really seeing what you're seeing. Another note - I have taken my one 500mb source file and have broken it into 10 separate files. It sucks because it makes moving layers around difficult, but the time to export an image is down from 30 seconds to about 3. I need to relate to the gimp team that it seems linearly related to the total number of layers, and the layers aren't even visible... I'll be the 2.10.x beta tester - maybe one day I'll post "2.10.26 is GREAT!" 
|
|
|
|
Post by Vermin King on Aug 2, 2018 16:06:29 GMT -9
 mproteau (Paper Realms) mproteau (Paper Realms), There should be four images on a transparent background. Pick one and rotate. It shouldn't matter if you rotate by 1 degree or 180 degrees. One thing I didn't try, but could be interesting, is to select an image, then use the Rotate tool to click on it, and then cancel the action. I'm curious as to whether that would cause the degradation also. I truly hope you have found a fix |
|
|
|
Post by lightning on Aug 2, 2018 20:21:21 GMT -9
I just played around with your test file and remembered that in fact I also ran into these problems but forgot how I solved them.
Are you aware that when rotating (or using any transformation tool) you can select the NOHALO interpolation mode with is much better than the default CUBIC mode.
Also after the rotation I often use FILTERS-ENHANCE-UNSHARP_MASK to sharpen the image a little (play around with settings so you don't over sharpen, the default is too much for me). With any transformation a loss of quality is part of the process. The unsharp mask filter actually makes the original bitmap look better! :-)
BTW you can change the default interpolation method in the preferences, so you don't have to change it every time you use a transformation tool.
As for speed, doubling or quadroupling the bit depth might be the culprit. From what I have heard, internally GIMP is now using 32bit image processing, so even if you use 8bit images, internally they are transformed with 32bit rez. In the preferences, you can activate hardware accelaration. Not sure if that helps much.
One thing I have found is that if you have openend a file with 2.10 you have to set the layers (each one of them) to legacy mode, or you won't be able to open them when you go back to 2.8.
I am very happy that they have finally added larger than 8bit support, but this is only important for high quality imagery and probably won't be needed for our purposes as paper modellers.
Hope this helps
Chris
|
|


