|
|
Post by Vermin King on Aug 7, 2019 9:08:48 GMT -9
I've collected some great grunginess png's that I have used in the past on projects, but virtually all textures on this come from photos taken from the film. For the Snake Truck model, I think it needs to be as close to the film as possible. If I can ever get to more buggies, muscle cars and hot rods, I'll definitely keep 'dirty' in mind
|
|
|
|
Post by Vermin King on Aug 7, 2019 11:05:37 GMT -9
The importance of test builds. I printed at lunch and clear-coated, and now I see some tabs that need adjusted on the seats
|
|
|
|
Post by Vermin King on Aug 9, 2019 8:39:32 GMT -9
I glued the fold-overs together at lunch yesterday, thinking I might get started building last night. Only I picked up a bug and even now am barely out of bed. Here's what I did. 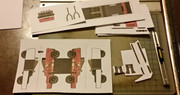 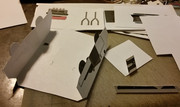 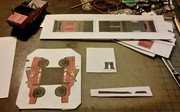 On the exterior sides, you will want to cut out the area that lines up with the windshield tabs on the inner sides. The tab only needs to be one layer thick. On the inner sides, the area between the wheels needs to be removed to not interfere with the base plate. I went ahead and cut out the wheels, too, which helps me verify the alignment of the fold. On the main hoist part and supports, I glued another layer in between the halves. On the rear strap part, only the central part between the folds needs folded over, so only fold-over that main part. I guess this will be back in business when I get home Sunday |
|
|
|
Post by Vermin King on Aug 9, 2019 18:16:05 GMT -9
I quickly gave up on trying to do anything on this tonight, other than cutting out the main body parts and started edging. Hands aren't very steady, but I am feeling much better than this AM. So I resumed the Ultra 4 Buggy. I'd already created a clean copy, but the front end is wrong. At the back, the fans should be over the engine, and the fire extinguisher ought to be red. I had been unable to find a frame/cage image (minus the panels) of this particular buggy, so I decided to work from the King of the Hammers 2015 version.  I've got a bunch of photos of this guy, and when I stretch things out, square it up and fix perspective, I almost think the original designer could have used this as the image he used to create his model. I haven't gotten hold of any of the Safecraft version images that match up as well as this one. So, as I build up this version, I am concentrating on keeping the frames and assorted visible internals right. That way I can swap out panels and have other Ultra 4's. One thing the designer did not have is the forward sub-frame, which you can see behind the front wheel. By having that part, I can turn everything up front into a second nose part that glues onto the main body. When the nose is done, it will have an axle/front end based on 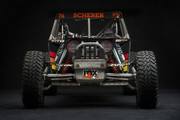 It also gives me the tread pattern for the wheels. I didn't get that much done on it, but it was important things that got done EDIT-- Here's where I got to yesterday. 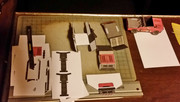 |
|
|
|
Post by Vermin King on Aug 11, 2019 5:50:12 GMT -9
I went to a joint birthday party yesterday for my grandson Warren and his mom. In downtown Windsor I happened to see an old Fairlane, so I got a few photos. There is a Fairlane in the movie, but substantially different from this one. It may make the list, but probably not
|
|
|
|
Post by okumarts on Aug 11, 2019 6:29:30 GMT -9
All of this is so amazing.
|
|
|
|
Post by Vermin King on Aug 11, 2019 8:25:34 GMT -9
More amazing if I could finish anything
|
|
|
|
Post by Punkrabbitt on Aug 11, 2019 9:20:27 GMT -9
More amazing if I could finish anything It's a process. Not everything in life goes according to a schedule. You'll get there. |
|
|
|
Post by Vermin King on Aug 11, 2019 15:37:10 GMT -9
|
|
|
|
Post by Vermin King on Aug 12, 2019 16:18:06 GMT -9
I went back to working on the Ultra 4 for a bit tonight. This is a back and forth thing. I need to get the innards worked out from the Fox vehicle to put into the blank one. So, I have the Working Blank version and Working Fox version on the same page. The whole Fox work needs to be cartoonized, etc. And I still need to work out the nose and get the Nitto treads done for the tires, but I think it shows pretty good progress 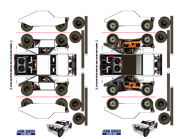 Back to studying... |
|
|
|
Post by Vermin King on Aug 13, 2019 9:34:33 GMT -9
The nose on this is giving me trouble on which way I want to go. Not so much difficult, as deciding which avenue to take to get there. Nominally, the vehicle is a jeep. That means the 'hood' rolls over the edge around the headlights (which are very cool. I saw a photo with the lights. A whole bunch of square led's make up each round headlight).
Right now I am leaning towards starting with the grill, having the sides starting at the outside edge of the headlight. I first tried working it out with the sides first. Either way, I have to decide on whether to have the shocks as part of the side artwork or the front end artwork.
Decisions, decisions
|
|
|
|
Post by Vermin King on Aug 13, 2019 17:41:19 GMT -9
 Okay, maybe not red and white, but I could see something like this It's rather odd that they don't get photos of the backs of the Ultra 4's. This photo and another are why I moved the fans to the top  From glimpses of the area below the fans, I don't think you can really see anything. Most drivers seem to like to keep their spare tire there. I might do that. Occasionally, you will see an exhaust pipe sticking up out of that area or going horizontal across that area, but I sure don't spot one in this photo |
|
|
|
Post by Vermin King on Aug 15, 2019 5:59:16 GMT -9
Well, last weekend I was out of town for my grandson's second birthday and his mom's 27th.  Needless to say, I haven't done much lately. Did get the laminate parts on the Snake Truck and started doing the seats 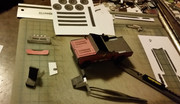 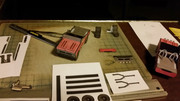 The round top and front edge have strips that glue around, then the sides get glued over them. I experimented with edge gluing them, but I'm going to put body-colored tabs on. I played around with the Ultra 4 buggy some more, too 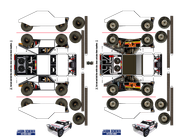 On Scherer's buggies, the exhaust pipes generally exit above the frame that holds the fans. I was trying to decide how I wanted to have them, angled out, pointed up, or one going horizontal. He does all three, but I'm not sure how you decide which orientation for what type of racing, so the easiest is to have them just going upward. I'm going to use some of the photos to add clutter in those areas (hoses, etc.), but I am definitely going to have the spare on the back end. Scherer rarely seems to have a spare back there, but then again, he went one whole season without having to change a tire during a race. Also not sure why he sometimes has a Jeep tail in some races, like in the photo above, and in others he just has the buggy back end. In others he has the Jeep tail frame without cladding, acting as a tray for miscellaneous stuff. If I do a set of three Scherer racers, I'll probably do the Fox and Rubicon buggies without the tail, but on the Safecraft I will add it. I have seen the no-tail and tray versions on the Fox, but not Jeep cladding, but that doesn't mean he didn't use it at some time. EDIT-- There were two Fox paint schemes over time. I like the original red, orange and yellow stripe personally, but in the 2019 paint scheme, it has the Jeep tail. And the tire 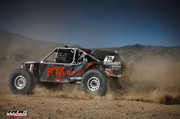 EDIT #2-- I'm not so sure adding the clutter is necessary, especially since it wouldn't be in a logical location and it will be covered up with the tire. I really wanted to keep this at two models per page. It puts the scale 'right' in that the tire height is belt high. But the separate nose will take up space. And it will need the bull bar on the front. The tires are the right height, but they aren't the correct width, so they will take up more space, as will the spare tire. This guy is going to have to be a one-page model, I guess. That will give me more room on the page to experiment with which method is best for the nose, so I shouldn't be bummed that I can't have it as a half-page model... |
|
|
|
Post by Vermin King on Aug 16, 2019 8:53:12 GMT -9
Did some prep work for the nose and tires on the Fox Ultra 4 buggy. Added the tabs on the Snake Truck seats. Here's the Ultra 4 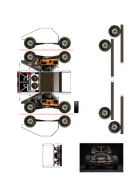 At this point, there are only three graphics from the original model, and those have been modified. The build was already different. I think I can safely call this My model at this point. Maybe I can do the nose and bull bar while I take a break from studying tomorrow. |
|
|
|
Post by Vermin King on Aug 17, 2019 10:23:39 GMT -9
On Snake Truck, seats are in and wheels are cut out. 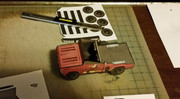 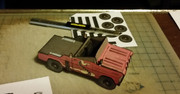 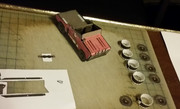 On the Scherer Fox Ultra 4, I am now down to all graphics being mine. Swapped out the tail lights with one from the Gavel version of the car, as well as the safety markings at the back. Flipped that also, since they should be at the top, not the bottom of the tail.  Perspective on the grill must come into play. When side view is taken as being correct, and width is adjusted based on height and width of the side, one would assume that a shot of the front end when adjusted to the width of the vehicle would be correct. Wrong! Quite a bit of playing with it to get it fixed, and had to shift and resize various elements to get things to look right. But I am going to come back to it with fresh eyes before I continue with the nose. And I need to add tabs to the wheel treads... |
|
|
|
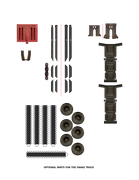
Post by Vermin King on Aug 18, 2019 18:21:46 GMT -9
Well, I didn't finish it tonight. On the Snake Truck, my treads are not long enough. I don't calculate tread lengths each time. In this case, I grabbed the wheel face and treads from the easy buggy and re-sized the two so that the truck's wheel face is the same size as the buggy wheel face. The treads should have adjusted accordingly, but somehow they ended up short. and I don't see where the problem crept in. So I just matched the treads to the bottom half of the wheel face, since the tops cannot be seen, but I need to fix it. So, here's where I got. 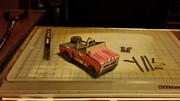 On the other hand, just positioning the wrecker hoist pieces ... dry fitting ... they all seem to work I need to get the tire issue figured out, so that I don't accidentally mess up a future model |
|
|
|
Post by Vermin King on Aug 19, 2019 4:56:03 GMT -9
Got up early today and pulled up one of Volker Preikshat's Corvettes. Grabbed the inner wheel face and treads. Re-sized to the truck wheel face, and lo and behold, the treads should have been longer. Over lunch, I'm going to lose his graphics and create a new file, VK's wheel and tread template. I also plan on fixing the Snake Truck treads. Maybe even the Ultra 4 treads
|
|
|
|
Post by Vermin King on Aug 19, 2019 8:00:54 GMT -9
|
|
|
|
Post by Parduz on Aug 19, 2019 12:56:24 GMT -9
I'm lurking here.... waiting for a "go! go! go!" when things will be finished and ready to download. I can see me playing DeathRally, or Outrider, or even CarWars with them! So, if you even feel alone here in this thread, just remember that i'm here, silent, waiting (is'nt this creepy?  )  |
|
|
|
Post by Vermin King on Aug 19, 2019 17:29:16 GMT -9
well, I will continue to plug away, but my computer died today. All my stuff may be long gone unfortunately.
at least I posted most of it as it was developing...
|
|
|
|
Post by Vermin King on Aug 20, 2019 4:20:48 GMT -9
I've collected some great grunginess png's that I have used in the past on projects, but virtually all textures on this come from photos taken from the film. For the Snake Truck model, I think it needs to be as close to the film as possible. If I can ever get to more buggies, muscle cars and hot rods, I'll definitely keep 'dirty' in mind Sorry, Punkrabbitt, but my grunginess png's are on the dead computer... I wish I'd posted more of my research images and that I'd backed things up. I'm kinda outta luck, it seems on my favorite computer. I've been sending phone photos of the screens on what is going on with my computer, and sending them to my IT guy and it looks like he will be lucky to recover anything. Looks like a total system fail... |
|
|
|
Post by Antohammer on Aug 20, 2019 4:58:51 GMT -9
Vermin King I dont like 3d paper models...too much work... but... Damn...those are very cool !!!!
|
|
|
|
Post by Vermin King on Aug 20, 2019 6:36:16 GMT -9
Thank you, sir. I think it is the challenge of 'seeing if I can do it'. Not only that, but seeing if I can do it in a way that someone else can do it.
Even though I still plan on doing the Road Warrior cars and the Rally cars, my focus is not very good still. The loss of my computer is the loss of progress on many models that I had partially done. As far as this project, I lost my research images on many, many vehicles. I also lost my progress on the nose of the Scherer Fox Ultra 4 buggy. I also lost the Pinto/Falcon Ute, a Camaro-based 4X4, a 4X4 BelAir and the Chevy Nomad in both wagon and ute versions.
My Ultra 4, Monster Energy and other buggies are gone. I had decided on doing the Scherer Fox, Safecraft and Rubicon buggies and had appropriate images. I also planned on doing the Healey Ultra 4 and generic Road Warrior buggies built on my base Ultra 4 model.
Crud, if it wasn't for this forum, my Doctor Who Bessie and Onager mods would be gone into the ether. Even the Lunar Excursion Module.
And for work, I cannot get to the agent database, and all of my work documents since October are gone. And I cannot get to the Medicare certification training to finish it up. I used to think that if I lost my phone, I'd be lost, but losing this computer is far worse
EDIT--
Ach! I even lost my Jaguars and my progress on the Who Edsel.
I need to go back through my posts and rebuild my files as best I can
|
|
|
|
Post by Vermin King on Aug 20, 2019 10:31:15 GMT -9
As far as the motorcycle swarms in Road Warrior, as I was going through re-downloading my uploads, a couple of those repaints of Punkrabbitt's motorcycles would fit right in 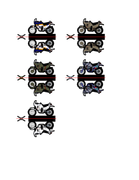 |
|
|
|
Post by Vermin King on Aug 24, 2019 18:06:18 GMT -9
In the course of rebuilding my buggy files and inspiration images, it hit me that these cycles need riders and I think I know how to do them as side views that slide over the bikes. I would think the method would work well for horse-back riders, too. I don't have time to work on it right now, but I wanted to leave myself a note here.
I really wish I'd posted my last update on the Fox Buggy...
|
|
|
|
Post by squirmydad on Aug 25, 2019 8:01:19 GMT -9
Did you ever see Sanity Studios removable mounted figures? If not I'll see if I can mock something up to explain it.
|
|
|
|
Post by Vermin King on Aug 25, 2019 8:19:22 GMT -9
Tried going to the Sanity Studios Sub-Forum, but I didn't see where it might be located, and the images were pretty much all broken.
I might put together a mock-up myself this afternoon
|
|
|
|
Post by Vermin King on Aug 25, 2019 19:25:35 GMT -9
As far as the motorcycle swarms in Road Warrior, as I was going through re-downloading my uploads, a couple of those repaints of Punkrabbitt's motorcycles would fit right in I wonder how hard it would be to modify berneart76's rideable cycles into these, cardboard-warriors.proboards.com/post/69182/thread. I had very little luck finding side views of the cycles in Road Warrior. Of course, the cycles don't have to be 'movie cycles'. |
|
|
|
Post by squirmydad on Aug 25, 2019 20:53:48 GMT -9
A simple knight mockup from the OneMonk Arthurian parts collection based on a concept from Sanity Studios; 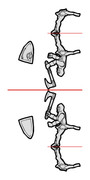 1) Fold and glue outer section of duplicate legs 2) Then fold and glue the torso, you should have an inverted "Y" figure when done with legs that can straddle any mount. 3) Glue the shield onto his left arm 4) Does this make sense? |
|
|
|
Post by Vermin King on Aug 26, 2019 4:02:02 GMT -9
Yes, that is what I was thinking, except different. I was going to have the inverted 'Y', but I was going to have the torso pieces sandwiching blank cardstock, so that the torso is closer to the thickness of the motorcycle and more space between the legs, which I did not plan to have textured on the inside
|
|


 )
) 


