|
|
Post by lightning on Dec 20, 2019 1:47:18 GMT -9
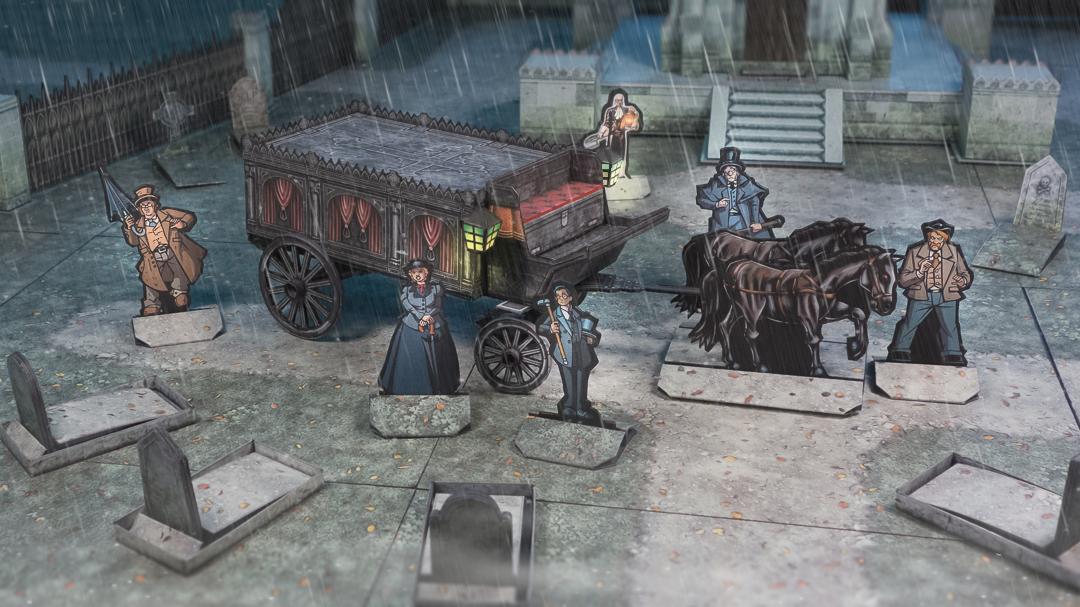
Happy to announce the release of the DELUXE edition of the hearse wagon. Made a little promo diorama with the minis by okumarts and bravesirkevin and the great new horses by DarekPages!
You can check out more detail pics here and get it on my Gumroad store!
I like the separation of the upper and lower wagon (body & undercarriage) and look forward to make more wagons in this design and hope for lots of advanced undercarriage builds with swapable upper bodies for different occasions.
But this will also be a kind of reality-check to find out how many of you will go for a rather quick and simple build or go all the way for the advanced version.
In any case I hope you enjoy the set!
|
|
|
|
Post by Vermin King on Dec 20, 2019 4:58:02 GMT -9
One of the most innovative ideas that I have seen this year. Very well done, sir
|
|
|
|
Post by emergencyoverride on Dec 20, 2019 7:36:39 GMT -9
WOW! That is awesome looking good Sir!!
|
|
|
|
Post by cowboyleland on Dec 20, 2019 11:37:06 GMT -9
lightning: the wip of this looked so good it inspired me to start working on some 3d horses to go with it. I am busy with Christmas prep right now but I hope to get back to them soon.
|
|
|
|
Post by squirmydad on Dec 20, 2019 13:47:42 GMT -9
I already know that the middle build will be for me.  The simple build looks too simple for me, and the complex one will exceed my skill levels with my eyes and my fingers. However, I applaud the beauty of it's complexity and creativity. |
|
|
|
Post by Vermin King on Dec 20, 2019 19:36:09 GMT -9
lightning, is there a template for constructing the springs? I know AirDave and others generally have a multi-layered piece with a cut-out of the springs to build into. Dave had me do a test-build to see how difficult it would be 'for an average builder', and I didn't find it difficult at all. Unfortunately, it is on my dead computer. Or do you have an alternate method? EDIT-- And squirmydad, don't write off the simple version. The boxes aren't that different than my circus wagons. Creative trimming could make these look nearly as good as the medium difficulty ones.
|
|
|
|
Post by lightning on Jan 9, 2020 8:52:55 GMT -9
I already know that the middle build will be for me. The simple build looks too simple for me, and the complex one will exceed my skill levels with my eyes and my fingers. However, I applaud the beauty of it's complexity and creativity. Actually the "complex" version is surprisingly simple. I just cut strips of cardboard, color them black with marker and then glue them together with white glue using a shaper part (But I think even that can be omitted and done freestyle). The only tricky thing is to get the all the heights of the springs to the correct level so the upper wagon can lay flat on it.
But that is the beauty of the different skill options to me. I want people to enjoy the build and have it matching their needs. I can imagine someone building one or two complex versions and still making maybe 5 simple ones for a special game event where you just need lots of the same fast!
lightning , is there a template for constructing the springs? I know AirDave and others generally have a multi-layered piece with a cut-out of the springs to build into. Dave had me do a test-build to see how difficult it would be 'for an average builder', and I didn't find it difficult at all. Unfortunately, it is on my dead computer. Or do you have an alternate method? EDIT-- And squirmydad , don't write off the simple version. The boxes aren't that different than my circus wagons. Creative trimming could make these look nearly as good as the medium difficulty ones. No template really. I explain the steps in the instructions. As mentioned above I use cut strips which I color a desired color and then cut and glue to form the spring shape. While the white glue is wet I form the desired curve shape and after a short time you can let it dry and it will stay in that shape and become quite sturdy.
I use a shaper part (maybe that is the template) for the front and rear springs where I cut out the (inside) curve section and double it up until I get a 2-3mm shaper part. This I use to make sure the springs have the right shape.
But while building I found that after I glued the springs on the flat bed I had to gently push the bed flat to make sure it really IS flat in the end. If there is not too much to correct it works great. If you have too much of a height difference, you might need to cut the larger spring off, trim and then glue back again. I had this happening on my last build. But the multiple layers of cardboard form such a strong material I was surprised how much squeezing and deforming and even cutting they would handle.
|
|


 The simple build looks too simple for me, and the complex one will exceed my skill levels with my eyes and my fingers.
