kjev
Initiate

Posts: 17
|
Post by kjev on Dec 11, 2023 4:01:56 GMT -9
Thanks Aleks.
|
|
kjev
Initiate
Posts: 17
|
Post by kjev on Dec 8, 2023 4:38:03 GMT -9
I wasn't sure what board to put this one, so Admins, feel free to educate me.
I was reading the instructions for the Underwing Stores and it said they would work on the Crotale, Percheron, and Halfinger.
What's the Halfinger? I don't recall seeing that one in Chris's archives.
|
|
kjev
Initiate
Posts: 17
|
Post by kjev on Feb 12, 2016 19:36:32 GMT -9
Okay, I have to brag, just a little, teeny bit. I got home late tonight, and turned on my PC, and found out...the Jotun made picture of the week on papermodelers.com. I was really tickled, because I consider myself an average builder. That's all. Thanks for humoring me! |
|
kjev
Initiate
Posts: 17
|
Post by kjev on Jan 25, 2016 1:35:47 GMT -9
Thank for the zip file. I'll take a look at it later on today.
I like the picture with the book. Stout wheel!
|
|
kjev
Initiate
Posts: 17
|
Post by kjev on Jan 24, 2016 18:17:46 GMT -9
It looks good to me! What does it look like unfolded? I could trace a vector copy in Illustrator and size it as needed.
|
|
kjev
Initiate
Posts: 17
|
Post by kjev on Jan 23, 2016 3:33:10 GMT -9
Thanks, guys! I may never get to this level of greebling [sp?], but I appreciate you efforts. Inspiring. With Chris's attention to detail, it's pretty simple. Just make extra copies, use one as the base to build on, and the others get chopped up as needed for layers. I'd recommend at least 3 copies of whatever model you choose. It's time consuming, but worth it. |
|
kjev
Initiate
Posts: 17
|
Post by kjev on Jan 22, 2016 7:38:51 GMT -9
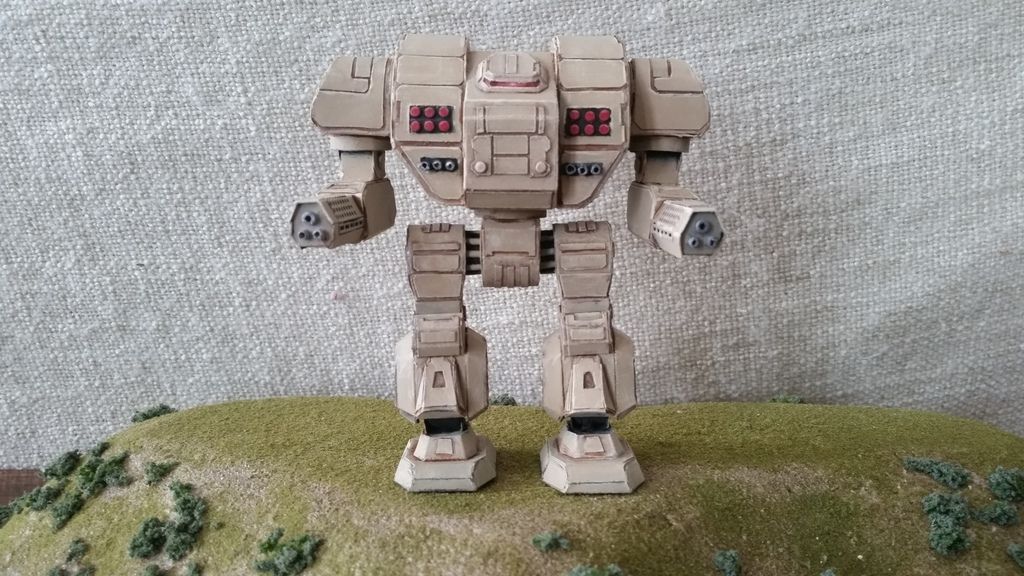
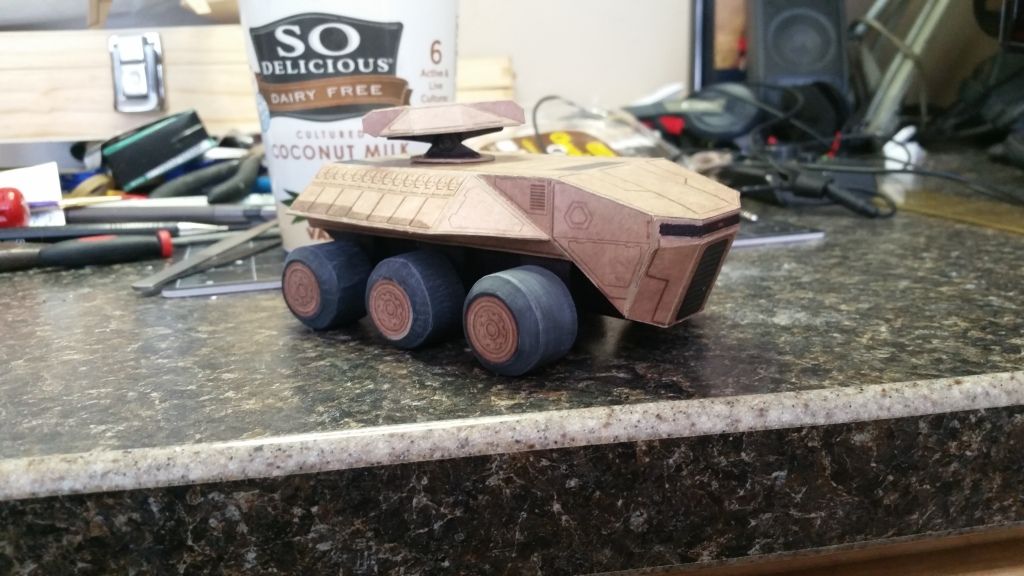 Chris was nice enough to talk me through recoloring the Prowler to match my Kirchner (and my Jotun...sort of). I finished it up yesterday. As you can see, I need practice on making wheels. I sanded down all the edges, and ended up repainting them. I think next time I get a wild hair like that I'll add some tread to them before I do the painting. Because the hull has some large flat areas, I reinforced them with cereal box cardboard before I put it all together. Other than that, the turret, and the wheels, it's all straight from the printer. I also took a couple of shots to show how I make my magnet-washer joints:  This is roof (upside down) the inside of the joint, under the weapons turret. The cylinder under the washer (above, when it's right side up) is just paper I wrapped around the magnet and glued together when it was the right circumference. I glued a piece of paper across the bottom of the stubby little cylinder it made, and glued the washer under that. I threw a couple of strips of paper over the washer and glued them to the inside of the roof to help hold it in place. This is the topside, looking down into the socket where the magnet will fit.  And this is the magnet, which doubles as the turret's pin: 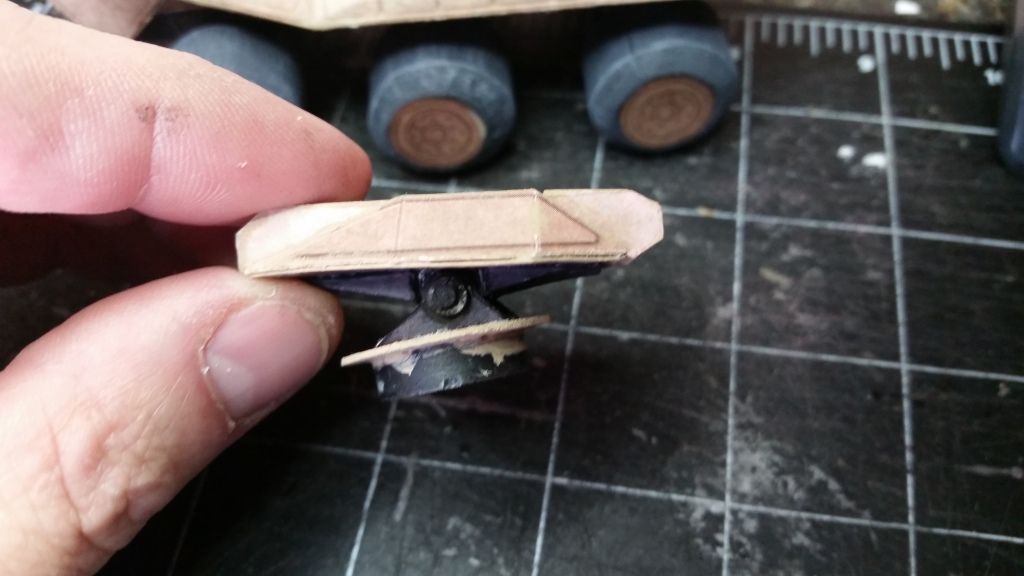 I couldn't resist using a bamboo barbeque skewer to make a shaft for the gun mount, so the guns can travers vertically as well. I capped each end with the shaft with a couple of small plastic disks, and painted them black. And here it is in the linup. I was surprised it turned out a little smaller than the 6x6. It always looked so burly, I thought it would be bigger. (Hmmmm....next build ideas...) 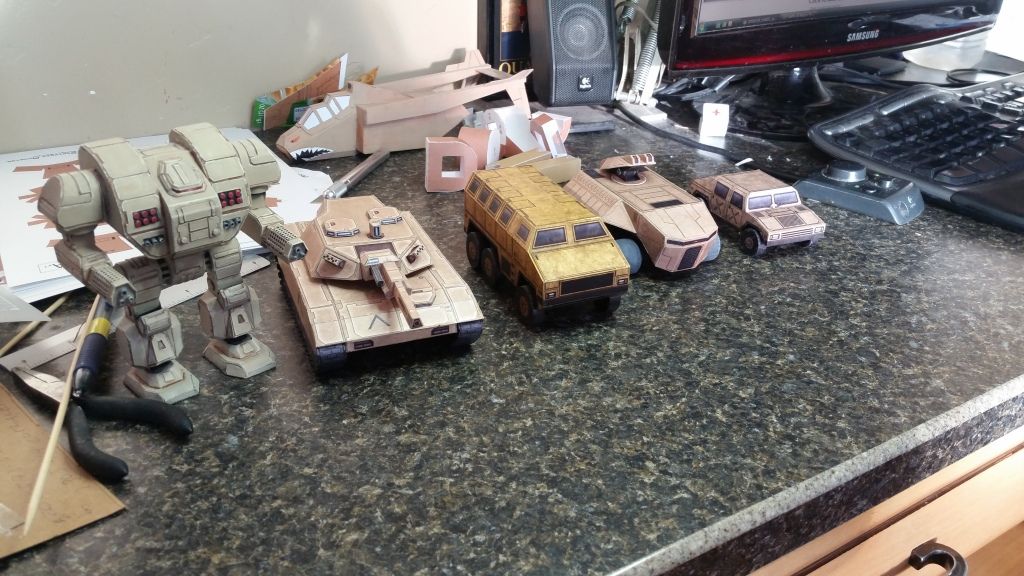  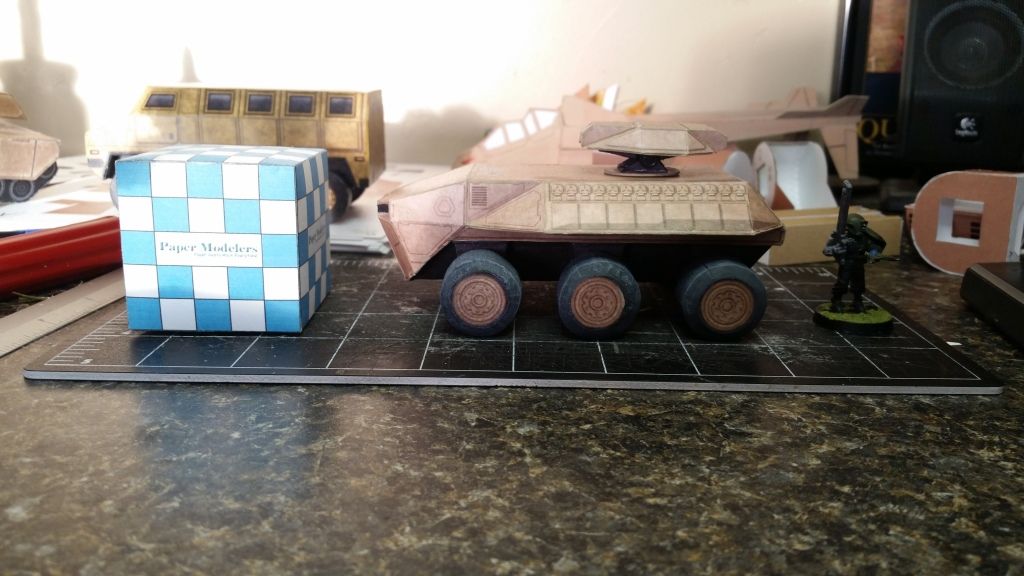 All in all, it was a fun little challenge. |
|
kjev
Initiate
Posts: 17
|
Post by kjev on Jan 20, 2016 19:47:55 GMT -9
Don't have any pictures as yet, but I do preshape the parts, and I started using the strip behind the tread. I just always seem to end up with a flat spot, and my rims/hubs always seem to big for some reason.
|
|
kjev
Initiate
Posts: 17
|
Post by kjev on Jan 20, 2016 6:11:04 GMT -9
I bought a hundred of 10mmx2mm rare earth magnets from here: Magnets on Deal ExtremeI still have maybe half of them. There's even smaller than that. Thanks! I'll check them out. |
|
kjev
Initiate
Posts: 17
|
Post by kjev on Jan 20, 2016 6:05:53 GMT -9
You're right. The Prowler is the current project.I got 3 wheels done. One looks decent. The other two may be hidden in the middle. I've also built the 4x4 GPV and the 6x6 APV. Even though the wheels were simpler, Round and I don't get along that well. I think I made eight wheels to get four good ones That reminds me of the Starcraft Siege Tank I'm working on. I decided to redesign the tracks (since I was running a bulldozer at the time). I think I built the front tracks and rear tracks 4 times each. It took me all summer, and by the time I was done, I was so sick of making tracks I shelved the whole thing for a few years. The repetition part of them is...well, it's a good reason there's Netflix. But the repetition part also seems to help me improve. |
|
kjev
Initiate
Posts: 17
|
Post by kjev on Jan 19, 2016 16:56:18 GMT -9
I'm sure it's been asked before, so I'll be brief.
Are there any tutorials, tips or tricks for making wheels? If I had to drive on the wheels I make, I'd be beaten to death after half a mile.
|
|
kjev
Initiate
Posts: 17
|
Post by kjev on Jan 18, 2016 7:13:02 GMT -9
Thanks for the compliments. The layering was done with layers of 110 cardstock and cereal box cardboard. I would have used smaller magnes, but 1/2 inch across was the smallest I could find.
I also learned (more with the Kirchner) that the refrigerator is a wonderful place for drying things I want to stay flat. I glue the parts together (like extra cardboard inside a hull), then stick it to fridge with magnets. They hold it flat while it dries. If I had a small metal plate at my desk, that would work as well.
And if anyone knows where to find smaller magnets, I'd love to know!
|
|
kjev
Initiate
Posts: 17
|
Post by kjev on Jan 16, 2016 19:35:03 GMT -9
I build one of these straight from the printer a few years ago, but lost it in a fire. When I decided to build it again, I tried to do it on the cheap and print it in black and white then color it. It looked like crap. Not just the color I chose, the whole idea looked like crap. 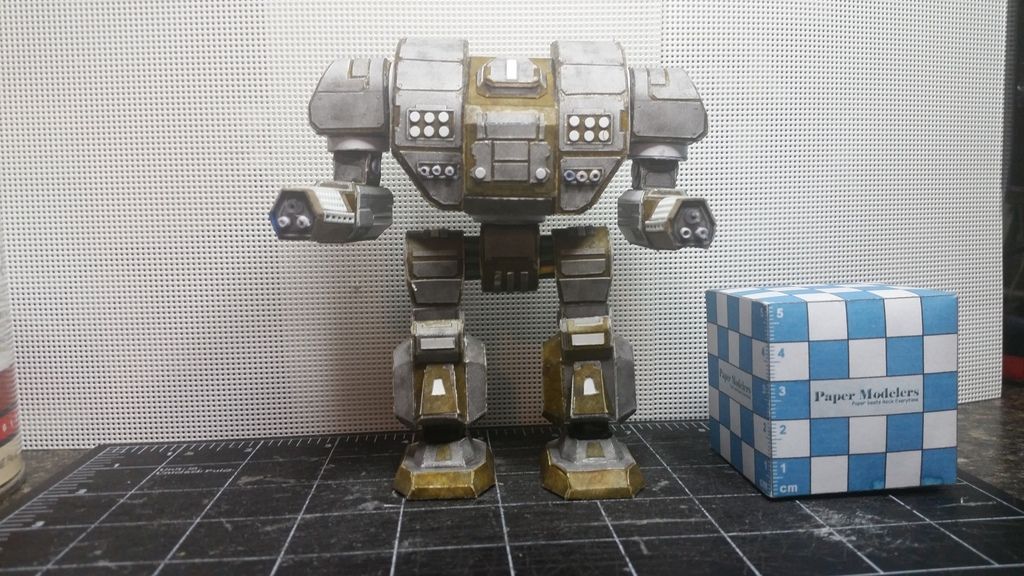 I got disgusted, put it away for a few years, stumbled upon it one day, and decided it wasn't hopeless. I'd detail the outside, and while I was at it, magnetize it as well. I've used magnets before and aligning the polarity was always such a pain in the butt, I went with a magnet-and-washer approach instead. The joins aren't quite as strong, but it made sticking things together much easier. Originally, I just had the magnetized parts sitting flush against each other, but when I rotated the arms, they slid all over the sides of the torso, and the torso slid all over the hips when he was rotated at the waist. I ended up making some "sockets" out of skinny strips of paper wrapped around my magnets and then glued into place. It's a great technique, because you can get a nice fit, but take care: everything shrinks a little when it dries, and now his joints are pretty tight. 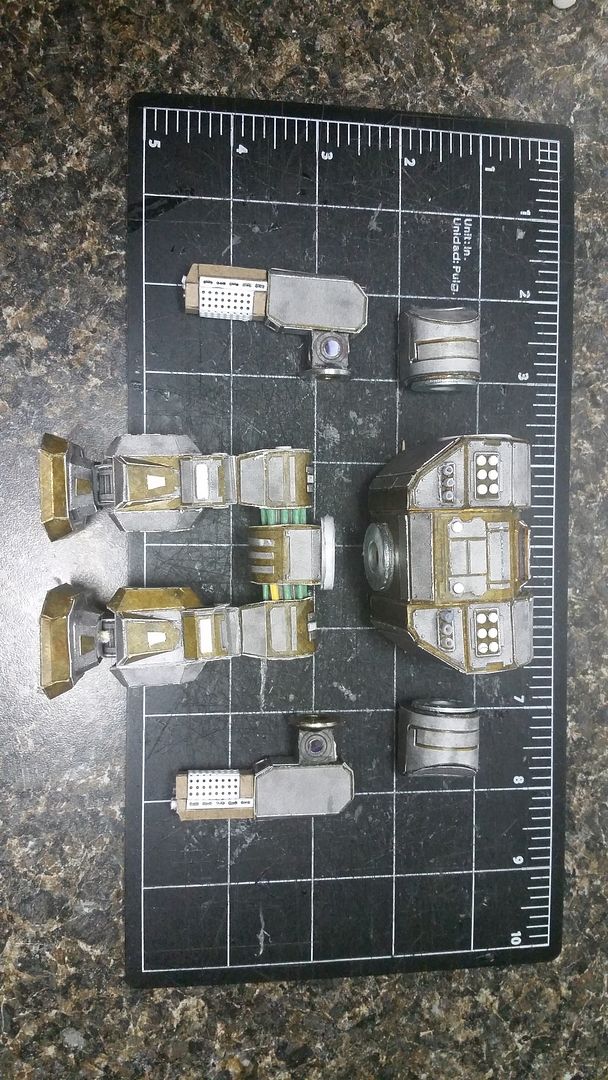 On the plus side, he's pretty flexible. 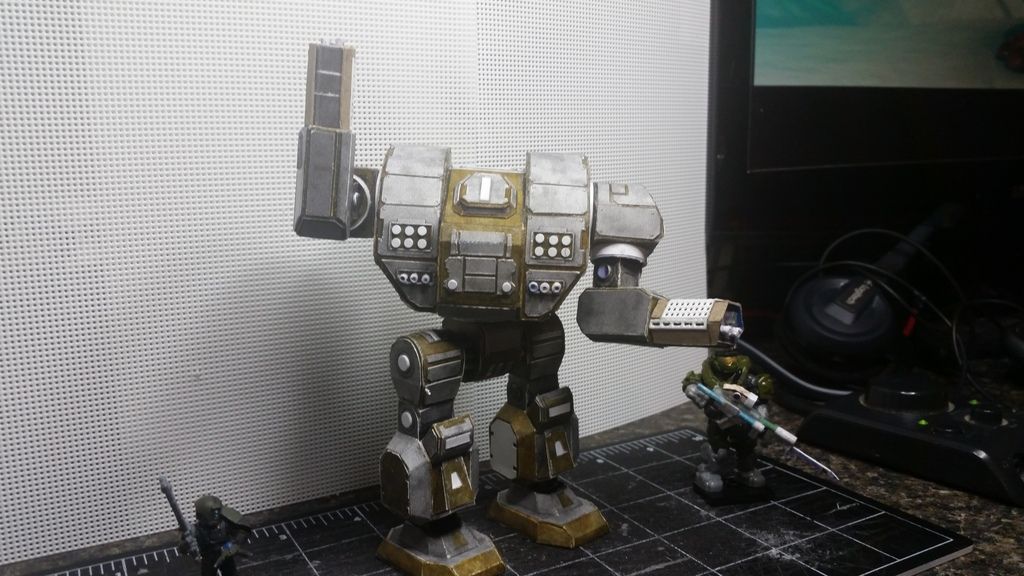 I also had to rack my brain to come up with a way to make the louvered vents in the rear. I tried cutting out the small slits, and they never came out right. So here's my solution: - Cut out the center of the vent. You want nothing left but the frame.
- Cut a strip of paper (card, whatever) the WIDTH of the vent.
- Cut several pieces TWICE as wide as the width of the louvers. In this case, the strips were about 3/16" wide, and about 1/4" long.
- Cut one of these strips in HALF LENGTHWISE. Set one piece aside for later.
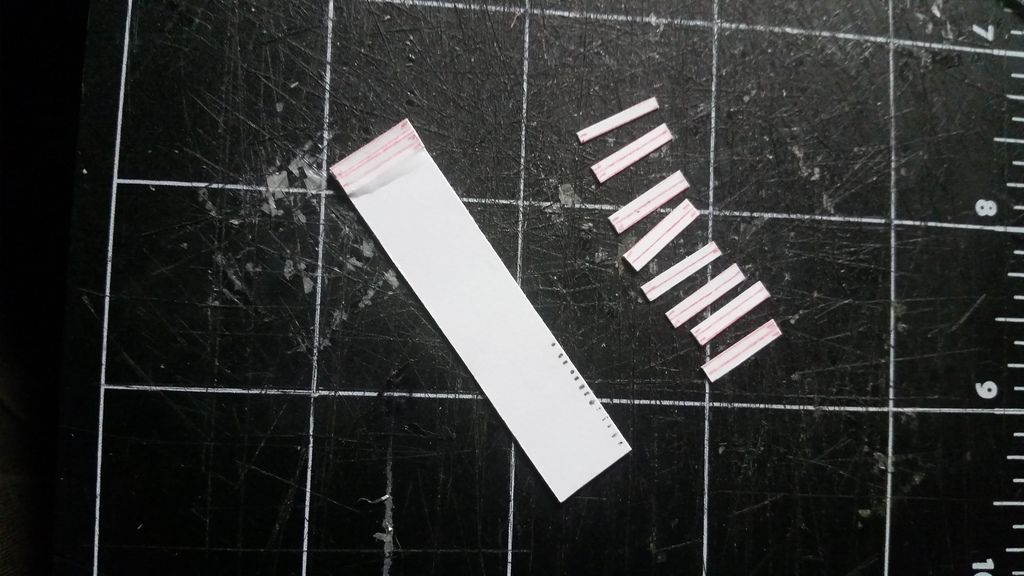
[li]Cut a second strip of paper the HEIGHT of the vent hole, and the WIDTH of the vent hole. It should just fit inside.
[li]Glue one of your super-skinny strips to the bottom end of the piece you cut in Step 5. - Glue the next piece (regular width piece) so that it halfway overlaps the first piece. You really only have to glue the edge that touches the piece you cut in step 5.
- Repeat until you are as close as you can get to the top edge of the vent hole.
- Finish it off with the second super-skinny piece you set aside earlier.
- Let the whole thing dry, and glue it into the vent hole. Voila! Louvered vents.
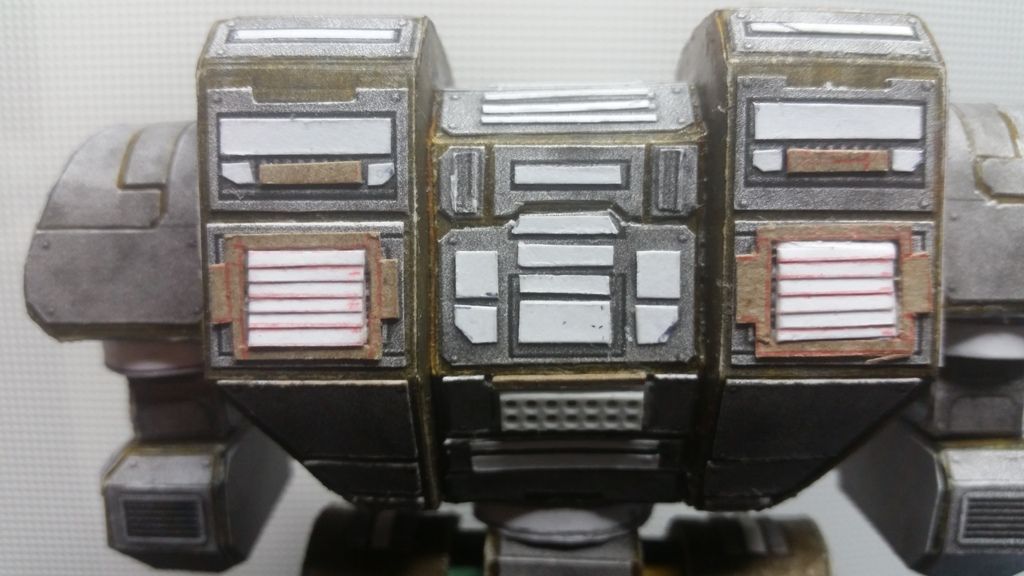 For the guns, again, I couldn't cut skinny strips out of the printouts to save my life, so I cheated, and got some fine mesh screen at the local craft store. I think it's originally used for cross-stitching or embroidery or somesuch. Whatever, it's easy to cut, and it works.  As a side note, I used plastic to make the various disks at the elbow and knee joints, and the missile warheads (the red thingies) in the torso. My technique is pretty easy (and it works with paper as well). I have a hole punch for working leather. The business end has a rotating wheel with several different sized punches on it. It's great for making teeny rivets as well as pieces a little over 1/8" across. I usually make a bunch at a time and store the extras for later (and I usually lose a bunch on the floor, too). 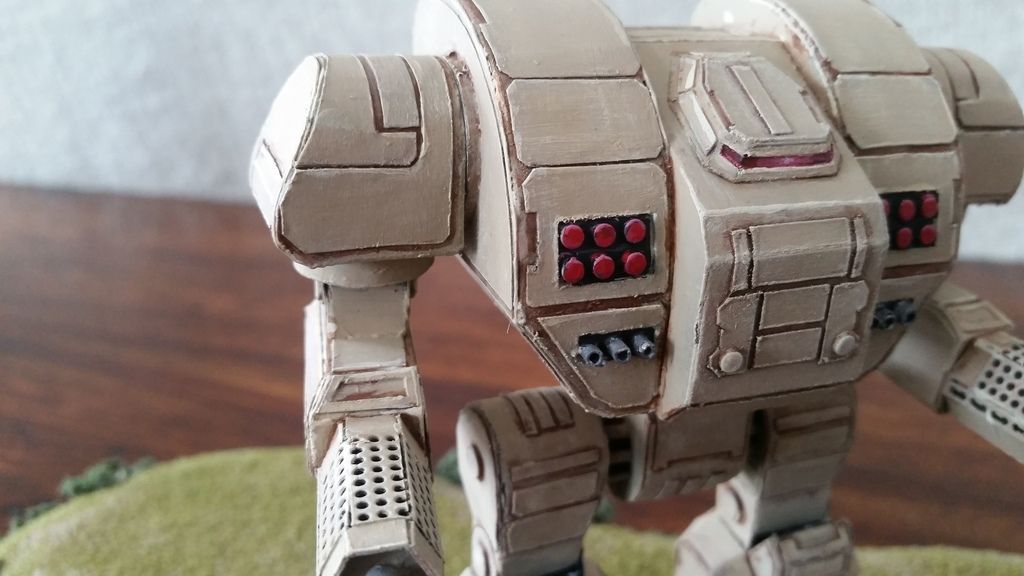 I lacquered this along with a test box (to see what the lacquer would do) and another project, and the magnets came in really handy when everything was drying: 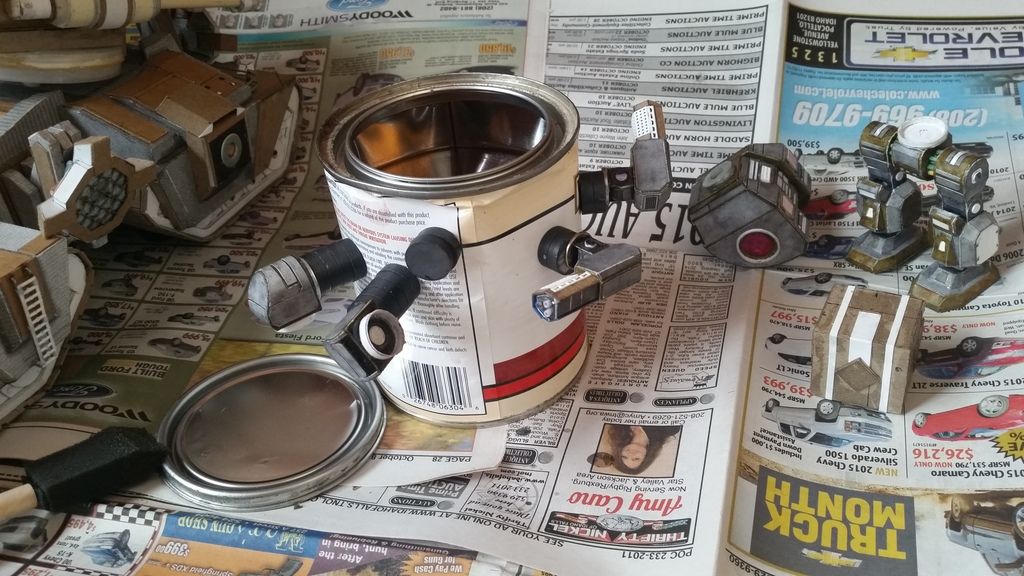 Painting was pretty easy. I primed it with cheapo black primer from Walmart, and then finished it up with acrylics. If I was to do this again, I'd change a few things: - I'd print 3 copies, with at least one in color. I'd do this because looking at the textures, I could come up with at least 2 layers of details, and of course, I'd need a base to build on.
- I'd plan better, and integrate the magnets from the start, instead of having to pull apart seams, jerry-rig sockets, and so on.
[/li] [li]I'd run some supports horizontally through the hips (I did have to run some down through his legs into his feet. The magnets made him top-heavy, and his ankles were giving out), probably 2 bamboo skewers. Even though this guy isn't very big, he's pretty barrel-chested and I can see already where they may come apart (this is a gaming mini, so he won't just be on display).[/li] [li]I'd get a variety of tubes (I used either rolled paper or the guts of some non-functional pens) for gun barrels, and actually cut the holes out and insert the barrels, rather than simply gluing them to the surface.[/li] [li]Weight the feet. Make them as heavy as possible. I think that and the hip pins will become SOP for every mecha I make from now on.[/li] [/ul] Scale Shot, with a Lego Mini, Mega-Blocks SPARTAN, G'nea Pyg the Tau Test Dummy, and a scale block. 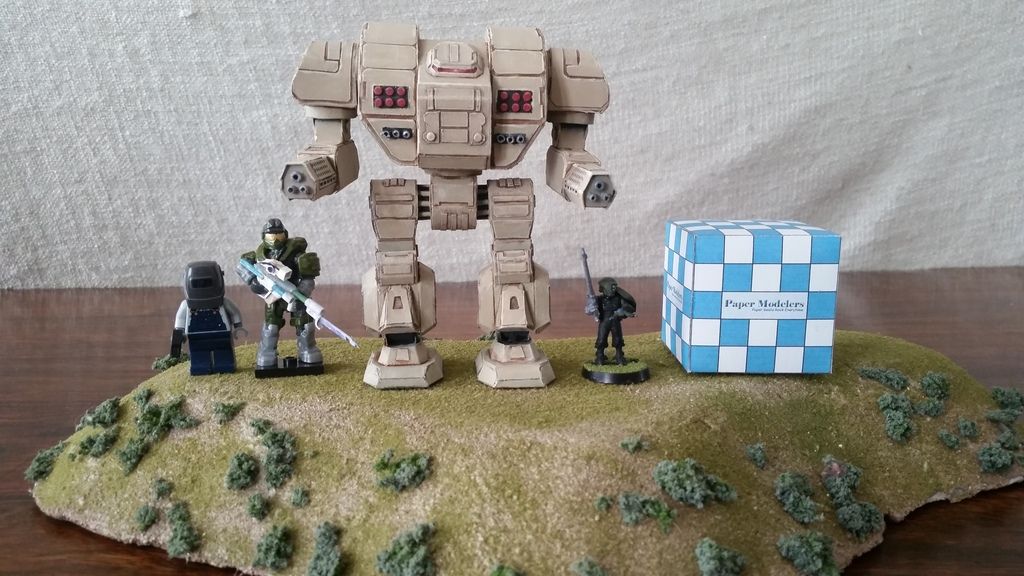 Cannon Fodder's Eye View: 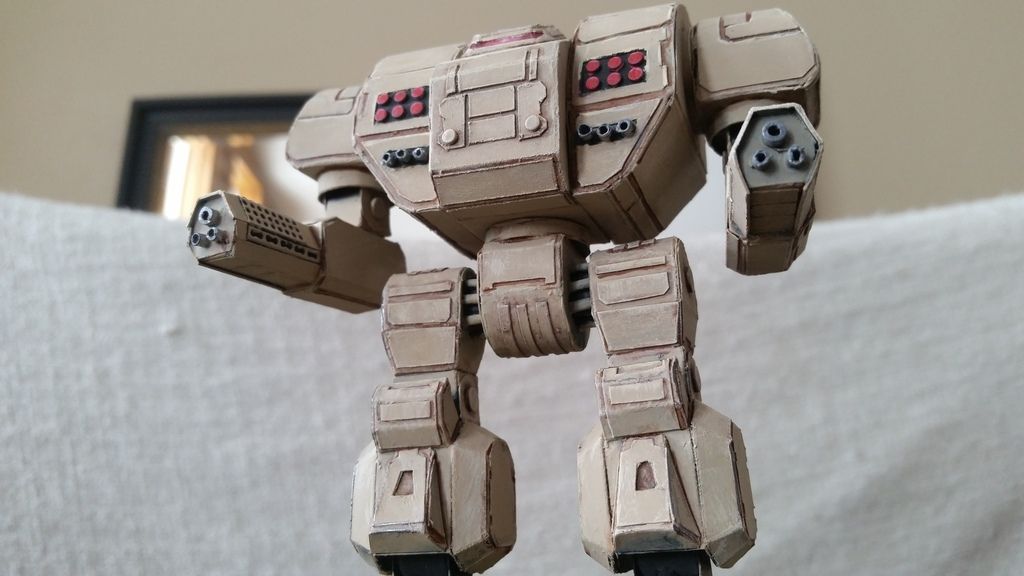 Extreme Closeup: (I really like how the viewport turned out. It was a combination of red, black, and silver, with a teeny dot of white) 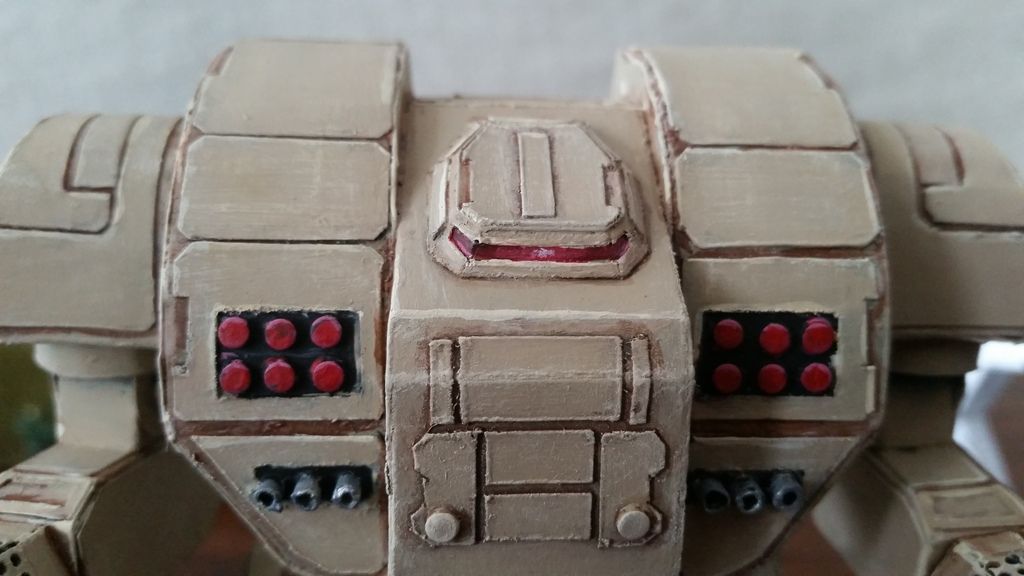 Jotun and the Kirchner out to play: 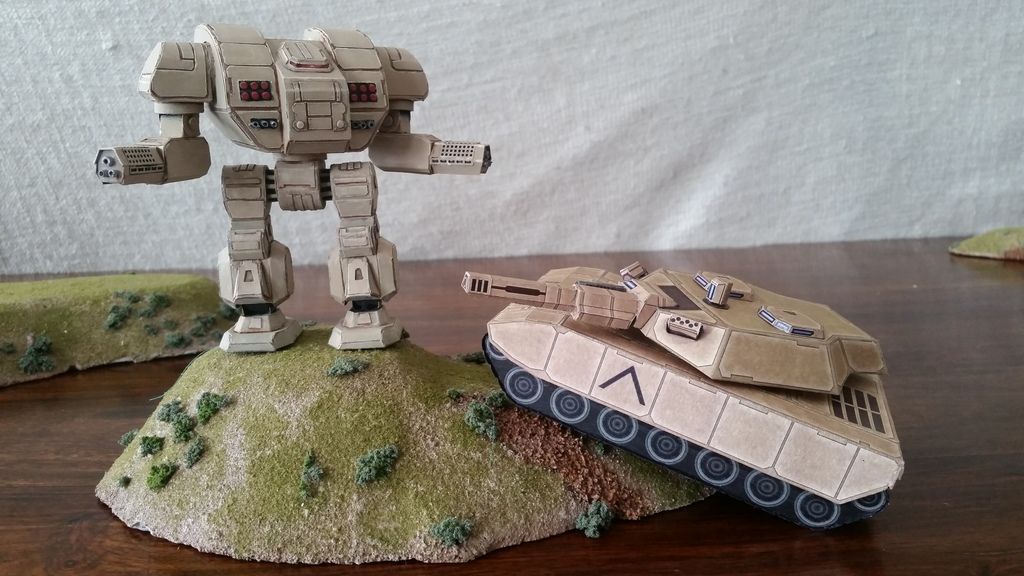 AUTHENTIC BATTLE DAMAGE! (You have to sound like Kung Fu Panda when you say that) My oldest boy loved the smoke effect. 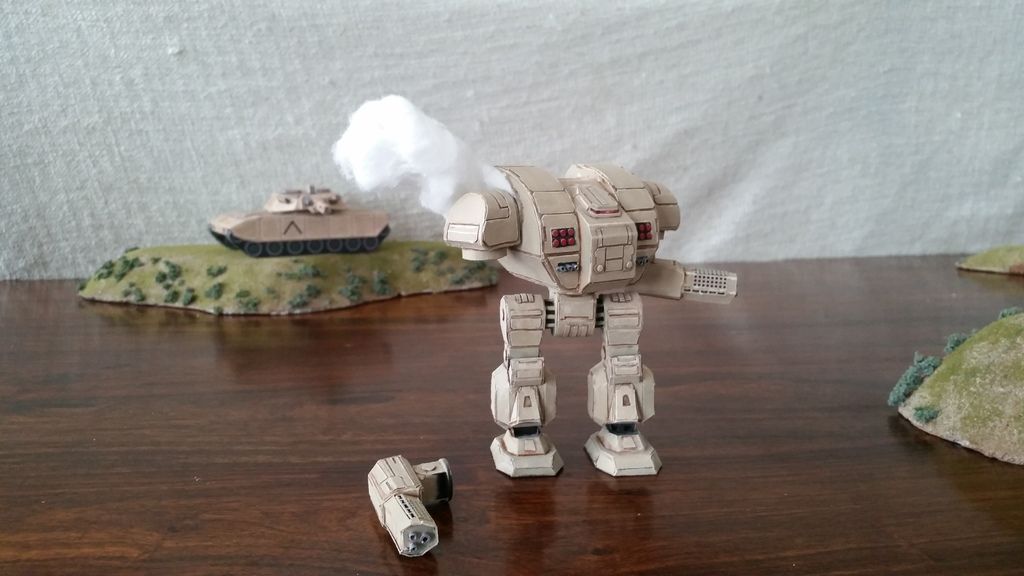 A Lego Welder and an astromech. They can fix darn near anything. 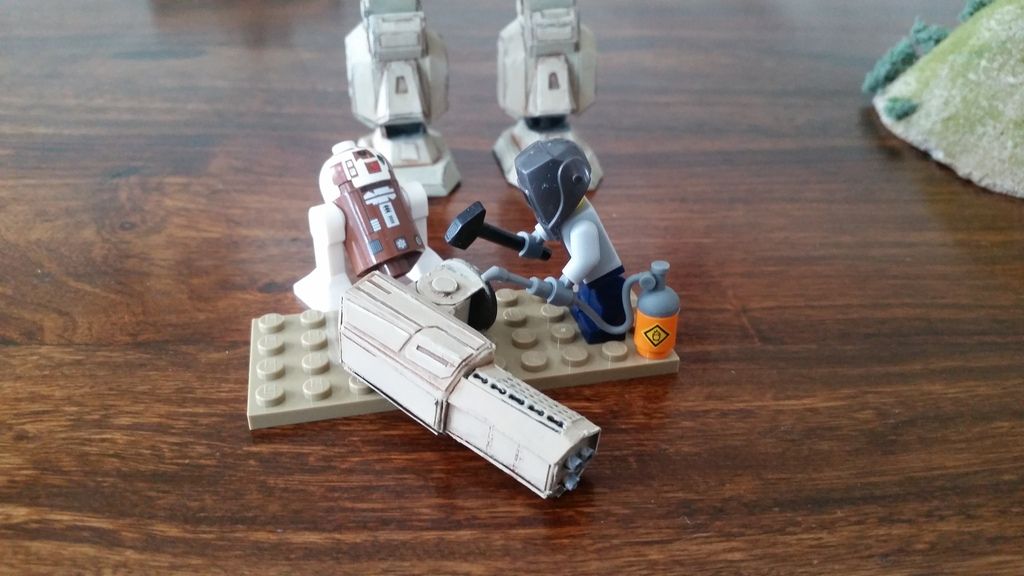 "I'll fix that #$& *$ @ &*(%# one way or another!" 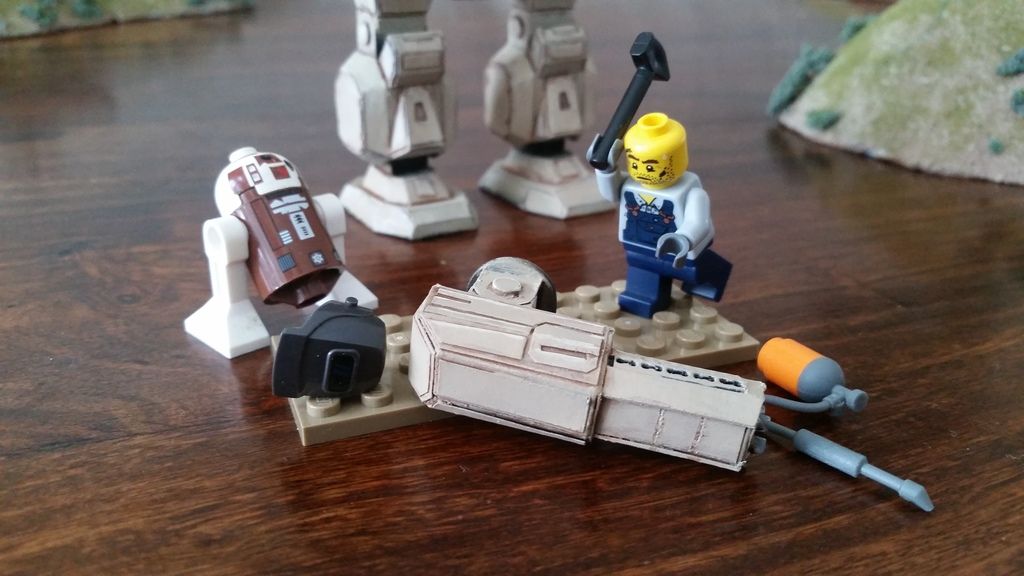 At any rate, thanks for looking. As always, comments and critiques are appreciated. Here's my photobucket album, if you're interested: s441.photobucket.com/user/Stormsforge/library/Jotun-geeeblified?sort=3&page=1 |
|
kjev
Initiate
Posts: 17
|
Post by kjev on Jan 16, 2016 19:05:07 GMT -9
Thanks! I got a very nice thank you note from him today. He'd just been busy. But I'll keep his info handy.
|
|
kjev
Initiate
Posts: 17
|
Post by kjev on Jan 14, 2016 21:35:40 GMT -9
The Jotun actually started out with the idea of printing it in black and white, and coloring it with a felt-tip marker (because I was REALLY broke at the time). I colored it, looked at it, and hated it. I was also adding magnets in most of the joints, and the more I looked at it, the more I wanted to detail it, both to get rid if the hideous yellow marker, and because it just deserved it.
It's getting close to completion (after a few years in storage), and when it's ready, I'll put pictures up as well. There is an album for it in my Photobucket library. I believe it's called "Jotun," or something really original like that.
My next project is a recolored Prowler. I like the tan color scheme, and Chris was kind enough to talk me through changing the Prowler's color scheme to match the rest of my builds. I emailed him a copy of the finished scheme, but I'm not sure if I used the right address or not.
|
|
kjev
Initiate
Posts: 17
|
Post by kjev on Jan 14, 2016 6:26:47 GMT -9
I took a break from some of the bigger projects I've been finishing up, and decided to build this little tank. 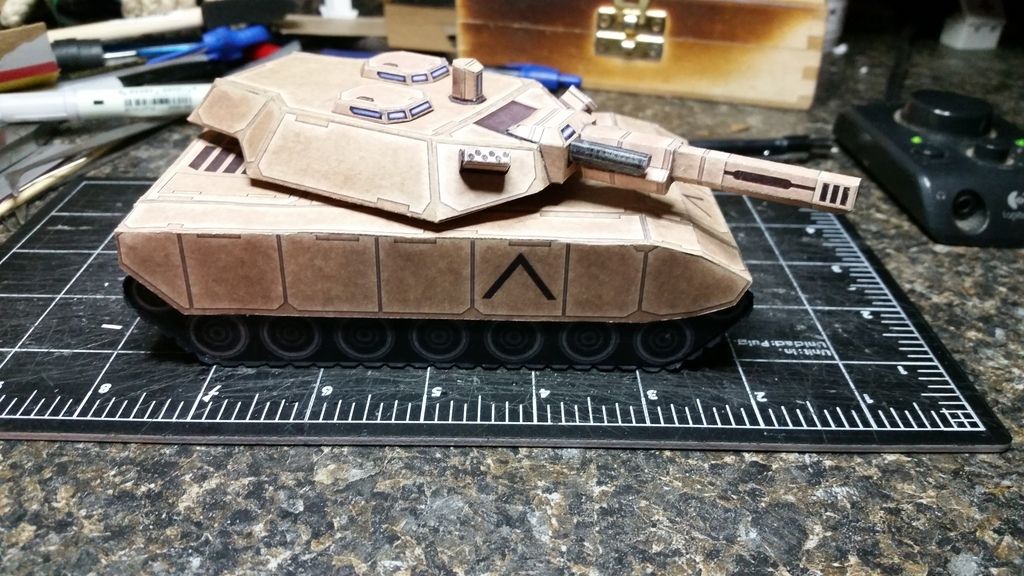 I decided to build this straight from the printer, and I learned...I can't. I can't build anything just like the instructions say. Everything I make ends up tweaked, adjusted, customized, fiddled with, improved (which may be a matter of opinion), or added to. But I tried, this time, I really, really, really did. In actuality, the only things I did "non-standard" were to reinforce the insides with cardboard, pin the gun barrels in place with a bamboo skewer and a toothpick, make a pin-and-socket "joint" under the turret, then add a cardboard disk under the turret so it could rotate. 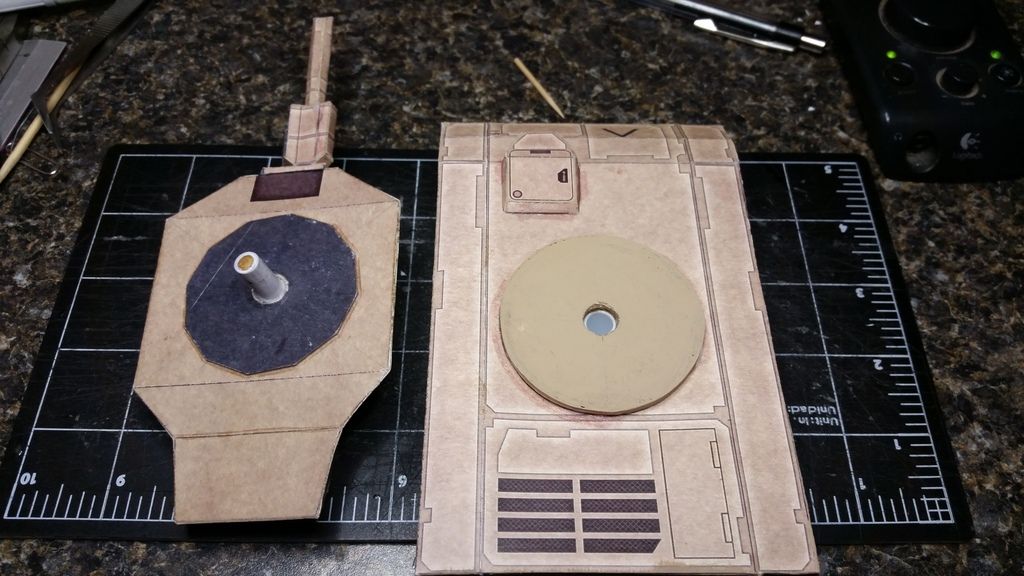 This was because I got ahead of myself and decided the turret was going to rotate before I added the driver's hatch, and put the turret pin and socket in the wrong place. I should have put it about a quarter of an inch closer to the rear of the tank. But even with all the over-engineering, it took me about a day and a half from start to finish. Well-designed model, and a lot of fun to build. Here is my new tank with G'nea Pyg the Tau Test Dummy, and a Jotun that is in the middle of being painted. 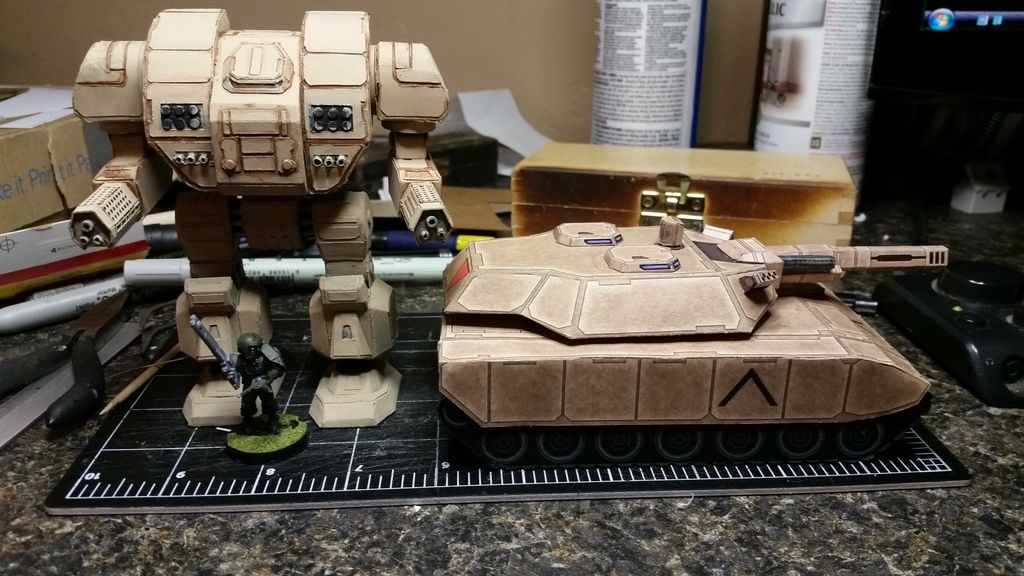 Chris, thanks for the years of hard work you've put into these! |
|
kjev
Initiate
Posts: 17
|
Post by kjev on Sept 22, 2014 14:18:01 GMT -9
I was a member of the Ebbles Miniatures forums, but I drifted away for awhile. Actually, I got sidetracked with a new addiction.
My name is K'Jev. I'm a Battletech player, terrain maker, and in other hobbies, a paintball team captain, and a blacksmith (that's the other addiction: beating the crap out of hot steel can be very therapeutic).
Many moons ago, Mel was kind enough to award me with a gift certificate for a model I designed. After seeing his work, I was humbled, and hooked. I'm not passing the paper modeling tradition down to my sons.
|
|