|
|
Post by johnpuh on Nov 8, 2018 19:34:04 GMT -9
I would say that I personally feel the added back side art is important for immersion and could even be useful for game mechanics.
It's not very immersive to turn around a figure on the table and be looking at their front again. If anything I print a copy of them facing left, and one facing right so I can even swap those for "fuller immersion". Plus even though I can't see the goblins back when it's facing me, my friend sitting across from me at the table can see it's back. And he can't see the rogues back, but I can. That's just how sides work... What you are suggesting when extrapolated to a whole group of mirrored figures would be looking at a crowd of people facing you, even though you are standing behind them.
And as far as mechanics by printing the back on all the figures, then the rogue knows at a glance that they ARE behind the goblin and thus they can reliably gauge whether they could or could not get a sneak attack... Plus vision is essentially a cone in front of a persons facing direction, so it would be hard to see at a glance what sight lines are if the figures were mirrored.
By all means you could print your own figures any way you want, but I will only use figures that have front and back art because its what I like.... And it seems that the majority of this forum may agree based on the "conventions that are demanded" as you put it.
That said I've seen plenty of creators out there in the world who make, and plenty of players who use mirrored figures. There may even be a forum somewhere just for single sided figures. They just won't ever earn a place at my game table, but you do you.
|
|
|
|
Post by johnpuh on Jun 24, 2017 9:43:07 GMT -9
Hi, I'm John. I am a broke college student who also happens to be a giant nerd and a cheap skate. That is why I was super excited when I learned about printing mini figures and set pieces for my D&D games. I am also about 17% eccentric engineer (I feel mad scientist is misleading, I don't really do science) and I even have a laser that cuts through paper, wood, plastic and my enemies. As a bonus it works really great at cutting out paper mini-figures. Actually better than the silhouette cutting machine I tested out a while back. With my experience the drag knife just doesn't get the little stuff very well. Plus a little baby knife won't bore through plywood. As reference to my manufacturing proficiency: I made everything in this photo. 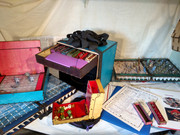 All the minifigures in the photo use the art of printable heroes, they were one of the first artist I stumbled across who make the paper figures. |
|
|
|
Post by johnpuh on Jun 20, 2017 19:09:22 GMT -9
This is a tutorial that I made that is more of an example of my technique, from start to finish, of how I make duplexed front and back mini-figures.
I should note that I am a better craftsman than I am a film maker.
I think that using a double sided page is a good solution for paper mini-figures, however it does require that all the art is edited into fronts on one page and backs on the next, aligned with each other. They also have to be aligned ahead of time to compensate for the offset caused by the printer during the duplex function. I mention it a bit in the video, but that is the most important part to being able to use a duplex printer and reliably print them with correct alignment.
I have a partnership with printable heroes to produce figures with their art and this video uses their art. The technique works with most any of the paper figures here and elsewhere on the web. The only ones I have found it doesn't work with is things that are very tall, and big, and top heavy. Those need an extra bit of core material. That's what will be in the expert-advanced tutorial. The cliff notes are: print on two single sided pages, trim by the registry box, line them up properly, add a chunk of tape on one edge, flip open, spray on adhesive, and seal closed. Then I cut them lose.
As full disclosure the video is about 68% useful information. The rest is about 15% useless ramblings, 12% self promotion, and 5% promotional for printable heroes.
|
|
|
|
Post by johnpuh on Jun 20, 2017 17:04:38 GMT -9
OMG! I had a similar idea. I built mine out of poster board. Laser cut and engraved the poster and wood. The wooden frame holds the paper and helps to force the folding action. The mountain folds on the parts that squeeze the mini are taped with packing tape to make the surface smooth so the figures slide easier. Used creative commons photos from Pexels for the floor texture. Laminated those pages so they can be drawn on with dry or wet erase markers. 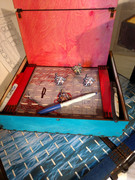 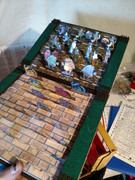 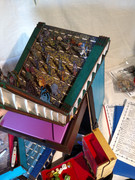 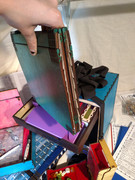 Next goal is to build some slide in 3d pop up terrain. My end game is a pop-up encounter that has multiple levels. |
|
|
|
Post by johnpuh on Jun 20, 2017 16:50:43 GMT -9
I started off with packing-tape too! Works well, except for the times that it gets a wrinkle or stuck in the wrong spot. I have grown fond of adhesive laminating pages because they function like the packing tape but I find it easier to handle.
I have used a bit of spray on Matte clear coat over laminate for reducing glare of some mini-figures for a photo shoot. It worked well and looked great, however not sure how well that matte finish would hold up on the long haul though. I have not done any durability tests with it.
Also haven't tried thermal laminates yet. They have been on my to-do list for a while.
|
|


