rag
Member

Posts: 7 
|
Post by rag on Sept 7, 2020 13:00:32 GMT -9
Is there a fast automatic way (gimp, inkscape, imagemagick, whatever) to convert paper minis done in "photo" style (as, for example, these ones: zenseeker.net/PaperMiniatures/Downloads/StarWarsCharacters.pdf or anything by Arion Games) into the "thick black outline" minis, as fashionable nowadays (as, for example, minis by Okumarts)? |
|
|
|
Post by Vermin King on Sept 7, 2020 15:10:15 GMT -9
I don't have a good method, so I would like to hear what folks come up with
|
|
|
|
Post by oldschooldm on Sept 7, 2020 15:27:22 GMT -9
I like to use the Stroke size later effect on photoshop. I think there is something similar in GIMP.
|
|
|
|
Post by oldschooldm on Sept 7, 2020 15:28:24 GMT -9
I like to use the Stroke size later effect on photoshop. I think there is something similar in GIMP. layer effect |
|
|
|
Post by cowboyleland on Sept 7, 2020 16:03:43 GMT -9
I rarely find the best way to do things, but what I know how to do (in GIMP) is:
1) magic wand to select background,
2)invert selection (in select menue),
3)stroke selection 1 pixel,
4)grow selection 3 pixels, stroke selection 6 pixels,
5)grow selection and stroke selection until you have reached desired thickness.
|
|
|
|
Post by alloydog on Sept 7, 2020 22:00:34 GMT -9
This is how I do it with GIMP:
Use the free select tool, with "Feather edge" set to about 2 or 3, to select the figure. Don't "draw" freehand, rather click lots of times.
Copy the selction.
Set the background to black.
Grow the selction by 10 to 15 px (depending on your preference)
Delete the selction
Paste the figure back onto the black area.
|
|
|
|
Post by thehobbybox on Sept 9, 2020 3:48:12 GMT -9
in pshop:
1. drop out the figure using the selection tools.
2. make the photo an individual layer
3. usde layer effects and apply a thick back stroke. Depending on how clean the dropout ewas, you may need to smoother the selection using the "modify the selection" tools
|
|
|
|
Post by thehobbybox on Sept 9, 2020 3:50:45 GMT -9
|
|
|
|
Post by thehobbybox on Sept 9, 2020 3:53:20 GMT -9
you can save the stroke attributes as a style so next time you have an object, just drop it out from the background and then apply the style.
|
|
|
|
Post by cherno on Sept 25, 2020 5:16:25 GMT -9
I generally draw a selection zone using straight lines around the figure so that it follows the cuts I'd have to make later when cutting it out, and then fill it black. Since I glue the printed sheets to 1.5mm cardboard, I try to avoid undercuts (which is apparent on the right leg where the line goes down from his hips to his feet instead of following the leg closer. 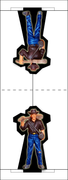 |
|
|
|
Post by Vermin King on Sept 25, 2020 5:37:28 GMT -9
cherno, I see that you like having the fold above the head, too! As I have been working on the figures from commedia dell arte, I have been playing with different methods. One of the big things I have noticed is that the quality of the original image will determine the best route to go. These figures were originally jpg, and when cleaning up the background, there are a lot of artifacts that seem to be gone when I use cowboyleland's method, but show up when I do the invert selection or when I do the first stroke. And I thought I did an extensive cleanup on the background. I am not sure yet whether it is better to do that method, or go my old route of manually placing a thin black line around the figure. Still working out what works best for me, but having a clean figure makes a huge difference in the final product
|
|
|
|
Post by cherno on Sept 25, 2020 16:09:53 GMT -9
The fold is actually just for lining up both sides, as I seperate both halves and stick each one onto opposing sides of thick cardstock (1.5mm) and then cut along the black outline. I like my cardboard miniatures to have a boardgame quality to them, it makes them easier to grasp, sturdier, less likely to topple over and gives me the option to use different bases that can be swapped. Making them takes more time and effort, of course. 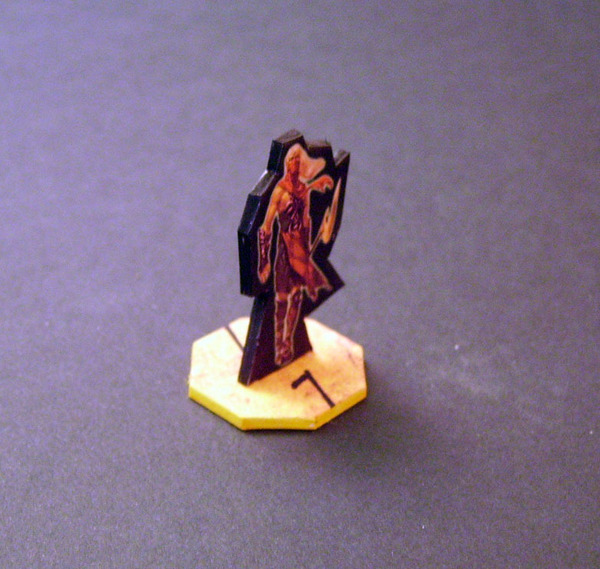 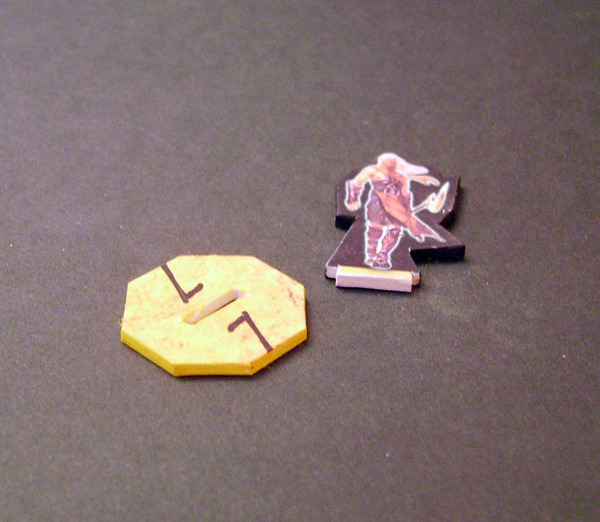 |
|


