|
|
Post by gothique on Dec 12, 2020 7:21:32 GMT -9
It was suggested to me that this building needed a flatter roof for ease of play. I played about in Photoshop with Venice Back Alleys. Here is the finished article  |
|
|
|
Post by emergencyoverride on Dec 12, 2020 10:40:18 GMT -9
That looks great!!
|
|
|
|
Post by greypilgrim on Dec 13, 2020 7:55:12 GMT -9
Beautiful!
|
|
|
|
Post by glennwilliams on Dec 14, 2020 7:10:29 GMT -9
This is probably the best kit bash of one of my buildings ever. Really well done.
|
|
|
|
Post by gothique on Dec 15, 2020 0:50:13 GMT -9
This is probably the best kit bash of one of my buildings ever. Really well done. That is high praise indeed |
|
|
|
Post by gothique on Dec 15, 2020 0:58:15 GMT -9
You were right my friend! I like it, a lot! So far your setting is awesome. May I suggest you to try some 1" high riva? There are high Rivas in Venice, but not so many. Game wise, having a 2" tall riva requires you a climb action to go away from the canal. I see it as a welcome addition, but probably playing on a board with only rised Rivas can give headaches to players 😉😂😂 anyway, differentiate the tallness of the Rivas can give an interesting gaming experience. A question rises and I'm sure you, as a more experienced cardboard modeler, can help me: Rivas and cardboard buildings are extremely lightweight. Have you got any trick to place them firmly on the board? There's nothing worst then clumsily hitting the board and make all of our beloved stuff take off... I thought about filling Rivas with some kind of material like plaster, Das or artist chalk, just to give additional weight. Giving consideration to the need for 1 inch riva, (and bouyed by the success of the Merchant Prince house) I have decided to rebuild the Venice Back Alleys buildings at the intended scale. These will be adapted for a 1 inch riva |
|
|
|
Post by gothique on Dec 15, 2020 1:11:31 GMT -9
 The green shop for 1 inch high riva. After some trial and error,I realized this kit-bash is very simple. On the canal facade, the lower trim is simply folded under. This continues back 10mm on each side. The remaining trim, including the bottom of the riva facade, is cut off and moved under the first floor line. This new line serves as cutting line for the cutaway base. This building has a simple porta d'acqua (I know, I've been misspelling that) made from an arched window to appear slightly submerged. The slightly smaller shutter windows come from the servants floors on the Merchant Prince house. |
|
|
|
Post by gothique on Dec 15, 2020 1:13:36 GMT -9
 The riva facade, matched as far as possible to the upscaled version |
|
|
|
Post by gothique on Dec 15, 2020 1:16:18 GMT -9
 Size comparison. Merchant Prince house on 2 inch riva beside Back Alleys house on 1 inch riva. The upper windows on the Merchant Prince are exactly the same as the lower ones on the green building |
|
|
|
Post by gothique on Dec 18, 2020 5:53:13 GMT -9
 The next Back Alleys building is finished |
|
|
|
Post by gothique on Dec 18, 2020 5:57:20 GMT -9
I have encountered a problem. I planned to add in a platform with shallow ramp to join the riva. The tiles I have on file for ramps are the same size as the basic platforms. Do I need to kit-bash a longer tile?
|
|
|
|
Post by Vermin King on Dec 18, 2020 6:44:28 GMT -9
|
|
|
|
Post by gothique on Dec 20, 2020 4:07:09 GMT -9
 As it turned out, the Dave Graffam ramp works without any changes (must be the gradual slope). A rough set up to demonstrate, it will be better on a flatter surface. |
|
|
|
Post by gothique on Dec 29, 2020 6:25:24 GMT -9
 Working on my next Back Alleys building. I wanted to create the home of a moderately successful merchant. The idea was to include many of the refinements of the big Palaces, with some scaling down, on a more modest property. This man wishes to impress his clientele on a budget. For my merchant I chose a mask maker. The riva facade was kit-bashed in Photoshop. The lower trim has been raised to the bottom of the first floor, to make room for the riva. The upper is taken from the Merchant Prince balcony interior and added to the upper edge of this floor. The door is from the grand entrance of the Merchant Prince, with all background removed. The signs are stock images, resized to fit. All this was done in Photoshop to make the layering easier. |
|
|
|
Post by gothique on Dec 29, 2020 6:32:28 GMT -9
 After some consultation with a Facebook friend, I arrived at this design for the shop window to the left of the door. I combined three leaded windows from the family level of the Merchant Prince house, increased the dpi to 300 and cut out the window from the frame. I then inserted a stock image of an actual Venetian window display and added a 50% blur to suggest plate glass. The final window was merged together and will be reduced to 72dpi before printing. |
|
|
|
Post by monstersbtm on Dec 29, 2020 11:55:28 GMT -9
Wow! That window is really cool! Will you add any oddities to the building? A fancy door or any other detail?
|
|
|
|
Post by gothique on Dec 30, 2020 1:57:42 GMT -9
Wow! That window is really cool! Will you add any oddities to the building? A fancy door or any other detail? Thank You. The canal facade will have gothic windows on the business level and a balcony with leaded windows on the family level (scaled down to fit the building) I also plan to fit an external chimney on the side furthest from the window with small fireplaces on the business level (for the workshop) and another on the family level. Not sure how I will do the Porta d'Aqua. The fancy door and signage can be seen on my previous post |
|
|
|
Post by gothique on Dec 31, 2020 2:28:22 GMT -9
 The mask maker's shop, canal facade. The Porta d'Aqua is the recessed door from the Back Alleys set with a scaled down Merchant Prince balcony door inserted. The windows on this level and the top floor are from the servants quarters of Merchant Prince. The large window on the business level, from Back Alleys, is the mask maker's workshop. The two scaled down gothic style windows, also from the balcony interior, are in the shop area. A leaded window balcony, also from Merchant Prince, dominates the family level. The balcony and associated elements were scaled down to 80% to fit the size of the building |
|
|
|
Post by gothique on Dec 31, 2020 2:42:31 GMT -9
 Riva facade. In addition to the Photoshop elements,the shop window was reduced to 72dpi and stuck on the wall. The two windows on the family level are from Back Alleys, the servant's window from Merchant Prince, all actual size. |
|
|
|
Post by gothique on Dec 31, 2020 2:50:48 GMT -9
 The side chimney. I took a side chimney from Merchant Prince and halved the fireplace box. This was then modified to place one half on the workshop and the other at the family level. The chimney, which was fitted into this arrangement, was shortened to the upper joint (not every Venetian chimney towers over the building). As a final detail, I topped the chimney off with a Back Alleys chimney pot. |
|
|
|
Post by gothique on Dec 31, 2020 8:47:47 GMT -9
 It was suggested I add another window on the top level. This gives a little more balance |
|
|
|
Post by monstersbtm on Dec 31, 2020 9:08:06 GMT -9
it turned out so good! well done! now i'm eager to see your next project  happy new year! |
|
|
|
Post by gothique on Jan 1, 2021 3:06:56 GMT -9
it turned out so good! well done! now i'm eager to see your next project happy new year! Happy New Year to you. Wine merchant coming next |
|
|
|
Post by gothique on Jan 2, 2021 5:53:26 GMT -9
I have been thinking about how to join the riva sections for a more stable layout. Paper, being lighter than MDF, can easily move if knocked. Has anyone tried using the peg and slot system of Fat Dragon hills for this purpose? I realize this would be combining Dave Graffam and Fat Dragon products but it might just work
|
|
|
|
Post by Vermin King on Jan 2, 2021 7:43:26 GMT -9
I was thinking slightly different. Several folks use bobby pins and paper clips to hold things together, but with my experience, I have been less than satisfied. Warpage and inconsistent secureness of the join bugs me. Taking a page from kris, I would want to try using corrugated cardboard along the interior walls of the riva sections for strength and to keep things square. Then use binder clips to hold the reinforced sections together. I did something similar when folks wanted me to do theater props for their events. I had some pretty large projects that were very solid, but easy to dismantle. Or this could just be muddying the waters |
|
|
|
Post by emergencyoverride on Jan 2, 2021 8:10:39 GMT -9
That actually sounds great!
|
|
|
|
Post by okumarts on Jan 2, 2021 16:35:15 GMT -9
I've got some suitable minis for this coming in a few days!
|
|
|
|
Post by okumarts on Jan 2, 2021 16:37:42 GMT -9
There are some really cool ideas for terrain here. I Iove the idea of canals and bridges and rooftops to fight on. 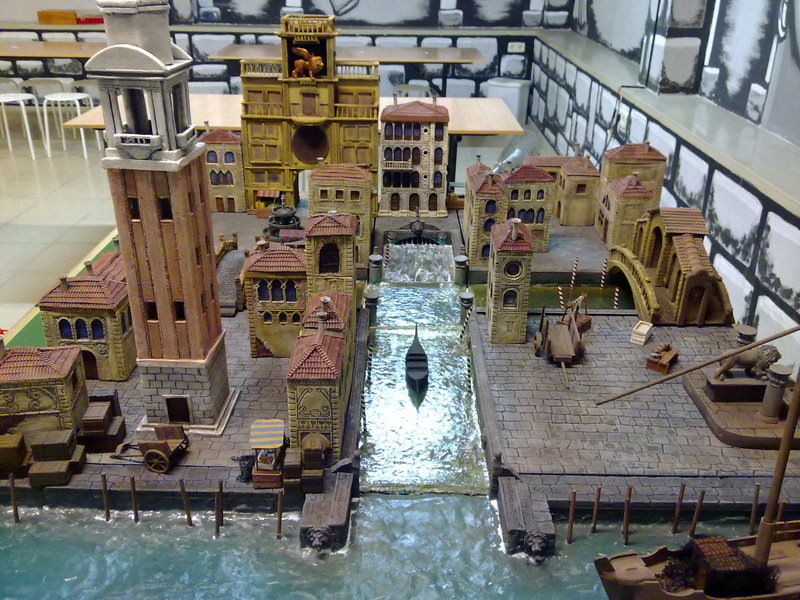 |
|
|
|
Post by okumarts on Jan 3, 2021 7:15:11 GMT -9
I'm working on a set of Musketeers and a set of Venice Duelists.  |
|
|
|
Post by greypilgrim on Jan 3, 2021 9:18:13 GMT -9
In the immortal words of Flounder (Animal House): "This is going to be so great!]
|
|


 happy new year!

