|
|
Post by adjutantgeneral on Dec 31, 2020 19:43:00 GMT -9
 Can I get a quick tutorial on: 1. Recoloring these guys and 2. Resizing these guys in gimp. I'm hoping there might be, say, a relatively easy way to turn the blue mounted and dismounted King's Musketeers into red Cardinal's Guards, (or green, yellow, chartreuse, hot pink, whatever) using some of the gimp's tools. For that matter, also resizing them to other scales without pixelating them too much. If I'm asking for something that seems like it would be comparatively easy, which is, in fact, hideously difficult, please let me know, but this would be very, very useful for a historical wargmer, in situations where, figures designed for the Thirty Years War, the Napoleonic Wars, the Victorian (or La Belle France, if you prefer) Era, just to name a few, could be easily transmogrified into troops for similar armies where the only real differences were color. Also, changing scale without wrecking the figure's definition would be great. Again, though, please realize that this is being requested by the artistucally challenged, bordering on totally ignorant. Please use small, simple words, if you are such a benevolent sould as would be willing to undertake this task. Thanks. Note: FIgures by Patrick Cruiau, which he has put into the public domain. |
|
|
|
Post by Vermin King on Dec 31, 2020 20:47:58 GMT -9
If no one gets to this tonight, I will do one tomorrow
|
|
|
|
Post by Antohammer on Jan 1, 2021 2:37:26 GMT -9
 FASTER MAKE THAN EXPLAIN  here they are in red wellcome back man if you want i can teach you how to do it using paint.net i dont use gimp paint.net is free and very simple.... recoloring is very easy let me know if it s ok for you |
|
|
|
Post by Vermin King on Jan 1, 2021 4:43:57 GMT -9
What is your target size on these, sir?
|
|
|
|
Post by cowboyleland on Jan 1, 2021 10:13:06 GMT -9
NOt to steal Vermin King 's thunder: in gimp under the "Image" tab you can "Scale Image" or under the "Layer" tab you can "Scale Layer" to resize. I think there is something clever that can be done in the "Color" tab (even though it is spelled wrong  ) using the "Map" function, but I am not sure exactly. If you want to change all the colours you can use this tutorial: cardboard-warriors.proboards.com/thread/4546/coloring-figures-gimp (the pictures show up for me if I click on the icon.) |
|
|
|
Post by adjutantgeneral on Jan 1, 2021 20:24:37 GMT -9
FASTER MAKE THAN EXPLAIN here they are in red wellcome back man if you want i can teach you how to do it using paint.net i dont use gimp paint.net is free and very simple.... recoloring is very easy let me know if it s ok for you Beautiful and generous of you as always, Antonio. But how can the bird ever learn to fly if he doesn't leave the nest? ;-) |
|
|
|
Post by adjutantgeneral on Jan 1, 2021 20:26:45 GMT -9
FASTER MAKE THAN EXPLAIN here they are in red wellcome back man if you want i can teach you how to do it using paint.net i dont use gimp paint.net is free and very simple.... recoloring is very easy let me know if it s ok for you Beautiful and generous of you as always, Antonio. But how can the bird ever learn to fly if he doesn't leave the nest? ;-) Seriously. though, I'd enjoy learning to do it in paint.net |
|
|
|
Post by adjutantgeneral on Jan 1, 2021 20:29:15 GMT -9
What is your target size on these, sir? These guys I am actually fine with as they are, size-wise (just showing them as an example). I'd just generally like to be able to size up/down other flats to around 25/28mm. Thanks much. |
|
|
|
Post by cowboyleland on Jan 2, 2021 10:11:17 GMT -9
For re-sizing just divide your target scale (i.e. 28mm) by the measure from foot to eye in mm of your image. If your image is big (i.e. 32mm groud line to eye line) you will get a decimal 28/32 = 0.875 so you scale your image to 87.5% or simply print at 87.5%. Same thing applies if your original image is too small: 28/20 = 1.4 so scale image to 140% and re-arrange so everything fits in the margins. Simple rule "What I want divided by what I've got."
|
|
|
|
Post by Vermin King on Jan 2, 2021 12:54:40 GMT -9
Not knowing how comfortable you are in Gimp, I am going to go through my process. Takes a bit longer when I am taking screen shots. But this is my process When I work, I like to work with a fresh page. Click on 'File', then 'New'. I work in Letter and 300 dpi, so my new page will be 2550 X 3300.  When getting ready for another image to be saved into my new page, I like to see things a bit larger. Drag the borders to enlarge the main window. For Letter, I can enlarge the image to 25% and see the whole page. You do this under the 'View' tab 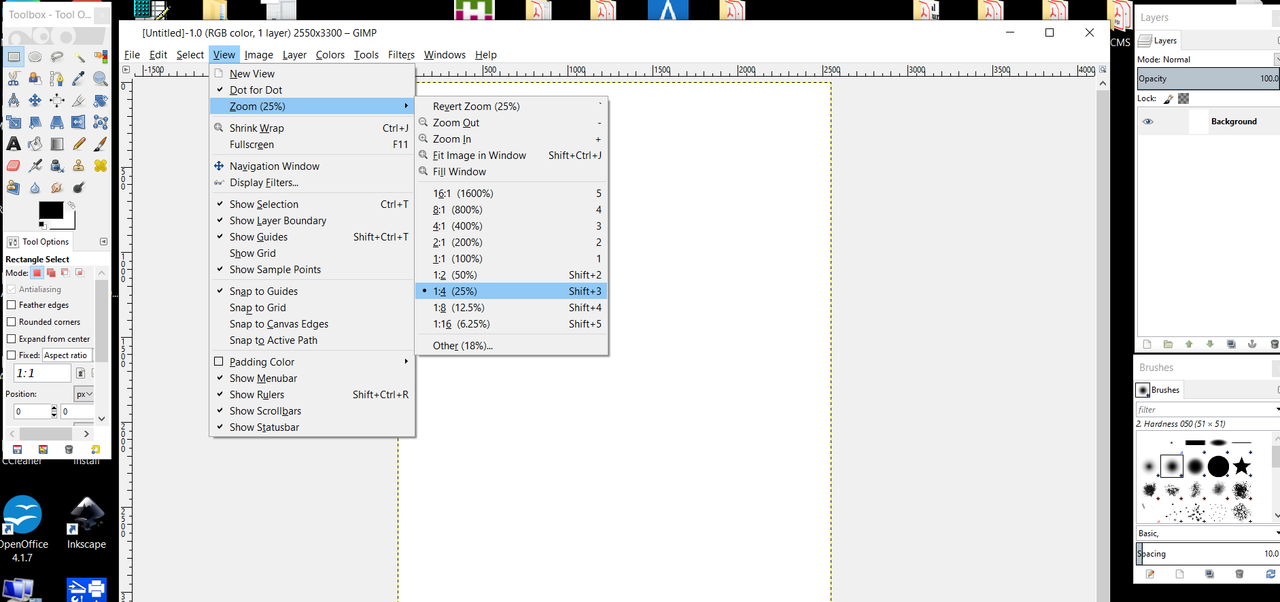 I like to work turning the grid off and on while I work. Here's how you turn the grid on. At 300dpi, I have Gimp set up to show grids at 75 pixels.  To set your grid this way, you have to Configure Grid. You get to this by clicking on 'Image' and then clicking on 'Configure Grid' 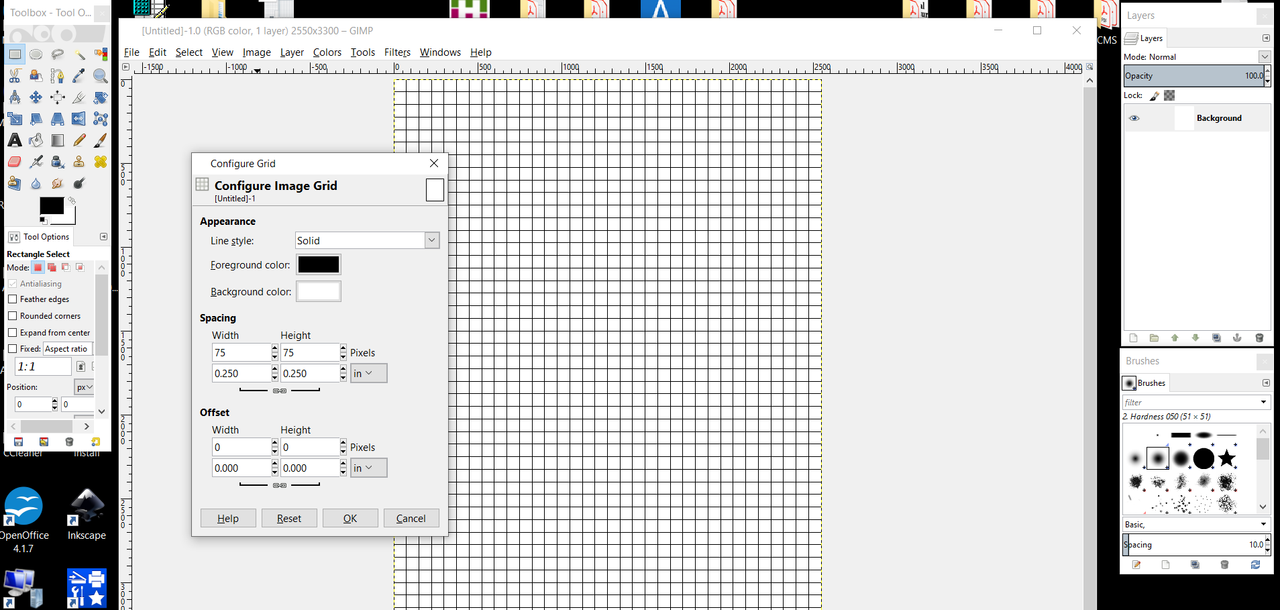 I saved your image to my Desktop. To open, click on 'File', then 'Open', then click on the file you want to open  Now we have to Select the image we are working with. In this case we are selecting the whole page by clicking 'Select' and 'All' 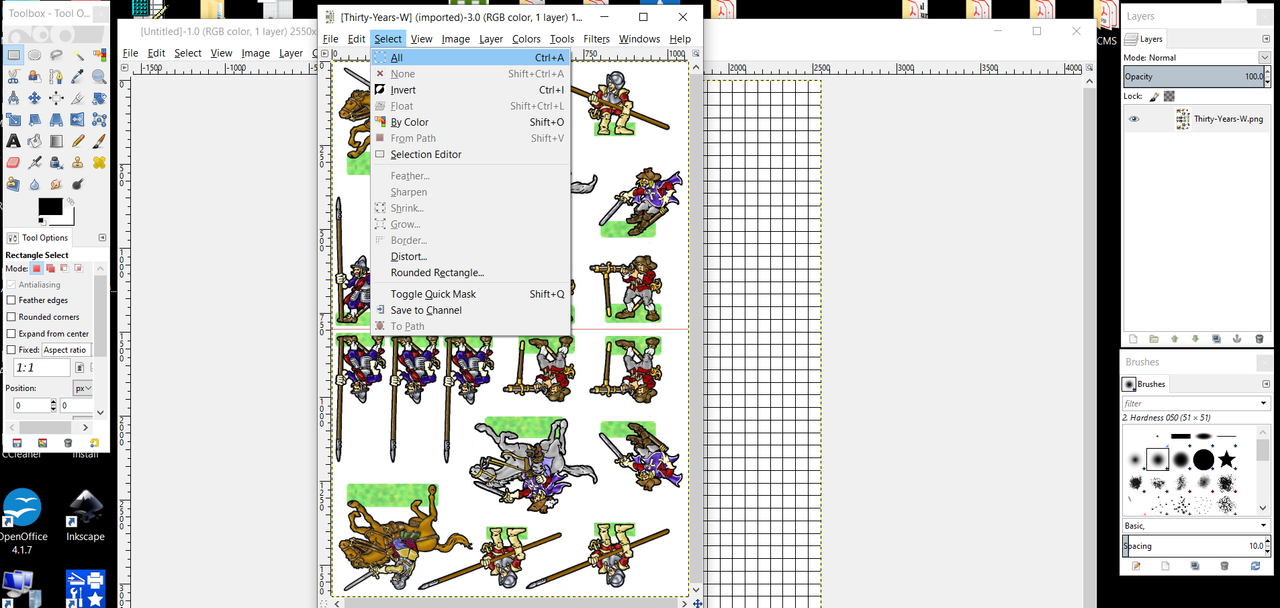 Now, copy that image from EDIT. The image has the rotating dashed line border. So from EDIT go down to Copy. You can also do this by right clicking and going down the drop-down to Edit, and then Copy  Now, paste this into your new page from either the Edit tab or the right click route 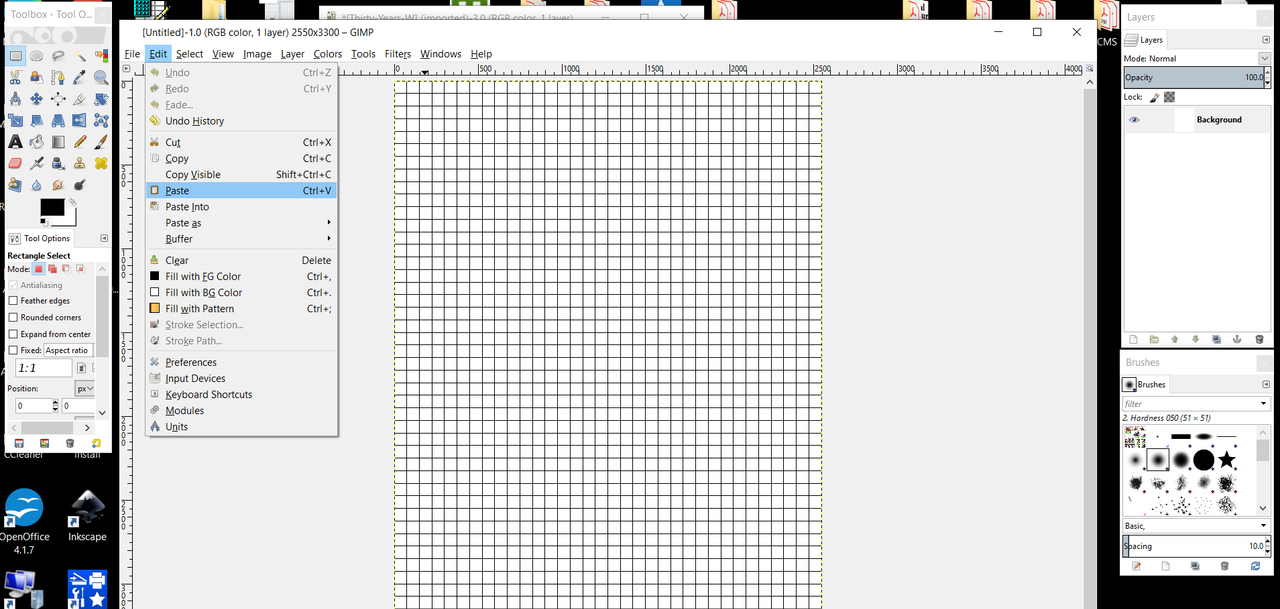 When you paste, you will have something like the image below. This was not issued at 300dpi, so it is small.  The border is still rotating (the selected image), so you can use your mouse to drag and drop this to the top left corner. The original image has almost no borders, so I left it 1/2 inch down and 1/2 inch in from the edges.  Click on the Scale Tool in the Toolbox on the left, then click on the image. A new window opens  In the new window, we want Width and Height scaled proportionately, so click on the broken chain link and it becomes whole, meaning that Height and Width are linked. 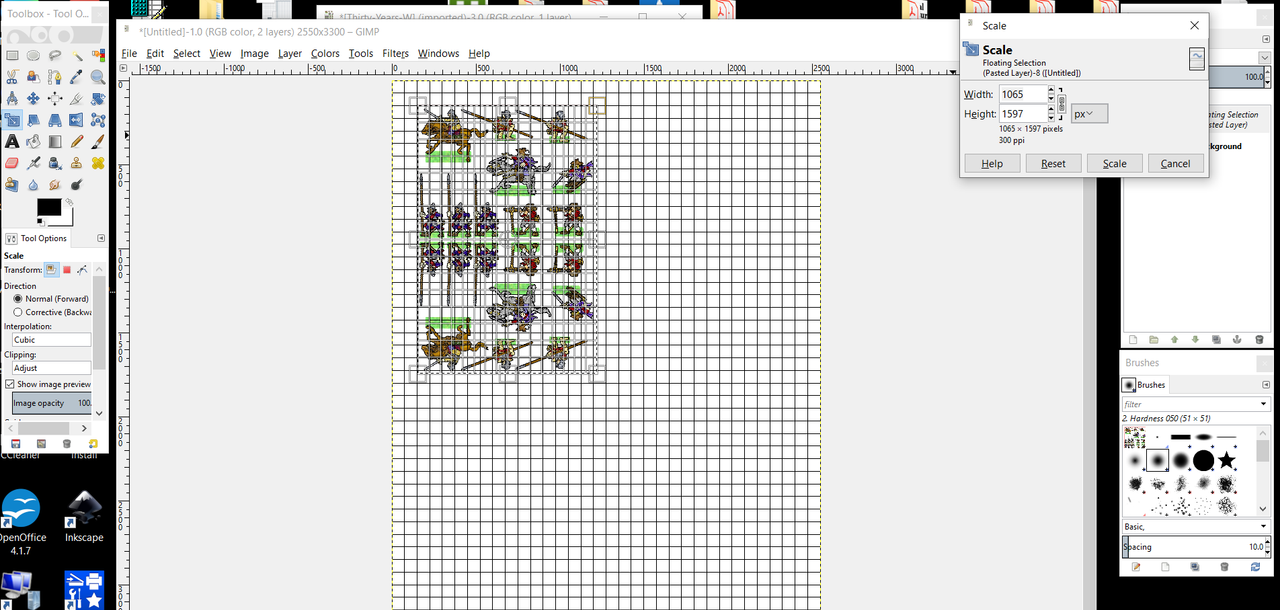 Twelve steps and we haven't Re-scaled or Re-colored anything at this point, but in the next post, I will cover the re-scaling. Almost there |
|
|
|
Post by Vermin King on Jan 3, 2021 10:52:28 GMT -9
I actually have the screenshots to enlarge these to 28mm, but will have to post a bit later. Since these were done as jpg printed Fit to Page, and I was wanting at 28mm, not 25mm, on a Letter-sized page, this gives an opportunity to show some additional techniques which will probably be helpful in developing your Gimp skills
|
|
|
|
Post by Vermin King on Jan 3, 2021 13:37:00 GMT -9
I started out guessing (by the grids) how large this needed to be. Eyeballing it, I arrived at 2037 X 3057, or 191%  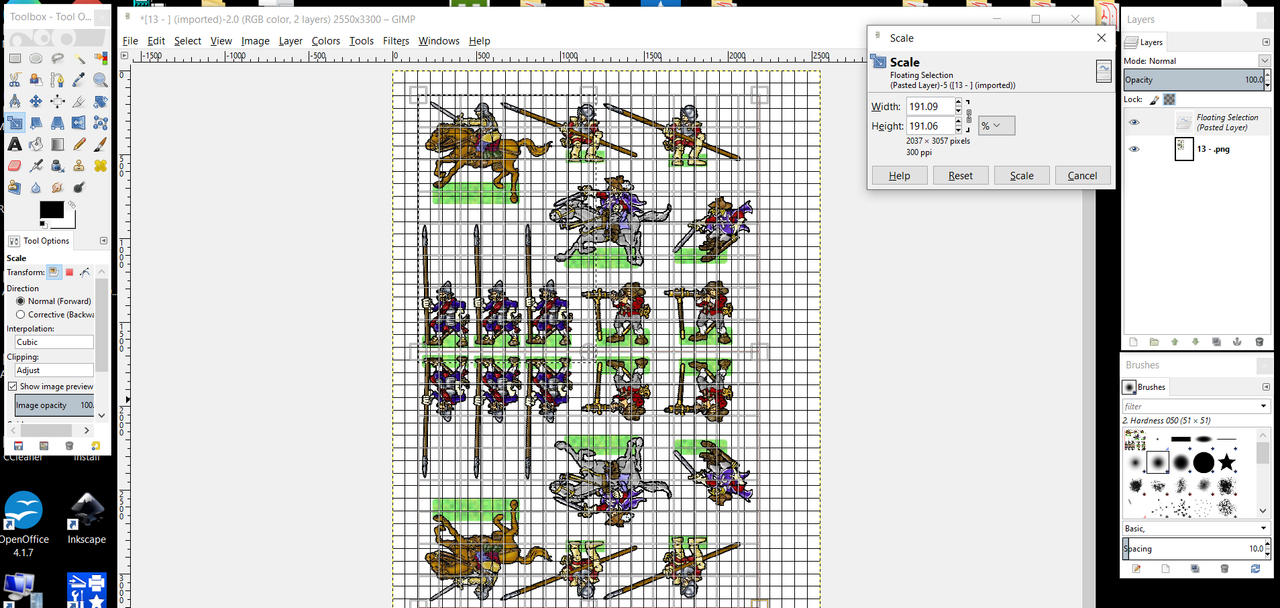 So, I have to check my guess, which comes up as 298 pixels at the bottom. When I measure, I change the view to 50%, and I measured using the Measure Tool 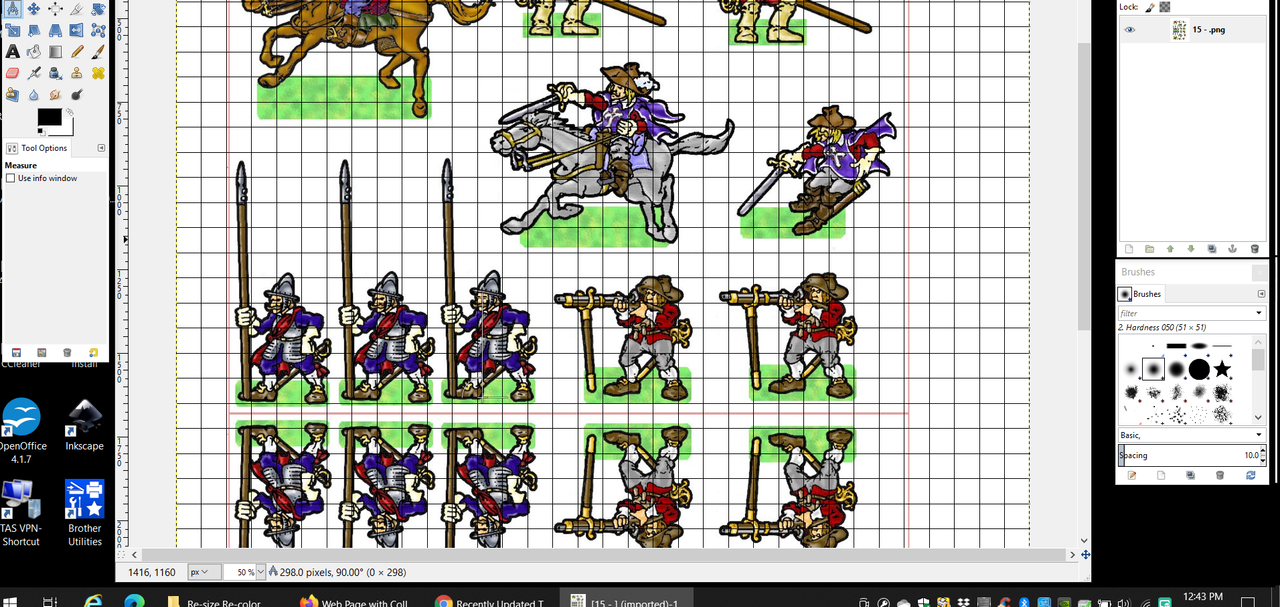 You can also use the Selection Tool, unfortunately, you can't do a Ctrl/PrtSc without altering the box, so I had to finish the selection without the 300 pixels showing at the bottom border 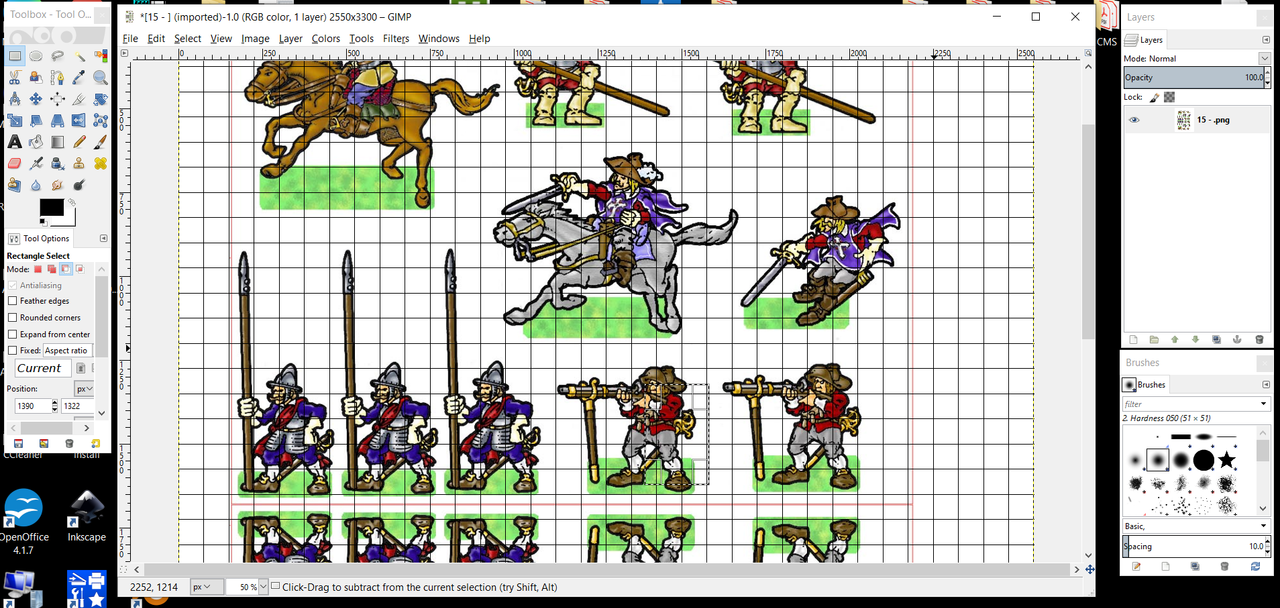 Using cowboyleland's formula above, to get to 28mm, I need to enlarge 110% 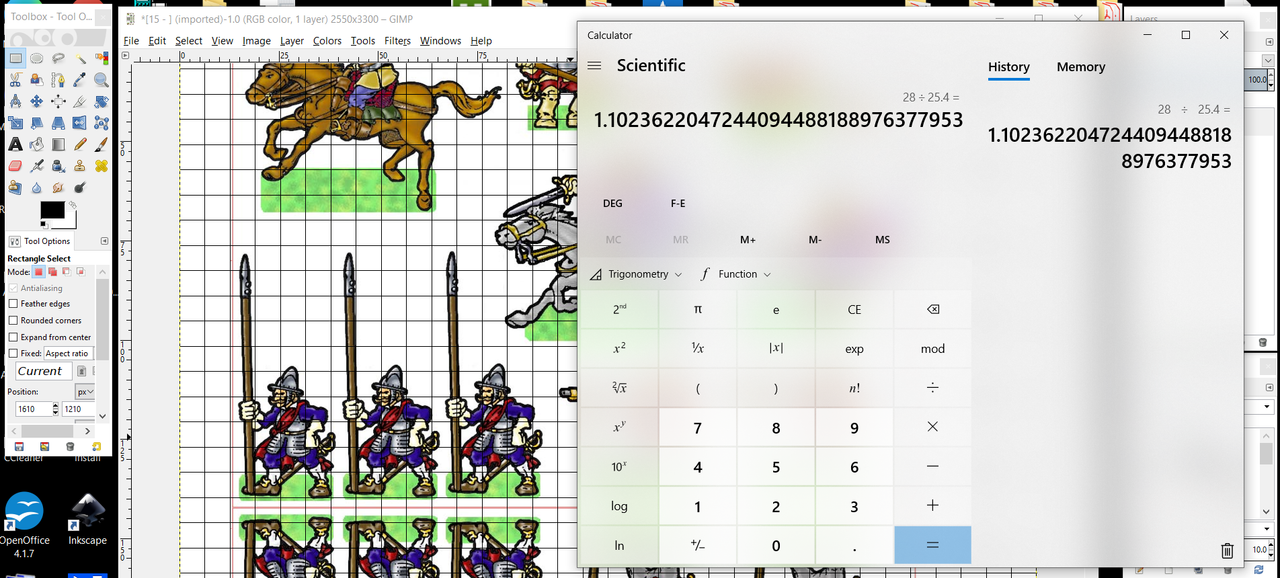 Now we select the area to be enlarged or shrunk 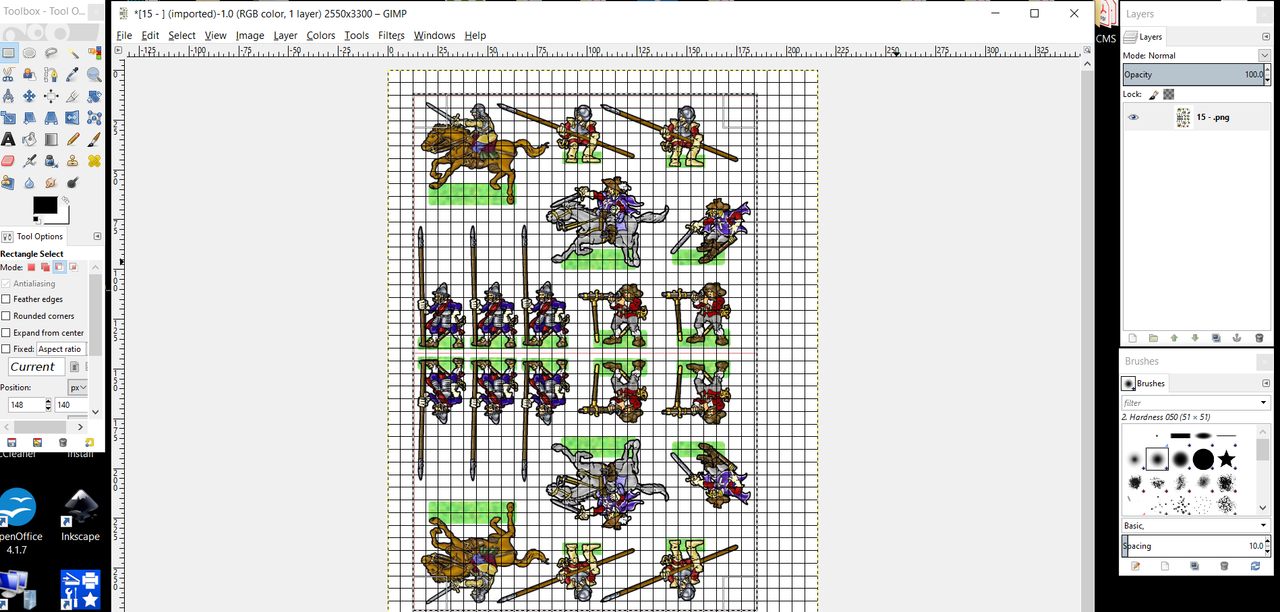 Using the Scale Tool, we again link Width and Height and this time we set things for % in the drop-down list 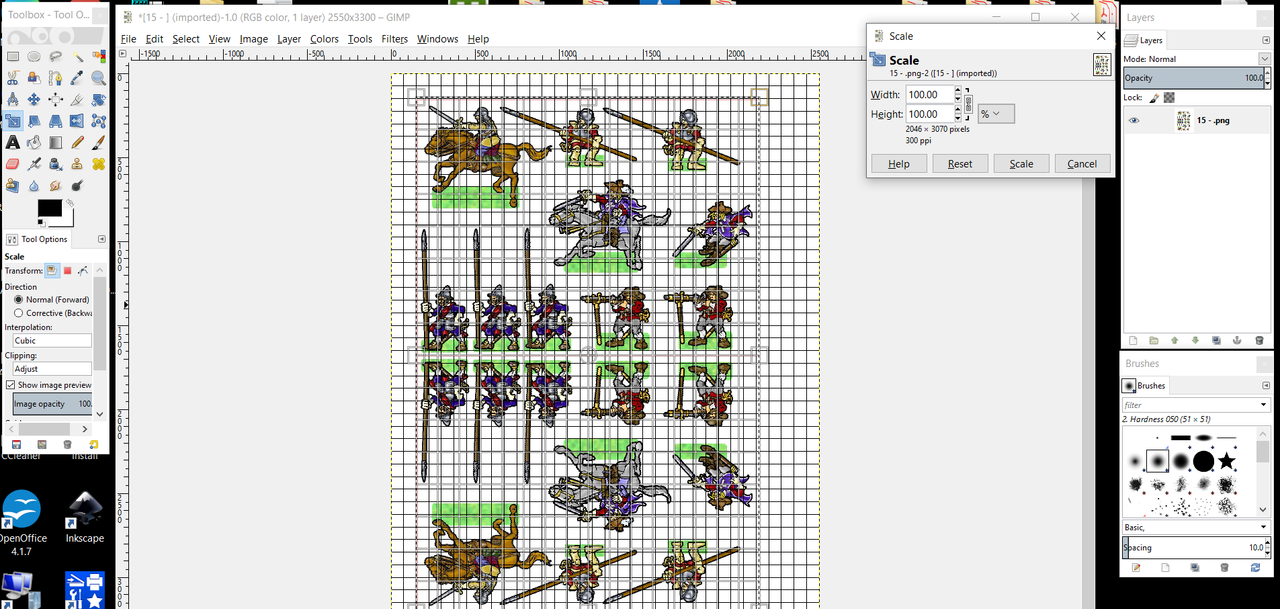 Oops. Where we had things positioned, 110% runs us past the bottom of the page 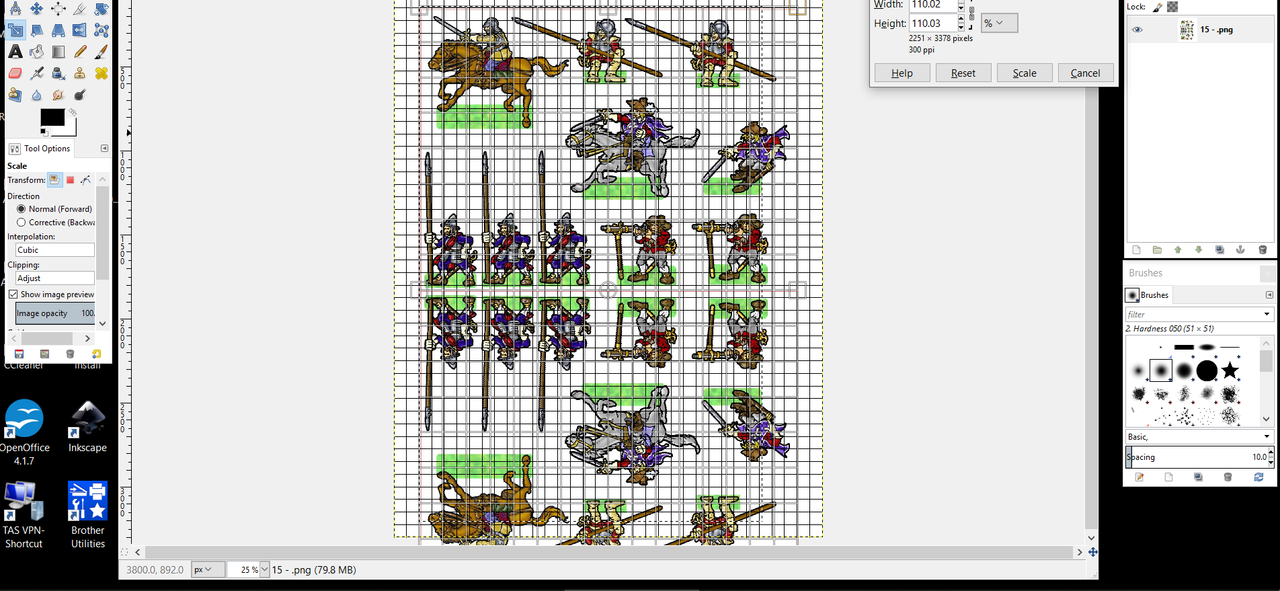 Keeping the selected image selected, we can drag the image up. Things barely fit.  If you were printing on Letter, chances are the top and bottom will be messed up. So we are going to change the layout for better fit. I told you we would cover some other techniques. We need to see more detail, so we need to see more detail  Then we use Free Select to grab the top figures to slide them down. 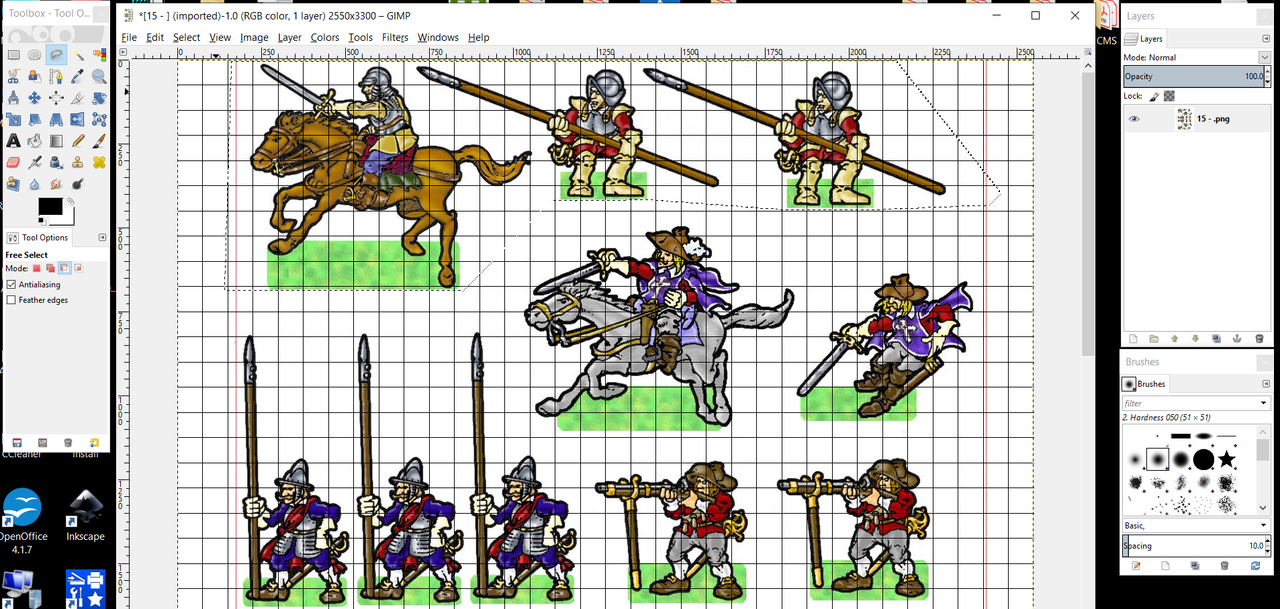 We then cut out the selection  Then we paste the selection and move it down  But top and bottom will no longer match. As these have mirrored backs, we just have to copy the top, flip it, rotate it and position it We start with selecting the top half  To flip, copy selected and paste. Then select the Flip Tool in the toolbox and click on the image  Using the Rotate Tool, rotate 180 degrees 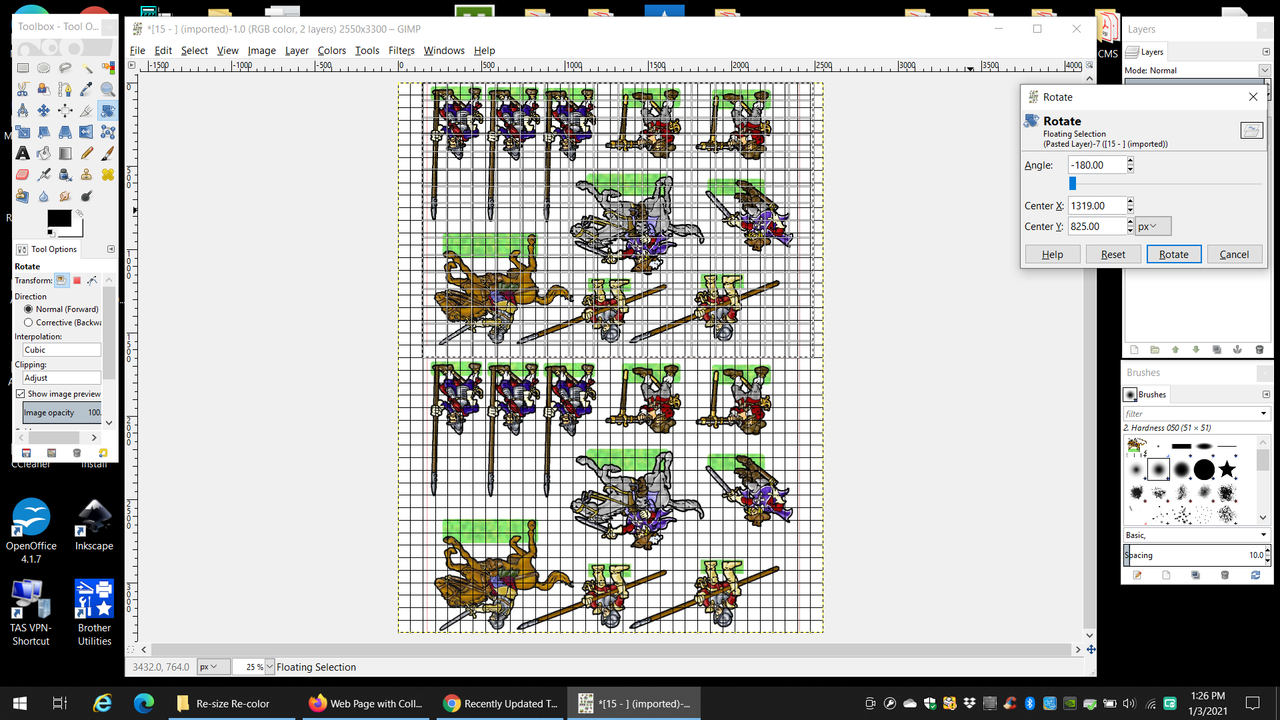 Enlarge the view to 200% and drag the selection down to where it lines up with the top image 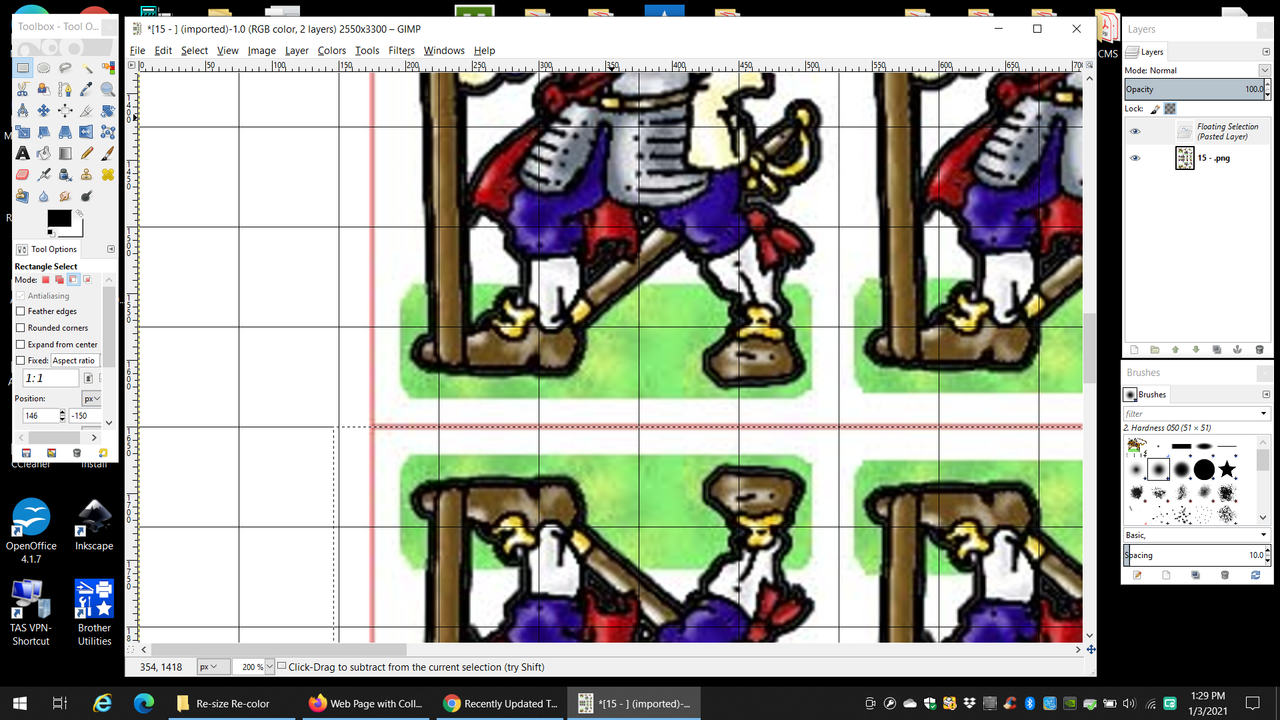 Anchor by clicking outside the selected area and change view to see the results. 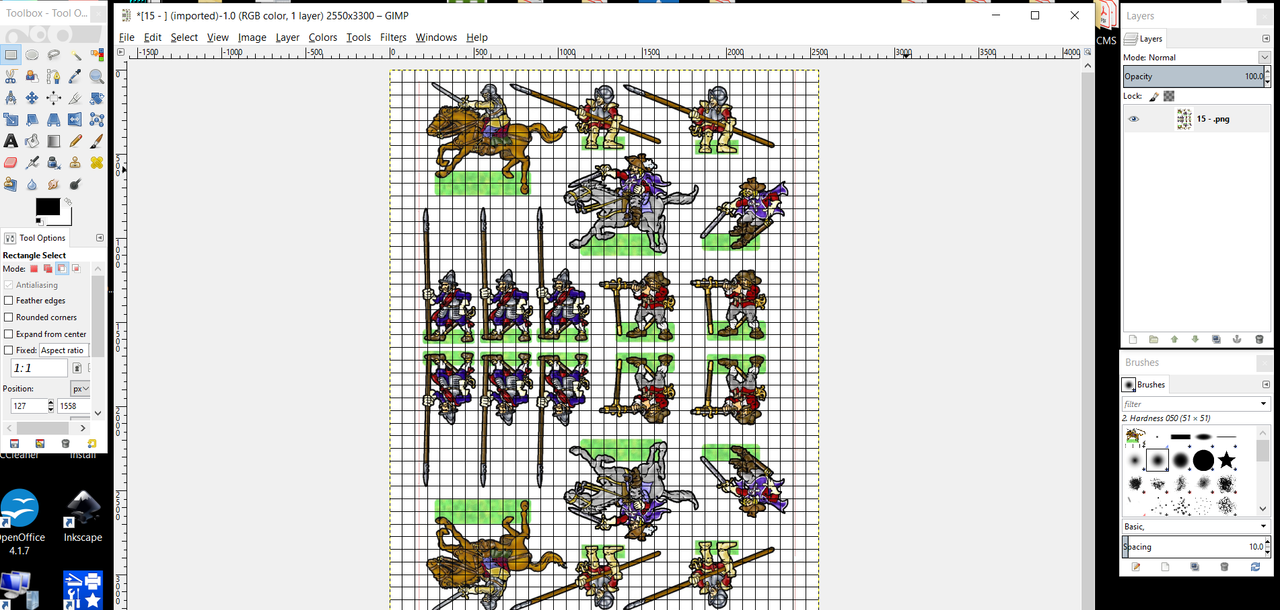 Then Export/Overwrite page  And here is the final result  I probably covered some things you already know, but I didn't know what you know and what you didn't. Until I did this, I didn't realize how many steps I combine automatically from practice. Keep at it and your skills will improve. There were a couple things I probably would have done differently, if I were doing this to be doing it, instead of as a tutorial. As Antohammer stated . I hope this was helpful. Have I worn you out? I haven't done the repaint side of things, yet |
|
|
|
Post by mproteau (Paper Realms) on Jan 3, 2021 15:23:57 GMT -9
GIMP lets you do the math right inside most of the boxes. So, if you have a size of, say, 200, you can change it to "(200*28)/25.5" and it'll do the calculation for you.
|
|
|
|
Post by mproteau (Paper Realms) on Jan 3, 2021 15:24:25 GMT -9
|
|
|
|
Post by Vermin King on Jan 3, 2021 16:45:00 GMT -9
It's long, but things have a tendency to get that way when you document each step.
Rather than have to click on each PostImage thumbnail, I pulled each up and linked to the image. When you view the videos out there, they whip through things so fast you have to back up and hope to see what they did. This way it is step-by-step, showing as much 'click here' info as I could. It should be good for those who are new to Gimp, and for those who are more familiar can easily skip down to where they have questions.
|
|
|
|
Post by adjutantgeneral on Jan 28, 2021 21:57:38 GMT -9
It's long, but things have a tendency to get that way when you document each step. Rather than have to click on each PostImage thumbnail, I pulled each up and linked to the image. When you view the videos out there, they whip through things so fast you have to back up and hope to see what they did. This way it is step-by-step, showing as much 'click here' info as I could. It should be good for those who are new to Gimp, and for those who are more familiar can easily skip down to where they have questions. Sorry it took so long, but I got awfully busy with work. It is 2am here now. I hope to go over your tutorial tomorrow. Thanks much for your obviously painstaking efforts Vermin King. |
|


 here they are in red

 ) using the "Map" function, but I am not sure exactly. If you want to change all the colours you can use this tutorial:

