|
|
Post by Dave on Jul 9, 2010 2:28:11 GMT -9
|
|
|
|
Post by Floyd on Jul 9, 2010 4:13:30 GMT -9
:thumbs up:
Off to purchase!
~F
|
|
|
|
Post by afet on Jul 9, 2010 7:33:11 GMT -9
Beautiful product, Dave.  These, like all of your other fantasy themed buildings, should combine well with the Fat Dragon Dragonshire sets. Cheers, |
|
|
|
Post by josedominguez on Jul 9, 2010 7:55:23 GMT -9
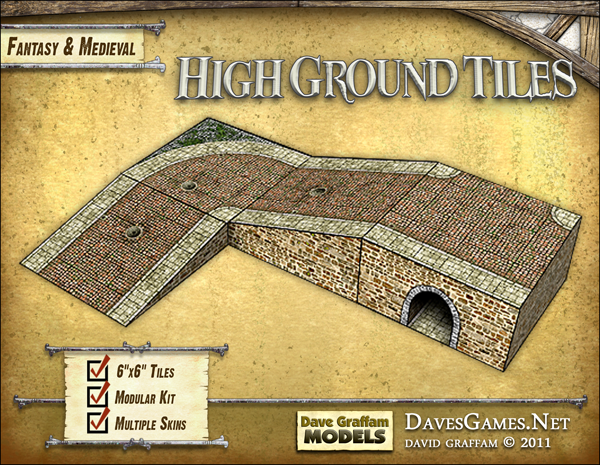
Don't they use an 8" base? I like how the mud/paving/cobbles transition works, the paving runs to the edge of the tile and then stops, so it's a natural transition, clever stuff |
|
|
|
Post by pblade on Jul 10, 2010 22:03:07 GMT -9
The earlier FDG stuff uses 8" base tiles, but the later sets have gone to 6" bases for more modularity.
- Pb
|
|
|
|
Post by josedominguez on Jul 11, 2010 2:07:35 GMT -9
Cool Can you do a really long/wide 'makeshift bridge' to hold us off until the bridge set Longest one I've got is about 7", from the church I think. Add it to the next ruin set maybe |
|
|
|
Post by afet on Jul 11, 2010 6:24:37 GMT -9
Cool Can you do a really long/wide 'makeshift bridge' to hold us off until the bridge set Longest one I've got is about 7", from the church I think. Add it to the next ruin set maybe Hi, José Werewolf8, user over at the FDG Forum, did an excellent tutorial for making a wide version of the Dragonshire foot bridge. You could use multiples for extra wide crossings. fatdragongames.proboards.com/index.cgi?action=display&board=gallery&thread=1034&page=1Cheers, |
|
|
|
Post by josedominguez on Jul 11, 2010 21:54:51 GMT -9
I've kitbashed one already as a stand in, but I like 'official' stuff |
|
|
|
Post by afet on Jul 12, 2010 7:13:04 GMT -9
I agree. I would love to see a bridge made up of two ramps and a center piece. Then you could add in as many center pieces as you like. A drawbridge would be amazing, and not all that difficult, actually. The standard ramp could lead up to a 3x6 raised piece surmounted by a 3x6 drawbridge building with an arch at it's center. The actual bridge raising mechanism could function just like medieval drawbridges: etc.usf.edu/clipart/25100/25144/draw_bridge_25144.htmThe drawbridge building piece could be used at the middle of a regular bridge, to facilitate river travel by masted ships, or as part of the Medieval city walls. |
|
|
|
Post by aviphysics on Jan 19, 2012 7:03:41 GMT -9
I like the high ground tiles well enough, but I am wondering if there is a trick to getting them to come out with flat tops without resorting to foam board.
Mine are plenty strong enough but came out bowed down in the middle.
I have made four 1" high tiles so far from 110 Lb card stock. I strengthened the sides by folding over and gluing the bottom tab instead of cutting them off and strengthened the top by gluing a slightly smaller sheet to the bottom after attaching the sides.
I assembled by attaching all the sides to the bottom side of the top piece, gluing the piece to strengthen the top, and then folding the sides in (scored ahead of time of course) and gluing the corners.
Perhaps I should glue the sides together first and then attach to the top, or is there something else I am missing? I have also thought about putting something really heavy on top while they dry flat (or maybe using a dry iron) before folding the sides.
Thanks for your replies.
edit: just in case it matters, I use Algeen's original glue and burnish with a rolling pin, use a piece of baking parchment to cover the top and bottom, before rolling up the sides. I apply the glue in a fine spiral bead but don't spread before rolling. I did take a piece apart to make sure the glue was well spread out from the rolling and it look good.
|
|
|
|
Post by Dave on Jan 19, 2012 8:23:02 GMT -9
Here's what I recommend to keep the tops from bowing:
Use two layers of cardstock. To join these, use a glue stick (or spray glue if you're brave). Aleene's is probably too wet for covering large areas like that, even with a brayer/roller. When applying the glue stick, just go quickly around the edges and a quick zig-zag in the middle. Flatten it under a heavy book for a few minutes.
The cardstock sheets should fuse and remain flat. If they're still not sturdy enough, a third sheet of cardstock might be needed. But I think you'll be okay with two.
If you need some reinforcement inside the tile, I think the set includes some blank side-wall pieces that can be printed on cardstock and placed inside.
|
|
|
|
Post by josedominguez on Jan 19, 2012 8:27:30 GMT -9
It may be the strengthening that's making them bowed.... the more water based glue you use the more you risk warping. May be better to leave out the strengthening layers and use support posts instead. IF you do want to add layers, then spray adhesive is much better as it's solvent based and the card doesn't warp. Also, if you burnish too much you can add a curve to the card.... really useful when you want something to roll into a cylinder, but not so good when you want it flat. Try just using scrap paper over the tile and giving it a press with the flat of your hand (or leave some books on top) using a rolling pin will encourage paper or card to curve in the direction of the roll. Same technique used to curve sheet steel! Anyway, try it without the extra layer... you'll probably be surprised. I've made Loads of Dave's stuff and have never needed to veer from the instructions. it all works out great |
|
|
|
Post by aviphysics on Jan 19, 2012 8:45:33 GMT -9
Thanks for the quick replies. Can't wait to get home and try it out. I have some experience with spray glue from my old photo shop days so I will try that first. Should I use that for attaching the sides to the top as well?
|
|
|
|
Post by josedominguez on Jan 19, 2012 8:58:04 GMT -9
It's a huge advantage when sticking anything large down or laminating layers.... any glue with moisture in it will naturaly make the paper/card warp as it soaks into one side and swells the material unevenly. Same reason you presoak paper before watercolour painting. There's no water in spray glue so it works much better.
I'm currently working at 15mm and I've replaced foam board with magnetic paper which is nice and heavy but really thin.
Have you tried glue-pens? They seem to have a lot less moisture in them and work really well for figures and buildings. I use UHU ones for stuff that's too precise to use spray mount on.
|
|
|
|
Post by aviphysics on Jan 19, 2012 9:04:54 GMT -9
I have a scotch glue pen but haven't tried it yet
|
|
|
|
Post by josedominguez on Jan 19, 2012 9:10:53 GMT -9
I think that's the same stuff. I use it on buildings and figures, you use a think layer and it doesn't get things as wet as white glue.
|
|
|
|
Post by aviphysics on Jan 19, 2012 10:22:29 GMT -9
Just found a supplier for magnetic and steel paper in the U.S. Not sure if they are the cheapest place to get the stuff though. www.custom-magnets.com/blank_magnets.htmseems like 4 sqft (equivalent to our play area) is about $55 for either steel or magnetic sheets. Tempting to cover the play area in the steel sheet and put all the buildings and terrain on magnetic basis. Way more expensive then cardstock though. The whole reason I decided to make paper terrain vs by something like WorlWorks was so it was cheep enough that I wouldn't mind if it got ruined (Also so I wouldn't be stuck with their strict 3"x3" building tiles and windowless walls.) note: My new papercraft hobby is all about adding more variety to our Mordhiem games. |
|
|
|
Post by josedominguez on Jan 19, 2012 10:28:46 GMT -9
That's what we used it for...... but we used a terrain cloth as the base and totally covered it in Dave's buildings.
|
|
|
|
Post by aviphysics on Jan 19, 2012 13:38:48 GMT -9
That's what we used it for...... but we used a terrain cloth as the base and totally covered it in Dave's buildings. That is my plan. Which terrain do you think gave the greatest benefit to gameplay? My plan is to start with the ruined buildings set. I am especially excited about the possibilities of the Tower Ruin but many of them look like a lot of fun. |
|
|
|
Post by josedominguez on Jan 20, 2012 2:00:19 GMT -9
The tower is awesome and becomes a key terrain piece whenever it's used (Hochland long rifle!). I'd start with a tower and one of the ruined houses then lots of 'crosspiece ruins' they are really flexible and by arranging them cleverly the board rapidly starts to look like a huge complex ruin. They are one of the cleverest, easiest to assembel terrain pieces I've seen. It's only when you've made a few up and laid them out that you see it. Four or five archways in a row look like a ruined cathedral, one archway and a flat wall and you've got a cottage.
|
|
|
|
Post by aviphysics on Jan 20, 2012 7:38:15 GMT -9
Spray gluing and pressing with a book worked great. I highly recommend baking parchment when pressing pieces together as glue doesn't seem to stick to it hardly at all.
I just noticed yesterday that my inkjet (Canon mx860), even on the fast setting, seems to get the cardstock wet enough that it bends slightly. Spay gluing the printed sheet to another sheet of card stock helped flatten it out. In the future, I think I will switch to printing on paper and attaching that to card stock.
I also started on the Wrecked House. These sheets really came warped off the printer (I think it uses a lot more ink). After gluing the backs to the fronts and pressing, everything seem to flatten out perfectly. Also, the cut lines were really hard to see in many spots (perhaps printing on normal paper will help this). On my computer screen they are easy to see so I think it is a printing problem.
BTW, I love all the little extra bits. I am gonna make a whole sheet of the small crates (that came with the wrecked house) to replace the treasure tokens we have been using. We tested the bridge that came with high grounds with our heaviest 30mm metal ork figure (thing must weigh at least a pound) and it didn't flex even a little ;D. Bridge was built to spec without any reinforcement.
|
|


 These, like all of your other fantasy themed buildings, should combine well with the Fat Dragon Dragonshire sets.