|
|
Post by Sirrob01 on Nov 4, 2011 2:38:58 GMT -9
|
|
|
|
Post by labrat on Nov 4, 2011 3:35:49 GMT -9
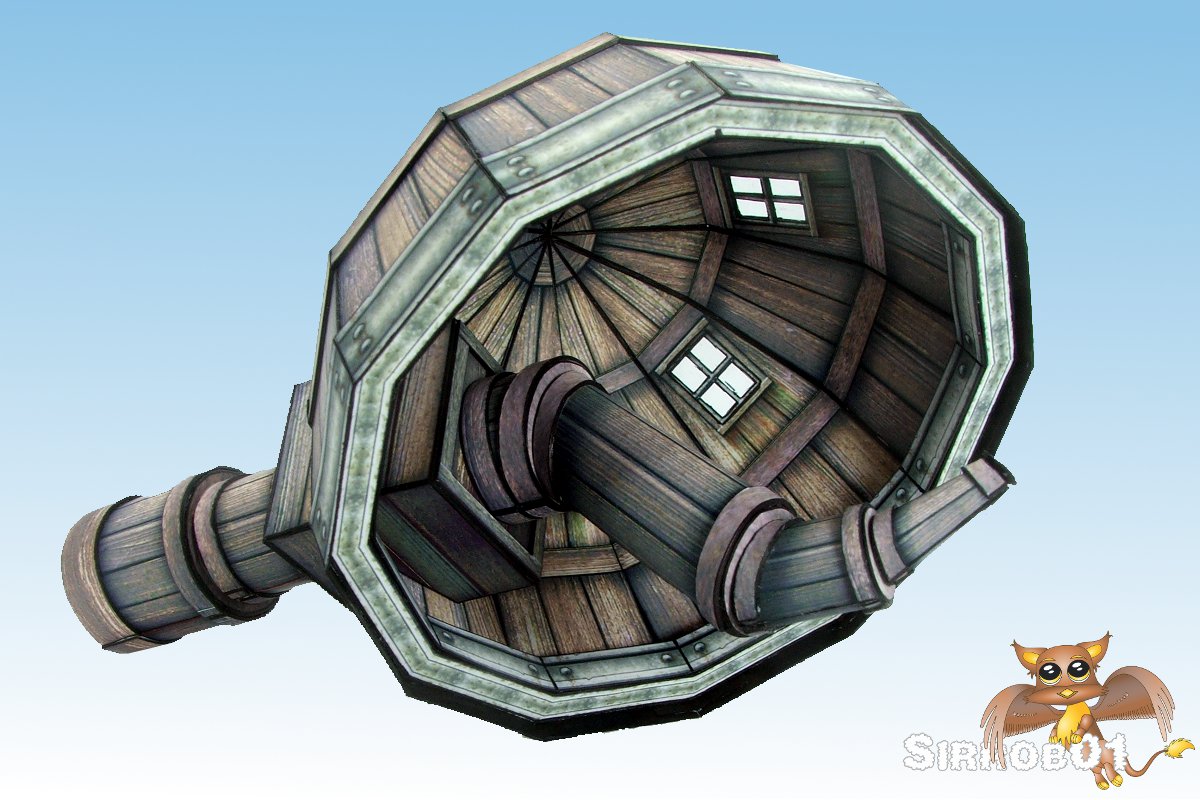
Awesome! I love the glass piece, the way you did that. Are the windows modded too, or is that the original design?
|
|
|
|
Post by mruseless on Nov 4, 2011 5:09:40 GMT -9
Sweet build! I love kitbashed stuff, it shows real creativity!
|
|
|
|
Post by Adam Souza on Nov 4, 2011 6:46:53 GMT -9
Great Work !!
Any gamer I know would love to have terrain of that caliber on thier gaming table.
|
|
|
|
Post by kiladecus on Nov 4, 2011 8:06:55 GMT -9
Funny, MINE doesn't look like that!  Great stuff! I like the fact that the way they did this, you can even place it on a bigger building making it a HUGE observatory. Another thing that is cool about it is you can also use it as a big building for 15mm scale, just overlook the doors. |
|
|
|
Post by Vermin King on Nov 4, 2011 9:32:10 GMT -9
Kiladecus, just don't print the door layer when you print and put an in-scale door on it. I've done that before.
Sirrob1! That is phenomenal. Do you take orders and ship to the US? Excellent detailing. Doing the interior and layering of the details really sets this off.
|
|
|
|
Post by gilius on Nov 4, 2011 12:47:21 GMT -9
|
|
|
|
Post by Sirrob01 on Nov 4, 2011 13:28:35 GMT -9
Thanks all  The windows are pretty much stock I just added clear acetate for glass and coloured the individual frame crosses black instead of white, after edging them they looked really dodgy due to the thinness of the piece and the black marker bleed factor. Door is a little out of scale but not by much. The door above is 1 3/4 inches high. I tried to align door to the door height of wwg/fdg but I miss measured a little (wwg= 1 5/8 inch & FDG = 1.5inchs) so it's a little tall but about the right width. The glass bead for the telescope lens and the clear acetate for the windows are the only non-Dave texture bits . |
|
|
|
Post by Vermin King on Nov 4, 2011 13:36:15 GMT -9
This build is one that I keep coming back to gawk at. Very nice. I think that you might want to consider one addition ... a front step. Using the stone texture, just build a small slab to fit under the door. That would be just one more nice touch to add to the nice touches you've already added. You don't have them pictured, but do you have any other furnishings?
|
|
|
|
Post by dcbradshaw on Nov 4, 2011 14:31:20 GMT -9
THAT
IS
MAGNIFICENT.
How many layers are the laminations of the framing pieces? I've been wanting to try something like this with a smallish Graffam piece (one of the cabins or somesuch) and this just blows me away.
|
|
|
|
Post by Sirrob01 on Nov 4, 2011 14:39:18 GMT -9
No other furnishings at this point, even at 145% the floor space is quiet small, just over 4.5 inches square usable. However I do have a desk in the works but I want to do some other furnishings as well so I left it to do them all together. I was going to add a step just wasn't to sure if it might not get in the way when stored or worse torn off  Doubled up 220 gsm on most of the detailing the upper window frames a re single layer to keep them recessed a little more than the wood beams. |
|
|
|
Post by Vermin King on Nov 4, 2011 14:47:42 GMT -9
Tearing off could be a problem. I'd say make it separate. Attach using the bobby pin approach. Store inside the building when not in use.
Do you do much with furnishings? If you are ever in need of something like that, check out the Vintage papercraft sites like Agence Eureka. A lot of the turn of last century cut-outs were dioramas with lots of furniture and props that can be used for other purposes. She's actually photoshopped many of them to take away the aging.
|
|
|
|
Post by Reivaj on Nov 4, 2011 18:42:59 GMT -9
Wow it´s amazing Sirrob!!!  |
|
|
|
Post by Floyd on Nov 8, 2011 6:08:00 GMT -9
You guys have really brought this piece to life.
Especially the glass bead. And the layers of detailing...
Outstanding work.
That entire building deserves this level of detail.
Will
|
|