|
|
Post by orcoloco on Oct 21, 2012 18:20:24 GMT -9
|
|
Deleted
Deleted Member
Posts: 0
|
Post by Deleted on Oct 21, 2012 18:40:50 GMT -9
Very interesting!
But this is glossy surface so what about light reflection?
BTW: I like these trees - what's material used for upper branches / leaves?
|
|
|
|
Post by orcoloco on Oct 21, 2012 19:01:06 GMT -9
Thanks  Yes, they are glossy. The trees are just very cheap plastic trees that I painted with acrylics paints. I bought them in a local store (in Mexico) ;D |
|
|
|
Post by Rhannon on Oct 22, 2012 2:56:12 GMT -9
Excellent solution, orcoloco. Thanks for sharing the process.
One of the first great paper minis' artists, shadowolf, had laminate their swedish dragoons and they were a very good job. Unfortunately he is now missing from this hobby.
In my projects (in future) the rlamination of the figures is one of my three definitive steps (photo paper, laminating and litko bases )
Thanks.
|
|
|
|
Post by Vermin King on Oct 22, 2012 5:47:08 GMT -9
Does the lamination stock come in a Matte finish?
|
|
|
|
Post by orcoloco on Oct 22, 2012 6:49:49 GMT -9
|
|
|
|
Post by markem on Jul 23, 2013 13:14:10 GMT -9
|
|
|
|
Post by spaceranger42 on Jul 23, 2013 14:42:07 GMT -9
I use self adhesive laminating sheets. They work pretty well so far. |
|
|
|
Post by whisper31 on Oct 28, 2016 14:38:21 GMT -9
Another old thread that I just found.
Anyway...
I have found the least expensive way to laminate minis and cards for games is to buy a roll of clear, self-stick shelf paper (it costs me about $5 US for about 30ft x 19 in wide), and it can usually be found in the homewares section of your local superstore. You cut one piece and remove the backing, put your minis/cards on it, then take another cut piece and stick it onto the top of the sandwich. One note about this: Once the second sheet touches the first, that's it, it's stuck so it may take a few tries to get the technique down to make sure all of the bubbles and wrinkles are out of it. When you finish burnishing it and making sure the edges are closed, you can use dry erase markers on them and just wipe them off when you finish. This works great for reusable damage tracking cards (i.e. Armor Grid, OGRE, etc.).
|
|
|
|
Post by chiefasaur on Oct 29, 2016 5:56:45 GMT -9
I recently started "laminating" my figures with packing-tape before I cut them out. Next time I swing by an office shop, I'll have to look for some wider stuff for bigger figures. I'm actually really pleased with the results of packing tape. The obvious benefit is I just had some laying around  but it also really reinforces the figures I make, especially fiddly thin bits like spear shafts and sword blades. The plastic "slickness" also just feels better to touch, and protects their printing. I actually really like the slight shine they get. 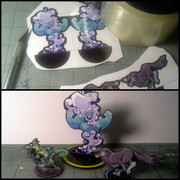 |
|
|
|
Post by johnpuh on Jun 20, 2017 16:50:43 GMT -9
I started off with packing-tape too! Works well, except for the times that it gets a wrinkle or stuck in the wrong spot. I have grown fond of adhesive laminating pages because they function like the packing tape but I find it easier to handle.
I have used a bit of spray on Matte clear coat over laminate for reducing glare of some mini-figures for a photo shoot. It worked well and looked great, however not sure how well that matte finish would hold up on the long haul though. I have not done any durability tests with it.
Also haven't tried thermal laminates yet. They have been on my to-do list for a while.
|
|


