|
|
Post by Arcknight on Aug 13, 2014 13:17:16 GMT -9
So, i've never done paper crafting before, but it's essentially no different than several of our ongoing projects - we're making double sided art to print onto clear plastic, and we convert that art over to digital tokens for online VTTs. We've got about 70 pieces. So, I'd like to dive right in and convert these over to paper craft so you guys can enjoy them as well! I've got a pretty good idea what to do, but I want to give a quick heads up and get some information before I proceed:  (Dotted Lines are simply for size reference, they won't be printed) 1> Should I bother putting a thick black outline, or just make large black backdrops, and let you cut them out however the heck you want, or leave them on clear white (again, cut them however you want) (A, B, C or some other option?) 2> Ideally, how big should the 'lip' be at the bottom of each piece, so the base can be attached? (Currently it's 1/4 inch) 3> Bases… Seems to me I should make a pill-shaped piece that can be cut and goes across, then up, then back down, then back up, then back down, then across, so the fold "pinches" on the bottom of the paper and it's all glued together. But I'm not seeing this done elsewhere. Is there a tutorial or clear suggestion somewhere on whats best? If you guys are interested in more information about the project, you check out our Google Plus Post, or our Pinterest collection of completed pieces |
|
|
|
Post by Vermin King on Aug 13, 2014 13:46:29 GMT -9
As a user, not creator, I definitely would be against the black backdrop. That's wasted ink.
|
|
|
|
Post by squirmydad on Aug 13, 2014 14:50:43 GMT -9
The solid black background is a real ink waster. What I and others do is to put an 8 pixel black border on the front and a 16 pixel black border on the back side. The larger border on the back side helps with misalignment issues. The bottom tab works well at 4 millimeters or quarter of an inch but it's better to have the figures front and back above and below each other instead of side by side. That will help with construction. There are many examples of figure layouts here; onemonk.com/Downloads.htmlIf you go to the bases page of that site you can see many examples of base textures and a tutorial on how to assemble them. Really good looking figure art on your Pinterest page. Welcome to the forum.  |
|
|
|
Post by wildagreenbough on Aug 13, 2014 15:09:34 GMT -9
Welcome to the forum Arclight Your figures look really great and are certainly types that are useful to any RPG gamer or wargamer. I certainly will be following your progress with great interest. squirmydad, now that's really interesting about the above and below vs side by side layout question because with my own paper creations I've tended to use the side by side layout; - not that I'm any sort of expert, - far from it! |
|
|
|
Post by WackyAnne on Aug 13, 2014 17:34:10 GMT -9
Welcome, arcknight! I'm glad you've found us! I've been admiring the battlemaps you've been releasing this last month or so, and would have gotten around to inviting you here before another month was through. And that's before I knew you were going to be doing minis  So, welcome, listen to the wise squirmydad, check out the onemonk basing style, but also Reivaj and bravesirkevin's variations as well. I prefer the latter, since they store flat, and the minis sit flat on the ground. And you are printing them on clear plastic, too? Reminds me of the guy doing shrinky dinks minis... |
|
|
|
Post by cowboyleland on Aug 13, 2014 18:12:53 GMT -9
I like the above/below layout for figures because there are two fewer cuts to make and the bottom of the tab is a nice straight line to fold along.
|
|
|
|
Post by arcknight on Aug 13, 2014 19:32:56 GMT -9
OP here (I was a guest when I posted, now I've registered so it may look different)
My first 'pack' is a grab back of random development pieces (the ones you see on our pinterest), PLUS some older art we had on transparencies that I might as well 'throw in'.
In some of these cases, there is NOT a back. I'm going to clearly put all these 'extra' tokens on their own last page and hope that I don't get complaints about the 'bonuses' not being as complete as the rest of the pack.
My question is : when you don't have any back at all, would you prefer a blank back, or a mirror of the front?
|
|
|
|
Post by cowboyleland on Aug 13, 2014 19:56:40 GMT -9
grey back
|
|
|
|
Post by bravesirkevin on Aug 13, 2014 19:58:52 GMT -9
My question is : when you don't have any back at all, would you prefer a blank back, or a mirror of the front? Generally it's preferable to differentiate the fronts of the backs in some way, as certain game systems do consider it important which direction a character is facing. I probably wouldn't go for a blank back however because that makes it difficult to identify the figure when viewing it from behind. It's probably better to do the back as a mirrored grayscale version of the coloured front. |
|
|
|
Post by squirmydad on Aug 13, 2014 20:25:08 GMT -9
My question is : when you don't have any back at all, would you prefer a blank back, or a mirror of the front? Generally it's preferable to differentiate the fronts of the backs in some way, as certain game systems do consider it important which direction a character is facing. I probably wouldn't go for a blank back however because that makes it difficult to identify the figure when viewing it from behind. It's probably better to do the back as a mirrored grayscale version of the coloured front. Yup, that's actually the method that the Virtual 3d Tabletop app uses to differentiate between front and back on the minis. I was thinking that one benefit of the side-fold layout for minis is that it does make it easier to keep the bottom tabs apart for people who like to use flat mount basing like @reivaj. Welcome for real this time. |
|
|
|
Post by arcticdragongames on Aug 14, 2014 0:15:22 GMT -9
Hello arcknight and welcome to the forum.
|
|
|
|
Post by Rhannon on Aug 14, 2014 7:38:55 GMT -9
Hi Arcknight. Welcome! ( ... and excuse me for my rough English ) I reply to you as a user and possible future buyer, not as a writer and producer ... 1 - as many others have said before me ... full black backdrops absolutely no, please. Options A and C are fine ( C is perfect, everyone likes it. A depends a bit on everyone personal tastes. I like white edges as Pasiphilo, and sometimes even Aaron, makes ) 2 - 3 - imho it depends by base. There are many cardboard/paper bases in the forum. The one preferred by many is the Reivaj's base system. but you can find the best explanation here: How to Base Paper MiniaturesHow to Base Paper Miniatures – Part 2Both of these two excellent articles are by Sirrob01. However I prefer clear acrylic bases as Likto and UK Warbases ( see this topic ). But you already use them. Ok, this topic is archived for me. Now ... about your Flat Plastic Miniatures project. I think it is really fantastic. I am very interested in it and follow it very carefully ( also as Patreon project ). When you think that the first set will be available for sale? Ah ... ok ( now I have more information ) Would you pay $100 for between 310 and 744 miniatures, based on the success of the overall campaignDefinitely yes. Are acrylic bases included? Would you pay $20 for a 62 piece kit with a specific theme?Idem. Yes. Same question as above. Would you pay an additional $50 to be able to submit your own idea/suggestion/your own face/art and have it made into a miniature?Only once, as a real kickstarter pledge during a kickstarter campaign. I know that this, even more, it is the right value for an artist's the work. but I haven't really a real great need for very specific RPG paper figures ( ok I'm talking about paper minis, but my talk is the same ). I need more paper minis' squad ( for skirmish games ). So I ask, for my needs, to some very good authors and and ask for paper minis sets ( 8/12 figures ). The average price for each figure ranges from 5 US dollars to 15 British pounds. If someone asks me 50 ( or 100 ) dollars for a paper figure, although this can be a fair price, I prefer to engage this money in something like this. I'm sorry but I think that some realism is usefull also in demand, not only in the offering. only a last thing about colored flat plastic minis ... Can't You crop the panel following the silhouette of the figure ( a little larger than silhouette )? Ciao |
|
|
|
Post by arcknight on Aug 14, 2014 7:41:01 GMT -9
I'm going with the bottom-fold technique. There are many times I can put 2 "strips" on a single piece of paper, but I'm not sure this is necessary, though it would "save paper" and I wasn't thinking that "saving ink" was too problematic until you guys told me so. Also, thanks a ton for the gray-back suggestion, it's certainly better than either a blank back or a full mirror. Man, u guiz r helpful! Anyway, more questions : Here's a sample first page, you guys can freely download it and use it if you wish. atlas.arcknight.com/images/aktpapercraftsample1.jpg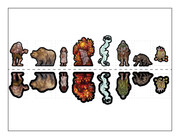 But I noticed that if I just put small/standard humanoid pieces on a page, I can barely fit 2x entire rows  Are there reasons why this would NOT be wanted? 'It saves paper' but now you're having to make an extra cut to split the page, and then fold it on irregular axis. Just figured I should ask. Also, something I find really neat is that since I don't have size constraints, I might make alternate versions of some of the pieces, so you can make them smaller or larger if you want. They'll be extra pages at the end of the .PDF, and the normal pages will all include the 'standard' size they were created in for plastic token purposes. |
|
|
|
Post by arcknight on Aug 14, 2014 7:56:27 GMT -9
"There are many cardboard/paper bases in the forum."Are there any free and open source bases I could include with my pack so I don't have to bother making them at all? Although it's really a minor amount of work to apply my own textures to someone else's designs… so we might as well show off our ground textures from our maps. "Now ... about your Flat Plastic Miniatures project. I think it is really fantastic." Thanks! I have Marta working full time on the pieces for 'The Grove', which will be our first 62 piece pack. Even if the kickstarter is delayed, we can start printing demo copies of this 'set' and find out where the mechanical troubles are. We plan to include 20x bases in the $100 kickstarter offer, and we really aren't sure how many to offer in the individual $20 packs. "I need more paper minis' squad ( for skirmish games ). So I ask, for my needs, to some very good authors and and ask for paper minis sets ( 8/12 figures ). The average price for each figure ranges from 5 US dollars to 15 British pounds."We're solving this in part with our 'horde' monster concept - a set of 'similar' miniatures that make a set. For 'The Grove' we're including a 'horde' of Wolves and of Elves. So the pack will have 4x different wolves that are similar enough to make a pack. As for the elves, this is interesting because they're all individual hero/npcs, but they should still overall make a 'force' so you could play a miniatures game with a pack of elves.
The set includes 6 fighter/hybrids (bows, swords, etc), 2 casters (1 male, 1 female) and 2 nobles (an elven king and elven queen). It's hard to EXPLAIN this, but I think this is one of THE BEST REASONS to chip in the extra $50 and develop your own piece. The 10 token 'elves' we're creating are great, and fill in most user's needs, but you can add another elf of your own design to round out the pack. We have to assume that with 10x humanoid user submissions we MIGHT get more additions to the elven force, but we just don't know. Nor do I want to predict the specific things that people want. So these user submission spots let you say "I love the IDEA of an elven team… but I really want a front-line elf with a tower shield and a thin longspear to lead the pack" or you may say "But I want an elf with a longbow who has camouflage to look like a tree so I can have a sharpshooter". I can't predict all the neat things that people MAY want, and we're hoping people throw in these elements that are actually important to them. " ... Can't You crop the panel following the silhouette of the figure ( a little larger than silhouette )?" Physically, yes. But theres no way to mass produce this or automate it. If I were to make a die that could 'cut' these shapes I would A> have to make a separate die for every single pack and panel we ever produce, and B> the die will have all sorts of cases where it cannot handle the shape of the curve, and this can break the die and make many more problems. So we've designed standard shapes that we'll be producing and cutting. But individuals who were crafty could certainly trim all the additional plastic off of these, and I expect a number of fans may do this. |
|
|
|
Post by oldschooldm on Aug 14, 2014 8:06:18 GMT -9
Please leave room for:
1) Cutfile registration marks
2) Printers that don't print all the way to the bottom of the page.
|
|
|
|
Post by arcknight on Aug 14, 2014 8:13:35 GMT -9
Please leave room for: 1) Cutfile registration marks 2) Printers that don't print all the way to the bottom of the page. I put a somewhat rediculous 1" border around the entire page (the thick black line) and all the art is inside that (even if I create 2 rows), so I should be completely clear of any of these issues. The outer edge of the image is actually the 8.5 x 11 page, the black box is showing my print area, so that these can be printed in US or A4 standard without a problem (as long as they don't shrink to fit / resize) Do I need MORE than 1" on all sides? |
|
|
|
Post by bravesirkevin on Aug 14, 2014 8:18:20 GMT -9
Even a half inch margin is plenty.
|
|
|
|
Post by arcknight on Aug 14, 2014 8:30:36 GMT -9
Even a half inch margin is plenty. Exactly. So I overdid the heck out of it for my own simplicity, and I don't believe I could use that extra inch to any great effect on these pages. |
|
|
|
Post by wyvern on Aug 14, 2014 9:28:58 GMT -9
I'm going with the bottom-fold technique. There are many times I can put 2 "strips" on a single piece of paper, but I'm not sure this is necessary, though it would "save paper" and I wasn't thinking that "saving ink" was too problematic until you guys told me so. Ink-usage can be really key, as it's not just the amount of wasted ink, but heavy blocks of (any) colour have a tendency to curl or distort the card when using an inkjet printer. Bottom-fold will work fine no matter how you want to base the figure. I use all sorts of basing techniques for paper minis, and all you really need remember is where you're supposed to cut and fold for the different methods. But I noticed that if I just put small/standard humanoid pieces on a page, I can barely fit 2x entire rows... ...Are there reasons why this would NOT be wanted? 'It saves paper' but now you're having to make an extra cut to split the page, and then fold it on irregular axis. Just figured I should ask. More minis per printout page is always appreciated! Getting the layout right is never easy, and experimenting with portrait or landscape format paper orientation may work better for some mini shapes than others, maybe reorganising which mini is on which page to make best-use of the space. As long as the fold lines are clearly indicated in some way, there's no real "axis" to worry about as such. The folds needn't even run on the same lines right across the page, providing there's enough space you can cut easily between individual minis on the page before you have to fold them. Also, something I find really neat is that since I don't have size constraints, I might make alternate versions of some of the pieces, so you can make them smaller or larger if you want. They'll be extra pages at the end of the .PDF, and the normal pages will all include the 'standard' size they were created in for plastic token purposes. Nice idea. Some manufacturers do this already, and it gives extra options without having to re-scale the "ordinary size" pages. Your Flat Plastic Miniatures look fascinating. Don't forget that clear plastic option exists for paper minis too, and although the colour tends to be less strong on home-printed plastic sheets than your pro-printed versions, it would be worth considering for ghostly or other transparent/semi-transparent creatures, things and beings especially - so one page of ghosts would give people the option of printing on card or clear plastic sheets. Also glass/crystal doors and windows with sculpted or painted decoration, mirrors ditto, and so forth. |
|
|
|
Post by arcknight on Aug 14, 2014 11:09:50 GMT -9
Edit : It's not letting me quote you… it just blanks out your text. I'm quoting "Don't forget that clear plastic option exists for paper minis too"
Do you mean that people have their own plastic printers, or that they put plastic through a normal printer, and still fold them for duplex?
To make proper art files for plastic printers would require knowing what type of printers they had and creating special files specifically for them. When we print to plastic we have to dice each file into color channels. It's quite a lot of work.
If they're just using plastic as their print medium, wouldn't they just want the files I'm already making, without the black outlines? My original pieces are already transparencies, I'm going through the extra steps to add the black outline, so it would be very easy to turn off this layer and re-save everything.
|
|
|
|
Post by bravesirkevin on Aug 14, 2014 13:30:31 GMT -9
Do you mean that people have their own plastic printers, or that they put plastic through a normal printer, and still fold them for duplex? Folks occasionally would just print on ink-jet transparencies. Most wouldn't double up in this case as the printers don't print white for opacity so adding it in would mean painting by hand. I'd say those who favour this option are in the minority as transparencies are quite expensive and are difficult to work with. |
|
|
|
Post by wyvern on Aug 15, 2014 2:00:23 GMT -9
Kev covered the main point, that inkjet printers will work with their own type of transparencies (also lasers will print on clear plastic too, so I'm led to believe, though I don't have a laser printer so can't confirm this).
In terms of colouring, see-through clear instead of "unprinted" white, and diluted colours overall, work well for ghosts and other transparent beasts. It's why I suggested only using such prints for transparent things, not opaque ones, of course. But you could also use such prints for invisible characters/creatures, for example.
Not sure what Kev means by printable transparencies being difficult to work with in this instance, as such minis - along with doors, windows and mirrors - just use flat pieces of plastic, which can then be fitted into bases like the plastic ones without gluing, or fitted between card "frames" of one sort or another, so again, gluing really needn't be much of a problem. My guess is that few people do this currently partly due to the cost of inkjet transparencies, but partly because manufacturers often don't give the option for things like transparent window prints in models (and it becomes REALLY expensive if you have to print off an entire wall on clear plastic just to get one small transparent window!).
Double-sided minis on plastic would work better as a front and back placed together rather than folded over (because for such tight folds, the printable plastic tends to snap), and again this only works well for transparent creatures and things unless you add paint to make them opaque, as Kev said.
|
|
|
|
Post by arcknight on Aug 15, 2014 8:19:17 GMT -9
Alright, well it means almost no work to me to make a 'transparent' background version in place of white, so I'll go ahead and do that as well and throw it into the pack. People can download it if they wish.
|
|


