|
|
Post by oldschooldm on May 3, 2017 6:29:43 GMT -9
Import, ... erase the old reg marks, and have the Cameo software print the page and new, Cameo reg marks. This is gold. I have a real fast way to get rid of anything (including old reg marks) I don't want to print: large-white-filled-no-cut rectangle over the area. I use this to hide company logos, large instruction areas, etc. Saves ink. Also, sometimes I just want a portion of the page printed/cut, so I use the same technique. Fast! |
|
|
|
Post by uptrainfan89 on May 3, 2017 7:28:34 GMT -9
I've considered the idea of just abandoning some of WWG sets due to there last hosting fiasco lol, but I do like the ground tiles from streets of Titan and the props from Titan Control lol. Out of curiosity how hard is it to make cut files on the Cameo 3 for models? I've really been toying with the idea of spending a weekend and making some cut files for Mel's 07-08 (GunCrawl) prop sets and such that don't have any and see how it turns out lol.  |
|
|
|
Post by sunraven01 on May 3, 2017 8:15:19 GMT -9
No need to abandon the old sets, just erase the old reg marks in the Cameo software and let the Studio software print new ones when it prints the page.
|
|
|
|
Post by uptrainfan89 on May 3, 2017 8:28:35 GMT -9
No need to abandon the old sets, just erase the old reg marks in the Cameo software and let the Studio software print new ones when it prints the page. I think I'll have to give it a try, really out of the couple WWG sets I use anyways the main thing I'd really like to work with the cutter is the props for Titan Control (which is only like 7 pages). Streets of Titan I hand cut as I don't build the street tiles like they do, I only cut out the main square and glue it to the top of Foamcore board lol. |
|
|
|
Post by erc1971 on Apr 28, 2018 9:31:49 GMT -9
Just picked up a Silhouette Cameo 3, and Mystic Mountain Productions suggested I come here for an answer to my question...
I am using the automatic registration for my guide marks, however the further away from the upper left corner I get, the further off the cut is. Mystic Mountain suggested that the cutter is only reading 1 guide mark that that there might be a way to make it look at other others as well.
Is this correct, or could my problem have another cause?
Thanks,
Eric
|
|
|
|
Post by lightning on Apr 28, 2018 10:54:34 GMT -9
Just picked up a Silhouette Cameo 3, and Mystic Mountain Productions suggested I come here for an answer to my question... I am using the automatic registration for my guide marks, however the further away from the upper left corner I get, the further off the cut is. Mystic Mountain suggested that the cutter is only reading 1 guide mark that that there might be a way to make it look at other others as well. Is this correct, or could my problem have another cause? Thanks, Eric When this happens with me it is usually that I am printing not at 100%/actual size but the Adobe Reader is auto scaling to the physical page size. |
|
|
|
Post by erc1971 on Apr 28, 2018 18:45:49 GMT -9
Just picked up a Silhouette Cameo 3, and Mystic Mountain Productions suggested I come here for an answer to my question... I am using the automatic registration for my guide marks, however the further away from the upper left corner I get, the further off the cut is. Mystic Mountain suggested that the cutter is only reading 1 guide mark that that there might be a way to make it look at other others as well. Is this correct, or could my problem have another cause? Thanks, Eric When this happens with me it is usually that I am printing not at 100%/actual size but the Adobe Reader is auto scaling to the physical page size. This could very well be it. Unfortunately, I have already built half the Coliseum, meaning I am in a bind either way I go - having to cut out the rest by hand, or start from scratch to get the cutter to work for me. At least I can print a single page at actual size to see if that is truly the issue. Thanks, Eric |
|
|
|
Post by erc1971 on Apr 28, 2018 18:54:20 GMT -9
When this happens with me it is usually that I am printing not at 100%/actual size but the Adobe Reader is auto scaling to the physical page size. This could very well be it. Unfortunately, I have already built half the Coliseum, meaning I am in a bind either way I go - having to cut out the rest by hand, or start from scratch to get the cutter to work for me. At least I can print a single page at actual size to see if that is truly the issue. Thanks, Eric Nope, this was not the problem, I printed 1 page at full size and the cut was significantly smaller than what was printed. so that leaves me still not sure why the cut is off when you get further away from the upper left hand corner. |
|
|
|
Post by berneart76 on Apr 28, 2018 20:34:52 GMT -9
I had a similar issue as this awhile ago, and it hhd to do with the printed page being printed as "centered", which even with scaling tuned off and no margins set in the print dialog, was the print driver/printer was still printing an additional 1/8" off from the top and left sides of the page.
|
|
|
|
Post by lightning on Apr 29, 2018 10:21:51 GMT -9
Maybe you can post a link to the pdf you are using? Or the cut file?
|
|
|
|
Post by erc1971 on Apr 29, 2018 15:29:27 GMT -9
|
|
|
|
Post by mproteau (Paper Realms) on Apr 29, 2018 15:52:32 GMT -9
What kind of printer? You might want to print a test page that has a 6”x6” square and see if, even at full size, it prints correctly. Using the Silhouette Studio software you can make a 6” square and put in reg marks. Select the square and set the line thickness to 1pt so it prints. Print the page from studio then cut it. Measure the sides of the square and the sides of the cuts. That might zero in on something.
|
|
|
|
Post by oldschooldm on Apr 29, 2018 17:01:41 GMT -9
I've posted elsewhere that some printers don't print square. Measure the distance between the registration marks... Cheap printers drift (only in the vertical dimension.)
|
|
|
|
Post by uptrainfan89 on Jun 30, 2018 16:23:30 GMT -9
Finally getting around to using my cutter again after being busy the past few months and was wandering by chance if there were cut files for any of Darkmook's, Slick's, Okumarts Vile Villains sets, Or the TAU minis in the One Monk downloads? Just a few odds and ends I was wandering if they existed. |
|
|
|
Post by mproteau (Paper Realms) on Jul 1, 2018 2:15:43 GMT -9
Finally getting around to using my cutter again after being busy the past few months and was wandering by chance if there were cut files for any of Darkmook's, Slick's, Okumarts Vile Villains sets, Or the TAU minis in the One Monk downloads? Just a few odds and ends I was wandering if they existed. Okumarts’ vile villains sets are on my list to do but my todo list has grown long. |
|
|
|
Post by uptrainfan89 on Jul 1, 2018 4:40:04 GMT -9
Okumarts’ vile villains sets are on my list to do but my todo list has grown long. No worries, I was just kinda curious lol. You are definitely a cut file master, I really appreciate all the hard work you've done so far. I might have to learn the ins and outs of making them just so I can make some for a few older sets that don't have them in my free time. I also need to possibly come back to which ever WWG Titan set it was and tweek the cut files in it a bit to work properly (I think it was Titan Control). |
|
|
|
Post by uptrainfan89 on Jul 5, 2018 8:07:52 GMT -9
So I finally started messing with the cutter again, I'm using a Silhouette Cameo 3 and I'm wanting to try and cut out the Armory set from WWG with it. I'm printing actual scale in the PDF but so far 2 cuts have came out like this, I'm sure I'm missing something (I also turned on the regmarks the 2nd cut cause it didn't look for them the 1st one): 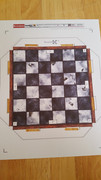 |
|
|
|
Post by uptrainfan89 on Jul 5, 2018 9:19:19 GMT -9
Update: Ok so I decided to try what was mentioned, I opened the PDF in Photoshop and saved the page I wanted as a PNG then drug the PNG image from my desktop to the cut file in Silhouette, lined it up, erased the old reg marks, and had it print cameo ones. Worked like a charm! I only wish there was a quicker method but it works so only a minor complaint. It also doesn't cut the left and right edges due to being outside the safe cut area, not sure if there is a work around to that but I don't mind having to make 2 straight cuts by hand, way better than cutting the whole thing and scoring lol. 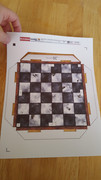 |
|
|
|
Post by mproteau (Paper Realms) on Jul 5, 2018 12:01:22 GMT -9
The new silhouettes don’t support the reg marks that the WWG guys have on their sets. Chris Roe came up with a reg Mark patch kit you can make printed onto sticker paper I think. I would prefer importing to Studio and printing from there, myself.
|
|
|
|
Post by uptrainfan89 on Jul 8, 2018 10:49:30 GMT -9
The new silhouettes don’t support the reg marks that the WWG guys have on their sets. Chris Roe came up with a reg Mark patch kit you can make printed onto sticker paper I think. I would prefer importing to Studio and printing from there, myself. Yeah, I think I tried the patches before, it seemed to be hit and miss. I agree, least with printing from Studio it's worked every time so far and I can make sure everything lines up. Out of curiosity do you have some neat tips or pointers for making cut files? I'm really thinking about making some for a few sets, mainly some WWG and Ebbles GunCrawl sets that don't have them, to speed up my building process, but I haven't tried making cut files yet lol. |
|
|
|
Post by mproteau (Paper Realms) on Jul 8, 2018 15:46:32 GMT -9
I probably should have some tips, given how many cutfiles I make, but I'm afraid that a forum post would just be confusing (a picture is worth at least 120 words here...) and I don't have a lot of time to dedicate to it. If you have a particular model you want to make cutfiles for, I might be able to find a time to kind of walk through it at the same time, chatting on discord to compare the process.
|
|
|
|
Post by uptrainfan89 on Jul 9, 2018 2:38:53 GMT -9
I probably should have some tips, given how many cutfiles I make, but I'm afraid that a forum post would just be confusing (a picture is worth at least 120 words here...) and I don't have a lot of time to dedicate to it. If you have a particular model you want to make cutfiles for, I might be able to find a time to kind of walk through it at the same time, chatting on discord to compare the process. Hahahaha no worries, it kinda occurred to me after I asked that it was most likely a question with a thousand possible answers depending on what set and what I wanted to do. I'll have to play around with Studio a bit and see what more specific questions come up that I can't figure out. From what I've gathered a big thing seems to be a lot of older sets page layouts didn't have cut files in mind so I may have to move things around in Photoshop to get them in the safe cut area and also have room for the reg marks. I've also found I like to do the past mentioned method and turn the PDF pages into PNG from Photoshop and then just drag and drop them into Studio. That way I can just open the Studio file and do both my printing and cutting from it. I was hoping making the cut and score lines was as easy as playing connect the dots but I get the feeling there is more to it than that hahaha!  |
|
|
|
Post by mproteau (Paper Realms) on Jul 9, 2018 8:14:10 GMT -9
There are lots of little tricks. I'm not in front of Studio right now, so I may get some key modifiers wrong, but I'll try to write stuff while waiting for software to compile... It's useful to know that if you Ctrl+C then Ctrl+V something, it's exactly 5 Ctrl+Up & 5 Ctrl+Left away from the original at the scale you did the copy/paste from. Ctrl+Arrow will duplicate the selected shapes in that direction. Get used to merging and subtracting shapes - it can often be easier to create complex shapes this way than it is to lay down polylines. While editing points, Shift+Mouse Selection lets you select multiple points. Also, it's useful to recognize the difference between "curved" and "straight" points. If I need a couple line segments that are aligned horizontally (like when doing the center line for minis) I often lay down one long line, edit the line's points, click to add points where I want to divide the line up, then select all the points, right-click on one of the points and hit B to break the points. Then Ctrl+Shift+E to break apart the compound path, leaving you with multiple line segments. To make boxes (like buildings) I typically lay down rectangles for the wall parts, and overlapping rectangles that lead to the flat parts of the tabs. I merge the rectangles together, which makes it easy to delete a couple points and end up with the tabs angled nicely. I usually duplicate the interior box first, so one is left behind for my score lines. Many things are mirrored along a center line. Lay down the center line to mirror on, and then use polylines to do one half of the shape. Don't let that half cross the mirror line... Then, select the polylines to mirror and the center line, and mirror it horizontally or vertically. Delete one of the center lines (if you want one to remain as a score line) or both. Select both sets of mirrored parts and make a compound path out of them. Then edit the points of the combined thing, and join the end points together. Lots of separate lines makes cutfiles bigger. Make sure you don't have stray "points" in your cutfile - sometimes if you start to make a polyline and you cancel it, you may have left behind a point. That'll both make the file bigger, and it'll sometimes confuse Silhouette Studio (at least, older versions occasionally became unhappy). As a final step with cutfiles (this is mostly important if you want to share them) select all of the lines that can be logically combined (like, all of the cutlines vs. all of the score lines) and make a compound path out of them. It can dramatically reduce the size of the file. If you're manually making lots of triangular tabs, like on a long strip for a wheel or some other rounded piece, I start by making the interior shape, then duplicating it so there are two stacked on top of each other. That's because one will become the score lines. Select one of the two and edit its points. I first click on all of the points that make up the base of the tabs. I then go and click in between them to make the points for the center of each tab. Select each center point and Ctrl+Arrow once to bump them out an even amount. Then you can easily select all of the center points together and use arrow keys to move them all at once. This keeps them nice and even. |
|
|
|
Post by uptrainfan89 on Jul 9, 2018 9:16:10 GMT -9
Wow this is some really good pointers and info, thank you mproteau! This will definitely help a lot and hopefully take out a little trial and error. I think I'll try something simple to learn on at first like a box. I think one of Mel's box stacks from one of his GunCrawl sets might work perfect. |
|
|
|
Post by oldschooldm on Jul 9, 2018 10:47:09 GMT -9
There are lots of videos on Youtube - mostly by older lady papercrafters - who taught me a lot about various manual and automatic tracing methods.
|
|
|
|
Post by uptrainfan89 on Jul 9, 2018 12:47:49 GMT -9
Thanks oldschooldm! I'll definitely have to check those out too! I'm really enjoying the cutter too now that I'm figuring it out Lol. It's definitely making projects, I've always wanted to do but made my hand cramp at the thought, easier! |
|


