|
|
Post by oldschooldm on Jun 19, 2015 21:13:42 GMT -9
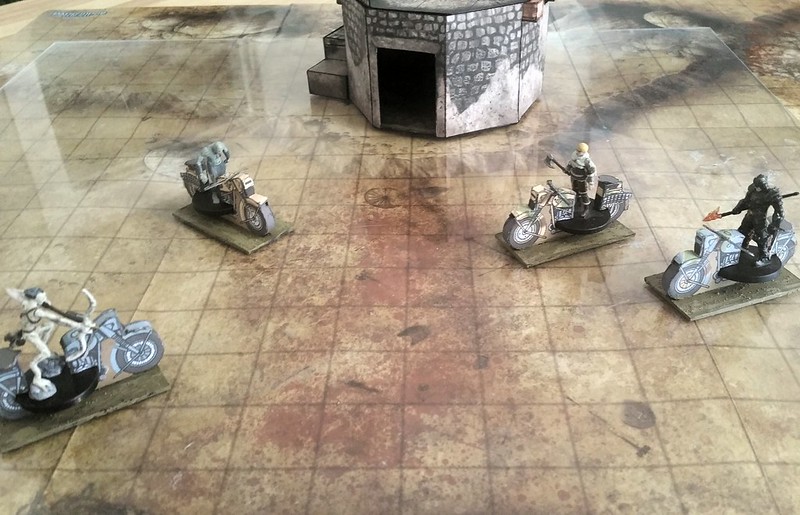
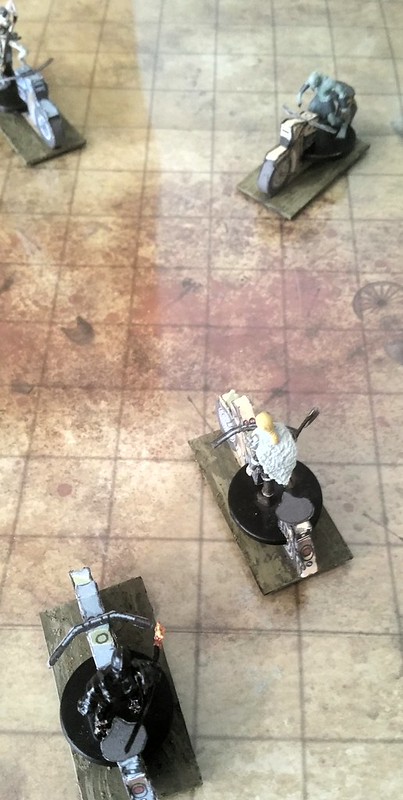
Y'all know I like to put minis in my models - buildings and vehicles especially. There is something like this from Litko for horses (bears, boars, etc.): www.litko.net/products/Horse%2C-Character-Mount-Marker-kit.html#.VYUDxDxdVRE I couldn't find this adaptation yet in any motorcycle minis. As you know, that never stopped me. This thread will document my attempts to create a miniature paper figure for a motorcycle that can hold a standard 1" based figure in it's center as a "driver". I welcome all comments and suggestions along the way. So far, I have one rough prototype to share... |
|
|
|
Post by oldschooldm on Jun 19, 2015 21:29:22 GMT -9
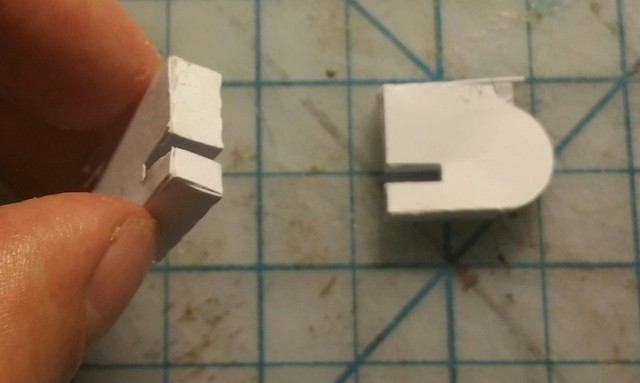
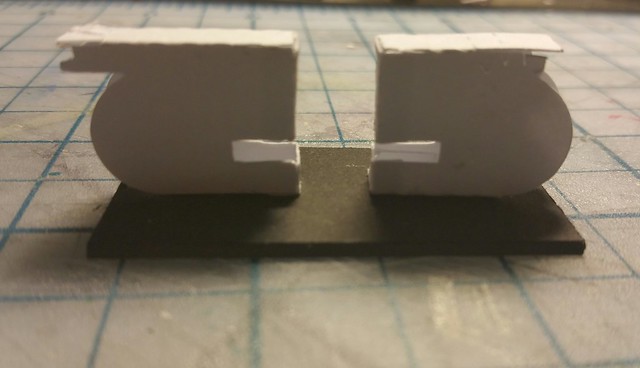
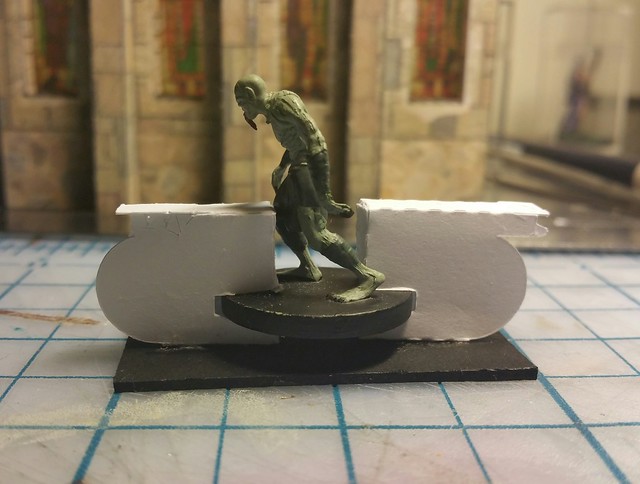
So - that plastic in the Litko models is providing a lot of strength- something paper doesn't have all by itself (without folds and glue...) So I'm looking for a "boxy" and easy-to-mod motorcycle model. After an hour or so searching (mostly via Google at Papermau) I found this one: papermau.blogspot.com/2013/11/japanese-classic-police-motorcycle.html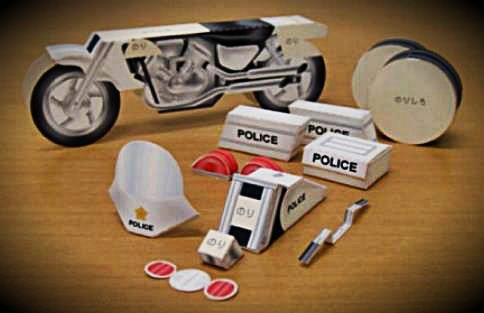 The correct scale for my minis has the model on the map at 2" long by less than 1" wide. So I decide the first thing to try is make a solid mount out of paperboard. I will glue the model to this for stability and proper positioning on the play mat. Initially I scale the model down by 55% (probably still a bit to large, given the photos below) but the tires will fit on the tile. Tracing just the tire and the body at this point, I can make quick paper (no ink) prototypes. Prototype number 1 is dead simple - cut the model in half, and glue each half to the tile:  Protype motorcycle #1 Protype motorcycle #1 by Oracle Omega, on Flickr The bobby pins are holding the two halves in place (there is not any glue under them) so that the bike doesn't droop (all the glue is under the tires.) Wait for a while, insert mini, and shoot photos... 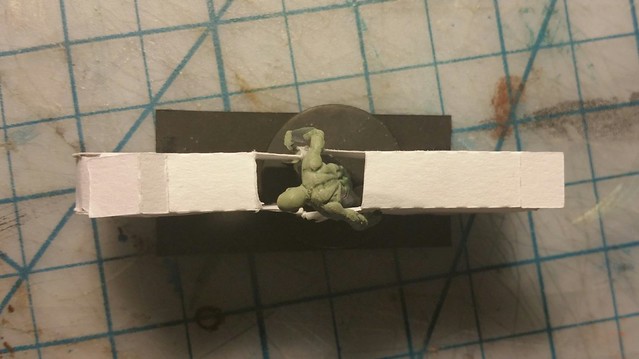 Prototype motorcycle #1 Prototype motorcycle #1 by Oracle Omega, on Flickr 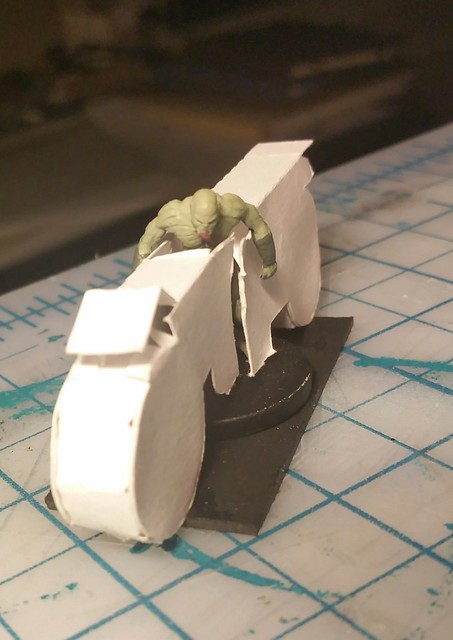 Protype motorcycle #1 Protype motorcycle #1 by Oracle Omega, on Flickr 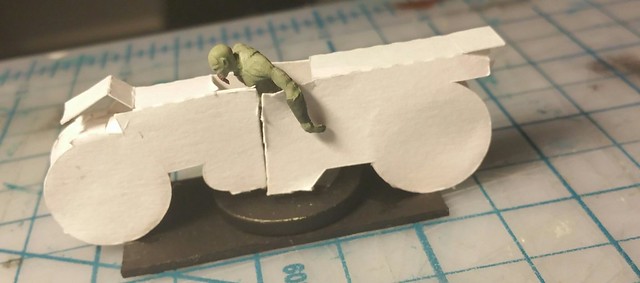 Protype motorcycle #1 Protype motorcycle #1 by Oracle Omega, on Flickr My observations: - Having only one mount point for each half of the bike is awkward and leads to alignment errors.
- Having the sides overlap the mini is an interesting idea, but makes it fiddly to load/unload, not good for game time. Considering just an open gap.
- Where the rider "sits" is just a 'U' shape of paper, should really be a solid box, perhaps even closed.
- The model is too big. Next time I'll make it all fit in 2"
- The rider is setting too low - after reducing scale and testing, consider raising rider from tile height.
- Consider a pure-box model (actually, 2-half models, each a box, with a base slit...)
What are your thoughts? |
|
|
|
Post by oldschooldm on Jun 19, 2015 22:49:13 GMT -9
|
|
|
|
Post by Vermin King on Jun 20, 2015 4:27:36 GMT -9
|
|
|
|
Post by oldschooldm on Jun 20, 2015 5:23:34 GMT -9
Yes! Grabbed all 3! Thanks! |
|
|
|
Post by berneart76 on Jun 20, 2015 6:34:19 GMT -9
You got the jump on me , I was going to look into working on this today. I'm liking how prototype #2 is looking to work out, it just comes down to applying a design on it, adding some ground ( grass or other) where the wheels aren't. I was going to start with these, scaling them up: prmodels.webnode.cz/products/bmw-r-75-1-100-made-by-ringo-rpmodels-/ |
|
|
|
Post by berneart76 on Jun 20, 2015 8:26:27 GMT -9
Working on scaling up, combining the parts and adding glue tabs...  |
|
|
|
Post by cowboyleland on Jun 20, 2015 11:10:27 GMT -9
I think you want the tabs in the middle of the "top side" grey as well, don't you? Great idea btw to have figs be able to stand in the bike.
|
|
|
|
Post by berneart76 on Jun 20, 2015 11:46:58 GMT -9
Quick build of Version 2.0 on a 1" wide by 2" long base... Unfortunately I don't have any miniatures any more that will fit, but this should be a good start.   Here is the .psd file... ( it has the top of the middle "stand" section colored grey) drive.google.com/file/d/0B0tiICZZl68JZkRSWTFaeW9jSVE/view?usp=sharingI'll take a look at the other ones after I mow the lawn... |
|
|
|
Post by berneart76 on Jun 20, 2015 14:05:36 GMT -9
Updated .psd file with Grey, Desert Camo, Grey Camo, Red, and Sand colors and a headlight option and optional score and tab marking lines. Rideable Motorcycle template |
|
|
|
Post by oldschooldm on Jun 20, 2015 15:05:21 GMT -9
Awesome work Tom! @bearneart76 you've definately improved the idea with a one-piece construction. I really like that a lot. You've moved this design up a notch, but it isn't finished yet! Here's my build of Prototype #3 (Tom's one-peice model) with feeback and a cutfile! 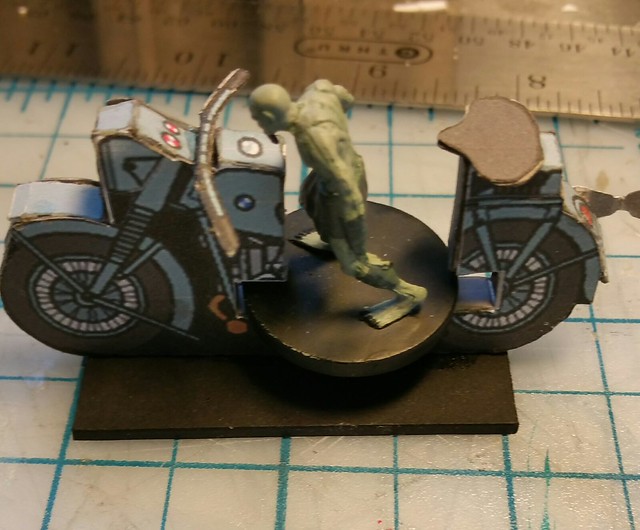 Prototype motorcycle #3 Prototype motorcycle #3 by Oracle Omega, on Flickr 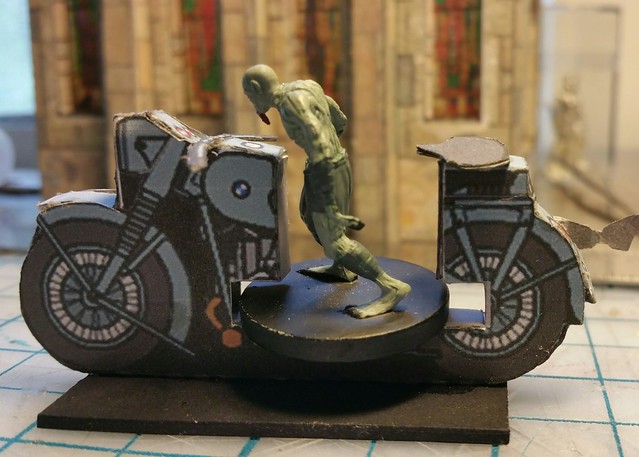 Prototype motorcycle #3 Prototype motorcycle #3 by Oracle Omega, on Flickr 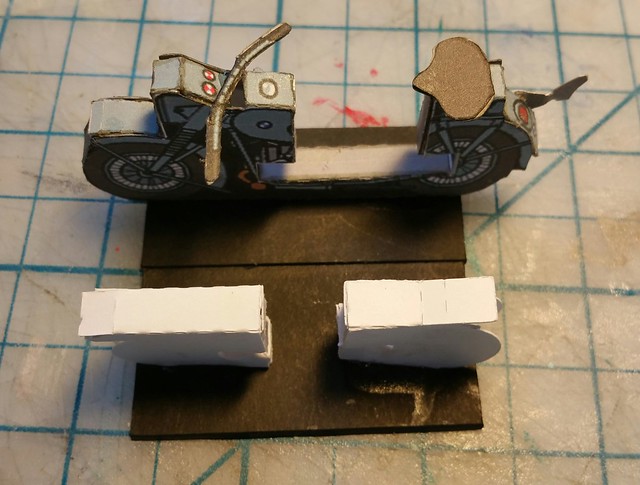 Prototype motorcycle #3 Prototype motorcycle #3 by Oracle Omega, on Flickr Comments: Turns out it doesn't work as-is with a mini because the mini keeps falling off! The mount is too deep/wide so the mini has to rest on a very small platform with nothing else to hold on to. See my "size" comment below for one possible solution. Also, the tabs need to be changed to glue easily around a rounded surface. Should be traniangles/trapizoids, not rectangles. Otherwise layers overlap awkwardly. See my cutfile for a trace you can use. The exhaust pipe is too flimsy without a back-side. Looks like it would be easy to mirror on the page. The grey tabs are on the wrong PSD layer (should be part of the cycle, not the tracings), so they disappeared when I wanted to print without tracelines. BTW - did you try black? That might look better, but I'm not sure. There is a tab missing on the edge of the piece that sits under the seat. I put one in the cutfile after I built the photos here. Here's a link to the screenshot of my cutfile so you can see the detail: www.dropbox.com/s/zuo5dqe36qedjyl/Screenshot%202015-06-20%2016.56.12.png?dl=0Lastly, like my first prototype, it's too big for my miniature scale - it makes the minis look smaller than the bike, the bike look bigger than the cars, and contributes to the "I keep falling off" problem :-) the slot should be just-barely 1" wide, and 1/8" high - that way the mini fits in snug enough to not fall out. Good news on this front is that I think I can solve all these problems by just scaling the mini down to 80% of your original (and maybe a tweek or two...) Here is the cutfile for my first cut of Prototype #3: Rideable Motorcycle Prototype 3.studio3 (102.97 KB) Thank you so much for jumping in on this - I love how strong this model is! We're almost there! |
|
|
|
Post by berneart76 on Jun 20, 2015 15:17:37 GMT -9
Addressing the issues later tonight or tomorrow... Will also look at the sidecars for these as well. Also, the tabs need to be changed to glue easily around a rounded surface. Should be traniangles/trapizoids, not rectangles. Otherwise layers overlap awkwardly. See my cutfile for a trace you can use. I'll get these fixed for version 3.The exhaust pipe is too flimsy without a back-side. Looks like it would be easy to mirror on the page. There is a small section to fold back onto the tailpipe, I'll clear up instructions for that as well. On your build it wasn't folded back, probably because I forgot to have the fold line identified on version 1.The grey tabs are on the wrong PSD layer (should be part of the cycle, not the tracings), so they disappeared when I wanted to print without tracelines. BTW - did you try black? That might look better, but I'm not sure. I'll check version 2, but I am sure I have this issue corrected. I'll also add a black option.
There is a tab missing on the edge of the piece that sits under the seat. I put one in the cutfile after I built the photos here. Here's a link to the screenshot of my cutfile so you can see the detail: www.dropbox.com/s/zuo5dqe36qedjyl/Screenshot%202015-06-20%2016.56.12.png?dl=0 This has been corrected in version 2.Lastly, like my first prototype, it's too big for my miniature scale - it makes the minis look smaller than the bike, the bike look bigger than the cars, and contributes to the "I keep falling off" problem :-) the slot should be just-barely 1" wide, and 1/8" high - that way the mini fits in snug enough to not fall out. Good news on this front is that I think I can solve all these problems by just scaling the mini down to 80% of your original (and maybe a tweek or two...) I'll fix the slot issue as well, how does the size of the cutout work? It might work better scaled down to 80%.... it has been sort of challenging not having any actual mini's anymore to work with. I might also include an additional piece that's a bit wider to glue in the bottom of the slot. |
|
|
|
Post by oldschooldm on Jun 20, 2015 15:33:16 GMT -9
Glad most of these have already been fixed! :-) The exhaust pipe is too flimsy without a back-side. Looks like it would be easy to mirror on the page. There is a small section to fold back onto the tailpipe, I'll clear up instructions for that as well. On your build it wasn't folded back, probably because I forgot to have the fold line identified on version 1.Cool! Dab o glue did the trick! I didn't know the target shape, so I missed that. Lastly, like my first prototype, it's too big for my miniature scale - it makes the minis look smaller than the bike, the bike look bigger than the cars, and contributes to the "I keep falling off" problem :-) the slot should be just-barely 1" wide, and 1/8" high - that way the mini fits in snug enough to not fall out. Good news on this front is that I think I can solve all these problems by just scaling the mini down to 80% of your original (and maybe a tweek or two...) I'll fix the slot issue as well, how does the size of the cutout work? It might work better scaled down to 80%.... it has been sort of challenging not having any actual mini's anymore to work with. I might also include an additional piece that's a bit wider to glue in the bottom of the slot.80% looks right for overall size, but the slot (cut out) needs more adjusting to the dimensions suggested. |
|
|
|
Post by cowboycentaur on Jun 20, 2015 15:36:24 GMT -9
These are awesome! I need to see if there's some way to do something like this with some of Eddnic's quadrupeds or griffon.
|
|
|
|
Post by berneart76 on Jun 20, 2015 15:50:02 GMT -9
Glad most of these have already been fixed! :-) The exhaust pipe is too flimsy without a back-side. Looks like it would be easy to mirror on the page. There is a small section to fold back onto the tailpipe, I'll clear up instructions for that as well. On your build it wasn't folded back, probably because I forgot to have the fold line identified on version 1.Cool! Dab o glue did the trick! I didn't know the target shape, so I missed that. Lastly, like my first prototype, it's too big for my miniature scale - it makes the minis look smaller than the bike, the bike look bigger than the cars, and contributes to the "I keep falling off" problem :-) the slot should be just-barely 1" wide, and 1/8" high - that way the mini fits in snug enough to not fall out. Good news on this front is that I think I can solve all these problems by just scaling the mini down to 80% of your original (and maybe a tweek or two...) I'll fix the slot issue as well, how does the size of the cutout work? It might work better scaled down to 80%.... it has been sort of challenging not having any actual mini's anymore to work with. I might also include an additional piece that's a bit wider to glue in the bottom of the slot.80% looks right for overall size, but the slot (cut out) needs more adjusting to the dimensions suggested. Working on the slot size adjustment, have it at a little larger than 1/8" high ( .14" rather than .125") and 1" long, the main cutout is now also at .53" front ot back, which exposes more of the tank and engine as well.. That requires a change to make the tank top longer and some of the tab and score lines adjusted also...  |
|
|
|
Post by berneart76 on Jun 20, 2015 18:17:18 GMT -9
Break out your toothpicks and magnifying glasses..
Re-sized motorcycle, re-sized slots, reworked tabs and score lines, Seat color options, exhaust color options, headlight option, interior option, tab cut lines in red or black...
4 up on one sheet, plus original design template. I left the handlebars a little thicker so they wouldn't get too fiddly.
Rideable Motorcycles V3.0
Attachments:
|
|
|
|
Post by berneart76 on Jun 20, 2015 20:41:12 GMT -9
|
|
|
|
Post by oldschooldm on Jun 21, 2015 10:19:28 GMT -9
|
|
|
|
Post by oldschooldm on Jun 21, 2015 14:19:55 GMT -9
I've now printed and cut a sheet of these, and completed the build of one of them to confirm the cutfile works - so I'm uploading it now (complete with the image embedded, so just choose your cutmarks, print, and cut all from Studio.... Rideable Motorcycle Prototype 3.studio3 (2.11 MB) If you don't like the options I chose, remove the bitmap and merge something generated from Tom's originals. Pics when I'm done with the other 3... |
|
|
|
Post by cowboyleland on Jun 21, 2015 16:37:03 GMT -9
cowboycentaur, I made a hippogriff by mashing eddnic's griffon and unicorn together. The griffon legs were strong enough that I could just cut a little "x" in its back and stuff a plastic gnome figure up from the underside. I also had a dino rider hafling once. Both the dino and rider were out of paper. I drew his legs on the dino and had his upper body a detachable piece. I had a separate whole figure for when he was dismounted.
|
|
|
|
Post by cowboycentaur on Jun 21, 2015 23:41:12 GMT -9
cowboycentaur, I made a hippogriff by mashing eddnic's griffon and unicorn together. The griffon legs were strong enough that I could just cut a little "x" in its back and stuff a plastic gnome figure up from the underside. I also had a dino rider hafling once. Both the dino and rider were out of paper. I drew his legs on the dino and had his upper body a detachable piece. I had a separate whole figure for when he was dismounted. you wouldn't happen to have a photo of the end result would you? those sound cool! |
|
|
|
Post by Vermin King on Jun 22, 2015 11:54:46 GMT -9
I was thinking about this very thing before I took off for the weekend. I was thinking about having 'footrests' across the center of the cutout and having the sides of the motorcycle be fold-downs. Flip them up when the motorcycle isn't in use, but then fold them down onto the footrest supports when using your figures, giving a larger base for the figure to sit on.
May be more effort than necessary without much improvement in stability, but that was what I was thinking
|
|
|
|
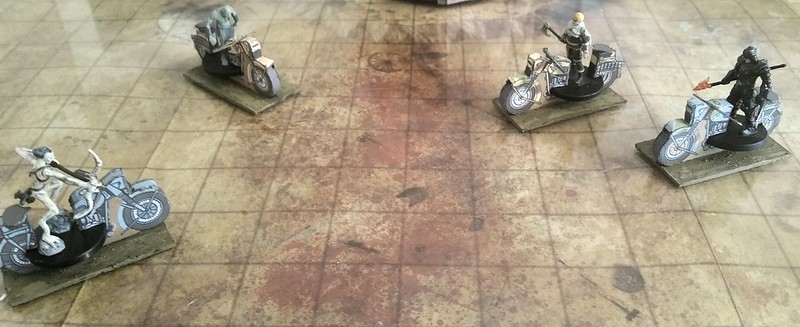
Post by oldschooldm on Jun 22, 2015 12:28:18 GMT -9
|
|
|
|
Post by berneart76 on Jun 22, 2015 12:44:16 GMT -9
Those are looking good oldschooldm! After I get the instructions for the Wooden Piers finished up I'll probably look at getting the sidecars and saddlebag/fuel cans and possibly different styles of motorcycles added on..
|
|
|
|
Post by cowboycentaur on Jun 22, 2015 13:21:16 GMT -9
Oh my gosh those look so amazing.
|
|
|
|
Post by oldschooldm on Jun 22, 2015 13:31:30 GMT -9
Oh my gosh those look so amazing. I agree completely, and want to thank berneart76 again for jumping in and taking this project to the goal line! Great detailed work! Sent from my SAMSUNG-SM-N910A using proboards |
|
|
|
Post by berneart76 on Jun 22, 2015 13:42:57 GMT -9
It was a nice break from working on/ stressing over my wood piers/ and I got liucky in remebering seeing/having the 1/100th BMW's that were able to be converted realtively easily for this. Mechanical/structural design I'm pretty good at, now if i could just figure out how tyo draw people/figures I might have something really going for me...
|
|
|
|
Post by cowboyleland on Jun 22, 2015 18:29:21 GMT -9
you wouldn't happen to have a photo of the end result would you? those sound cool![/quote] The dino rider I whipped up while sitting at the gaming table out of a business card and some markers. It lasted most of the campaign before it went the way of . . . well the dinosaurs. The hippogriff I still have but the gnome figure belongs to a friend. If I think of it when I have some time I will try to borrow one of my sons plastic figs and get a picture of it. I love the motorbikes. I've tried several similar ideas with horses over the years but never came up with anything very satisfying. Yes, that is the sound of a gauntlet dropping.  |
|
|
|
Post by berneart76 on Jun 22, 2015 19:21:07 GMT -9
cowboyleland said: Challenge accepted. But it will probably be done over the weekend.
|
|
|
|
Post by cowboycentaur on Jun 23, 2015 3:15:53 GMT -9
I accept this challenge gladly, from one cowboy to another.
|
|