|
|
Post by oldschooldm on Jun 23, 2015 21:10:53 GMT -9
There is so much talent here, and such great work - and much of it is hiding behind terrible photography.  Some of our most prolific contributors are taking bad pictures, for example: over a dozen minis in rows on in a single shot, on a washed out background, with the minis themselves barely visible. Before you get all sad or think I'm calling you out - Au contraire mon amis! This is a call to arms to raise the bar for us all! I am one of you! I think I'm pretty crappy at photography, but with some examples from my peers here and other places, I was able to learn a few quick tips that started making my shots much better. I'm now much less crappy at it - and it's all self taught - no fancy study or anything. No expensive camera, no fancy equipment (though those all help the pros with packaging and promotion quite a bit.) Some of the contributors here, take amazing photographs and I'm asking them to contribute tips and pointers to the rest of us. Stuff we can do without spending a lot of cash. Pointers to videos, blog posts, or other threads that helped you archived here would be a great boon to us all. I'm looking at you dcbradshaw, bravesirkevin, Sirrob01, madarchitect, Nemo (to name a few...) We need help with framing our shots, balancing our compositions, getting the right focus/detail, well - stuff make our snaps look awesome... Will you share? |
|
|
|
Post by oldschooldm on Jun 23, 2015 21:20:36 GMT -9
Taking my own advice - here's my #1 Tip for making your build photos more awesome: Tool: This tip can be done with the built in photo editor on any smartphone, smart camera, or in sites like Flickr quickly and easily. OLDSCHOOL's #1 TIP: If you can't frame the image yourself (as it is with my players taking pictures of my games) the NUMBER 1 TOOL is CROP (and sometimes free rotate, if the image is tilted.)
You'll get 80% of the awesome you are looking for by finding the photo inside the photo that was taken.
Keep in mind that the field of view to get the minis/terrain in the shot may end up including lots of other stuff, such as furniture, game gear, soda bottles, and even player body parts (usually waistlines.) All of that stuff distracts from the minis and terrain. It is AMAZING what happens when only your build is in the shot. Here's a simple example: Before:  After:  One shows a portly DM with his trusty laptop, lording it over his terrain model on a sunny day. The other shows some the ominous far off dungeon. ALWAYS CROP. None of us takes perfect pictures without a tripod. It takes <30 seconds and is worth it! |
|
|
|
Post by BSGTony (lordzsezse) on Jun 24, 2015 0:47:08 GMT -9
My short tips: 1, If you take photos in a darker room, you have no tripod and if you use a little better camera, increase ISO up to around 200-400. Pictures will be a bit noisier but much sharper! 2, Don't be afraid of taking more photos. Then, you can pick the few bests and share only them. 3, Play with your camera, it is your friend! (Even if you use your phone) Try out more angles, and change distance from the subject. 4, Tell a story. And place your subject at the third line of your picture. It means use the Third and Fibonacci rations. More about them: digital-photography-school.com/divine-composition-with-fibonaccis-ratio-the-rule-of-thirds-on-steroids/www.apogeephoto.com/may2014/how-to-use-the-golden-ratio-to-improve-your-photography.shtmlIf you do that, even if you crop the pictures based on Fibonacci/third rules, your picture and your theme will be stronger. 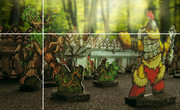 In most cameras and phone apps you can switch on these lines to your screen and you will be able to see them while you are taking photos. (Of course you cannot do that everytime but it can be very handful)  |
|
|
|
Post by hackbarth on Jun 24, 2015 4:41:34 GMT -9
And never forget to set the Macro setting of your camera. It's there for this reason.
|
|
|
|
Post by bravesirkevin on Jun 24, 2015 6:09:03 GMT -9
Before I take a bunch of credit that's not mine to take, I happen to have several friends who are professional photographers, and the vast majority of my product shots were not taken by me. I frequently use CGI rather than actual photography, and when I do want actual photographs, my friends have great camera, well-equipped studios and skills that dramatically exceed my own so it's natural to leave that in their hands.
I'd like to add that if you have access to a proper DSLR camera, you should learn to manually set it and focus it rather than relying on the automatic lighting and focusing. The camera's automatic settings are generally quite good for taking pictures of your family but you'll get dramatically better results if you understand how to work with the ISO, aperture, focal length and shutter speed.
Good lighting makes a world of difference. If you don't have access to fancy studio floodlights, then it might be worth taking the photographs outside in the sunlight. It's also useful to bounce light back on to the scene with a reflector. Before my photographer friends had bought fancy studios, we used to use gigantic sheets of polystyrene to reflect sunlight to fill in the shadows a little.
|
|
|
|
Post by aaron on Jun 24, 2015 8:59:00 GMT -9
Kevin is absolutely right. if you have a lamp at home that you use for lighting (unless it's a special photography lamp) it's not bright enough. Most house hold lamps and lights are trying to create a soft defused glow rather than the kind of lighting you need to have on your models. Now if you like me and you have a cruddy cell phone camera, a house hold lamp and no money to change that then I say do the best you can with what you have. if you have one lamp that's fine but if you can use two or three that's better. when taking a picture indoors you can never have to much light.
|
|
|
|
Post by berneart76 on Jun 24, 2015 12:44:10 GMT -9
My collection of tips, some of which repeat what others have said.
If you can, take your camera or phone off "Automatic" . Depending on what you are taking a picture of, use "landscape" or "portrait" or "macro".
If the room is dim, see if your phone or camera has a "night" or "sunset" setting.
Learn to shoot a camera in "program" or "aperture" modes at least, so you can have better control over the type of light .
Try to take pictures from different angles with and without flash.
If you want more stability, even if you don't have a tripod use boxes/books, etc as stands/braces for your camera/phone and use the timer function to eliminate handshakiness.
If you are holding by hand, try using a "multishot" setting to help illuminate shakiness/blurriness.
If you are close to and taking a picture of a single mini, offset the subject to one side to reduce being oversaturated by direct flash,
If you want the miniature and background both relatively in focus, get farther away and do as@oldschooldm said and crop the picture.
If your camera or phone has a "bracket" setting, use it. It takes multiple pictures, usually 3 at different exposure settings to get different balances of dark and light areas.
|
|
|
|
Post by berneart76 on Jun 25, 2015 18:35:54 GMT -9
A few more tips:
Practice and note what settings work best for you.
Keep a notebook handy so you can jot down different settings.
Also just practice at home with different ligthing and different angles and distances and then review your pictures
If you are at a convention and really want to get some good pictures of a game you are running or participating in, take a few test pictures of other games ti make sure you have your settings right.
|
|
|
|
Post by berneart76 on Jun 27, 2015 0:13:19 GMT -9
Here is an illustration of a Focusing issue. Lighting and everything else is good, just that the focus was too far back from the breakwaters I was trying to get a picture of in the foreground: Original Picture, looks pretty good:  Cropped, you can see the blurriness from the focus being wrong:  Second attempt, Original Picture:  Cropped, you can see the better balance of focus, the breakwater and figures in the foreground are much clearer:  |
|
|
|
Post by berneart76 on Jun 27, 2015 8:52:02 GMT -9
On my post with the pictures, on the blurry one the camera was tilted up slightly from what I wanted to actually focus on, which is why it focused more on the background. To trick it, I tilted the camera downa little so it was focusing a little in front of the figures on the breakwtaer.
|
|


 Some of our most prolific contributors are taking bad pictures, for example: over a dozen minis in rows on in a single shot, on a washed out background, with the minis themselves barely visible.


