|
|
Post by alloydog on Jun 27, 2015 2:35:48 GMT -9
I've started to attempt "My First Figure"... I've tried using Inkscape, but just can't seem to get the hang of it. I'm very familiar with LibreOffice Draw as I use it for technical drawings at work (and export then to PDF), so I'm using that. However, although the figure looks good huge, once it's scaled down to 28 mm, it looks horrible. I know you can't overload it with detail, and that's where a lot of artistic talent comes in: creating apparent detail with few lines. Looking at the figures I have got from the likes of Dave Okum and OneMonk, even printed up as 28 mm, the figures are very clear and detailed. Mine, so far, looks like a fuzzy lump  Here it is as a scalable vector/PDF:  And a bog-standard pixel image:  I even dropped a lot of detail from my original attempt because that looked even worse! So, is LibreOffice the worse application to use? Anything better? A few months back, my daughter wanted to use something called paintal psi (  or something like it), but I couldn't get it to work on Linux with WINE. Since it is a vector drawing application, I installed Inkscape for her. 15 minutes later, it was "Daddy, what do you think of this?" My reaction was like "Wow!, that's awesome. I hate you!" I've been struggling with Inkscpae on and off for ages. She can churn out really wild stuff with it. |
|
|
|
Post by cowboyleland on Jun 27, 2015 4:51:29 GMT -9
I use GIMP. It is possible to vectorise stuff. There was a lot of trial and error on the learning curve.
|
|
|
|
Post by alloydog on Jun 27, 2015 6:01:06 GMT -9
I use GIMP. It is possible to vectorise stuff. There was a lot of trial and error on the learning curve. I didn't think GIMP could do vectors. I'll have to look into that. Thanks for the pointer! I just compared my figure to a professionally made one and one think I didn't really notice before, was that the proportions are like a lot of solid wargame figures: wider than real: 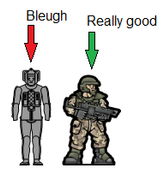 Mine look rather "Supermodel-ish" as in under-nourished... I'll try bulking it out a bit. |
|
|
|
Post by alloydog on Jun 27, 2015 7:10:13 GMT -9
I've had a look for vectors with GIMP, but it seems either not possible or very difficult. cowboyleland, can you point to a tutorial? I tried exporting the drawing to SVG and opening it in Inkscape, but the whole image was a single entity and I couldn't figure out how to edit it. I've played around with the proportions and come up with this: 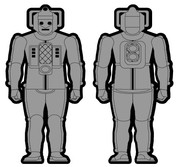 The black border seems to improve things, makes it stand out more. I haven't had a chance to test print it yet, as I'm currently at the Mrs's dad's place. I'll give it a bash later. |
|
|
|
Post by mesper on Jun 27, 2015 7:40:34 GMT -9
<...> I've played around with the proportions and come up with this <...> Much better! <...> The black border seems to improve things, makes it stand out more <...> Hope that you are adding border/outline as separate layer (so you can add/remove or adjust it later)? Then IMHO border should be thicker, so it will be 1,5-2mm when printed. Tip: some details might be blurred or even almost disappear (opposite effect might occur as well, depends on used techniques and/or tools:) when figurine is a) texturised b) coloured. As for printouts final effect and quality heavily depends and vary both due to the printer's type (ink-jet, laser) and printer quality as well as used paper (matt, glossy, photo-paper or cardboard etc.). As cowboyleland already mentioned - some test and learning would be inevitable, but afterwards you should've better "feeling" of what can be done and achieved already at early stage of designing the figurine. Anyway, great job so far, so keep posting  |
|
|
|
Post by cowboyleland on Jun 27, 2015 11:11:03 GMT -9
|
|
|
|
Post by alloydog on Jun 28, 2015 0:39:37 GMT -9
Hope that you are adding border/outline as separate layer (so you can add/remove or adjust it later)? Yeps! Actually, LibreOffice Draw doesn't have layers, every line or shape is a separate entity so can be moved around and up and down on it's own or grouped with others. Which is handy, because when I made the figure wider, I just increased the width of the whole figure. This made the circles into ovals. I can go back and correct them individually. Mark II:  It printed up just the right size. I made it 30 mm as in the RoboDude** is supposed to be taller than normal people. I'll follow up the GIMP/Vector thing and will start trying to play with Inkscpe again, because although I'm pretty comfortable with Draw, once you start to get a lot of detail in an image, it starts to slow down something chronic. ** Any similarity between RoboDude and a certain creation copyrighted by the BBC are purely coincidental and for educational/training purposes only... (Saunters off casually, whistling) |
|
|
|
Post by alloydog on Jun 29, 2015 7:03:18 GMT -9
First printing For some reason, I didn't line the front and backs up as well as I normally do, so the black border is thicker on the left of the figures where I coloured the excess white in with black. I didn't bother 2½Ding them, as I knew I'd find more than a few areas to fix and improve, such as: The eyes need to be smaller and according to my daughter, I need to add the "tears" (I didn't add them because I thought they wouldn't show, but orders are orders...) Also, the holey thing at the top of the head could be a bit smaller. I think the next batch will also be a lighter grey/blue, so they're more silvery that grey. 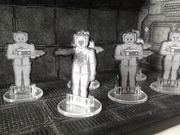 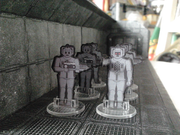 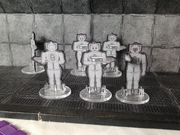 |
|
|
|
Post by alloydog on Jul 4, 2015 6:35:01 GMT -9
I guess the learning curve is pretty steep. I followed the video and still ended up with pixelated images. The other one still requires Inkscape and doesn't really deal with complex images. I'll stick with Draw for a while as I know I can use that, and have found a few tweaks to speed things up a bit (not a lot, though). I'm now playing around with Inkscape on it's own. But in the meantime, MKII: 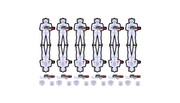 PDF: Robodudes MKII.pdf (231.72 KB) |
|
|
|
Post by cowboyleland on Jul 4, 2015 6:45:55 GMT -9
Honestly, I have only bothered to vectorise a few times. I just work at 300dpi and it seems to be OK when printed. Most other gimp users do use vectors, but yes, the curve seems steep.
|
|
|
|
Post by alloydog on Jul 5, 2015 0:04:24 GMT -9
I agree that using a higher resolution prints up just fine if you keep the figures as-is, but in the past, when I've tried to rescale pixel images, even only by a few percent, they seem to go fuzzy. Though I do admit to having a basic bog-standard printer (HP Photosmart C4380) and I usually only use the regular quality setting - I save high quality photo for photos.
I guess one reason I like Draw is because coming from the technical drawing side, you can right click on any object and edit any item property, such as height/width, rotation, fill, stroke and so on. Sheer laziness...
|
|
|
|
Post by cowboyleland on Jul 5, 2015 6:20:48 GMT -9
Sounds like as much efficiency as laziness to me, but I think I'll stick with GIMP since I know how it works.
|
|
|
|
Post by aaron on Jul 5, 2015 19:41:22 GMT -9
I use photoshop. Cs5 it has all the stuff I need without beeing a monthly subscription. I make all my models at 8x11 300dpi then I shrink them down to 28 mm but I keep the original so I don't ever have to worry about re-sizing.
|
|
|
|
Post by alloydog on Jul 6, 2015 23:33:19 GMT -9
I make all my models at 8x11 300dpi So, you still use a rasta/pixel format? From your's and cowboyleland's comments, I see where I was going wrong with GIMP. I was working with figures close to the final size (actually twice the final size) and a too low resolution - my GIMPs default is 96 dpi because I had been mostly editting images for my website. I'll give GIMP another bash, but start with bigger images and better resolution. Thanks gents! |
|
|
|
Post by cowboyleland on Jul 7, 2015 10:52:51 GMT -9
I usually start the figure at 28mm-30mm to eye line at 300dpi but I'm zoomed in 200% or 800% as I draw.
|
|
|
|
Post by lightning on Aug 25, 2015 9:02:30 GMT -9
i started with open office draw for the unfolds. later i used gimp for texturing. for more complex unfolds i wrote open office macros to create unfolds for stuff like domes etc.
recently i have been playing around with sketchup (there is a unfold plugin available on the web) which i found very easy to use. you can get the basic training in very short time from their youtube channel.
but now i am back to using blender which i have been using before for 3d modelling. it has matured into a very solid application and the ui is much better now. there is a great unfold plugin which creates svg files. these i can finetune in inkscape (very powerful but not very intuitive to me so expect some learning curve although i only need very little functionality and found all the todos on the web quite quickly).
i got a graphics tablet now and am not that happy with gimp anymore as it has some problems in supporting all the goodies of the tablet. i am looking into krita which has an excellent "seamless repeat texture" mode. and i will also do some testing with photoshop and illustrator.
i have a feeling that i will end up with blender, illustrator for finetuning of unfolds and photoshop for everything painting and texturing. inkscape can only handle one page per file right now (hope that will change with new svg version) and photoshop seems to be able read the mind of my tablet :-)
|
|
|
|
Post by yifferman on Aug 25, 2015 11:16:43 GMT -9
i use photoshop 6
|
|
|
|
Post by dicingdangers on Sept 3, 2017 12:45:02 GMT -9
Adobe Flash CS6. It is a great vector drawing machine. I might use Photoshop for printing.
|
|
|
|
Post by jeffgeorge on Sept 3, 2017 15:06:06 GMT -9
I use GIMP for most everything, including exporting single-layer .pdfs. When a multi-layer .pdf is called for, I go to Scribus. Both of these are valid open source alternatives to Adobe products, although they are a tad less intuitive in terms of UI, and in some ways less feature-rich.
I've never needed to vectorize anything. I do my original work much, much larger than final printing size (the exact size varies, depending on the subject matter, but it ranges from 2x to 5x final size), and scale it down to 28-30mm size as a near-final step. GIMP's layers are vital when coloring, and when adding outlines/borders, bases, and fold lines. I always save the version with all the layers, flatten the image to export to .pdf, .jpg, or .png, and then unflatten it again before I quit out.
I do all my drawing freehand using a Wacom drawing tablet, and use varied line-widths to indicate depth and dimension, so vector images really don't lend themselves to my work. I've recently become aware of Krita, another open-source drawing program, and want to experiment with it. It appears to be very focused on drawing/painting, and really doesn't do much with text, lines, shapes, etc. The Photoshop feature it includes, which GIMP does not, is the ability to rotate the image freely without rearranging the pixels, the way you can turn a page around on your desk, so that you can move the paper to match the natural movement of your drawing hand and arm. I realize I'm not explaining this well, because GIMP lets you rotate an image, but when you do, it re-builds the pixels according to the new orientation, so if you do it often, you'll degrade your detail quality. Krita (and Photoshop, apparently) allow you to rotate the image on your screen without changing how its stored in memory, so there's no loss of image quality when you rotate it, and you can snap it back to level when your through.
|
|
|
|
Post by Dominic on Sept 7, 2017 21:43:23 GMT -9
I am just getting back into things, but after my experiences the last time I dabbled in miniatures and models I want to do most of it with Inkscape this time around. Last time I used a mix of Inkscape and Gimp, doing the geometry in Inkscape and then taking what I believe to be the scenic route - export the geometry (i.e. the whole page), then draw and import textures into it, import it back into inkscape an place it under the lines.
I have been experimenting with ways to make okay textures in Inkscape, and I have had moderate success when it comes to stuff like scales. For that, Inkscape actually has nice features to mess with.
For the experimental minis I started, I think the biggest problem for me is the scale, i.e. how something I do in close-up on the screen will work (or not) in small on paper. Though at this point I am also going back and forth between sketching on paper (on a template), then vectorising the scan, and designing the whole thing in Inkscape. We will see...
|
|
|
|
Post by nullpointer on Sept 8, 2017 7:05:54 GMT -9
"seamless repeat texture" The way I do it is to use the "Offset" filter in Photoshop (under Other, enable the "wrap" option), offset by a few hundred pixels in each direction and then clone out the newly visible edge lines. Not perfect, but pretty good for must stuff. |
|
|
|
Post by jeffgeorge on Sept 8, 2017 7:17:36 GMT -9
"seamless repeat texture" The way I do it is to use the "Offset" filter in Photoshop (under Other, enable the "wrap" option), offset by a few hundred pixels in each direction and then clone out the newly visible edge lines. Not perfect, but pretty good for must stuff. GIMP does have an Offset function, though it has quirks. It's buried in the Layers menu: Layers > Transform > Offset. There's a button in the Offset dialog box that automatically offsets the selected layer by 50%, which saves you entering some pixel numbers in most cases. Since it's a Layer tool, and not an Image tool, it only affects the selected layer, which can be annoying, but this can be worked around by linking all the layers you want to effect with a single Offset use in the Layers window. (Toggle on the linked-chain icon for each layer in the layers window to link it to the current selected layer.) |
|
|
|
Post by cowboyleland on Sept 8, 2017 11:47:56 GMT -9
For the experimental minis I started, I think the biggest problem for me is the scale, i.e. how something I do in close-up on the screen will work (or not) in small on paper. I usually draw something to scale, but work on it enlarged 200-400%. I try to make a habit of looking at it at 50% regularly so I don't get carried away with details that won't print. |
|
|
|
Post by nullpointer on Sept 8, 2017 16:14:55 GMT -9
The way I do it is to use the "Offset" filter in Photoshop (under Other, enable the "wrap" option), offset by a few hundred pixels in each direction and then clone out the newly visible edge lines. Not perfect, but pretty good for must stuff. GIMP does have an Offset function, though it has quirks. It's buried in the Layers menu: Layers > Transform > Offset. There's a button in the Offset dialog box that automatically offsets the selected layer by 50%, which saves you entering some pixel numbers in most cases. Since it's a Layer tool, and not an Image tool, it only affects the selected layer, which can be annoying, but this can be worked around by linking all the layers you want to effect with a single Offset use in the Layers window. (Toggle on the linked-chain icon for each layer in the layers window to link it to the current selected layer.) It only works on a single layer in PS too, there's lots of good ways to do it though. First of all you'd want to do it in its own document so it can wrap around the edge (make sure to crop it first just in case you've got pixels hiding out off-canvas) for me the easiest if you have a lot of layers is to dump them all into a folder, duplicate the folder, and then merge the new folder so you have all the originals plus a set of the layers all merged together, ready to offset. |
|
|
|
Post by jeffgeorge on Sept 8, 2017 19:12:17 GMT -9
It only works on a single layer in PS too, there's lots of good ways to do it though. That's a bit of a surprise to me--I figured Photoshop would let you offset the whole image. Oh well, maybe GIMP isn't as gimped as I thought it was. Which is good, because I'm way to cheap to pay the monthly subscription fee for Photoshop, and the version of Photoshop I actually have is way, waaaaay out of date. |
|
|
|
Post by Dominic on Sept 9, 2017 0:34:52 GMT -9
For the experimental minis I started, I think the biggest problem for me is the scale, i.e. how something I do in close-up on the screen will work (or not) in small on paper. I usually draw something to scale, but work on it enlarged 200-400%. I try to make a habit of looking at it at 50% regularly so I don't get carried away with details that won't print. That's a good idea if you can keep that in mind while drawing. Going back and forth in my mind after my last post between drawing something on paper first or doing it digital all the way (although I expect the later to take a lot longer anyway), I think the 200%-approach is something I will definitely try. Thanks! |
|
|
|
Post by nullpointer on Sept 9, 2017 1:56:34 GMT -9
Working at 200% also ensures that the tracking resolution of your graphics tablet is never larger than the resolution of your canvas -- if it is you'd better be doing fast smooth stokes because any slow lines will develop stair-steps that look terrible.
|
|
|
|
Post by cowboyleland on Sept 9, 2017 4:52:52 GMT -9
That is probably a good point, but I draw with my touchpad or mouse. I don't own a graphics tablet.
Also, the habit I am trying to form is to save whenever I go to 50% in case gimp crashes or I shut it down wrong. It has only happened three or four times over ten years or so but it is very frustrating when it does.
|
|
|
|
Post by jeffgeorge on Sept 9, 2017 8:43:29 GMT -9
That is probably a good point, but I draw with my touchpad or mouse. I don't own a graphics tablet. Also, the habit I am trying to form is to save whenever I go to 50% in case gimp crashes or I shut it down wrong. It has only happened three or four times over ten years or so but it is very frustrating when it does. Save early, save often. You just can't save too often. You really should consider getting an entry-level graphics tablet. I've been using the same entry-level $60 Wacom tablet for years now, and it's made a huge difference to my papercraft hobby, as well as my real work, which often involves retouching photos. I really should step up to a better tablet, but there's always something more pressing--or fun--to do with the $200 that the next ones up seem to cost. There are alternate brands of tablets available, though I've read mixed reviews of them. Wacom seems to be the leader in the market, however, so they are the brand that the software developers focus on for compatibility. Also, their products are both well-designed and reliable, and not that much more expensive than the off-brand competitors. The entry-level Wacom will serve you for years; it was called the "Bamboo" when I bought mine, but they may have changed the label since then. |
|
|
|
Post by Dominic on Sept 10, 2017 23:59:02 GMT -9
You really should consider getting an entry-level graphics tablet. I've been using the same entry-level $60 Wacom tablet for years now, and it's made a huge difference to my papercraft hobby, as well as my real work, which often involves retouching photos. I really should step up to a better tablet, but there's always something more pressing--or fun--to do with the $200 that the next ones up seem to cost. I have to ask - why do I need a graphics tablet? I am completely blank on this, have never used one, read that I absolutely needed one to do any graphics work on the computer, and also read that I should learn to draw properly first, then switch later if at all. To go a little deeper, my current process is to draw domething with pencil on paper, use a lightbox to keep what I want and change what needs changing till I have something that I like, then I use the lightbox again to create different layers (for overlays, fur etc). Then I scan all that, vectorize, add color etc. What can a tablet do for me there? Thanks in advance! |
|