|
|
Post by lightning on Sept 27, 2015 22:56:32 GMT -9
Having much fun with my drawing experiments and am now wondering what the state of the art is in regards to basing/mounting minis.
My (old) technique would be to fold front and back and have flaps going out from the bottom line and then glue that to a (paper) base.
I have seen that alot of minis now have a small (apx 5mm) extension towards the bottom and no flaps. Makes storing easier? I am assuming this extension will be slotted into some base part. I am also guessing there is a market for plastic premade bases for this kind of mounting. Is there a paper only version of this for the paper only purist?
Or am I overthinking this? :-)
|
|
|
|
Post by Vermin King on Sept 28, 2015 4:16:01 GMT -9
This has been a big discussion. I would do a search in the forum on 'base' and 'basing'. There are quite a few topics
|
|
|
|
Post by Cardstock Dane on Sept 28, 2015 4:41:15 GMT -9
I have seen that alot of minis now have a small (apx 5mm) extension towards the bottom and no flaps. Makes storing easier? Indeed it does. Here's my own small collection of some 80-90 homemade minis (yes really): 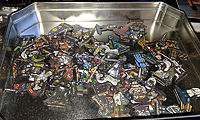 I am assuming this extension will be slotted into some base part. I am also guessing there is a market for plastic premade bases for this kind of mounting. Indeed there is: www.litko.net/categories/Bases-%26-Base-Bottoms/Paper-Miniature-Bases-%26-Stands/I love these, I use them myself, and have just ordered more.  Is there a paper only version of this for the paper only purist? Ideed there is. Check this out: 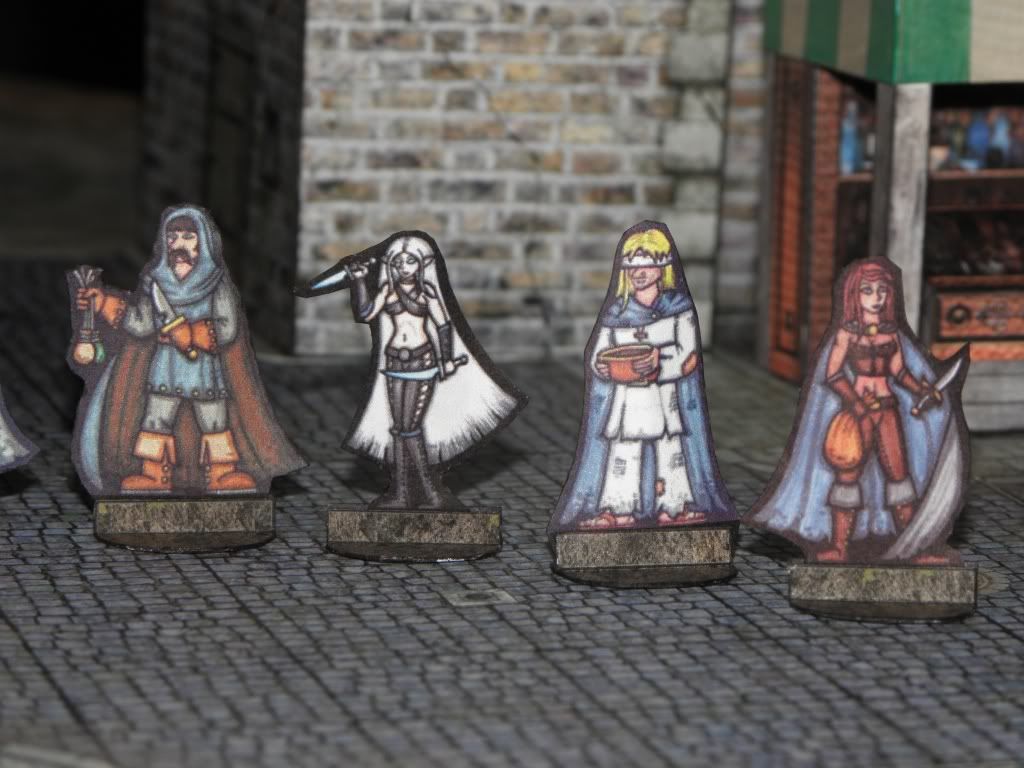 You will find tons of free paper bases like that out there on the internet. A good place to start is at the Onemonk.com site - Squirmydad has been so kind to provide us with paper bases in all kinds of shapes, sizes, colours, themes and flavours. Check it out.  And bravesirkevin has provided us with a different, but nonetheless clever system. Sirrob01 has a good and comprehensive article about paper miniature basing on his blog: sirrob01.com/tag/base/ |
|
|
|
Post by lightning on Sept 28, 2015 6:23:42 GMT -9
Thanks for thoroughly bringing me up2date on this topic :-)
Love the very efficient paper versions. Just what I was looking for!
|
|
|
|
Post by cherno on Sept 28, 2015 7:05:18 GMT -9
I like my standees to have a boardgame quality to them. Therefore, I make them from 1.5mm cardboard which is harder to cut but doesn't tear or crease like paper would, and it is easier to handle and doesn't get blown away by the wind as easy I leave a little tab at the bottom and stick it into a matching slot in the base, which also means that the bases are interchangeable. Handy for different names or numbers on them, or even colors which denote the character's army.   |
|
|
|
Post by lightning on Sept 28, 2015 7:46:28 GMT -9
I agree, it's a good idea to use sturdier cardboard to make the effort last longer :-)
Another thing I have seen is that there seems to be a way to varnish? paper minis and models. Anyone know how? I would think that regular varnish would be too wet, no?
|
|
|
|
Post by Vermin King on Sept 28, 2015 8:34:53 GMT -9
I generally use a spray varnish, generally Krylon Clear Satin
|
|
|
|
Post by yifferman on Sept 28, 2015 9:12:53 GMT -9
i use asimple spray in mate, or brillant for water
|
|
|
|
Post by lightning on Sept 28, 2015 10:41:40 GMT -9
will bear that i mind when i come around to make water tiles ... or water elemental figure :-)
i hope to have some prototype mini soon ready to test. will see how the varnishing goes. would love to make them a little more durable!
|
|
|
|
Post by Vermin King on Sept 28, 2015 11:29:05 GMT -9
It is a rare thing for me not to use a clear coat on anything I build. It enhances and protects the colors, allows easier removal of any glue smudges, and gives a little extra weight and strength. I generally use one or two very light coats before I start, and another light coat on completion
|
|
|
|
Post by squirmydad on Sept 28, 2015 16:19:57 GMT -9
Pre-spraying doesn't foul the blade? That's a surprise.
|
|
|
|
Post by berneart76 on Sept 28, 2015 16:23:57 GMT -9
Pre-spraying doesn't foul the blade? That's a surprise. I wouldn't think so, as long as it is allowed to dry completely. |
|
|
|
Post by Vermin King on Sept 28, 2015 17:04:01 GMT -9
It will dull the blade faster than paper only. I don't think it is that much faster, though.
Yes, read the label. Most of these products will say something like 'Avoid Handling for Two Hours. Completely Dry in Four Hours'
I think that drying has to be an exponential function, so it's probably 75 to 80% dry after two hours. After four, it is 'essentially' dry, not 'completely'
|
|
|
|
Post by wyvern on Sept 29, 2015 4:41:41 GMT -9
Varnishes: Check around the artist supply stores, and you'll find various spray options. Anything that'll be fine with pencil, charcoal or chalk pastel drawings should work with fully dry inkjet printouts too, though I'd advise you to check using a non-essential item first, just in case!
With varnish on all models and miniatures (papercraft or cast plastic, resin and metal), it's best to leave it for at least twenty-four to forty-eight hours so it cures fully.
|
|
|
|
Post by cherno on Sept 29, 2015 23:20:33 GMT -9
I'd like to add that it is always recommend to test-spray a surface before any varnishing attempt. There have been countless hobbyists, myself included, who have experienced the dreaded "frosting disaster" where due to a combination of ambient temperature and air humidity the spray varnish collects as tiny crystals on the surface.
|
|
|
|
Post by Vermin King on Sept 30, 2015 4:17:30 GMT -9
That is something that has never happened to me (knock on wood), though I have heard about it a lot. I think the very light coats is helping me on that. In Kansas City, we have high humidity for days, then extreme dryness for days. Our temperatures are all over the map. In a discussion of the cloudiness issue, several folks talked about using multiple 'dustings' to avoid this, so that is what I've been doing. Clouding is more of an issue with Gloss sprays, than with Satin or Matte.
|
|
|
|
Post by cowboycentaur on Sept 30, 2015 20:10:06 GMT -9
Be careful with mixing brands too. I got a milky opaque finish that ruined some nice props I had spent quite a bit of time on.
|
|
|
|
Post by Vermin King on Oct 1, 2015 4:11:25 GMT -9
That is something we learned the hard way on one of my son's wood shop projects. I would take Michael's projects when he brought them home and re-engineer them to make them more sturdy and attractive. His TV/Gaming cabinet evidently used enamel on the finish. I had assumed it was lacquer. When we used lacquer to finish up the project we got clouding and crazing. So CC is correct that you need to finish with the same product you start with
|
|
|
|
Post by cowboycentaur on Oct 2, 2015 4:06:25 GMT -9
 Yeah a couple evenings work that originally turned out pretty good looking basically ruined. Ah well, live and learn. |
|
|
|
Post by Vermin King on Oct 2, 2015 6:37:49 GMT -9
Oh, the pain!
|
|
|
|
Post by Cardstock Dane on Oct 2, 2015 8:02:18 GMT -9
I did that with the first varnish I tried. Frosted an entire batch.  I found a good, glossy multi-purpose varnish afterwards, and it works - enhances the colours without getting too shiny. It still feels like paper to touch, and it definitely improves the look. |
|
|
|
Post by wyvern on Oct 3, 2015 5:53:13 GMT -9
Some of the frosting might pass for dust or mould, if you felt less critical about it cowboycentaur. But as you now know, you're not alone. Another example: I lost two weeks' cast model scenery painting once when the spray varnish reacted with the paint, and it all started peeling off. Had to strip all the paint off - down to the bare resin - and start again... |
|
|
|
Post by cowboycentaur on Oct 3, 2015 9:18:09 GMT -9
Nah I'm too anal retentive about my gaming stuff. It's all got to be perfect and organized in all my official world works organizer boxes.
Now mind you my garage is a total wreck and I can't sort socks to save my life, not to mention the dirty dishes in my kitchen sink or the state of our living room.
But by god my RPG stuff is immaculate!!!!
/priorities
|
|
|
|
Post by paperpusher on Oct 3, 2015 17:52:21 GMT -9
Hehe I have ...believe it or not...never considered varnushing paper minis. Back in the day of no family, no mortgage and nothing do to but spend money on gaming. When I had tons of 3d minis. I was the varnish king. I would even use its quirks( once learned..) to my advantage. One particular brand would look fuzzy if you used it out side on a cold day..loved it for horses.
One of the reasons I like paper is because of my careless nature...grape soda..just print more
|
|
|
|
Post by cowboyleland on Oct 4, 2015 5:01:50 GMT -9
One of the reasons I like paper is because of my careless nature...grape soda..just print more This is my attitude. I use paper figs for RPG's and we start a new campaign about once a year or so. That means after fifty game sessions I need a whole different figure, maybe a different genre, anyway. Also at some point I will probably upgrade my armour and need a fig with a new look. And I love the idea of the fuzzy horse technique. |
|
|
|
Post by lightning on Oct 6, 2015 21:22:35 GMT -9
working on parts of my startup demo freebe set right now (finalized and settled on one of the two texturing methods i want to be able to do) and definitely have to get some varnish now and start this testing.
if it could be controlled i like the "milky" version. could be lots of things if wanted.
|
|
|
|
Post by lightning on Oct 7, 2015 22:24:07 GMT -9
one more question about varnishing: do you spray the finished build or the flat unfolds after printing but before cutting?
|
|
|
|
Post by Vermin King on Oct 8, 2015 4:05:36 GMT -9
Yes, I do two very light dustings after printing. I usually wait for 15 minutes before I do the first. Then I wait 30 minutes (or longer) before doing the second. Sometimes this causes the paper to curl. If it does, I wait an hour or two and leave the pages pressed under a stack of books overnight. I had to do this with the carriage house.
I usually do a second coat after the build.
The coatings seem to give the model a bit more strength, and make it easier to dust later on. Using the carriage house as an example, the coatings also brought out the color more.
|
|


 And
And 


 I found a good, glossy multi-purpose varnish afterwards, and it works - enhances the colours without getting too shiny. It still feels like paper to touch, and it definitely improves the look.


