|
|
Post by okumarts on Jul 27, 2017 8:53:56 GMT -9
OH, I just love these! This makes me want to run Ruins and Ronin again.
|
|
|
|
Post by okumarts on Jul 27, 2017 9:02:04 GMT -9
|
|
|
|
Post by lightning on Aug 2, 2017 20:17:38 GMT -9
Worked on getting the boats a more used look. They now look like they have been in action for quite a while, don't they? Comparison of the blunt bow version. I have updated the interior "wall" to reflect how the Japanese really assembled their boats. The old version is still there as alternate.  Comparison of the pointed bow version. I have also added the transvers beam. Not sure what it is ... probably for anchoring, I guess. 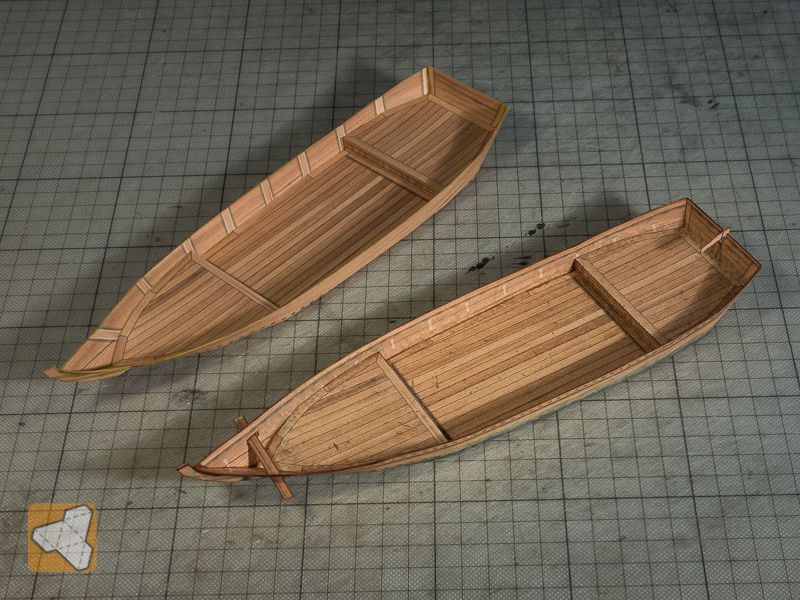 The easy version of the superstructure.  Full pointed bow boat with the detailed super structure. 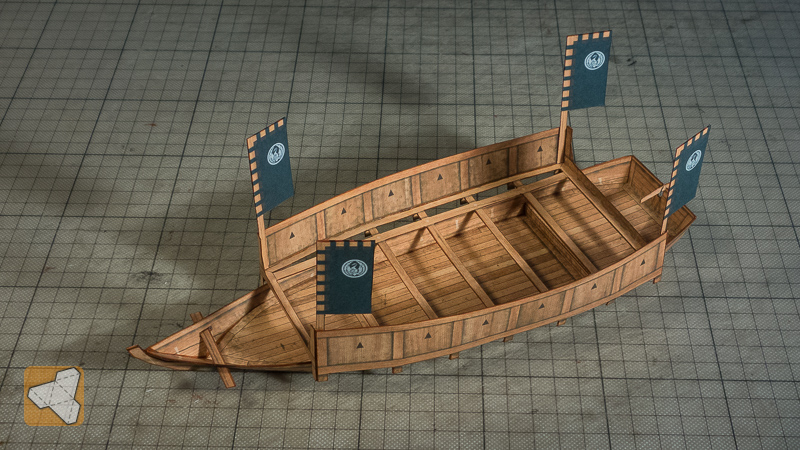 Full blunt bow version. The easy version is assembled much faster of course :-)  I even weathered the water line!  Now on to the big boats!!! |
|
|
|
Post by marzman on Aug 3, 2017 14:47:07 GMT -9
Those look awesome, can't wait to pick them up!
|
|
|
|
Post by lightning on Aug 3, 2017 19:45:48 GMT -9
Thanks marzman, it will be a while as I am just starting to tackle the big boats. Right now I am adapting the stern section to the feedback I have received. But I hope to have textured teasers soon  |
|
|
|
Post by lightning on Aug 9, 2017 0:06:59 GMT -9
Completed the adaptations to the big ships geometry and redid the unfold. I then started the texturing of the hull section and worked on a more serious unfold for the super structure. I extended the stern section (compare to the original left) as I was told that the rudder was covered. The easy version will have the rear just textured. The detailed will have the dark section cutout and you can then see the inside and the rudder. 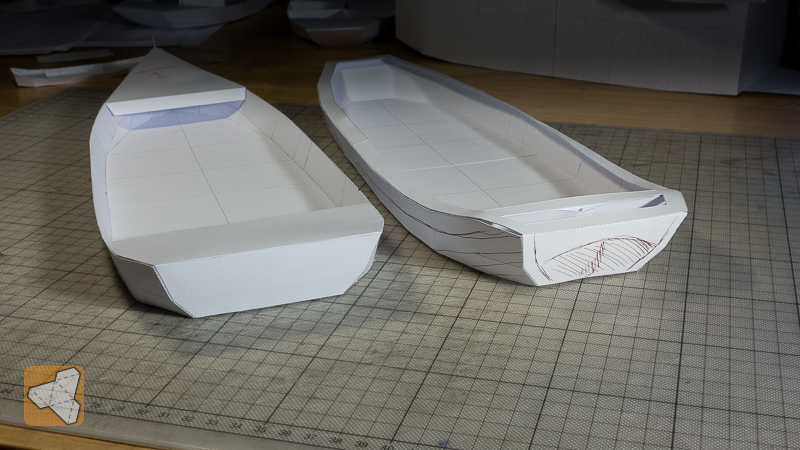 This what the textured easy version looks like. 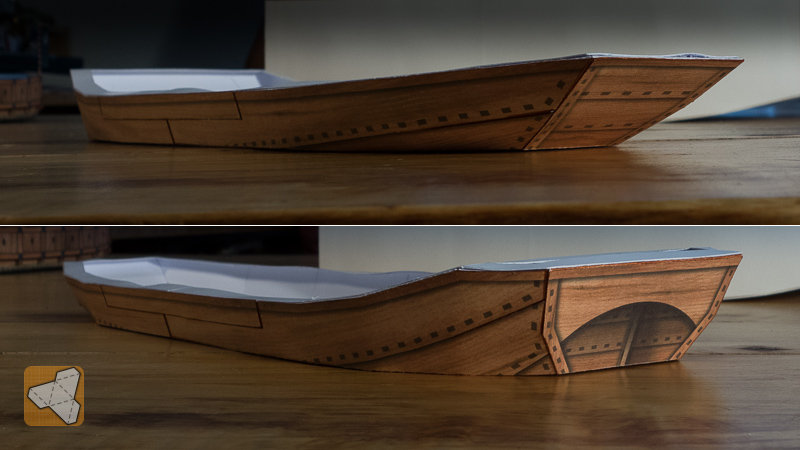 And here is a fleet overview with the white build of the superstructure!!! Should be enough space for lots of samurai! Also the small versions are done :-) 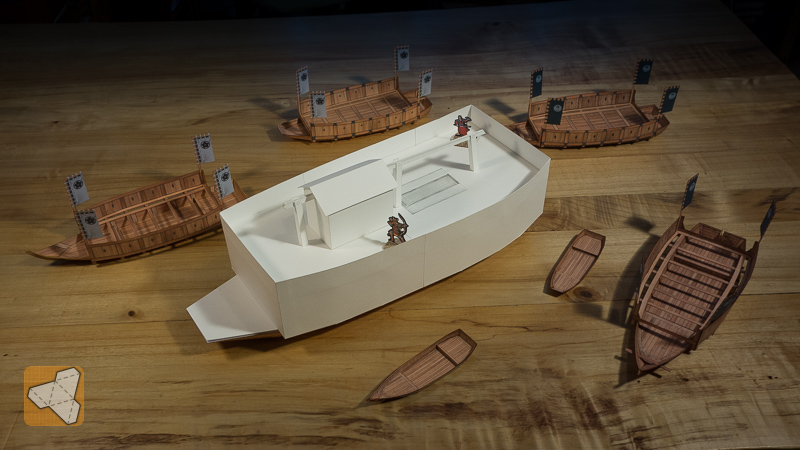 |
|
|
|
Post by Vermin King on Aug 9, 2017 3:59:54 GMT -9
Magnificent!
|
|
|
|
Post by squirmydad on Aug 9, 2017 8:38:30 GMT -9
That looks like so much fun!  I should finish my Junk so our ships can fight it out. |
|
|
|
Post by Vermin King on Aug 9, 2017 9:39:40 GMT -9
|
|
|
|
Post by lightning on Aug 15, 2017 20:53:30 GMT -9
That looks like so much fun! I should finish my Junk so our ships can fight it out. I am getting so many requests for Chinese Junks. So if you don't finish yours I might give it a try! What a lovely model!!! |
|
|
|
Post by squirmydad on Aug 16, 2017 7:31:10 GMT -9
Big Book of JunksIf you can find this book it is a great resource for the diverse Junk and sampan designs. My project is a Harbor Junk, approximately the same size as Dave Graffam's Patrol Boat model. I'd love to see a big War Junk style model, it's the masts and attaching them securely that trip me up the most.
|
|
|
|
Post by Vermin King on Aug 16, 2017 8:12:10 GMT -9
The method for masts that I favor is having masts that go through a hole in the deck. If the deck doesn't lay flat on the base, the mast is glued to the base, and when it is passed through the hole in the deck and the deck glued in place, the mast has good support. If the deck lies on the base, I still like the mast to go through a hole in the deck, with the tabs glued to the bottom of the deck. When the deck is glued in place, with the tabs sandwiched between the deck and the base, it is fairly solid. Masts that get glued to the top surface of the deck are rarely stable
|
|
|
|
Post by squirmydad on Aug 16, 2017 8:32:21 GMT -9
The method for masts that I favor is having masts that go through a hole in the deck. If the deck doesn't lay flat on the base, the mast is glued to the base, and when it is passed through the hole in the deck and the deck glued in place, the mast has good support. If the deck lies on the base, I still like the mast to go through a hole in the deck, with the tabs glued to the bottom of the deck. When the deck is glued in place, with the tabs sandwiched between the deck and the base, it is fairly solid. Masts that get glued to the top surface of the deck are rarely stable I like that too, the problem I find is in that junction of the glue tabs where the mast comes through the deckbecomes a fail point due to the weight of the sails. The solutions I'm looking at are making sure the sails are on their own page so they can be printed on lighter stock (like regular 20lb bright) and inserting a small block into the mast base just to "beef up" that area. The other ideas I had was to make the deck base out of 1/4" foamcore so I could have a nice sturdy hole for the mast to sit in and then have the ships sides come down and cover the foam. Or, the total paper solution, where you have a raised deck 1/4" or more in height supported by paper corrugated ribs _/\/\/\_ mast comes though a deck base and glue flaps attach to the bottom, and a paper tube fills the hole in the deck and provides a sturdy bridge between the deck base and the deck surface and the mast is also reinforce by going through that tube. That tube opens the possibility of being able to remove the mast for storage. I'll see if I can find a picture or the prototypes as Pictures usually make more sense. I still want Chris to make a War Junk though. |
|
|
|
Post by Vermin King on Aug 16, 2017 8:50:47 GMT -9
Exactly.
Maybe we are giving him ideas for masts.
You can always do like Olli Bizer, and have masts that wrap around skewers or spaghetti, but that still leaves the attachment point issues
|
|
|
|
Post by lightning on Aug 19, 2017 22:41:43 GMT -9
Have been away in the mountains for a few days so I missed the mast discussion :-) Here are my latest WIP pics 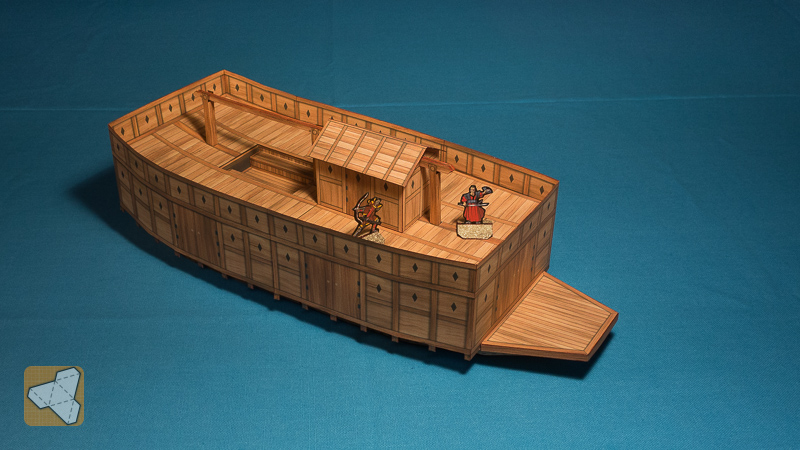  You can take the big blocks apart ... 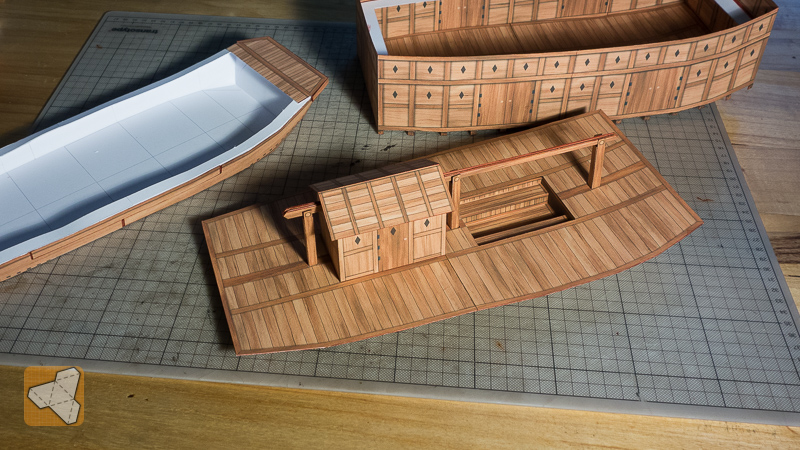 Actually you can also take the smaller bits apart too. I have glued the hut and the mast holders on in this assembly but here I take the mast out.  Here I have inserted the mast in "sailing position". Unfortunately I have not found any good pics showing details on the sail or rigging. And I am guessing for gaming this should be fine enough. But if I ever find more details I can always update with sail pages... 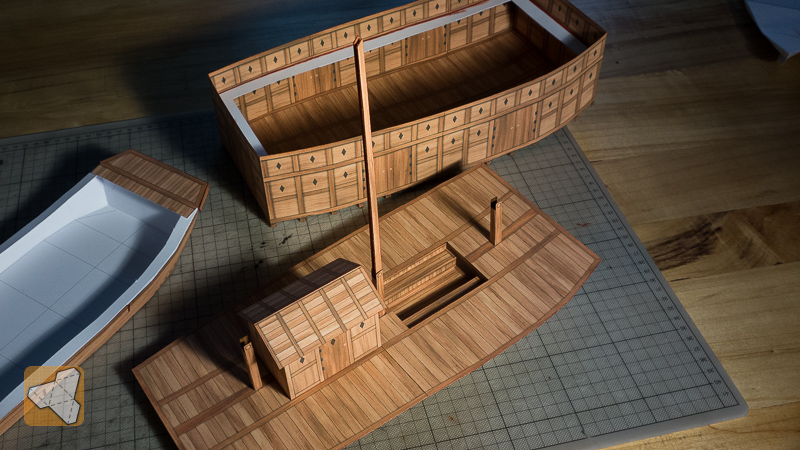 After lots of far too complicated constructions for the underside of the deck I ended up with this. The mast holders could be just inserted into their slots and are held in position/depth with these "bags". The stairs and house could also be made removeable if one wants that. The two stabilizers going from bow to stern help to keep the curving of the deck in place. 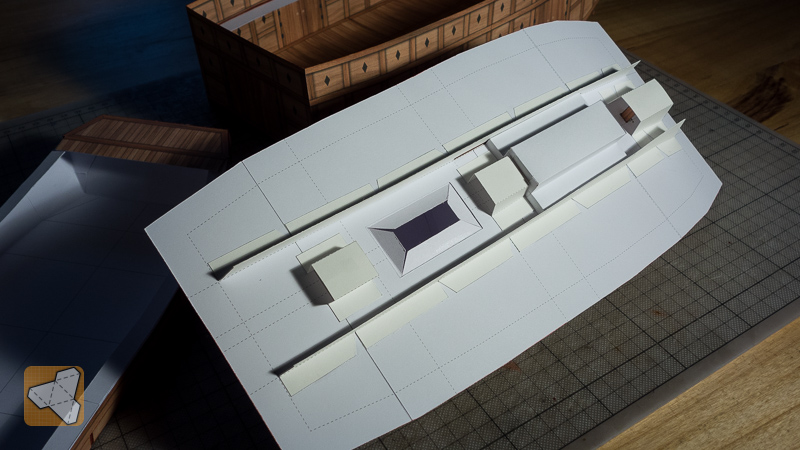 I am enjoying the boat building very much and am definitely looking forward to do a wako pirate ship and then some chinese junk ships too later! I think there is more detail available for the junks :-) |
|
|
|
Post by Vermin King on Aug 20, 2017 4:17:55 GMT -9
Very beautiful work, sir
|
|
|
|
Post by lightning on Aug 20, 2017 9:07:32 GMT -9
It's a beautiful original to start with :-) |
|
|
|
Post by lightning on Aug 24, 2017 8:33:15 GMT -9
Pointed bow version done! 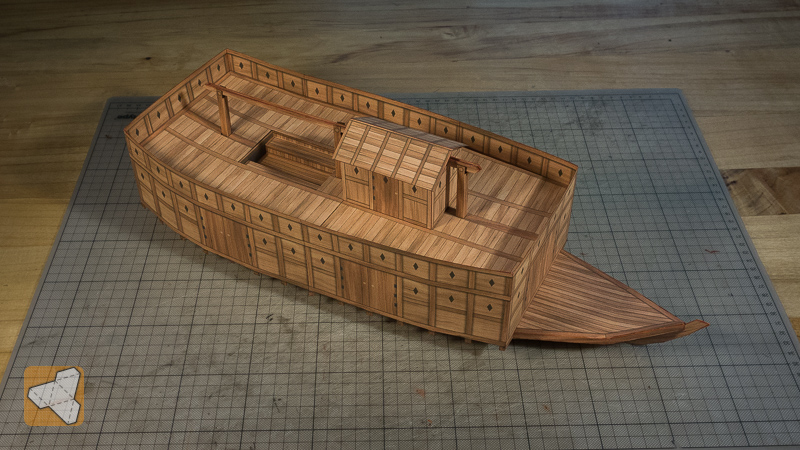 The riders of Rohan have left their horses to join the Samurai on board   |
|
|
|
Post by lightning on Aug 27, 2017 8:57:40 GMT -9
Some variation and weathering for the sekibune (pointed bow) version... 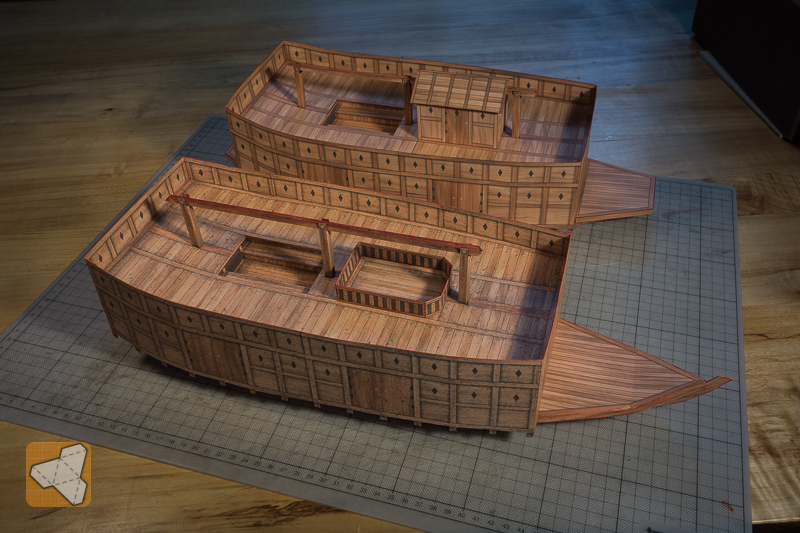 If one wants to, the deck parts can be taken off. 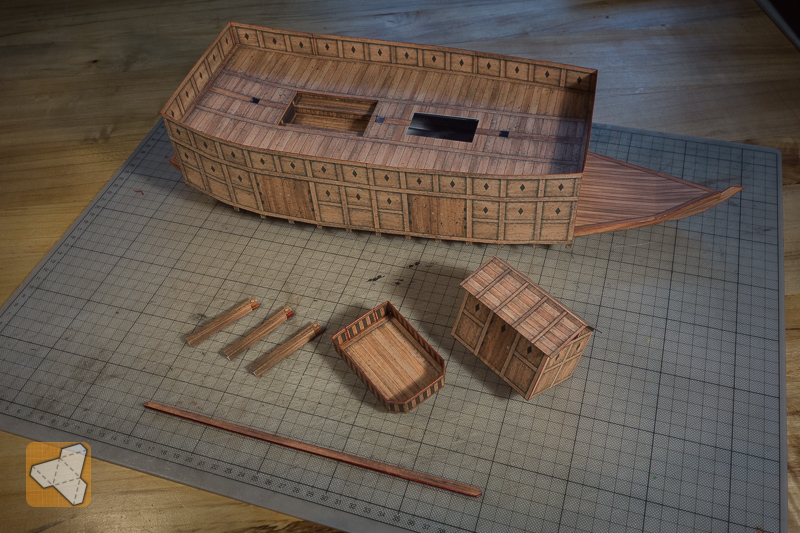 I have not done a flat-fold layer for the super structure, but I think it could be done. Not sure if one would need some rubber band inside to hold it better together ... I glued it and I just use it to store my stuff in the box :-) |
|
|
|
Post by lightning on Aug 28, 2017 22:27:21 GMT -9
For the medium boats before I just glued the flags in. But (obviously, what was I thinking!) this lead to problems when storing them. For the big boat I wanted to be able to change the flags. Either because the wind might be coming from the back or I want to change the clan altogether. So I made the changeable flag holders this time.  Now I can insert and remove the as needed!  |
|
|
|
Post by marzman on Aug 29, 2017 14:40:18 GMT -9
I SOOOO can't wait to pick these up, gonna put one of the mediums to use as the gondola of an airship full of Banzai Pirates!
|
|
|
|
Post by lightning on Aug 29, 2017 20:27:33 GMT -9
Hehe, it'll be soon. I am starting to get rid of all the prototypes, so it can't be long.  |
|
|
|
Post by lightning on Sept 1, 2017 7:10:33 GMT -9
I think I am pretty much done. The last things I added are the grappling hooks and texturing the sail. 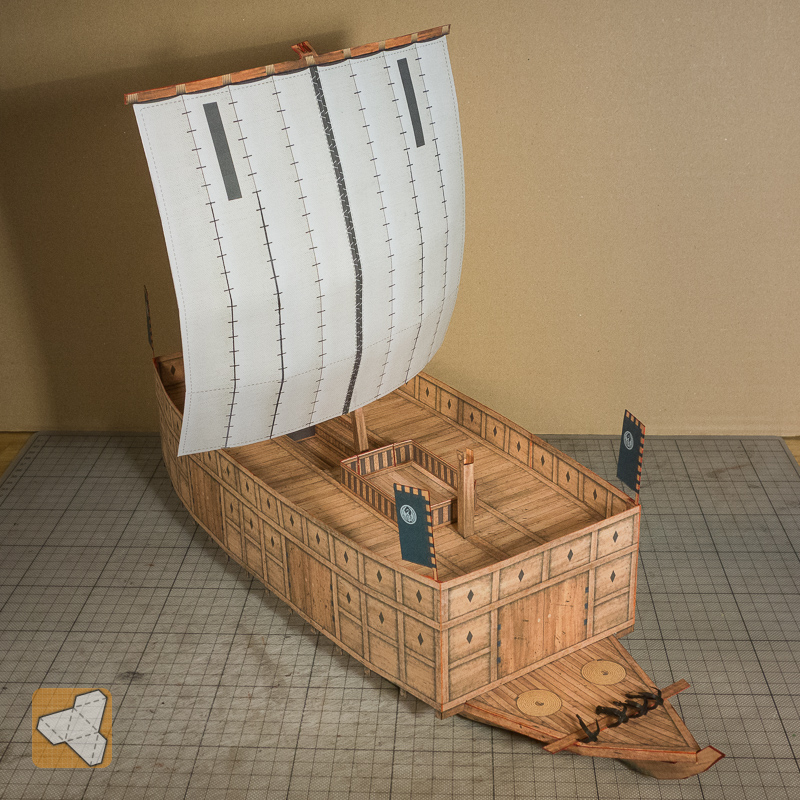 |
|
|
|
Post by Vermin King on Sept 1, 2017 7:39:27 GMT -9
Is the forward bracket for a second mast?
|
|
|
|
Post by nullpointer on Sept 1, 2017 7:40:29 GMT -9
What goes in the little circles up front?
|
|
|
|
Post by lightning on Sept 1, 2017 8:33:11 GMT -9
Is the forward bracket for a second mast? I have not seen them with more than one mast. The mast holders are just to hold the one mast when in lying position. What goes in the little circles up front? They are (optional) ropes! Nice and neat curled up in this spiral fashion. |
|
|
|
Post by squirmydad on Sept 1, 2017 9:32:47 GMT -9
Hehe, it'll be soon. I am starting to get rid of all the prototypes, so it can't be long. See how well the prototypes actually float! |
|
|
|
Post by lightning on Sept 1, 2017 9:47:42 GMT -9
Haha, it's raining outside and I have not yet taken them out. So they'll float right into the garbage now!
|
|
|
|
Post by cowboycentaur on Sept 3, 2017 15:32:32 GMT -9
cant wait to get my grubby mits on this!
|
|
|
|
Post by lightning on Sept 4, 2017 4:49:04 GMT -9
Release will be in the next couple of days. I am finishing the instructions and starting the sale page ... and I tried to rig the sail version of the sekibune. How do you like it? 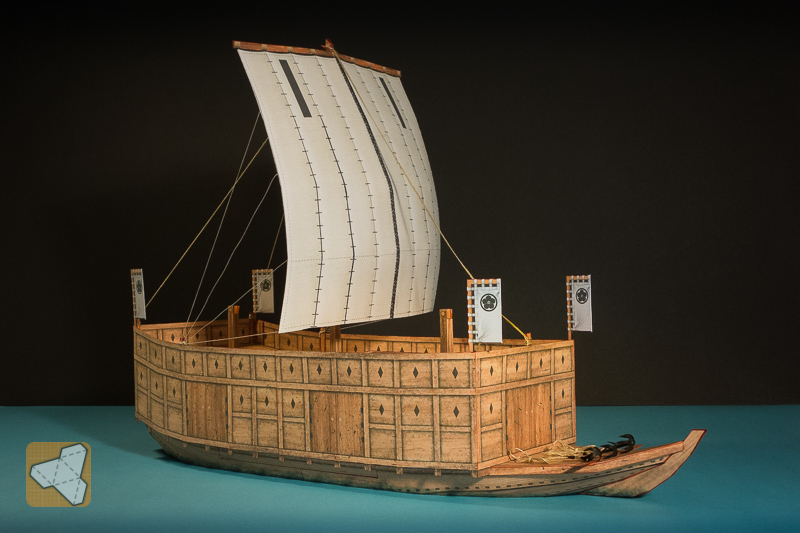 Even roped the grappling hooks! 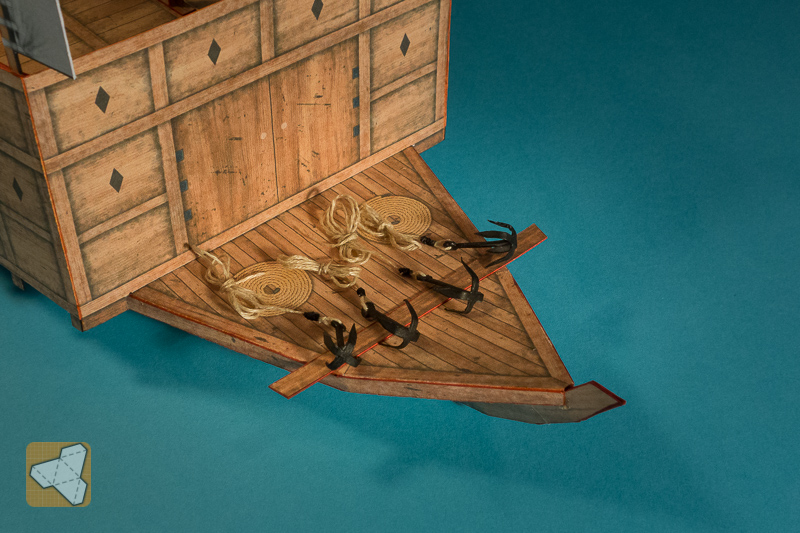 And don't these two from do-I-have-to-say-his-name look fitting? I can almost hear them banter and argue 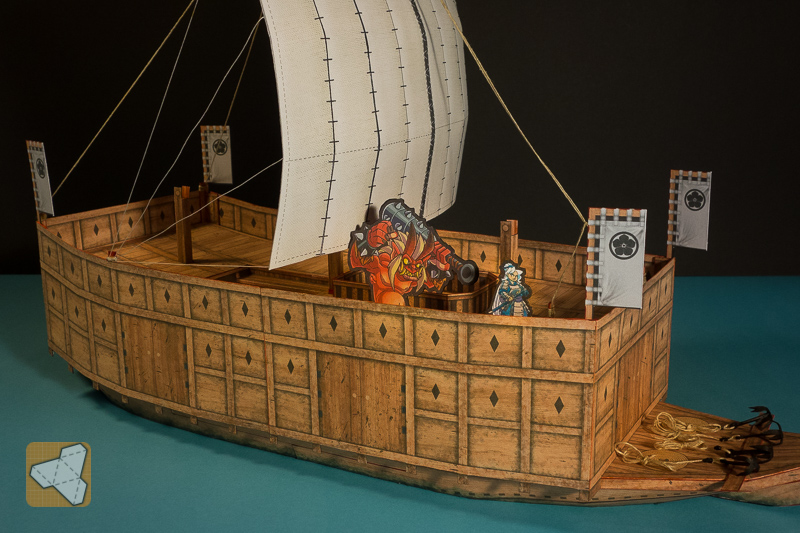 |
|


 I should finish my Junk so our ships can fight it out.


