|
|
Post by Vermin King on Jun 10, 2016 18:50:31 GMT -9
As mentioned elsewhere, I'm hoping to do a steam carriage for the Steampunk/VSF Hoard. I want to come up with something that isn't too tedious. I want this to lean heavily towards one of the 'successful' steam carriages in use in England pre-1850. Not sure which I will be doing, but I've been doing prep work on these two. Hopefully I'll get one done.  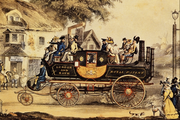 During Out and About, I'd hoped to do a Medieval Coach, and in doing research, I decided I'd really like to do a Royal Mail Stage. 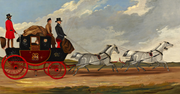 For practice, I decided to do Greywolf's Gothic Coach which had a link on greywolf.critter.net/figureflats.htm in the past, but I can't seem to get to it now. The file is called 'PEG_GH_FigureFlats_CarriageSampler', if you want to search for it. First thing I had to do was brighten it up. In the sample and instruction photos, it isn't nearly so dreary as the actual file. Also in the instructions, there are a dog and coachman, so as long as I was working on the file anyway ... 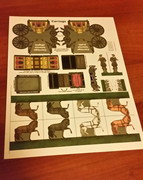 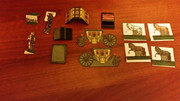 Of coarse, even though I made the almost black background a medium gray, most of it is being cut out, only I shouldn't have hardened the backs with CA glue first and glued the hardened back-to-back pieces before cutting out details. I keep knocking off my blade points ... EDIT-- Here's the Tudor Coach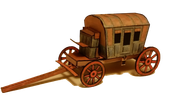 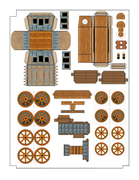 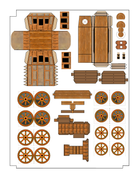  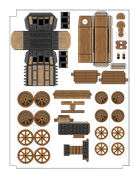 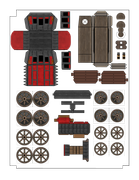 |
|
|
|
Post by Vermin King on Jun 14, 2016 18:28:11 GMT -9
Had a lot of issues arise lately, but I decided this was on my table too long.  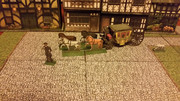 I'll have to go back and catch the edging. Two pens died on me. One had never been opened. I think it might be time to go back to acrylics for edging |
|
|
|
Post by Vermin King on Jan 6, 2017 13:04:04 GMT -9
|
|
|
|
Post by Papercraft Warrior on Jan 6, 2017 13:57:53 GMT -9
Looking fine. If I ever increase the hobby budget to include color prints on good paper, I might assemble one of your coaches for my nephew. I have to get my assembly skills in proper order first. And get good edging gear.
|
|
|
|
Post by Vermin King on Jan 6, 2017 14:14:48 GMT -9
Edging gear? Black Sharpie and cheap markers.
|
|
|
|
Post by Papercraft Warrior on Jan 6, 2017 14:43:43 GMT -9
I have cheap black no name marker which is half dead, and a similar state dark blue one. Few more black ones with writing tip which does not seem good for edging.
Did you edge the coaches with black marker only, or did you use other colors? I am using my black one for Chris' Onager, it works well with BW models, but I am not sure would it work well with color coaches.
|
|
|
|
Post by migibb on Jan 6, 2017 14:44:37 GMT -9
The best edging gear I have found yet is some incredibly cheap chisel tipped markers you can get in The Works here in the UK for a pound a pack. Gets you two black and one navy-ish blue...... I now have about twelve unused navy blue markers if anyone knows of a good home for them!! lol!!!
|
|
|
|
Post by Vermin King on Jan 6, 2017 16:11:47 GMT -9
I got this pack of 12 markers at Dollar General. Half the colors wouldn't match anything in this universe.
On the coach, I mostly used black, some blue and brown. Just a little orange on the steps
|
|
|
|
Post by Vermin King on Jan 7, 2017 11:02:21 GMT -9
Well, I think I have the squarer coach worked out. Will build it after I do a bit of shopping. Printed, clear-coated, drying. If this works, it shouldn't take long to do the less square Tudor Coach utilizing a lot of the parts from this one. 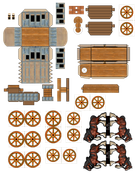 Most folks will recognize the xtea draft horses, but I do need to give credit. They won't be part of the final model |
|
|
|
Post by Vermin King on Jan 8, 2017 9:02:35 GMT -9
The roof is a bit wide, otherwise this is going together well   Also, I want to pose a question. For those who don't want to do the detailed wheels, I'm thinking that I should add shading between the spokes. I thought that I would do half medium gray, half black or dark gray, the bottom half. Much less cutting, and should look okay. |
|
|
|
Post by Vermin King on Jan 8, 2017 12:15:34 GMT -9
So, to give windows depth, I have those two inserts as an option, then build the chassis and cabin and attach the steps. Next step is to get the base wheels folded over and glued so they can dry. Rims and hubs are optional. 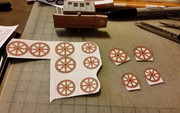 Then build the other components. The seat has a face plate with the footrest. Build the axles, the flat axle, the front axle top, the tongue and the yoke. 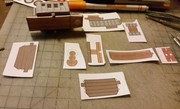 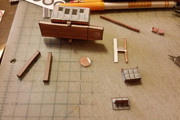 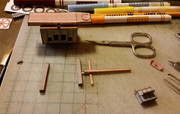 That axle top has two fold overs. I think it is part of the hitch, and it was part of the actual coach. This gets glued to the front axle and the tongue gets glued in and the two flaps get glued to the tongue for added strength. The flat axle allows the front axle to rotate right and left. The front axle top allows the tongue to move up and down, in case it isn't hitched or you choose to use a different set of horses. I forgot to mention that I moved the location of the flat axle on the chassis back a bit and added an internal brace in the chassis at the point where the chassis narrows |
|
|
|
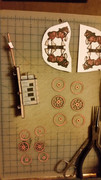
Post by Vermin King on Jan 8, 2017 13:13:59 GMT -9
Adding an extra flat axle cap to be glued on for reinforcement to the file Glued the axles and seat in place. On to the wheels 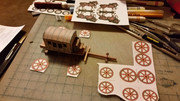 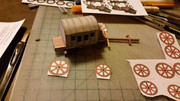 Razzum Frazzum! I was going to post the two versions so you can see the difference, but I accidently overwrote them. Blast it! Riggem, Biggem, Rum Rip! EDIT -- Revised file  |
|
|
|
Post by radoslawkamil on Jan 8, 2017 15:15:48 GMT -9
Wow it is small:) Nice looking. It will be horror to cut those weels for my. Intresting diorama.
|
|
|
|
Post by Vermin King on Jan 8, 2017 15:42:04 GMT -9
That's what I think most people would think. That's why I did the wheels with shading. Most people wouldn't want to bother cutting out spokes
|
|
|
|
Post by Vermin King on Jan 8, 2017 16:32:08 GMT -9
Okay, I took a break from spokes and did the straight-ended Tudor Coach to go with the Fodor Coach. 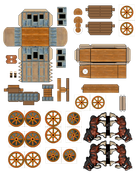 ... Revised file Will revisit this tomorrow for the slanted-end version. Now that I have this done, with a clear mind, the version that is closer to the actual coach shouldn't take too long (as long as you will allow me to have the option of keeping the curved portions of the ends vertical) |
|
|
|
Post by Vermin King on Jan 8, 2017 18:26:38 GMT -9
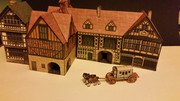
Wheels are on. I need to put dots on the axles to mark the centers. Had to yank off the rear axle and reposition it. Now for Beauty Shots 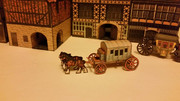   |
|
|
|
Post by cowboycentaur on Jan 9, 2017 12:02:59 GMT -9
I love these coaches and they're just what I need for Curse of Strahd!
|
|
|
|
Post by Vermin King on Jan 9, 2017 12:49:00 GMT -9
Well, I'm printing up the slant-end version of the 2-door Tudor Coach later this afternoon. I took a bit of a long lunch and worked it out. Using the measuring tool, it looks like I didn't screw anything up. Pulled up the original photos while I was working and made the optional bracket for the seat pedestal, made the pedestal taller and lengthened the footboard. When I build it, I'm going to leave the wheels to the last and see how it looks with the 'simple' wheels before finishing them off. I'll just set the coach on something to raise it up and prop the simple wheels up against the axle. I'm of two minds on these. Something tells me that most folks will have differing desires for detail. Even though it isn't difficult, you may not want the swiveling front axle. You may not want the extra wheel pieces to give them depth. You may not want to mess with the steps or the seat pedestal bracket. You may not want to cut out the windows and put the insert behind. Or you might want some of the details, but not all. Should I set these up as a 'Quick-Build' version and 'Intermediate' version, or should I just do the Detailed version and mark pieces as being optional? Revised File -- 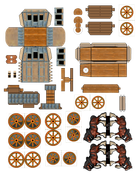 |
|
|
|
Post by Papercraft Warrior on Jan 9, 2017 13:07:22 GMT -9
If detailed version with extra parts can fit inside one page, do it first... than put alternate files with unneeded pieces erased (you can do it in a few minutes). It enables people who print at home to save extra ink for parts they do not want (if they are not tech savvy).
If it takes multiple pages, and it is a mess to make multiple versions, make a detailed one and mark the extra pieces. If you later find the time you can put "simplified versions".
In short: do whatever you have time and will for. Do not strain yourself, make it a fun activity. Anything you are not in a mood to do can wait. You are doing it without charge of your own free will.
|
|
|
|
Post by Vermin King on Jan 9, 2017 13:18:29 GMT -9
As I was getting ready to print this off, I noticed that I must have made this version from a previous version that didn't have the line for the rear axle marked, which got me noticing that I can simplify the chassis build by moving a couple tabs. The tongue also isn't capped on both ends. Not sure what I did there. The version above is buildable, but I want to make the corrections while they are fresh in my mind.
|
|
|
|
Post by cowboyleland on Jan 9, 2017 15:25:03 GMT -9
Personally, I would most likely build a "quick build" version. If that would fit on a page or two with "optional parts" on an extra I think that would be ideal. But that is just me.
|
|
|
|
Post by Vermin King on Jan 9, 2017 15:52:47 GMT -9
I wish I knew how to do layered pdf's. Even with the xtea horses, it fits on one page (probably not if I were making it cutter friendly).
Without the horses, there should be no problem fitting on one page cutter friendly. If I were a master of layered pdf's, I could lay this out so that you can turn off the detail parts.
But I'm not
|
|
|
|
Post by jeffgeorge on Jan 9, 2017 17:06:34 GMT -9
I wish I knew how to do layered pdf's. Even with the xtea horses, it fits on one page (probably not if I were making it cutter friendly). Without the horses, there should be no problem fitting on one page cutter friendly. If I were a master of layered pdf's, I could lay this out so that you can turn off the detail parts. But I'm not Layered PDFs turn out to be not that much of a problem, if you're willing to do a tiny bit of text-file manipulation right before you finalize the PDF for publication. I beat my head against this problem quite publicly a few months ago, as I was getting the Dungeons of Olde beta-test version ready for sharing. I won't pay for Acrobat Pro (Adobe's new pricing scam...er, scheme...is too expensive for a hobbyist or part-timer like me), so I was using Scribus (a pretty fully-featured open-source alternative) to create my PDFs. I struggled for several days to get a PDF with properly functional, print-when-visible layers, until the crew here at CWF sorted me out. The problem is that the prints-when-visible setting for layers when saving a PDF in Scribus remains on the features-yet-to-be-implemented list. There is a workaround that works, though, and you'll find it in this thread: Layered PDFs in Scribus. The TL;DR version is go to that thread, read Christopher Roe original post, and follow the instructions using Scribus v.1.4.6 and the current version of Notepad++. Be sure to use that precise version of each program. When I tried with Scribus 1.5.2 or 1.5.3 to make the PDF, or with Sublime 2 as the text editor, the resulting PDF was corrupted and wouldn't open. But when I use that exact combination: Notepad++ and Scribus 1.4.6, it worked exactly as described in Chris's post. Once you have the process down, making the recommended deletions from the PDF file takes just a couple of minutes, so it's really not much of a burden. Both Scribus and Notepad++ are free and open-source, and very useful programs. If you're on a Mac, you can't use Notepad++, since it's PC only; I'm not sure which text editors will and won't work on a Mac. I also can't comment on any text editors aside from Notepad++ and Sublime 2 (which is otherwise my go-to text editor); those are the only ones I tried. Notepad++ works for this workaround, while Sublime 2 just doesn't. For me, at least. In any case, hats off to Christopher Roe , who shared the workaround, and mproteau (Paper Realms) , who tipped me off about going back to Scribus 1.4.6, so that it would work for me. Whenever you get around to trying it, if you have problems, post them to that Layered PDFs in Scribus thread, and I'll try to help you sort things out there. Pay it forward, and what-not, you know? |
|
|
|
Post by Vermin King on Jan 10, 2017 5:02:53 GMT -9
Well, since it looks like freezing rain may have me staying home this weekend, I'll have to look that up.
I had three cats wanting to cuddle and not let me do anything last night, so didn't get far. A few posts up, I was re-working the tabs on the chassis to make it easier to build, but the fix was not successful. So instead of finishing the build, I slashed off the offending tabs and put joiner strips where the tabs should be. Unfolded, and this morning made the changes to the file. The new version has the top and sides forming a box with the bottom being the lid to close it. The sides of the narrowing front also have no tabs and just glue down to the box now.
Having worked on a lot of vintage hand-drawn kits, my natural reaction to an issue is to size it up and make a plan for getting around the issue. On previous versions I did that and afterword went back to change the file from memory. By having the example in hand while fixing the file made it rather an easy fix.
EDIT -- Went back and changed the files to the revised chassis
|
|
|
|
Post by Vermin King on Jan 10, 2017 10:46:16 GMT -9
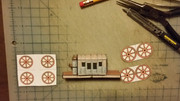
Here's where I stopped myself last night and cut off tabs 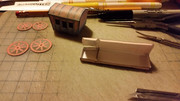 Extended my lunch a bit longer than I should have, but here are the parts for the Basic Coach 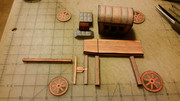 Going from top to bottom: 1. The cabin 2. The driver seat pedestal 3. The footboard with the seat pedestal front plate (makes it securely glueable) 4. The chassis 5. The connector for the tongue and axle 6. The two axles 7. The tongue 8. The four wheels. In looking at the shadows on the Fodor Coach, I realized that with the wheel positioning, I needed more light gray spaces. When I put it together tonight, we will see if I was correct |
|
|
|
Post by mproteau (Paper Realms) on Jan 10, 2017 10:58:20 GMT -9
|
|
|
|
Post by Vermin King on Jan 10, 2017 11:03:56 GMT -9
It's sounding like I will have time to go over them this weekend. Thanks
But I ordered a new laptop for a back up, and to use while this one is in the shop. Hopefully my IT guy won't decide to swap them out before the weekend
|
|
|
|
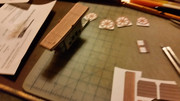
Post by Vermin King on Jan 10, 2017 12:08:13 GMT -9
Let's hear it for conference calls! Simple version 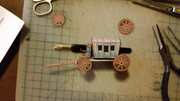 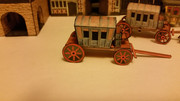 Restickable glue didn't hold well, so between the two photos the front wheels moved and the shading isn't lined up right |
|
|
|
Post by Vermin King on Jan 11, 2017 6:31:30 GMT -9
Going back to Greywolf's Coach, I think I can turn these into Super-Simple versions. I think that having each of the two sides as back to back pieces with wheels, flat roof, front piece with driver seat, back piece and then a fold-over tongue to glue under the front will work.
I'm also thinking about the texture variations. I'm thinking the four-door version in all wood, the second version in wood and canvas instead of leather, and a dark grey and red version of the last one.
What variations would you like to see?
|
|
|
|
Post by Papercraft Warrior on Jan 11, 2017 11:26:11 GMT -9
Worn and torn version, from many years exposure to the elements. Partially charred coach from fire in the stables. Damage adds variety (I am talking about texture versions, not change in the physical model).
|
|