|
|
Post by missileer on Aug 25, 2017 17:26:14 GMT -9
With the blessings of Vermin King, I am going to be building his White Hart Inn and coaches. Only this time around, I will be making all those wonderful details that he provided in his designs take on a little more life. I am starting with the coaches to build my confidence and try out ideas. I will only post the ones that work! I will be making enough mistakes to keep you laughing anyway. The plan is to only use the details provided in his designs; nothing added from outside sources. Primarily, it will consist of overlays and recesses or a combination of both. My decisions will be based on my skill level or lack thereof. I started with the wheels. Looking at the picture that VK provided of the museum coach, I decided that I needed to fatten the wheels and add a bit more 3D. I use scissors for 99 per cent of my cutting and I have found a new use for the Japanese Hole Cutter; making pilot holes for my scissors points for small details. It really speeded up cutting out the wheel spokes and ended forever, poking holes in fingertips. So my arbitrary width of wheel became 8 stacked wheels with an additional rim on each side and two hubs stacked on the outward facing side of the wheel. (Pictorial diagram below) It started out being fun, but by the time I cut out the 40th wheel, I had finger cramps. By the way, I forgot to add that this model is the Tudor Coach printed on 65# paper. I have the wheels assembled, the sides of the spokes and the inside of the rims have not yer been painted. I am thinking of rounding the spokes a bit. One of the things to remember is to glue the back to back wheels first. That way, you won't accidentally wind up with a white sided wheel. (Wait; you're all thinking that I did that!) 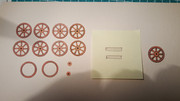 |
|
|
|
Post by Vermin King on Aug 25, 2017 17:34:53 GMT -9
I'm a bit giddy seeing this built
|
|
|
|
Post by missileer on Aug 26, 2017 12:20:12 GMT -9
Thanks, VK, Here is where it gets interesting. The attached photo shows my approach to detailing the coach box. The coach box on the left is the basic structure that I will be using. Only the windows are removed in this one, to accommodate the recessed windows included by VK in the kit (small rectangles in the middle). The coach box on the right is the detail supply depot. Some of the cut-outs are shown as finished and all the spots with punch marks were cut out also. .Once the cut-outs were complete, the various pieces were separated (roof/sides/lower ends). 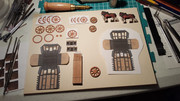 |
|
|
|
Post by missileer on Aug 26, 2017 12:24:28 GMT -9
I forgot to mention, in the last post, that the horses were assembled months ago. I cut out the horses and then traced the outline of one horse onto 4MM foam board, cut out the blank horses and wrapped the 2D horses around the foam board. Nothing fancy, but the foam was easier to work with than 4MM cardboard. (I did use a knife for foam board) I assembled the standard coach box, with recessed windows, and then glued the cut-outs onto the structure. Photos attached show the result. It ain't beautiful, but it did turn out better than I expected.   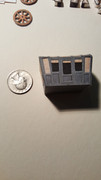 |
|
|
|
Post by missileer on Aug 27, 2017 14:02:20 GMT -9
OK, I have finished the drivers seat, the rear axle and the wagon tongue. I will not be able to work on it the next four days; I have to take 3 Granddaughters to Williamsburg, VA. I have been promising that all summer. Maybe I can squeeze a little more assembly in later tonight. Not a good photo, but the best I could do quickly. 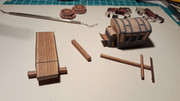 |
|
|
|
Post by missileer on Sept 1, 2017 18:41:16 GMT -9
Have the drivers seat installed along with the axles and two right side wheels. There was a lot of white inside the wheel spokes that needed attention. I dug out my old flat paints for plastic aircraft and was rewarded with the exact match for the coach wheels. With that kind of luck, I should be in some casino. I hope to finish the coach tonight. I have already started cutting out the Fodor blue and gray coach. It should turn out a lot better than this one. I have learned a lot of what not to do on this first one. So here are the photos.   |
|
|
|
Post by missileer on Sept 1, 2017 22:12:15 GMT -9
I completed the the first Tudor coach and horses, with the exception of the entry stirrups, reins and a driver. If anyone has a suggestion as to where I might find a driver figure, I would appreciate the help.  |
|
|
|
Post by Vermin King on Sept 2, 2017 2:43:04 GMT -9
Are you wanting a rustic driver, or more sophisticated?
|
|
|
|
Post by nullpointer on Sept 2, 2017 8:10:15 GMT -9
Are you wanting a rustic driver, or more sophisticated? Both! A scruffy tophat! |
|
|
|
Post by missileer on Sept 2, 2017 8:23:15 GMT -9
VK and Nullpointer,
For this one, I definitely want a rustic, but the scruffy top hat would be a great idea. When I build the Red and Black, then I will need a higher class driver.
|
|
|
|
Post by Vermin King on Sept 2, 2017 9:10:40 GMT -9
I'm kinda thinking that one of the One Monk seated tavern patrons might be able to be converted to a driver ... unless you want the driver hoisting a tankard while in the driver's seat, then it could be used straight away
|
|
|
|
Post by missileer on Sept 2, 2017 9:19:18 GMT -9
Since this is going to end up in an elementary school, the tankard probably would not be looked upon with a kind eye.  But the suggestion sounds good. Where would I find the seated figures? |
|
|
|
Post by Vermin King on Sept 2, 2017 9:32:18 GMT -9
|
|
|
|
Post by missileer on Sept 2, 2017 9:47:50 GMT -9
VK,
Thanks, again.
|
|
|
|
Post by missileer on Sept 2, 2017 10:15:45 GMT -9
VK,
Got them; along with some odds and sods that I think will come in handy.
|
|
|
|
Post by missileer on Sept 4, 2017 8:53:01 GMT -9
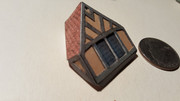
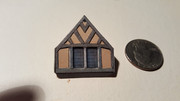
As you can see in the photo, I have added a driver from One Monk Miniatures. I think I may have reduced it a bit too much. I also want to thicken the driver to add more 3D effect. I want to use the cargo you see in the photo, but that is going to have to be reduced by half, so that will be another day's project. In the meantime, I have started applying my 3D efforts to the buildings. The first attempt will be the Dormers, since they are the easiest to work with. The windows will be glued to the inside front wall of the Dormer; then the Dormer will be assembled. The woodwork will then be glued in place on the outside walls (with a fervent hope that it looks as good as my mental picture). I am going to try to finish the Dormers today and get some more assembly done on the Fodor coach.  |
|
|
|
Post by Vermin King on Sept 4, 2017 12:02:05 GMT -9
The museum coach this was based on didn't have storage on the back. I added that as either a place for people to stand or minimal storage.
|
|
|
|
Post by missileer on Sept 4, 2017 12:28:37 GMT -9
|
|
|
|
Post by Vermin King on Sept 4, 2017 12:52:03 GMT -9
Over at PM.com, I sent you a link to the Greywolf Carriage. They no longer have the 'sampler', so this would have a bunch of figures you will probably never use
|
|
|
|
Post by missileer on Sept 4, 2017 13:41:31 GMT -9
VK, Thanks! I will check it out.
|
|
|
|
Post by missileer on Sept 6, 2017 17:58:54 GMT -9
This is going to be a much longer project than I had anticipated, but that is Murphy's Law. I had hoped to finish this and my Tri Sigma project by November. It may not happen, since I keep adding ideas. So, here is where I am to date (see photos). I have the 1st Tudor coach finished with the exception of the steps, cargo, reins and driver. The four Dormers are finished and I have all the parts cut for one wall of the Guild Hall end of the structure. In addition, I have the Fodor basic coach body assembled and the trim parts cut out. I added a former in the center of the coach, so that I could apply more pressure while gluing and forming the curve of the roof. I also have all the parts cut out for one of the rear wheels. At this point, the double door on the wall will be recessed by 2 layers (see spacers in center of second photo). I have not decided whether to partially open one door. If I do, l'll have to thicken them to at least 2MM. In that case, I will probably not recess the doors, but thicken the door frame to match the door. I will have to make a decision on that soon   |
|
|
|
Post by Vermin King on Sept 6, 2017 18:37:12 GMT -9
It's so nice to see this taken to the next level. Very nice work
|
|
|
|
Post by missileer on Sept 9, 2017 19:33:05 GMT -9
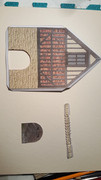
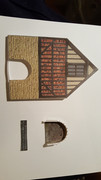
Thanks, VK. I have been spending my time on how to recess the large double doors on the Guild Hall. In keeping with my original plan of only using the details available on the model, I decided to modify the open Archway recess details. Using the photo as a visual explanation guide, I printed out a copy of the Archway parts shown in the photo as A: 1 & 2.; I cut out all of A2 and the straight long portion of A1; adding a tab along the bottom of the part (See B). I then cut out a piece of A1 containing 2 of the curve links to use as a blind connecting tab and cut the end tab off the end tab off the curving end of A2. I then glued the straight piece of A1 to the curving end of A2 using the blind tab (See C). My final modification was to cut C in half, lengthwise and glue one half on top of the other (See D). Using the copy function on my printer, I made a sheet of the modified Archway recessing parts, which I will use to recess all the double doors in the Guild Hall. I hope to get at least one wall finished tomorrow to test the effect.  |
|
|
|
Post by missileer on Sept 10, 2017 13:52:14 GMT -9
|
|
|
|
Post by missileer on Sept 10, 2017 13:58:40 GMT -9
I apologize for the orientation of the last photos. I think I fixed the problem. Here is a closeup of the finished doorway.  |
|
|
|
Post by Vermin King on Sept 10, 2017 16:19:04 GMT -9
That is outstanding. I would have done mine with less of a recess, but this looks 'right'. You have a good idea for the detail work
|
|
|
|
Post by missileer on Sept 12, 2017 13:20:13 GMT -9
Thanks, VK, My reasoning on the door depth was probably over-thinking. I was thinking that since this is the Guild Hall, the stone masons would want to show off their skill and build thick stout wall. The placement of the doors was based on security. I assumed that normal security of doors at this time in history is still based on the drop bar or draw bar against the interior side of the door. Following this reasoning, I also assumed the door would be massive, with the interior side matching up with the interior wall (for the drop bars). Looking at the thickness of the wall of the archway, I arbitrarily came up with my recess depth.  A bit round the pond, so to speak. I have made a little progress. I have all the trim on the Fodor coach body and drivers seat; I have one wheel assembled; I have the second story facade cut out for the front wall; and I have the hinges and window under trim installed on the small window of the front wall. Finally, I am assembling the recess frame around the entry door. Note that I have installed the hinges and the door pull handle. That's the second handle! The first handle I dropped while painting it (never found it), so I made a new one. Then I realized that I had started gluing the door upside down and had to pull that apart. At this point I stopped and poured myself a Tullamore Dew and watched the news. Then I realized that what I was watching was not helping my frame of mind, so I turned it and went back to model building. Now I hope you are all as confused as I am.      |
|
|
|
Post by jeffgeorge on Sept 13, 2017 15:02:13 GMT -9
I apologize for the orientation of the last photos. I think I fixed the problem. Here is a closeup of the finished doorway. This doorway looks great. Love the depth of it, even if it's a little deep for proper scale--remember, the door will be less than 2" tall and viewed from several feet away, amidst other building models. Under those circumstances, a little exaggeration of detail can make a model "read" better, even if it's less architecturally accurate. One tiny quibble: Am I looking at vestigial hinges on the edge of the doorway on the outer wall surface? Those probably made sense when the door was just printed on the wall, but now that it's recessed, they strike me as a tad odd. Maybe they should just be Photoshopped out? |
|
|
|
Post by missileer on Sept 13, 2017 17:45:04 GMT -9
Thanks, Jeffgeorge. And yes, those are hinge plates. "Therein lies the rub". Photoshop is not one of my talents. I don't own any such programs and would not know how to use them, if I did. I'm a dinosaur type model builder that uses paint and pencils for color touch up (or real live patches). I was reluctant to attempt a fix, but now that you noticed them, I will have to come up with a cover-up. I really DO appreciate the honest appraisal. I would like this to turn out well enough to display at the paper modelers' convention in Virginia next fall. |
|
|
|
Post by Vermin King on Sept 13, 2017 18:25:51 GMT -9
Thanks, Jeffgeorge. And yes, those are hinge plates. "Therein lies the rub". Photoshop is not one of my talents. I don't own any such programs and would not know how to use them, if I did. I'm a dinosaur type model builder that uses paint and pencils for color touch up (or real live patches). I was reluctant to attempt a fix, but now that you noticed them, I will have to come up with a cover-up. I really DO appreciate the honest appraisal. I would like this to turn out well enough to display at the paper modelers' convention in Virginia next fall. I too appreciate honest appraisal. I was thinking of saving paper on the green cloud (mirror printing on the back) and realized as I was cutting out my new cloud tonight that most folks wouldn't build that way. I wish someone would have said something. I am unable to attend the IPMC this year (farm-sitting), but plan on attending next year, too. Hope to see you there |
|


 But the suggestion sounds good. Where would I find the seated figures?

 A bit round the pond, so to speak.


