|
|
Post by jeffgeorge on Sept 13, 2017 20:30:27 GMT -9
Thanks, Jeffgeorge. And yes, those are hinge plates. "Therein lies the rub". Photoshop is not one of my talents. I don't own any such programs and would not know how to use them, if I did.  I'm a dinosaur type model builder that uses paint and pencils for color touch up (or real live patches). I was reluctant to attempt a fix, but now that you noticed them, I will have to come up with a cover-up. I really DO appreciate the honest appraisal. I would like this to turn out well enough to display at the paper modelers' convention in Virginia next fall. This isn't a hard fix. You can either use the Clone tool with a soft-edged brush (it looks like a rubber stamp), or you could select a tiny rectangle with a feathered edge from almost anywhere else in the stone texture, and Copy-Paste it over the hinges. It's Photoshop/GIMP 101, and Google/YouTube is your friend. What you should be doing with this next fall--in addition to anything else you have in mind--is entering it in Papercuts 2018.  |
|
|
|
Post by missileer on Sept 14, 2017 14:30:28 GMT -9
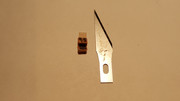
VK, If we both get there, the drinks are on me; for all the wonderful models that you introduced me to (paper models, that is). Jeffgeorge, Thanks for the pointers and the vote of confidence. I will have to bite the bullet and learn something new and maybe I will get brave enough to enter the contest. Quick update. I am working on the front wall of the Guild Hall (not quite finished). I will add a photo on that with my next post. In the meantime, I am building the Archway Interior. I installed the hinges and window ledge facade on the small closed window (see photo). I have the double door ready to install. It is slightly smaller than the outside doors, so I had to modify the recess insert. And since I am recessing the door I will have to add a piece of slate flooring in front of the door. Plus, I had to trim the wall tab next to the open doorway (it was intended to be used with the flat printed door in place). In the photo, you can see the floor strip on the other side of the door opening. I am going to edge glue (no tab) that joint, so I will conduct the gluing on a piece of wax paper to prevent gluing it to my cutting board (which I have been known to do). Plodding along. 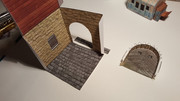 |
|
|
|
Post by missileer on Sept 24, 2017 8:48:08 GMT -9
|
|
|
|
Post by Vermin King on Sept 24, 2017 9:38:47 GMT -9
Oh, my goodness!
|
|
|
|
Post by missileer on Sept 24, 2017 18:03:54 GMT -9
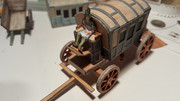
Quick update: here are the mounting steps installed on the coach. 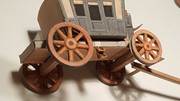 |
|
|
|
Post by missileer on Sept 26, 2017 16:54:45 GMT -9
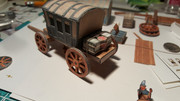
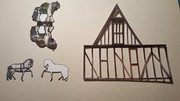
Next update. As you all know, I want to put freight on some of the vehicles. I have found several nice pieces, but they were way too big (no forklifts were available to these guys). So, the guy leaning up against the Hogshead barrel (which is too big) will be my scruffy driver of this rig and was reduced to 85 per cent to fit the doorways of the Inn and the rig he will drive. He is a barfly that was converted to a pious seated parishioner by OldschoolDM. The barrel is by Dave Graffam and I reduced it using a printer setting of 50 per cent. The coach, of course, is by Vermin King and was/is fun to detail. I have some additional detailing ideas for the next coach and the follow on Red and Black mod. Anyway, I threw in the dime to give some idea of size. I had to reduce the barrel a wee bit, so that the driver would be able to unload it by himself. I found a wonderful barmaid to travel with the driver, but then I remembered that this was going to an elementary school, so that was a scratch. I placed the flattened version of the barrel, so folks could see the neat construction design. It really wasn't that hard to build the smaller version. Just a little patience and a lot of Tullamor Dew. By the way, all the cargo I will be using (and the figures) were obtained through One Monk Miniatures. I also found some neat horses that I will be using on a red and black Tudor coach (third coach to be built for this project). I am working on the building, but it is slow work (lots and lots of cutouts). I am very close to finishing the front wall, the right side wall and the arched entry of the Hall. Sometime this week, I hope to show the completed sections. 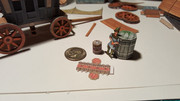 |
|
|
|
Post by missileer on Sept 28, 2017 18:06:34 GMT -9
I had a little time today, so I worked on selecting the coach commercial loads. The first photo shows the load that will be on the primarily finished coach. The Red and Black coach will have a cargo of personal trunks, similar to the one in photo 2 (I am trying to find 3 different styles). I have made some progress on the Hall walls, but not enough for photos, yet. I also found a hand cart that I will use as a prop for unloading a forth (undetermined style) coach or maybe a freight wagon (if I can find one). When I install the horses and reins, I will also tie down the cargo loads (the cargo will be glued to the coaches for more stability). The Fodor coach body, in the background, is not on fire.  That is the underside of tree branches of a tree that I am assembling for another diorama (I will probably use the same style trees for this project also. They are easily scalable, so you can create a multitude of different size trees.  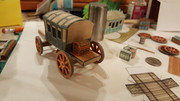 |
|
|
|
Post by Vermin King on Sept 28, 2017 18:14:00 GMT -9
Was the handcart Chris's from papierschnitzel?
|
|
|
|
Post by missileer on Sept 28, 2017 18:37:13 GMT -9
VK, no it's from Dave Graffam's CLOCK OF RAKES CORNER.
|
|
|
|
Post by Vermin King on Sept 28, 2017 19:00:34 GMT -9
Dave does throw some extra goodies in some of his kits
|
|
|
|
Post by missileer on Oct 1, 2017 15:51:20 GMT -9
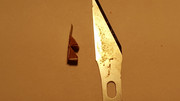
Jeffgeorge, See if this is any better. I tried removing the hinge plates the "dinosaur" way (scraping the surface gently with a blade tip and then rubbing a little dirt over the wound.  Is it good enough or does it need more work? 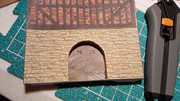 |
|
|
|
Post by Vermin King on Oct 1, 2017 18:05:06 GMT -9
That works. If you added a couple extra rough places in the stonework elsewhere, it wouldn't be noticeable at all. Maybe it won't be noticeable at arms length now
|
|
|
|
Post by jeffgeorge on Oct 9, 2017 17:37:52 GMT -9
Jeffgeorge, See if this is any better. I tried removing the hinge plates the "dinosaur" way (scraping the surface gently with a blade tip and then rubbing a little dirt over the wound. Is it good enough or does it need more work? This would never be visible on the table, so in that sense, it works fine. The only problem would be if you shared the model for others to build--your average customer might not be so deft with the blade and the markers to make the fix so hard to see. If you are really nervous about removing the hinges in GIMP or Photoshop, post the page with the hinges as a full-sized .png or .pdf, or send them to me directly (can we do message attachments through the forum?). I'll download it, take the hinges out, and post it or send it right back--won't take 5 minutes. |
|
|
|
Post by missileer on Oct 10, 2017 19:36:17 GMT -9
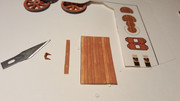
VK, Thanks. Jeffgeorge, I appreciate the offer and I would take you up on it, except that VK is the designer/producer of the building. So, I will not be offering it to anyone else, other than sharing the building of it here. I'm just kit-bashing everyone else's wonderful designs. Which brings me to an update (work and house guests have delayed things a bit). I am working on the covered entry to the Hall (photo 1); have finished the cutout for the upper floor of the left side of the Hall; and have started on a cart by Dave Graffam. I figured that this is a small village, so they would only have one wheelwright. Therefore, I am changing the original wheels on the cart to match the wheels on the coaches (photo 3). No one would order special wheels for a cart. 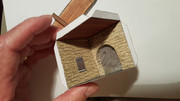 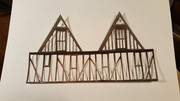 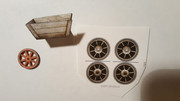 |
|
|
|
Post by Vermin King on Oct 11, 2017 4:29:09 GMT -9
Actually, I have no problem with anyone making changes to the file. But I do prefer files to be made available at this forum, not elsewhere.
|
|
|
|
Post by missileer on Oct 12, 2017 17:40:02 GMT -9
|
|
|
|
Post by chiefasaur on Oct 12, 2017 17:48:22 GMT -9
That cart is so cute!
|
|
|
|
Post by missileer on Oct 16, 2017 19:31:16 GMT -9
|
|
|
|
Post by missileer on Oct 27, 2017 17:58:16 GMT -9
I am still cutting out horses and horse blanks (and more wheels). However, I am working on the buildings, also. As shown below, I have the two walls that contain the covered entrance to the Guild Hall finished and ready for installation of the covered entrance. Only one half of the long wall is detailed, because the building between the Inn and the Hall will cover the other half. I probably will not get anything else done until after Halloween. About 15 years ago, I started turning my front yard into a scary garden the day before Halloween. Now the neighborhood looks forward to that display (I get more adults than kids). So starting tomorrow, I have to start assembling the garden. See you folks late next week. Happy Halloween! 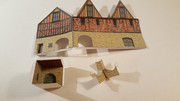 |
|
|
|
Post by Vermin King on Oct 27, 2017 18:01:47 GMT -9
You have very good print quality. What type of printer do you use?
Looking forward to photos of your Halloween Garden (I hope)
|
|
|
|
Post by missileer on Oct 27, 2017 19:44:53 GMT -9
It's an HP Photosmart 5520. When I print models, I set it to "Best Quality". Uses up a lot of ink, but I like the result. For large format models, I have a HP Officejet 7612. Picked it up on SALE at Office Depot for $30 about a year and a half ago. It works very well; I'm not sure why it was so cheap.
|
|
|
|
Post by missileer on Oct 29, 2017 8:19:51 GMT -9
I got up early and made some progress. I have the covered entry way installed. The parts fit nicely, but I would not recommend building/installing the arches to inexperienced modelers. You need a lot of patience and four hands would help. If installed properly, the box-like room slides in over the arches and fits like a driving glove. My Leprechaun helped me out quite a bit here. So here is the current pictorial status. The walls appear bowed in, but that is the glue holding all the detail, shrinking everything as it dries, I have an internal bracing system that corrects for that, which I will cover after I get the other two walls in place and a bottom plate on the building.  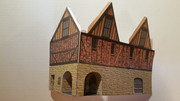 |
|
|
|
Post by Dominic on Nov 7, 2017 22:39:46 GMT -9
The cart turned out better than I hoped. One of my ink cartridges started running out just as the underside of the cart was printing. It left a greenish speckled look to the finish. It makes the underside look even more realistic, so I used it as is. 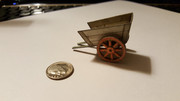 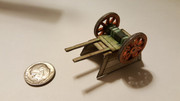 A little late, but am I the only one thinking "dung cart from Back to the Future III" here? Awesome skills you have there, too. And patience. For me, the bottleneck would be patience. And skill... |
|
|
|
Post by missileer on Nov 14, 2017 13:57:40 GMT -9
Dominic, a belated "thank you". Back in the '40s an '50s, my Dad taught me patience and tricks of the trade. There is a lot of luck involved here also, like finding this forum and Vermin Kings coaches and Coaching Inn. And luck trumps skill every time. |
|
|
|
Post by missileer on Nov 17, 2017 19:14:05 GMT -9
I think that I might have overextended myself. I had to tear down and pack up the Halloween Garden, plan the Christmas outdoor scene (will start assembling that the day after Thanksgiving), and working on 5 separate paper model projects. Oh, yeah, did I mention that I still have a day job? OK, here is the update for this project. I firmed up the plan for one end of the Inn and had to cut it out to see if it would work. It is a sandwich assembly reading from left to right. The left cutout will be the top of the sandwich. Since the middle of the sandwich will be the main structure with glue tabs, I will have to trim the right most piece to make sure that it does not interfere with the fit of the middle piece with it's connecting wall. I have all the parts for the second coach done, except for the stirrup steps. Hope to finish them tomorrow and assemble the coach this weekend. I also have to finish gluing the 3 recessed doors on the final wall of the Guild Hall. Hopefully, I can get the walls up this weekend also. PRAY FOR RAIN!!! 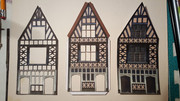 |
|
|
|
Post by cowboyleland on Nov 17, 2017 21:24:00 GMT -9
Here we are getting snow, prayers or no.
|
|
|
|
Post by missileer on Feb 1, 2018 20:35:14 GMT -9
After a long layoff, I am back (groaning will not sway my decision).  I have made a bit of progress. In this series of pics, I have finished the end wall of the Inn. The upper window has only the frame raised on the surface. The hinges on the door and the shuttered windows are surface raised, as are the shuttered window sills. The door is recessed. I will add a door handle after the building is assembled. Attachments:
|
|
|
|
Post by missileer on Feb 1, 2018 20:53:18 GMT -9
This series has to do with a rear wall of the Inn. The first photo shows the layering pieces before assembly. The woodwork, as in the last series, will be surface mounted. The upper and middle windows will be recessed. The lower windows and the door are shown as sub assemblies in the second photo. I built the recessing frame for the door from scrap. The door also has a wood trim overlay, thus recessing the door panels and windows. The two windows will be bay windows. I just bent the window wings about 30 degrees and then capped the windows (top and bottom) with scrap material. They will be surface mounted. Once again, I will add door handles after assembling the building. 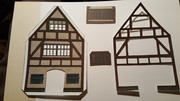 Attachments:
|
|
|
|
Post by lightning on Feb 2, 2018 10:08:27 GMT -9
I love how you double up the details. I think with technique like this you can improve a paper model quite a bit. Very worth the effort for your hero model building!!!
|
|
|
|
Post by missileer on Feb 3, 2018 19:14:08 GMT -9
Lightning, Thanks. A bit more progress; this time it is the back wall of the pass-through separating the Inn from the Guild Hall. The photo shows the parts I will use for this wall. The fancy hinges are for the door (almost drove me to drink cutting those). I will drill out the leaf-like pedals tomorrow. (I know, I should have done that BEFORE cutting the hinges, but I was afraid that would make them too fragile when cutting). The small straight hinges are for the shuttered window as is the stone window sill. The wood frame will be an overlay; the door and windows will be back mounted for a little extra depth. Once again, the door handle will be placed after assembling the building. More tomorrow. 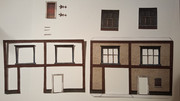 |
|


 I'm a dinosaur type model builder that uses paint and pencils for color touch up (or real live patches). I was reluctant to attempt a fix, but now that you noticed them, I will have to come up with a cover-up. I really DO appreciate the honest appraisal. I would like this to turn out well enough to display at the paper modelers' convention in Virginia next fall.


 That is the underside of tree branches of a tree that I am assembling for another diorama (I will probably use the same style trees for this project also. They are easily scalable, so you can create a multitude of different size trees.
 Is it good enough or does it need more work?


 I have made a bit of progress. In this series of pics, I have finished the end wall of the Inn. The upper window has only the frame raised on the surface. The hinges on the door and the shuttered windows are surface raised, as are the shuttered window sills. The door is recessed. I will add a door handle after the building is assembled.


