If you gimp (or photoshop) you could recolour this into a 3d medical patient.
Here are the instructions to help you out
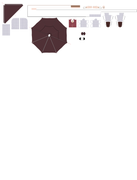
Hang Gliding Holmes
Instructions
I cut out, edge and glue the pieces together one at a time to avoid losing small pieces.
I build with card stock because I have trouble getting photopaper to curl and adhere.
1. Use the red lines as guides to score all the indicated parts before you cut any out.
2. Cut out and edge “the core of your figure.”
3. Starting at the widest end (i.e. the neck,) roll the core lenthwise as tightly as
possible.
4. Open up the core, apply some glue and roll again as tightly as possible. Make sure to
glue down the ends of the head and the longest bit that gives Sherlock his chest.
5. Put the head seam against your work surface and press down on the chest to give the
figure an oval cross section.
6. Cut out and edge one of the legs. (They are the plaid pieces with brown “boots” on
the end.)
7. Fold the scored tabs back and curl the leg so that the tabs meet each other and are
hidden inside. There will be an uncurled flap at the top.
8. Open up the leg again, apply glue and glue the tabs inside the leg.
9. Bend the bottom part of the leg that has no tab away from the seam to form the
foot.
10.Put glue on the flap and attach the leg to the core by wrapping the flap around the
bottom (where the plaid is.) Make sure the foot is pointing forward (away from the
seam on the back of the head.
11.Repeat steps 6 to 10 with the other leg
12.Cut out the vest and glue it over the chest, facing front.
13.Cut out one of the jacket halves. Fold it along the score line so that the jacket has a
lining edge and glue.
14.Curl the bottom of the jacket half and glue it to one side of the core.
15.Repeat steps 13 and 14 with the other jacket half.
16.Cut out and edge one of the arms. Fold the scored tabs back and curl the arm so
that the tabs meet each other and are hidden. DO NOT GLUE YET!
17.Cut out and edge one of the hands. Fold it in half and glue the halves together.
18.Glue the hand tab underneath the forearm tab of the arm. The three plaid tabs are
at the shoulder end of the arm.
19.Curl the arm again as in step 16 but this time glue the tabs together inside the arm.
20.Curl the hand into a fist and bend the arm at the elbow. When deciding how to bend
the elbow, remember you want to hid the seam by having it face backwards.
21.Fold the plaid tabs inside the shoulder, apply glue to the tabs and attach the arm to
the figure.
22.Repeat steps 16 to 21 with the other arm.
23. Cut out and edge the rectangle with the face and hair, curl slightly and glue it in
place.
24.Cut out and edge one of the hat brims, curl it slightly and glue it to the front of the
figure above the eyebrows.
25.Repeat step 24 placing the second brim on the back of the figure's head.
26.Cut out and edge the top of the hat. Glue the front and back onto the figure and
then glue down the sides. The front and back have curved ends, the sides are
straight on the bottom.
27.Cut out the cloak. You can leave the whole in the middle until after it is folded.
Edge.
28.Fold along the score line, glue and cut out the notch for the neck.
29.The fin is optional. (I left it off of my final entry to Papercuts because it ripped while
I was burnishing it. If using the fin (it makes aerodynamic sense and really, Sherlock
would have one) cut out and edge the fin. Fold the tabs up, then fold the fin in half
and glue it together without gluing the tabs together.
30.Put glue on the tabs and attach the fin to the bottom of the cloak. The bottom of
the cloak is the side where you can see the struts clearly. The folded edge of the fin
should face away from the neck hole.
31.Curl the cloak between the struts slightly so it looks like the struts are holding the
cloak down against the wind.
32.Glue cloak to the back of the figure and glue the hands to underside of the cloak.
33.Place figure on a flying base of your choice. I made mine out of clear plastic
packaging and used a needle to make a hole in the bottom of the torso to accept the
stand.
Just enough room left for me to say: “I hope you enjoy your model.”


