|
|
Post by Vermin King on Dec 1, 2019 9:35:43 GMT -9
Well, I take it back. At oscarandhamish.com/products/cyber-truck-download-pdf-build-your-own , there is a drop-down list which gets you a 'colour render'. 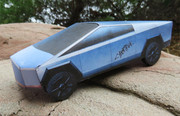 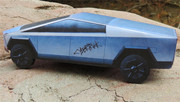 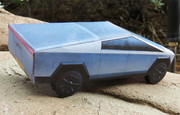 Model build and photos by Bob Penikas. I still see some things I would want to change, but that's not a bad model of that odd vehicle. I suppose I could do one without the tonneau cover... 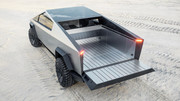 Well, this one is just to build as a novelty, but the render had some things that needed changing, and I reduced it to where it is a hair longer than the Ford F-150 Snake Truck, and if they have the middle section chassis, it might as well cover more of the bottom than this one does. I was hoping there would be room to lay images I collected onto a second model on the page, but it won't fit the way things are formatted, and I really want to throw this together today. Bob's photos look pretty good, but I enhanced the lights and adjusted the treads to be closer to the sidewalls. The bumpers are a closer match to the side molding now, but could be better. |
|
shep
Eternal Member
Red Alert! Shields up! LENS FLARE!!!
Posts: 1,260
|
Post by shep on Dec 1, 2019 13:46:39 GMT -9
Downloaded the model. Will be a nice add-on in a future Cyberpunk or Shadowrun game...  |
|
|
|
Post by Vermin King on Dec 1, 2019 13:58:52 GMT -9
To scale it right, I wish I'd made note of what percent you need it reduced to, but somewhere around 70%, I think. I don't know what happened on mine. Even though it still is bluish in the file, it isn't printing up blue at all. I went back and tried it with 'Vibrant Color' and came out the same. I hope you can keep the blue tint
|
|
shep
Eternal Member
Red Alert! Shields up! LENS FLARE!!!
Posts: 1,260
|
Post by shep on Dec 1, 2019 14:08:34 GMT -9
I'll have it printed in the copyshop around the corner. Usually, all of their prints come out somewhat darker than on my screen. So, I'll see what I will get.  I'll first build it in its original scale, take the measurements and calculat how much it needs to be scaled down. I'll drop the numbers here. |
|
|
|
Post by Vermin King on Dec 2, 2019 11:13:36 GMT -9
This blasted thing is so ugly, I don't know why I am obsessed with it. Of the six models of this thing that I know of, only two have the front end 'right'. The one I linked to isn't, but probably close enough. And only one model has the louvered tonneau cover right. It needs to be rectangular. insideevs.com/news/384248/tesla-cybertruck-tonneau-cover-video/Yes, I was hoping to do a bed-open version, but this stuff makes me want to do a more proper version of the closed bed, too. Aargh |
|
shep
Eternal Member
Red Alert! Shields up! LENS FLARE!!!
Posts: 1,260
|
Post by shep on Dec 2, 2019 12:23:47 GMT -9
How about doing a version where you can actually open and close the cover?
|
|
|
|
Post by Vermin King on Dec 2, 2019 12:38:27 GMT -9
If you watch the video, the whole thing rolls up into the lower back of the cab. Paper cannot do that at this scale, and if it did, it would develop a curve to keep it from laying right in the closed position. But I had given some thought to having a removable cover so that I would only have to do one version of the vehicle. That's as far as I would go. No working tailgate or doors. No interior to the cabin. No rolling wheels. No working lights or air shocks or windshield wipers. Probably not even the opening trunk in the floor of the bed.  Did he say this was a lifelong dream?  |
|
shep
Eternal Member
Red Alert! Shields up! LENS FLARE!!!
Posts: 1,260
|
Post by shep on Dec 2, 2019 13:35:15 GMT -9
Well, since we can assume that the bed starts as far back as the end ot the rear side windows, you could theoretically build the car with a lid that can be pushed into the passenger area, and be pulled back out, running in between an upper and lower rim on the sides of the bed. It's a little bit hard for me to put it in English...
The lid rests on a small rim on the side wall of the truck area. Another small rim on the same side wall encloses the lid from the top, so it can only move up and through a slit into the passenger area, and back down to close the truck bed. I think this would work, because the passenger part of the pick-up seems to be longer than the rear truck bed. So, the lid should move into the car easily. It would just need some kind of stopper, so it does not vanish into the car...
I would not build any other moving parts, too, nor any interior that would possibly interfere with the lid mechanism.
|
|
|
|
Post by Vermin King on Dec 2, 2019 14:31:23 GMT -9
Theoretically a slider would work, but it would actually extend down behind the windshield in the up position, but there is room side-to-side to do that. I had planned on having the bed glue onto the inside edge of the upper bed frame.  That would be a fairly easy build. But since the thing is slab-sided (pretty much vertical) below the side glass, the bed could glue to the sides, leaving a gap for the cover to sit on, below that upper plate. But how would one get hold of it to slide it up or down? To slide up, the obvious answer would be to have an opening tailgate, but that means finding a way to keep the tailgate up (tab and slot maybe?). Now, the back window glass is inset slightly. If there was a black laminated strip along the bottom edge of the cover, you would have your way of keeping it from going too far into the roof and give you something to grab to pull it back out, but it would take fairly precise building to get this to work. 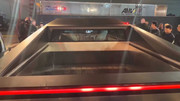 Wouldn't a drop in cover be a whole lot easier? BTW, I hope to build this tonight. I know there are things I don't like already (front corner plates are the wrong shape and don't have the correct shape for the headlights, as is the center, which shouldn't be rectangular). I will find out tonight if this is why Bob's build resulted in a slightly curved hood and front glass 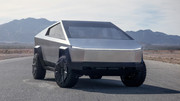 Also mechanicals should show below the top facet of the front bumper in the center section. Rear bumper wrap-around is the wrong shape 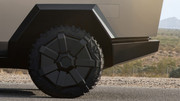 And the rear bumper is the wrong shape 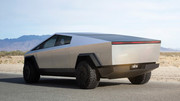 Fixing that wouldn't make the build that much more difficult. I'd also like to fix the tread pattern I think this photo emphasizes how much wider the upper bed frame is at the bottom than the top 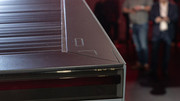 |
|
|
|
Post by Vermin King on Dec 4, 2019 6:25:27 GMT -9
I do have this mostly cut out and edged. Those little pointy areas are not the easiest to get a crisp fold. One-piece does not always mean easier. The tires get in the way trying to coax the body into shape. I will probably glue them together first to get them out of the way. I think the tabs on the bottom plate are meant to glue together like on some of the Zio models, but haven't gotten to building yet, so I haven't completely cut off the ends.  Need to find a soft lead pencil to edge the grey parts. I don't know what happened to the one I had with my edging pens... I'm not sure why I lost most of the blue tint of the model, but color-wise, I think it is closer to photos of the real thing. Gathering more ideas on how to make this a better model. shep, do you have yours printed yet? |
|
shep
Eternal Member
Red Alert! Shields up! LENS FLARE!!!
Posts: 1,260
|
Post by shep on Dec 4, 2019 6:55:06 GMT -9
shep, do you have yours printed yet? Had no time, so far. I've been decorating the appartment for the last 3 days, as my wife insists on season style. And now, there are LEDs and cables everywhere, a cretain bearded face is haunting you in every room, and everything is x-messy...  |
|
|
|
Post by cowboyleland on Dec 4, 2019 7:58:07 GMT -9
I will be tempted to try to make this out of an aluminum oven liner.
|
|
|
|
Post by Vermin King on Dec 4, 2019 8:43:37 GMT -9
The white version would probably work for that EDIT -- Walked past this this afternoon  If this thing didn't have the blunt front end, and had it looking more like the mid-eighty's Camaros, this could actually be a good-looking vehicle. I wonder how it would look with a slanted front end and a Z28 paint job? |
|
shep
Eternal Member
Red Alert! Shields up! LENS FLARE!!!
Posts: 1,260
|
Post by shep on Dec 4, 2019 20:58:35 GMT -9
How come you guys always end up with these super-pristine cuts, while mine are always wonky, no matter what I do...?  |
|
|
|
Post by Vermin King on Dec 5, 2019 5:00:06 GMT -9
Muscle memory. Not long after getting into card models, I read a post about someone cutting circles and his frustration.
The number one answer was to determine where you are most comfortable making a straight cut. The angle of your hand and arm, the angle of the line to be cut sitting on your cutting board, and the angle of the knife in your hand. To answer the circle question, you basically make a series of straight cuts, each starting beyond the circle and going past it, essentially shaving away the paper outside the circle.
I make my comfortable cut, then rotate the page so that my next cut is in the same position. It really helps.
Straight folds is another discussion, but that will have to wait until lunch. This thing was a bear trying to get the folds crisp at the pointy bits. Keep in mind, this is the one that is scaled to the Ford Snake Truck. But I knew it was going to be difficult, so I took my time.
BTW, at lunch I will glue the tires. These really need to be separate tires that glue to the back of the outer wheel face. Absolute pain in the neck. Another thing on my redesign, will be getting rid of the front piece folding over from the side. Very awkward. If it were attached to the front of the roof, this would be easier to build. Other than getting the tires glued, I am still trying to work out the best build order to get a decent build.
When I do one for the Hoard later, I plan on replacing the front end and tailgate with mods of either a Lamborghini or Ferrari. There are two cars that have the hood slope roughly the same angle to the bumper. One has a round front edge and the other one is segmented, similar to the Cybertruck, but both are more visually interesting. Or I could steal the Bumblebee front and back from Heather's model...
|
|
|
|
Post by Vermin King on Dec 5, 2019 8:35:52 GMT -9
Not the best photos, but I did the wheels and glued the front to the roof over lunch 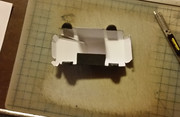 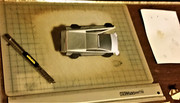 On the different sides I did the wheels differently. One side I glued the tread to the outer wheel first and then close up the inside. On the other, I glued the tread to the inner face then glued to the outer face. Inner first worked best for me EDIT-- While I was on hold, I had this fellow in my office and I think I have the build order correct. 1. wheels 2. roof 3. front end ( which scares me putting it as #3, but for this model, it almost has to be. I was hoping to close it up last so I could see what adjustments are necessary) 4. glue front end to side that has the upper front attached by design. 5. glue back end to that same side 6. glue the other side to the front. 7. glue the back 8. glue the cross-piece underneath |
|
|
|
Post by Vermin King on Dec 5, 2019 14:26:48 GMT -9
|
|
|
|
Post by mesper on Dec 5, 2019 15:12:41 GMT -9
Well, I don't have the blue tint, but I think it looks more like the real thing this way Looks great... CyberPunk2K77 FTW! //the crew;)) |
|
|
|
Post by Vermin King on Dec 5, 2019 15:25:34 GMT -9
|
|
|
|
Post by DarekPages on Dec 6, 2019 6:23:47 GMT -9
I think I do not understand :-) What's the problem? |
|
|
|
Post by DarekPages on Dec 6, 2019 6:30:52 GMT -9
Well, I don't have the blue tint, but I think it looks more like the real thing this way You're building a gang out of hell! I wonder how you printed the metallic on the car ... |
|
|
|
Post by Vermin King on Dec 6, 2019 6:41:26 GMT -9
DarekPages, no problem with figures, but with the model of the cybertruck. The overall design has errors in representation (the front isn't shaped correct, the tonneau cover is the wrong shape, lights are incorrect) and the whole thing is awkward to put together. Nothing that isn't fixable. This does seem to be the best model available (though I can't get to Wongday's model because he has a Trojan on his site, so with his normal attention to detail, I think it will be better). But this one is easily identifiable, and I really like his stainless steel texture. It really needs to be tweaked. One-piece does not necessarily mean easier EDIT-- I am planning on doing a better laid out model of this, fixing the nose and having a removable bed cover, and fixing a lot of little things that most people will not be aware are wrong. For the Hoard coming up, I plan on doing several variations on the new model. I want to try different noses and do things to make it more visually appealing. I also want to do a Halo Warthog version or Blade Runner version. We'll see
|
|
|
|
Post by Punkrabbitt on Dec 6, 2019 21:22:38 GMT -9
Might I suggest a blue police version?
|
|
|
|
Post by Vermin King on Dec 7, 2019 3:43:41 GMT -9
Do you have a particular livery that you would like to see?
I finally got to the Wongday model. Some right. Some wrong. And assorted things done to improve the appearance of the real truck.
I really think I need to do my model of this, rather than doing only variations. Somebody ought to do one that is close to the real thing. The OH textures might be used because they did an excellent job of getting it to look like real stainless steel
|
|
|
|
Post by Punkrabbitt on Dec 7, 2019 8:28:00 GMT -9
I'm not sure if you still have the Police VW Beetle, but that would be a perfect look. I like sci-fi police ground vehicles.
|
|
|
|
Post by Vermin King on Dec 7, 2019 12:46:20 GMT -9
Are you referring to the incomplete Spinner? That's what I had planned for this when I said Blade Runner
|
|
|
|
Post by Vermin King on Dec 8, 2019 9:57:22 GMT -9
As I am going to do my own model of this, I was looking for images to fill out panels that are hard to see. I did get my top-down view from the Tesla site, and specs. At wikipedia, I found the dimensions. The graffiti trademark on the OH model and used at the unveiling, is not the only one they filed a trademark on.  Looks more like a logo you would see on the actual vehicle, of course it would only be conjecture where they will place these on the actual vehicle   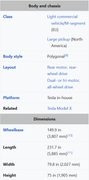 Not that I think we can trust the top-down render either. On every view I have seen of the truck, the bottom edge of the windshield looks square, and the windshield looks flat, which would be typical of bullet-proof glass. I'm going to trust my eyes on this part. But it does answer a question. If the Frunk is actually rectangular, does that carry over to the roof glass? Apparently not. EDIT-- After reading articles at the various car magazines (and CNET, CBS and CNBC), I found this article, which I find enlightening, www.resilience.org/stories/2019-11-27/why-elon-musks-cyber-truck-could-be-ruinous-to-a-future-worth-longing-for/EDIT #2-- electrek.co/2019/11/23/tesla-cybertruck-different-colors-musk-confirms-matte-black/  |
|
|
|
Post by Vermin King on Dec 8, 2019 17:42:51 GMT -9
I was curious what scale this model was.
By overall length 1/52.65
by height 1/52.44
by wheelbase 1/52.54
by clearance 1/48.51
by width 1/54.43
So I think I will design mine as 1/52.5
overall length 4.41 in/ 1324 px
height 1.43 in/ 429 px
wheelbase 2.86 in/ 857 px
clearance 0.30 in/ 91 px
width 1.52 in/ 456 px
As I was building it, I kept thinking 'I know it should look narrow, but I didn't think it should be that narrow'
|
|
shep
Eternal Member
Red Alert! Shields up! LENS FLARE!!!
Posts: 1,260
|
Post by shep on Dec 9, 2019 7:47:00 GMT -9
As I was building it, I kept thinking 'I know it should look narrow, but I didn't think it should be that narrow' Well, lesse silhouette equals less possibility to get hit. So, better combat vehicle... I'm pretty sure, the cybertruck was originally designed for military use. |
|
|
|
Post by Vermin King on Dec 9, 2019 9:06:46 GMT -9
Musk didn't really say that, but there is conjecture that it is designed for ruggedness where there are no mechanics ... Mars.
At separate times, he has made statements about it being inspired by Blade Runner, the Halo Warthog and Wet Nelly from James Bond. With his knack for misleading folks, he could have said those things because others said the design reminded them of these vehicles
|
|