|
|
Post by sonofspock on Jul 31, 2010 4:52:38 GMT -9
Hey guys, so I've read a few of the threads about people making paper minis out of pictures of real painted minis and I thought it was a cool idea since I have no artistic ability and I need to make some quick minis for Flying Lead. Anyway I was wondering, when making the outline of the figure do you actually draw it in Inkscape or is there a tool somewhere that I am missing. I was also wondering if there was a tutorial for this sort of thing floating around. If so a link would be great. Any help would be much appreciated. Thanks.
SonofSpock
|
|
|
|
Post by Reivaj on Jul 31, 2010 9:37:32 GMT -9
I don`t know inkscape but i had the same problems in photoshop until i found a layer efect called outline. You can choose the wide and the color of the border. May be when you finish your work in inkscape you can import it in photoshop and use it. I hope this help.
|
|
|
|
Post by Sirrob01 on Jul 31, 2010 21:00:35 GMT -9
|
|
|
|
Post by mruseless on Sept 29, 2010 16:53:14 GMT -9
It seems with the name change, all the links in posts are dead.  Can someone tell me where to find these posts now? I'm learning inkscape, but I can't seem to figure out how to outline something. Thanks! |
|
|
|
Post by Dominic on Sept 29, 2010 20:07:40 GMT -9
|
|
|
|
Post by josedominguez on Sept 29, 2010 23:25:44 GMT -9
One quick way in inkscape is to select the entire drawing, duplicate and send that duplicate to the back (or another lower layer) then go to 'line style' and make it thicker.
It's a while since I used inkscape, there will be better ways to do it!
|
|
|
|
Post by Sirrob01 on Sept 30, 2010 1:30:58 GMT -9
Path>>Trace Bitmap I think is what your after. But you'll probably find it will produce a not very good result  Best to trace over the picy of the mini using the pen tool and trace all the detail bits out you want then colour them and duplicate it and create a rear view. Goodluck  |
|
|
|
Post by mruseless on Sept 30, 2010 4:53:02 GMT -9
Yeah, doing a pen trace and re-scan would be best. However, this is what I'm trying to do, quick and dirty: I purchased a PDF of Savage Worlds figure flats (the kind that stand up as little triangles). When I open them with Inkscape, the figure has a white background and the selection is a white rectangle rather than the figure itself. Here is a screenshot:  How do I get rid of the white background? All I really want to do for now is to outline the figure with a thick black outline so I can cut it out and base it. Thanks for the replies, and thanks in advance for any more help! |
|
|
|
Post by josedominguez on Sept 30, 2010 9:13:43 GMT -9
I'm not sure inkscape can do that. I may be wrong though, but I don't think it's got any magic wand, outline etc... tools as it's a vector package (at least, I never found any) You cold use 'path' and trace bitmap, that will give you a pretty good black and white image you could colour. Gimp would do it quickly (and it's free). That's better for altering photos and images... colour selection, edge finder, magicwand and a regular erase tool |
|
|
|
Post by mruseless on Sept 30, 2010 11:15:14 GMT -9
I'll give GIMP a try then.
Most people here use a combo of the two, so I guess I'd better learn!
|
|
|
|
Post by Sirrob01 on Sept 30, 2010 14:00:30 GMT -9
Yep Gimp is what your after, I wasn't going to do a full how to but I seem to have ended up with one : Open the file in GIMP, if its trapped in a pdf you can do right click open with and select GIMP, the import screen will open set the settings to 300 dpi and select the page you want Use the rectangular select tool to cut out the mini you want: 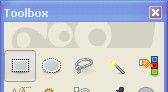 Use edit paste as new image On the new image use the Fuzzy select tool to select the back ground: 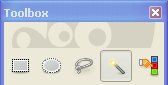 You should get something like this: 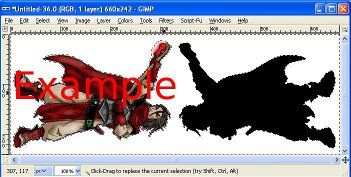 if you hold down shift you can select any area's of the background that might be isolated Next to get rid of the slight white haze around the edge go Select grow and input 1 pixels (to see what I mean skip this step and jump to applying the black border below) Hit delete key on keyboard and the backgrounds gone: 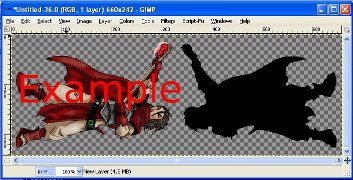 Your canvas maybe to small to support a border so go to Image>>canvas size and increase both dimensions by at least 20 pixels and hit center and then resize you'll see a yellow border around your mini thats the layer size to upsize that goto Layer>>Layer to Image Size If you have a cutter its best to put the outline on a new layer select the new layer button and pick transparent when it asks: 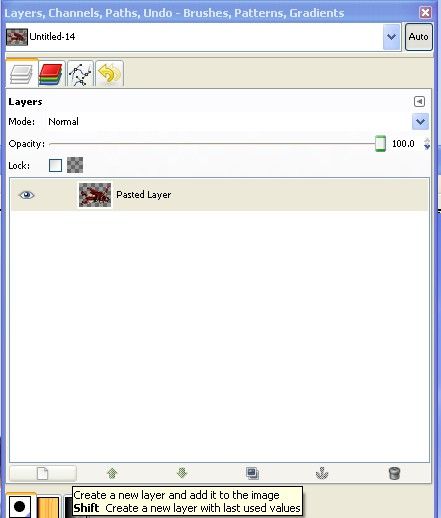 Move that layer below your mini layer, just click and drag it down: 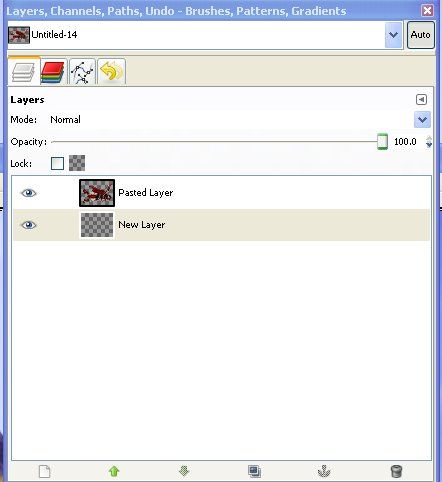 Select your mini layer and then use the wand tool to reselect the background then layer>>select inverse Use select>>grow and input between 8-10 pixels (this is the front black), select your new layer and use the bucket tool to fill the area with black: 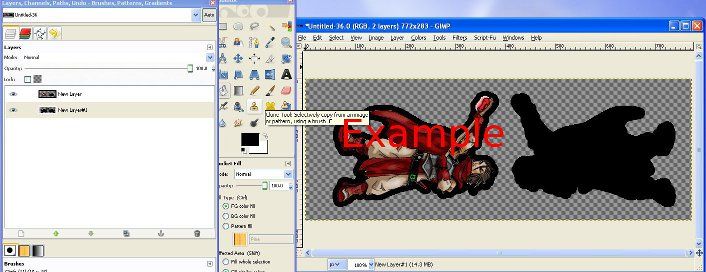 For the rear create another new layer and drag it below your other 2, grow the selection a further 4 pixels and fill this area with black. use the erase tool to remove the border from under the front side: 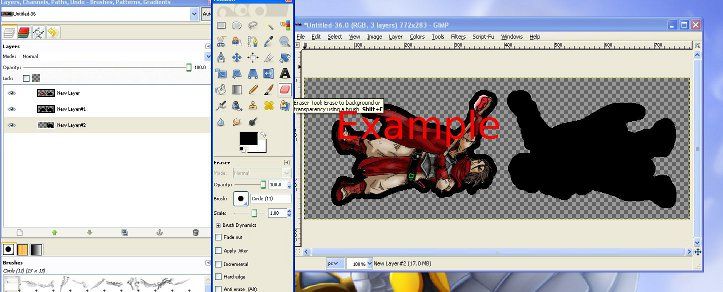 Right click on the layers, channel selection and select new from visible: 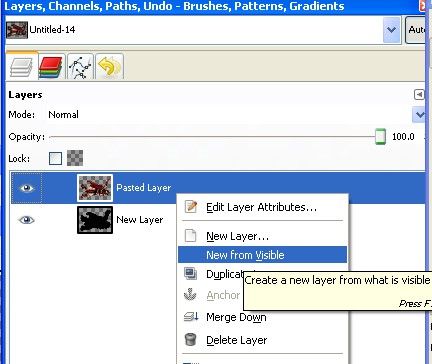 Dont forget to save your working file, cut the new from visible layer and paste it onto your robo template page and rotate and layout onto Onemonk tabs: 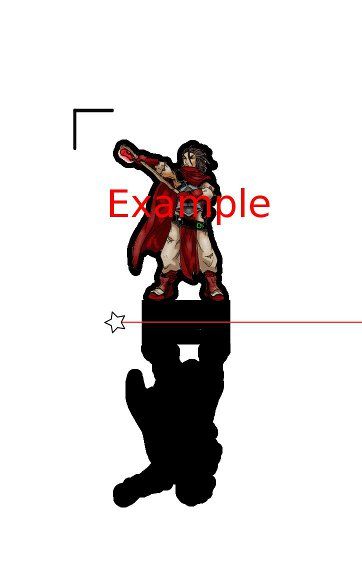 Victim mini from disposable hero's . If you get stuck I'm happy to clarify the steps, sorry if I've gone to detailed edit : this is a little out of order as if I was doing a full sheet I'd lay them out first on the gsd template then add the borders to them all as it's a lot easier to make the robo mask later on. |
|
|
|
Post by mruseless on Sept 30, 2010 15:13:20 GMT -9
Wow, thanks for the tutorial, Sirrob01!! ;D ;D ;D
I'll let you know how it goes.
|
|
|
|
Post by mruseless on Oct 3, 2010 10:56:16 GMT -9
Hi Sirrob01, thanks again for the tutorial. I got through it and the mini's look pretty good. Can you go into more detail about how you align and position them on the tabs? I'm having some trouble with that.
Thanks in advance!
|
|
|
|
Post by Sirrob01 on Oct 3, 2010 13:34:58 GMT -9
There are a few different ways to do it: lay them out before exporting them from your work file above. Don't outline them and layout them out on your layout page then outline the lot. I'll assume you've followed the above : ~ Using the wand tool select both the black tab bits: 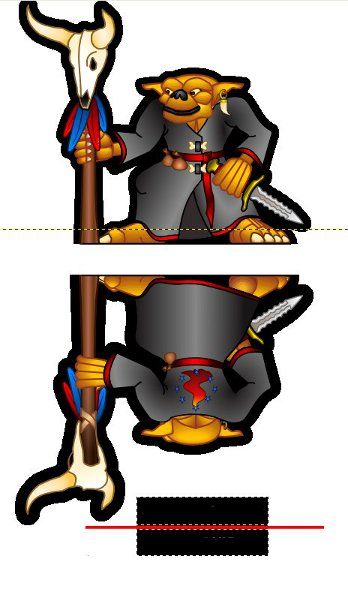 ~ Create a new layer (transparent) and flood file the selection with blue or purple or bright pink a nice contrast colour: 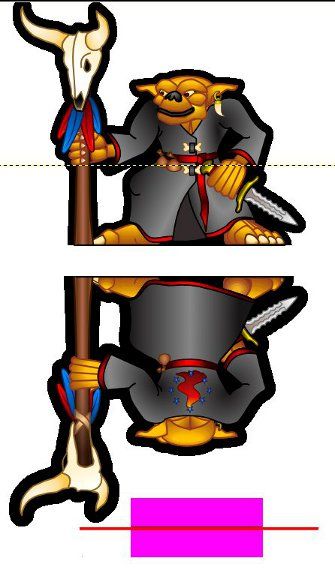 ~ Move your mini layer so the feet of the front just disappear under the pink:  ~ Cut and paste your rear veiew onto it's own layer, Do Cut and paste (do not use paste as new layer). Right click the floating selection on the layer panel to make it a new layer: 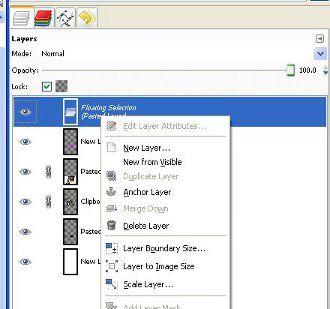 ~ Select the move tool: 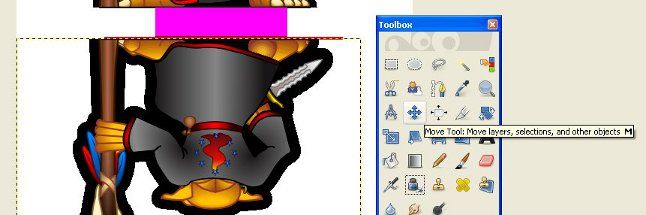 ~ click on your rear view on your canvas (make sure it's a single click don't move it). now use the down arrow key on your keyboard to move the layer down until it's in the correct location. This keeps the rear layer aligned with front <<>> correctly and erase any extra black outline from the overhang: 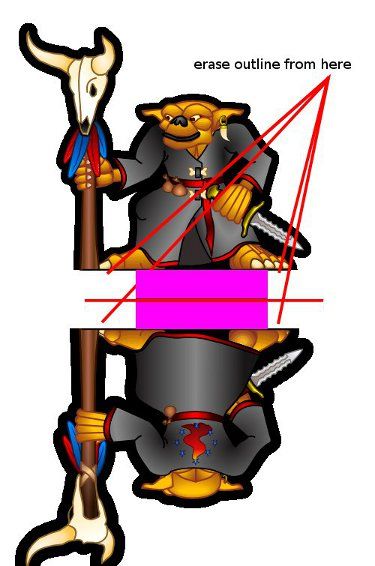 ~ Delete/Hide your pink mask. The above is really only a to get you going it's by no means the most effiecent order of doing things if your doign a full page...sorry about that I should have planned more carefully . it does however expose you to all the needed GIMP tools. Order for full page ~ open tab template sheet (or create one) ~ Open each mini as a new layer in GIMP (File>>Open as layer) ~ Align each mini front to the correct location on each tab ~ Split each rear view onto a new layer and align the rears ~ Merge all front views to one layer (right click layer panel merge down) ~ Merge all rear views onto one layer (different layer to the above ~ generate up your front outlines for the whole page 8-10 mask grow ~ generate up your rears for the whole page at 8-10 mask ~ generate up your rears for the whole page at 12-14 mask ~ delete any outline overhang from the above 3 layers (square mask tool is your friend  ~ add names to the tabs if you like (save the page and send to pdf printer, you have a fixed final then that wont change) ~ create a plain craft robo BMP/JPG by only having tabs seen and front outline and first rear outline(save as this page as robo outline.bmp/jpg ~ create your GSD cut page in Robo software. What I'll do once pirates/turtles/frogs are done is a new post with the above shown with pic's Goodluck |
|
|
|
Post by mruseless on Oct 8, 2010 7:47:50 GMT -9
Thanks again to sirrob for his help! Here's a pic of the finished mini's, I think they came out pretty well.  |
|