|
|
Post by aftershock567 on Aug 23, 2011 2:12:39 GMT -9
So I am running a Pathfinder adventure called Kingmaker and I like to have cool minis for all the big encounters. I didn't like Pathfinder's paper min for the Stag Lord, so I wanna make my own.
I took the pic of the Stag Lord from the cover of the book, removed the background garbage, and flipped the image.
I want to make a convincing back for the mini, which should be easier because he is wearing a cloak. I have never used Inkscape or GIMP. Does anyone have suggestions, tips, or walkthroughs?
|
|
|
|
Post by cowboyleland on Aug 23, 2011 5:23:14 GMT -9
Hey Aftershock
I did a bunch of backs all at once a while back and evolved a "method."
I use GIMP.
Open gimp go to file and open your base image
under "edit" select "copy"
open a new file sized 8.5 x 11
under "edit" hit "paste"
under "layer" choose "scale layer" and mess around with percentages until you get the foot to eye to 28mm or 30mm you can go to "view" and "show grid" and go to "image" and "configure grid" or you can just use the measuring tool (it looks like calipurs)
once you get it the right size anchor it (move your mouse off of the image so you see an anchor and click)
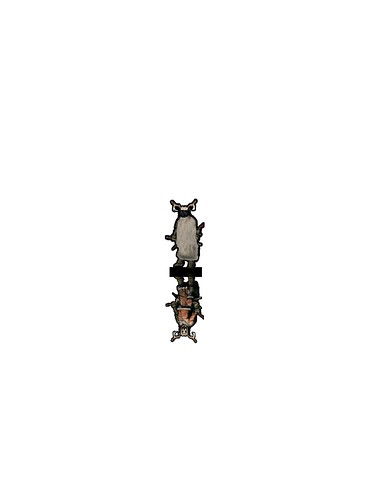
do a rectangle select as close to the edges of the image as possible with a little extra at the bottom for a tab. copy, paste, flip vertically and move so the inverted image is directly below the first.
I've got to go. More later
|
|
|
|
Post by cowboyleland on Aug 23, 2011 6:07:36 GMT -9
I would leave the bottom image as the front and work on the top (right side up) one as the back
take the pencil and set to 3 pixel size or so and then start conecting the edges of the cloak through the legs and other stuff to move it to the foreground. Select (eye dropper) a medium tone from the cloak and colour the cloak in with the airbrush.
Add some shadows and highlights and you should be close to done.
Same basic approach applies all over: select colour and airbrush stuff out. You might want to add detail back in with the pencil or paintbrush.
there is an "undo" button so mess around, try stuff and (as Stevelortz says) have fun!
C.
|
|
|
|
Post by cowboyleland on Aug 23, 2011 19:13:17 GMT -9
Oh yeah, when you import the basic image, go to 300dpi. I think is screws up the scaling, but you can fix that later.
I'm giving this a go, btw, so I may post a fig in a day or two.
C.
|
|
|
|
Post by cowboyleland on Aug 23, 2011 20:38:14 GMT -9
 staglord fig staglord fig by cowboyleland, on Flickr interweb acting funny, not sure if this posted the first time, so I'll try again while the link is still on my clipboard Edit: seems small, maybe I got the scale wrong. Tired now, I can look at it again tomorrow. |
|
|
|
Post by revgunn on Aug 23, 2011 20:56:51 GMT -9
Looks great but yeah, tiny. Awesome as usual though...
"Cowboy's got your back"
|
|
|
|
Post by aftershock567 on Aug 24, 2011 1:17:38 GMT -9
Awesome job on that! Can I buy that from you? Still working on mine but I lack a ton of artistic talent.
|
|
|
|
Post by cowboyleland on Aug 24, 2011 3:51:57 GMT -9
There is no way I could sell something so based on someone elses work. I should really find the original artists name and stick it on somehow. Anyway, I'm sure it is OK for you to use it in your game. I'll work on the scale some more. edit: here is the rescale. Wish I really understood how dpi interacts with size/scale. Anyway top of tab to eye line now measures 30mm when printed. Still looks a bit small to me, but you can mod to your own tastes. Also, I looked at a lot of related sites but I did not manage to find the name of the original artist.  30mm Staglord 30mm Staglord by cowboyleland, on Flickr |
|
|
|
Post by aftershock567 on Aug 24, 2011 5:47:32 GMT -9
Well I really appreciate your editing of the Stag Lord. Now when he rapid shot, multishot, sneak attacks someone for 9 dice of damage I can point to him on the map and grin!
|
|
|
|
Post by cowboyleland on Aug 24, 2011 12:09:47 GMT -9
My group actually kicked his butt a few weeks back. Good fun.
|
|
|
|
Post by thechristmasgolem on Feb 22, 2012 10:19:18 GMT -9
Hey Aftershock I did a bunch of backs all at once a while back and evolved a "method." I use GIMP. Open gimp go to file and open your base image under "edit" select "copy" open a new file sized 8.5 x 11 under "edit" hit "paste" under "layer" choose "scale layer" and mess around with percentages until you get the foot to eye to 28mm or 30mm you can go to "view" and "show grid" and go to "image" and "configure grid" or you can just use the measuring tool (it looks like calipurs) once you get it the right size anchor it (move your mouse off of the image so you see an anchor and click) do a rectangle select as close to the edges of the image as possible with a little extra at the bottom for a tab. copy, paste, flip vertically and move so the inverted image is directly below the first. I've got to go. More later what you do in your own time...  |
|


