Alchemist's Shop (Dave Graffam's Armorer's Workshop kitbash)
Aug 21, 2015 7:41:52 GMT -9
squirmydad, Vermin King, and 3 more like this
Post by soaringraven on Aug 21, 2015 7:41:52 GMT -9
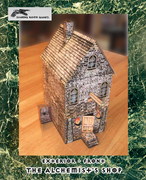
Our entry into the Kitbash category is an Alchemist's Shop built out of a modified Armorer's Workshop by Dave Graffam.


List of components:
Exterior:
Outhouse – kitbashed from Fat Dragon Games, FDG0148 Ravenfell Items
Runic ornaments – Eddnic's Heroquest furniture
Torch sconces – World Works Games, Chunky Dungeons
Cordwood stack – Dave Graffam Models, Armorer's Workshop
Shop sign – kitbashed from Dave Graffam Models, Armorer's Workshop, and Eddnic's Heroquest furniture (potions bottles)
Ground Floor:
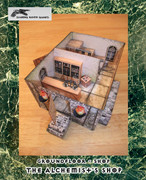
Counter – Fat Dragon Games, FDG0127 Expansion Set 10
Scales – Eddnic's Heroquest furniture
Large shelf – Kev's Lounge, Luxurious Lair Council Chamber Set
Crate with books – World Works Games, Thoumont's
Fireplace – Fat Dragon Games, FDG0128 Expansion Set 10
Small shelf – Kev's Lounge, Dungeon Furniture Pack
Painting's & map of Faerun – kitbashed from Forgotten Realms books
Stairs – original model, railings from Dave Graffam Models, Medieval Walls. You can download the stairs here: Stairs
Upper Floor:
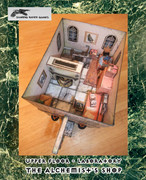
Desk, cupboard, alembic, lamps, crystal ball, scryer's table - Eddnic's Heroquest furniture
Crates with books – World Works Games, Thoumont's
Small table – World Works Games, Deadfall Building
Fireplace – World Works Games, Interior Works, Pubs and Inns
Cauldron – Kev's Lounge, Dungeon Furniture Pack
Chair with leather upholstery – World Works Games, Shellendrak Manor
High-backed chairs – Kev's Lounge, Luxurious Lair Council Chamber Set
Railings – Dave Graffam Models, Medieval Walls
Tutorial for building this kitbash yourself:
What I love about Dave Graffam's models is his use of layers that allow you to add or remove features of the model, such as windows or doors, and allow you to choose the textures of the walls and roofs. These layers make it easy to kitbash an interior into some of his models. What you need to look out for in whether a model can be easily kitbashed is the position of the features – the keyword here is symmetry. If the feature you'd like to use is either in the middle of a wall or has its exact opposite at the other end of a wall, meaning that it and its opposite are equidistant to the midpoint of the wall and/or the corners – then you can use the feature in your interior kitbash.
You have to mirror the feature on the interior wall, so if your window on the exterior wall is on the left side of the wall, then it has to be on the right side of the wall for the interior. The walls themselves should be done in different textures for the exterior and the interior. In our model build, for example, the exterior has the “[Walls] Gray Brick” layer active, while the interior is done with the “[Walls] Pale Stucco” layer. Dave has a Stucco layer in most of his models which serves well for interior walls, for a more rustic look you can often choose a Wood layer as well.
Let's take a more detailed look at page 1 of the Armorer's Workshop to test it for its suitability for an interior kitbash, shall we? The first thing we notice is that the door is fixed and can't be removed. Usually Dave allows this modification, but in this case it's necessary because the model has a raised interior floor and the door can only be reached via a low staircase. Thankfully the door is right in the middle of the wall – so no problem there. Now for the windows. We have 5 options for the windows: 4 & 5 are on the west wall ground floor, 2 & 3 are on the north wall ground floor on opposite sides of the front door and 1 is above the front door on the roof level. All windows are either symmetrically aligned to each other – (4 & 5) and (2 & 3) – or in the middle of the wall (1). Perfect for an interior kitbash. For the exterior wall we choose the “[Walls] Gray Brick” layer and activate the feature layers “Window 1” and “Window 4”; while for the interior wall we choose the “[Walls] Pale Stucco” layer and activate the feature layers “Window 1” and “Window 5”. We now have an interior wall that mirrors the exterior and can simply be glued to the exterior wall when we assemble the model. One minor thing that might bother you is the alignment of the door on the interior wall – since we're not truly mirroring the wall, the door itself is not mirrored, so that its hinges and handle will be reversed on the interior side. That problem could only be solved by mirroring the door in a graphics program such as Photoshop or GIMP – easy to do if you have the skills, but this kitbashing tutorial aims at showing you how to build the interior without computer edits. One other thing we have to do is trim off the triangular wall part above the door to form our roof level later on.
Once you have chosen the placement of all windows on your walls and printed them out, we can go about assembling the ground floor. The walls form a simple box with wall lengths of 4 in. across the front and 5 ½ in. along the sides. Now, we'll have to build a floor. As the door is ½ an inch off the floor we'll have to do a little construction work in the classical sense. By gluing together a few supports from left-over foamcore we can line our floor and raise it up – the supports can be easily built from two layers of 5mm foamcore glued under our floor piece. For interior floors I usually prefer 3mm foamcore, but you can just as easily use art board or thick pasteboard, whatever you like. Now we need a texture to glue onto the floor piece. In our model build we used another of Dave Graffam's files to keep the textures consistent – in this case the Stone Tile Kit 02 with the “Base 8” layer and the “Cracks 3” layers activated; add “Grime” and “Stains” to taste, print, cut to the floor's dimensions (4 in. x 5 ½ in.) and paste onto the floor piece. Add furniture as you like – the furniture we used can be found under “list of components” above. The interior footprint of the model is rather small, so you need to use short stairs to fit in – I've provided a download link to the stairs I custom created for our kitbash – feel free to use it.
The upper floor works just like the ground floor with two exceptions. Unless you want to create exterior stairs to reach a door on the upper floor, you do not want to have a door present on this floor at all. So, do not use page 01 of the Armorer's Workshop but instead print out page 02 twice for this level. Also, when you cut the foamcore for this level's floor, remember to trim off a 2 in. x 1 in. piece in the corner where your stairs come up to this floor.
The roof is a simple affair as well. Cut a piece of foamcore to size and attach the triangular wall pieces at the small ends, using a few tabs you have cut out of scrap cardstock. Then build the roof as usual for a Graffam model. You can simply stack the floors onto each other, but this will leave the whole structure rather wobbly and it can easily come apart when someone bumps the table. To avoid this effect, you can easily connect the floors with wall liners. Simply print out another wall with your chosen wall texture and no features activated. Cut the wall into long strips a little over ½ an inch wide. Edge the strips in an appropriate color than glue the strips around the bottom end of the upper level and the roof level, so that an over-hanging liner is created. Overlap the strips where the ends meet to create a sturdy liner. Test-fit the liners before the glue is completely dry by placing the floor on top of the floor below. The liner should fit tightly around the top of the walls of the floor below, but should easily slip off and be easy to place onto the floor below.
That's it – you're done.
If you're interested in the outhouse kitbash then you'll unfortunately have to devise it yourself. I'm afraid that I'd disregard Fat Dragon Games' copyright by providing the file here – it uses their textures. If you want to do it yourself, you'll have to rearrange the walls and door to create a mirrored interior and to place glue tabs at the necessary points. Alternatively you can nicely ask the good folks at FDG whether they'll allow me to post the kitbash here. ;-)
Enjoy!


