|
|
Post by Vermin King on Sept 17, 2016 9:05:05 GMT -9
My son's girlfriend's little girl is on a Disney kick right now, and really likes my paper models. When I saw her last, she and I did an internet search for Disney models, and she really wanted to see Uhu02's Tinkerbell, uhu02.way-nifty.com/die_eule_der_minerva/019.html. I'd downloaded it just after the Tsunami in Japan, but it is no longer available.  I printed it, and the darker greens came out all dark blue. Unlike most of his models, he doesn't really do a build thread on this one, so I shelved it. But my son said that she and he like playing Pokémon Go, so I did Paperized Pikachu, paperized.blogspot.com.br/2016/07/pokemon-pikachu-papercraft.html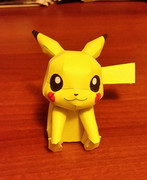 Did some more work on the Budweiser Christmas Semi, and then started checking some of my download files for something to do. Got looking at cars. I decided to clean up a vintage Jaguar and a Nissan GTR. 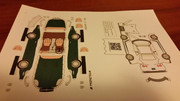 Which reminded me that there were a couple small SUV's that I'd wanted to turn into military vehicles a long time ago. Took me a while to remember that they were Daihatsu's, but it was fun playing around with them  Gonna knock the Coo and Bego out first, then the GTR and hopefully get to the Jag. Wish me luck |
|
|
|
Post by cowboyleland on Sept 17, 2016 15:58:23 GMT -9
Some day I would like to do something like that Tinkerbell but mod it to look like some characters from a play I directed a few years ago. I think the actors would get a real kick out of seeing "themselves" as "collectible figures" but other projects keep taking priority and I don't have a good model to start modding.
|
|
|
|
Post by Vermin King on Sept 17, 2016 17:29:59 GMT -9
I didn't get far today. On the one SUV, I used the color for the rear glass all around and it needs to be lighter or darker, but I'm not very pleased with the way it builds or looks when done. One of those vehicles that use bright colors to distract you from the rest of the vehicle. And for some reason, the GTR's colors don't show well in the photo. The windows need to be darker, too. But it's probably worth tweaking, unlike the SUV. 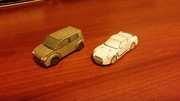 But now I need to get caught up on today's lesson on AirDave's Bluebird CN7. Big step with needing to let sit after gluing a section and going on to the next, but I don't want to get too far behind |
|
|
|
Post by Vermin King on Sept 18, 2016 17:52:15 GMT -9
|
|
|
|
Post by Vermin King on Sept 20, 2016 10:35:31 GMT -9
|
|
|
|
Post by Vermin King on Sept 20, 2016 17:28:50 GMT -9
There are times when you can see an almost great piece, especially on vintage models, and you clean it up digitally, and make a few changes, and then it comes out better than you'd hoped. The 1961 Jaguar E looked hand drawn, which usually means problems, especially when curved edges are involved, but the flip-down front and back ends looked like they would solve a bunch of fit issues. After cleaning up the surfaces, I grabbed colors off a different model Jag that seemed to fit, and were close to the original colors of the model, and then I printed the interior surround color on the back side of the door area, because I didn't think it deserved all that white. 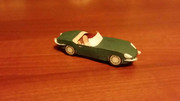   In checking through my files, I found a Bugatti Veyron that uses a similar technique on the front and back ends, but the tabs are totally wrong. I might have to give it a shot in the near future I really wish I could find a reasonably decent DB5... |
|
|
|
Post by Vermin King on Sept 29, 2016 20:06:44 GMT -9
Keeping up with the Decompressing theme, besides yard work this weekend, the Tumbler should be complete tomorrow night (only those two armor/wing thingies that protect the back tires to go), and I'm finally going to have a go at 2.5d Ancient Red Dragon from #PrintableHeroes  I know, I always do preliminary work on things that may or may not get finished, but Cole Camp, Missouri was one of the stops on the Butterfield Stage Line. I know that the stage station is still there, though in the 40's it was converted to a gas station. Two of the old hotels are still there, but the one had changes to it in the 20's, and then partially restored in the 70's (yeah, the ugly devoid-of-character part). The old stables had been a lumber yard for decades, but now it's one of those buildings that doesn't resemble either one a whole lot. That being said, I'm checking on the feasibility of the station, including the stationmaster's residence and the one hotel. And no, I am supposed to be getting some old photos soon, so they won't have political posters, etc.  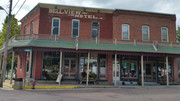 |
|
|
|
Post by Vermin King on Sept 30, 2016 19:21:37 GMT -9
Well, Tumbler v2 is done  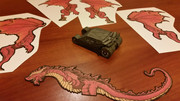 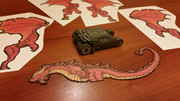 The dragon isn't the easiest edging task |
|
|
|
Post by chiefasaur on Sept 30, 2016 19:50:20 GMT -9
I learned pretty quick when working on my dragon pack, that big, spiky beasts can be a bit of a headache to edge.
|
|
|
|
Post by Punkrabbitt on Sept 30, 2016 20:06:03 GMT -9
I have actually used my Xacto to cut my Sharpie to a finer point to get into some edging....
|
|
|
|
Post by Vermin King on Oct 1, 2016 6:02:04 GMT -9
I generally cut out, edge, glue, then touch up.
Which is what I did on the body pieces, only touch up was a bear. All those little facets left all sorts of tiny white spots because you can't align everything. For the leg-wing parts, I just cut and glued and will do the edging after they are dry. Left them under piles of books overnight. I probably ought to go check on them
|
|
|
|
Post by Punkrabbitt on Oct 1, 2016 6:42:37 GMT -9
I also sometimes use a fine brush with black paint to edge, if even the modifed Sharpie can't get in there.
|
|
|
|
Post by jeffgeorge on Oct 1, 2016 7:00:39 GMT -9
I generally cut out, edge, glue, then touch up. Which is what I did on the body pieces, only touch up was a bear. All those little facets left all sorts of tiny white spots because you can't align everything. For the leg-wing parts, I just cut and glued and will do the edging after they are dry. Left them under piles of books overnight. I probably ought to go check on them I don't have a cutting machine, so that may affect my answer, but I always glue, cut, then edge. When I have white spots inside tight corners on the cut-out mini, I find that touching a fresh Sharpie to the mini right at the spot and holding it there for a few seconds allows the ink to flow into the right spots, without bleeding into the image area. Sometimes I have to do that on both sides. It doesn't work with an older Sharpie--it has to be new enough that it has lots of ink in it. The fact that I print on fairly porous (spelling?) 110 lb. cardstock may facilitate the flow of the ink into the paper--this method doesn't work with coated papers in my limited and disappointing experiments with them. |
|
|
|
Post by Vermin King on Oct 1, 2016 7:09:07 GMT -9
I'm using black acrylic on this one
|
|
|
|
Post by Vermin King on Oct 1, 2016 9:16:36 GMT -9
I kind of considered this first iteration of the dragon to be a test. In the hope of reducing errors, I created another one. Back to Gimp
|
|