|
|
Post by Aestelon on Mar 24, 2009 5:43:34 GMT -9
Yeah, it's really easy and quick to build with. Almost everything in it is simple box folds, so you can knock plenty of blocks out in no time.
And I agree, I think the simplicity of it's great. It looks solid, sturdy and utilitarian. And it looks like anyone could have built it, which means you can just whack it up and have some generic fortifications, or add some army-specific details to personalise it. Then you can dismantle it at the end of the game and make something new from the same pieces for the next one.
|
|
|
|
Post by Aestelon on Mar 23, 2009 18:02:48 GMT -9
I'm using 210 gsm white card from Staples, which is costing me £4.88 for 50 sheets. I looked at the matte photo paper in there today when I bought a new pack of card, but at over £16 for 20 sheets, I quickly dismissed that idea.
I'm using the traditional PVA glue method at the moment, but I'm definitely considering trying Hackbarth's trick of double-sided tape. Unfortunately, I think the only type I have around at the moment is the padded variety, so probably not much use.
|
|
|
|
Post by Aestelon on Mar 23, 2009 17:54:26 GMT -9
I'm finding the easiest way for me is to use a No.1 brush and black India ink. Does the job a treat.
|
|
|
|
Post by Aestelon on Mar 23, 2009 17:38:35 GMT -9
What about something like Scotch tape? I'm not sure I'm using the right name, but I'm referring to the 'invisible' tape used for book repairs and such. I don't know if it comes a wide enough roll to suit this purpose, but it may be worth considering.
I must admit, while I'd considered some form of varnish, I'd be less afraid of warping the card than I would be of making the ink run. I'm currently printing on 210gsm card from Staples.
However, I do have a bottle of the Duraclear varnish that Override's been using, so I may give that a go on piece of spare part-fig.
<EDIT> Just tried the DuraClear, and while it didn't make the ink run as much as I feared it would, it's still a bit too much to make it entirely practical for the job.
|
|
|
|
Post by Aestelon on Mar 23, 2009 14:19:17 GMT -9
Looking brilliant; can't wait to see your test build. So, what, the wings are forward swept, and the tail slots into the back edge, looping overhead?
|
|
|
|
Post by Aestelon on Mar 23, 2009 13:54:17 GMT -9
Can I ask what makes them better than the PCON range put out by WWG? I am not pimping here just wondering. They do look smart. Lord Abaddon of Wormwood From what I've seen, I don't know as I'd compare PCON with the Sci-Blocks, as much as I would with, say Slagtown: Eden. PCON has a ton of extra accessories, and is pretty much designed to be a full set of terrain in itself. Sci-Blocks I'd probably best describes as like textured LEGO. It doesn't have a ton of detail stuff (basically some barrels, pipes, barricades, a variable-function pylon and a control box thing), but what it does give you is the tools to build up a lot of mass quickly and effectively, which you can then combine with the flavour detail pieces from other sets. On the whole, I don't know if the F&T stuff is better than WWG's - I've never bought any WWG stuff to compare it. But I do really like what F&T sets I have so far, and it's a fair bit cheaper; their most expensive set so far is only ten dollars, and most are less than five. I do agree with Kane, though - I think the two would mesh together pretty well. |
|
|
|
Post by Aestelon on Mar 23, 2009 2:13:23 GMT -9
They really do, I thoroughly recommend them.
|
|
|
|
Post by Aestelon on Mar 22, 2009 18:23:17 GMT -9
Glad you like 'em. I haven't done a full build yet, but I've knocked out a paper test print, just to check scale, and looks like if you print out Slasher bodies and Stalker legs at about 150%, you can get a pretty decently scaled Tyrant Warrior equivalent compared to the Genethieves. I'm wondering if modded Stalkers would also work out printed at about 80% for a swarm of scuttlers. And here's some more Sci-Blocks teaser pics: A team of Terra Force marines hold off a clutch of Genethieves, protected in their armoured emplacement. The only parts not from the set are the hoarding round the sides, which is from the free Watchtower model.  Higher-angle view to get a better idea of the layout. 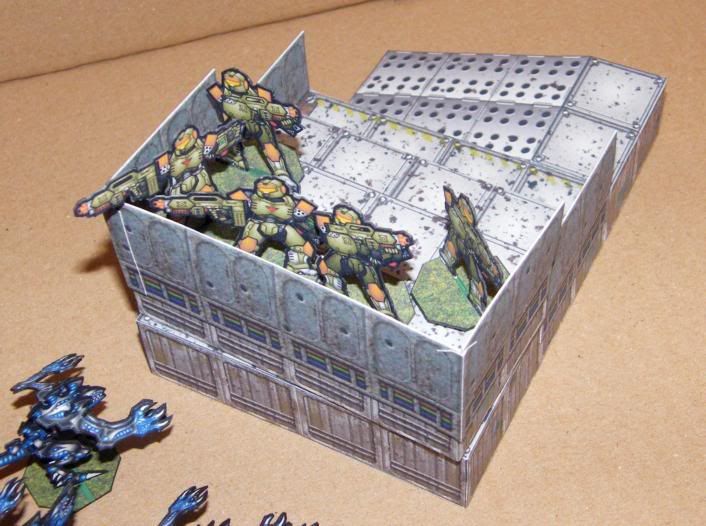 The emplacement broken up to show its component parts. Actually, the 4x1 strip doesn't come with the set; that's one I kitbashed myself, by reducing a 2x4 platform by half, cutting and pasting to double the length, and retexturing by sampling the original image. This was mostly because I wanted some shallower blocks so that models didn't have to jump a full inch to change levels. The ramp is handy, but not always practical, so I wanted to make some steps.  Another mini-building, probably some sort of power node thing. Again, the undetermined pylon thing does come with the set. I do like the bridge spans. The little vehicle is the Shiva hovertank, also from Glenn - it's one of the mini-vehicles designed to be carried in the Bumblebee. 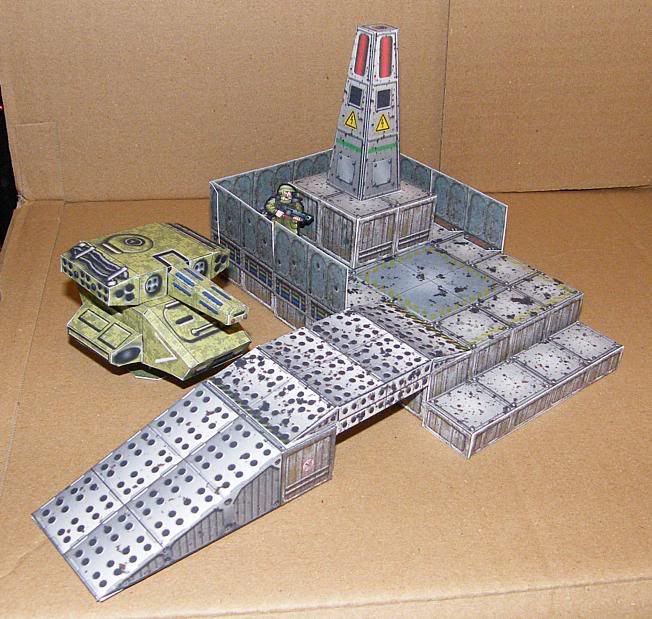 And here's a setup combining most of the Sci-Block bits I've made so far with the Watchtower model. The buggy at the back is a Coyote.  |
|
|
|
Post by Aestelon on Mar 21, 2009 18:25:59 GMT -9
No, I think mine was lazier, since it didn't involve having to colour anything. I just reassembled the bits I needed onto a single sheet and added a couple of extra slits.
I'm thinking of modding some more of the Hybrid guys into variations on the "Grandma Wendy" aliums. The Slitherer, for instance, is most of the way to one of their "devourer" species, and I should be able to create a "fighter" species by slightly upscaling the Slasher body and adding legs from a Stalker. Obviously the weapons can be varied using the same method as I did for the first genethief.
Oh, and I started putting together some of the Sci-Block bits, and they're a doddle, and very sturdy. I've just done a couple of the block platforms so far (a 4" square and a 2" square), but I'm thinking I might build up a bunker in the morning, using the ramp and some hoardings from the Watchtower set.
|
|
|
|
Post by Aestelon on Mar 21, 2009 17:04:30 GMT -9
This is with the modded Stalker arms, like I said. Needs a couple of tweaks to be spot on, I think, but they seem pretty serviceable. 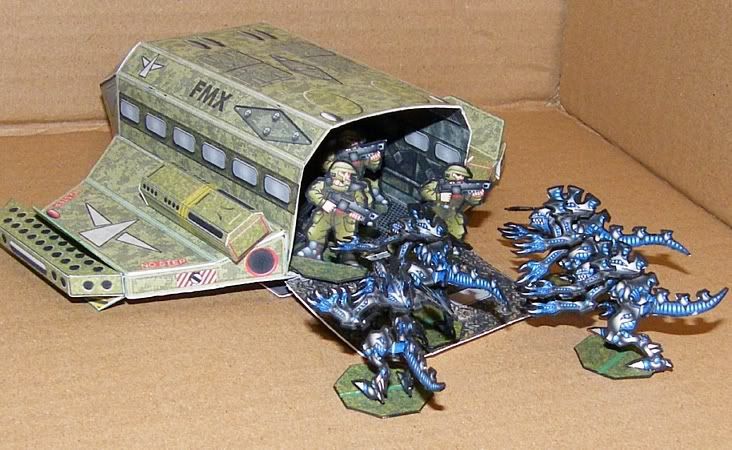 "Geez, the guide said to stay in the freakin' car! Do you guys never listen?" 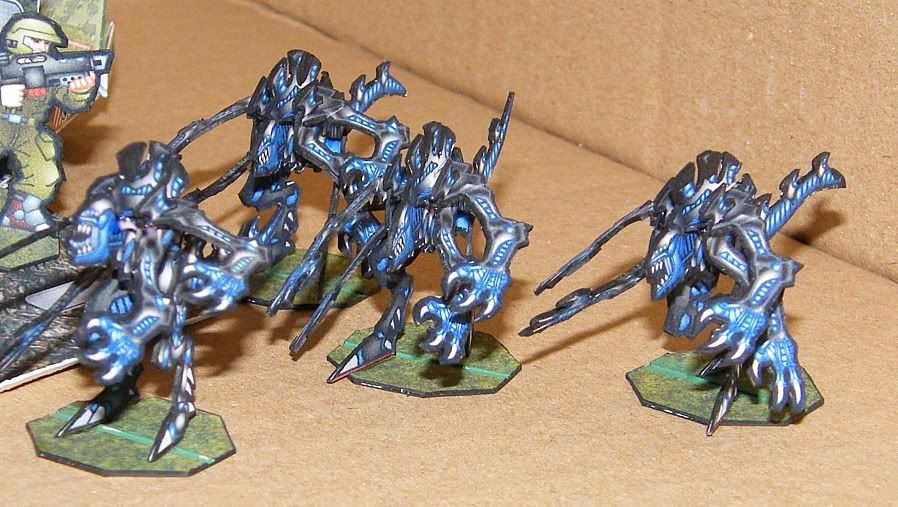 By the way, I also just downloaded Glenn's "Sci-Blocks" modular kit, and it looks like it's got a lot of potential. Simple block shapes, ramps, barricades and bridge pieces, as well as extra accessories and objective pieces. Lots of customisability for five bucks. www.fingerandtoe.com/sciblocks.html |
|
|
|
Post by Aestelon on Mar 21, 2009 15:11:50 GMT -9
Very nice. I'd love to see you how well that works. I considered trying that myself, but figured using the carapaces with existing arm slots would be less effort (read: I was too lazy  ). I've nearly finished building the Version 2.0 Genethieves, using the existing Stalker arms with slots cut in for the extras, and it seems to work reasonably well. I may have to lengthen the slots I added in the carapace just a little, to set the arms a little further back, but on the whole it's pretty cool. I just need to edge and glue in the inner left arms and I'll see about snapping some pics. |
|
|
|
Post by Aestelon on Mar 20, 2009 20:38:27 GMT -9
Thanks. I've actually just done a redo, as I suggested, using the original Stalker carapaces with the built-in arms, and just adding slits to them and putting the slits in the extra arms to the back instead of the front. I'll have a test-build of those tomorrow to see how much easier it is. My guess is "somewhat" . And as for the Finger and Toe models, love 'em. Building-wise, I only have the free Watchtower so far, but it's a brilliant little modular piece that even on its own can be turned into a pretty sprawling "Underhive" type set-up, or some sort of industrial setting. I daresay I'll be getting more in the future - the Junkyard looks like a particularly appealing buy. However, I do have a few of their vehicles. There's the military-version Bumblebee shuttle (I was actually working on designing a very similar vehicle myself until I found that for $4), and the three mini-vehicles, Shiva (hovertank with railgun), Hexentodt (fast one-man aerial scout craft) and Coyote (armoured buggy). They're all very simple builds, and very versatile. The shuttle can be built closed for simplicity, or you can model it open with a detailed interior, and fit stuff inside it. You can easily fit at least eight standard figures inside, or a cargo pod (which comes with the shuttle), or one of the previously-mentioned vehicles (which cost $2 each). Absolute bargain. ;D |
|
|
|
Post by Aestelon on Mar 20, 2009 19:23:36 GMT -9
That is very cool. I don't use Photoshop myself, so that particular route's probably not open to me. But it does occur to me that Artweaver has a set of Warping brushes, and the main one (appropriately called Warp) seems to do (I believe) roughly the same sort of thing as Photoshop's Liquify tool; you can literally 'push' the pattern around with the brush. That might be worth experimenting with for future attempts.
Beau - To be honest, I think even without changing the build of the figure, Conan's still too different from this to be a simple mod. I think it'd be easier to do a new one of him from scratch.
|
|
|
|
Post by Aestelon on Mar 20, 2009 16:57:23 GMT -9
I finally bought the Hybrid sets yesterday, and they're brilliant. But I got to wondering how easy it could be to convert the basic Stalker model into its obvious analogue, the ever-classic four-armed DNA-pilferering gribbly? Not actually that hard, as it turns out, if you combine some of the Stalker parts with bits from the free accessory set. I took the legs and body from the basic Stalkers, then swapped the normal carapace for the Slasher/Buzzer variant with the extra slits. Normally these would be used for overhead claws or wings, but in this case I used them to add extra arms. I copypasta'd double the normal number of arms onto the same page, and when I printed them out, I cut half of them as intended (with the notch at the front, so as to slide into the back slits of the carapace) but the other half with the notch at the back, so I could slide them in where the wings or slasher talons would normally go. 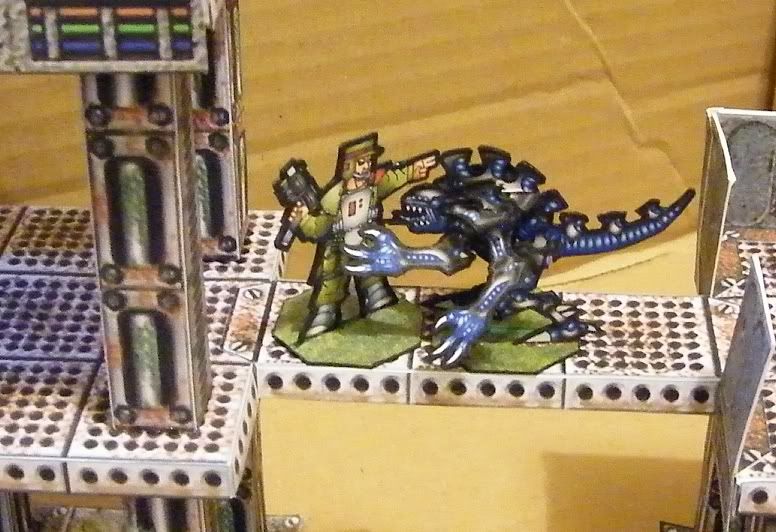 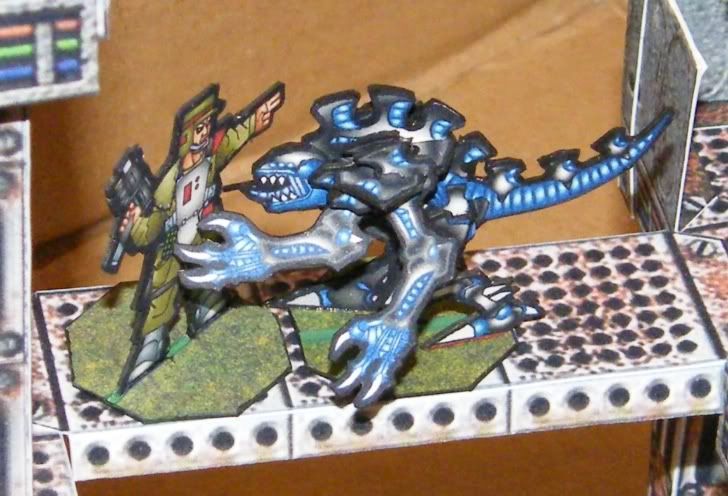 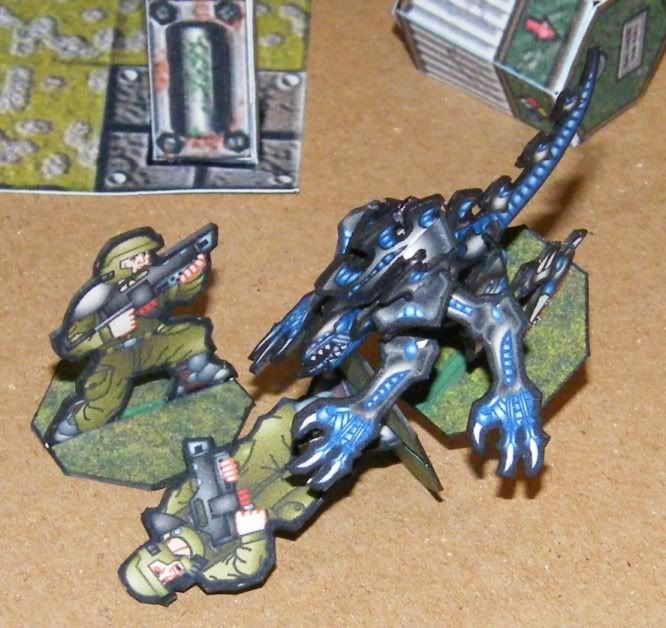 For the record, the building they're on is made from the free Watchtower model from Finger and Toe. It's actually occurred to me I might be able to make it easier by using the normal Stalker carapace as well, and just cutting the slits for one extra pair of arms, instead of having to assemble them all separately. I think I'll try remaking the sheet. |
|
|
|
Post by Aestelon on Mar 19, 2009 19:33:14 GMT -9
If the pattern had been especially complicated, then I might have been tempted to do something like that (although I probably would have hated myself for it afterwards! ). But this tartan was so simple to replicate by hand, there didn't seem to be any excuse to rely on stock patterns (in fact, it was probably easier to draw from scratch than it would have been to find a decent swatch of it online..!). |
|
|
|
Post by Aestelon on Mar 19, 2009 9:47:28 GMT -9
Niiiice. ;D
Actually, I think I'm gonna have to get myself the alium sets soon.
|
|
|
|
Post by Aestelon on Mar 18, 2009 18:54:46 GMT -9
And if you're still not quite sure what he means, just click the "Quote" button at the top of his post, and you can see exactly how the post is typed - including how the ![]() tags function. |
|
|
|
Post by Aestelon on Mar 16, 2009 4:31:29 GMT -9
Thanks! As I said, it was actually a lot easier than I was expecting; the tartan was done simply by starting with a flat mid-blue basecoat, laying down thick bands of a darker blue, then using a thin yellowish brush to run down the edges of the dark bands and a thinner orange one to run lines down the centre of the bands.
The actual shading and highlighting was just laid down with soft black and white brushes on a separate "overlay" layer.
|
|
|
|
Post by Aestelon on Mar 16, 2009 4:24:52 GMT -9
By the way, guys, thanks for reminding me to crack on with this! The previously-mentioned "get to colouring tonight" I mentioned never happened, so I've got to it now. It's flatted already, I just need to highlight and shade him and he'll be ready for posting! |
|
|
|
Post by Aestelon on Mar 16, 2009 3:52:24 GMT -9
A person doesn't need to be a Christian, or even hold the fundamentalist view of the Bible as inspired by God, to understand and marvel at the tale of David. Fair point. I guess that was kind of silly, linking two points that weren't really relevant to each other.  Oh well, individually they still stand. Thanks for the tipoff. I'll have to see if I can get hold of a copy. |
|
|
|
Post by Aestelon on Mar 15, 2009 20:18:03 GMT -9
OK, minis all cut out! It looks great, and the alignment looks fine. I've only got 2 comments: 1. The black outline around the ax blade is way too thin on both front and back. 2. There needs to be about a million more of these guys! Thanks a lot for the mod! Easiest way would probably be to open the image up in GIMP, or whatever graphics program you use, create a new blank file the size of your printable page (or a little smaller), and just copy/paste the figure onto the page as many times as you can fit it. |
|
|
|
Post by Aestelon on Mar 15, 2009 20:07:23 GMT -9
Of course, you don't have to measure the outline exactly, as long as it's thick enough. The main point of it is to give the modeller some leeway when cutting it out. And of course, when you've got thin areas of model (like the blade of a sword), that extra millimetre or two will help make it a little sturdier. But you can easily make the lines thicker than you need them, and let the modeller use their own judgement when the knife's out.
The new outline really does make a big difference, though! ;D
|
|
|
|
Post by Aestelon on Mar 15, 2009 20:02:03 GMT -9
Darn it - with the thread title cut off, I anticipated the last word to be "legs". I was half-expecting a model of Ernie Wise!  |
|
|
|
Post by Aestelon on Mar 15, 2009 19:57:27 GMT -9
I must admit, as I'm not a Christian, I don't really know my stuff in this regard; but the Internet is, as ever, a mine(field) of potential reference. I'm pretty much scanning for existing images for ideas of dress and such, and looking up articles (Wikipedia and the like) to get more textual info on the characters and stories. I'm making myself a nice little reference file for interesting Biblical characters and classic tales. Beau gave me a few good areas to start me off (in fact, as I said at the head of the thread, this whole thing was his idea in the first place...).
|
|
|
|
Post by Aestelon on Mar 11, 2009 9:50:22 GMT -9
Everything Floyd said; she's a beautiful piece of work. Have you tried doing a true-sized printout yet to see how she looks at that scale? Then it's just the back to go! |
|
|
|
Post by Aestelon on Mar 9, 2009 2:31:37 GMT -9
Right on. I do love painting miniatures, but I love painting individual miniatures. I get bored if I have to do too many figs almost the same, and for most armies, that's pretty much a necessity.
I think the only playable armies I could ever consider having completed are a Necromunda Orlock gang and a 28mm scale converted Inquisitor warband.
Card miniatures? The Terra Force sets mean I've got several squads knocked up in a matter of days (on and off), as well as several Finger and Toe vehicles and some terrain.
|
|
|
|
Post by Aestelon on Mar 9, 2009 2:26:00 GMT -9
Welcome aboard, Audrey! You're off to a great start. And getting the tablet was a good choice - I got mine a few months ago, and I love it to bits... you may be getting used to it now, but soon you'll probably be wondering how you got on without it! I think Jim's hints cover most of what I would have said (especially the bit about perspective - I wouldn't normally say it, but where these figures are concerned, you need to completely disregard perspective, otherwise you can't make the front and back match properly). Teeny tiny crit - I don't know if it's just me, but the line of the torso seems a little off, like one side of the waist is higher than the other. I think if the dip on the left (her left) was lowered a bit, that'd fix it easily; I'm not sure if that's quite what Jim was suggesting, but that's what I'm seeing. |
|
|
|
Post by Aestelon on Mar 8, 2009 15:16:34 GMT -9
On the other hand, you'll still be able to flip the whole image over and use it as a guideling for drawing the back.
Looks good so far. I take it she'll have heavier outlines later?
|
|
|
|
Post by Aestelon on Mar 5, 2009 6:15:23 GMT -9
But where did these Kobolds come from? I've got Keep on the Shadowfell (& the new book Dungeon Delve) waiting in the wings for some denizens with which to fill it out. What do you mean, Floyd? They're Jim's kobolds, and they're out next Friday. |
|
|
|
Post by Aestelon on Mar 3, 2009 13:04:06 GMT -9
Thanks! And tablet (Wacom Intuos 3 A4). I got it a few months back; it was the one big investment I felt I could actually justify - I won't spend money on expensive graphics programs or anything, but the tablet was well worth it. ;D
I can colour with a mouse, but till the tablet, I'd just draw on paper and scan.
|
|


 ).
).


