|
|
Post by Vermin King on Apr 21, 2020 9:46:20 GMT -9
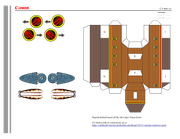
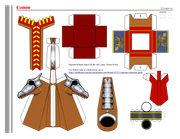
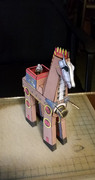
I had thought something like this would be a good project to go along with the Rialto Bridge for this month's Hoard, if I had time. Now that I see there isn't time to finish the Rialto Bridge, this seems like a good project that isn't too difficult. I have six Trojan Horse papercrafts on my computer ( and two Trojan Rabbits), but the one that seems best for redesigning for this is the old, old, old Canon Trojan Horse. Only I was trying to figure out how to turn the static legs into mechanical legs, when this appeared in another thread -- Perhaps save the bridge for a Papercuts 2020 entry? May the 4th is fine by me. May 4th then... I always wanted to finish a wooden titan mecha on Star Wars day...  I even remember saying somewhere, probably the 2020 Hoards thread, that I thought a horse mech with ATAT legs would seem appropriate. ATATs move like elephants, not horses, but I can still use the joints, and modify ATST feet into the hooves on this. I haven't started on that aspect yet, but have started on the repaint. As I picture this, there will be a cannon extending from the chest and a control booth/sniper nest on top. I was originally thinking of making the whole thing bronze, as a nod to the horses on the basilica, but I think I will keep it wood with classy trim. Trying to work out suitably Venetian trim. Probably should look for images of the Ducal Barge. Here's where I am at 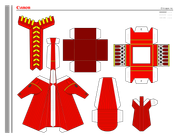 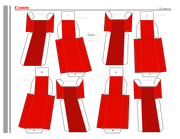  |
|
|
|
Post by Vermin King on Apr 22, 2020 4:51:51 GMT -9
After looking at the images above, I decided to not go with Ducal Barge Red, or at least I can lower the saturation a bit. Also found an excellent image of the winged lion from the basilica, and a different lion that shows more of the blue field with the 8-pointed star background, so I think I am going to work up a texture for the background and have the lion decorating the side of the control box. I was looking at bronze medieval warhorse statues, and got a good idea for the trim going from the shoulders down to the center of the chest and the embellishment out of which the canon extends. I also was looking at warhorse armor, some of which I plan on adding to this fellow. I was looking at the ZioPrudenzio cavalry horses and got a couple ideas. I wish he had done a mounted version of Jeanne d'Arc. Its armor would have been close to what I picture in my head. 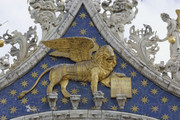 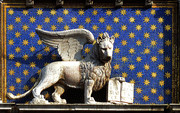 Took those two images and turned it into a new decoration on the box. 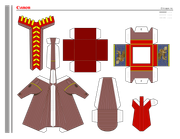 While I desaturated the horse, I tried to keep some of the Ducal Barge red and yellow on there. Next step is to add armor to the horse. Not the whole thing, but it needs a champron for the face, a crinière for the neck, and the peytral for the breast plate. I'm not going for full barding, but I think this will help mark it as a warhorse, as if a cannon sticking out of its chest wouldn't hint at that. In a way, I wish I had done another type of mech. I need a purpose for the head, other than looking good, and I'm not going to stick a laser on its head. It's a horse, not a shark |
|
|
|
Post by Vermin King on Apr 27, 2020 11:12:14 GMT -9
Should have gotten back to this over the weekend, but it didn't happen. Well, not as much as I would have liked. Got a bit of prep work done, but did some fitting out today. Tonight will be working on the legs. 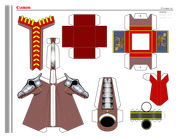 |
|
|
|
Post by Vermin King on Apr 27, 2020 14:57:55 GMT -9
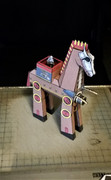
Not totally convinced on my latest coloration, but here's what I have 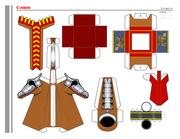 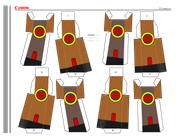 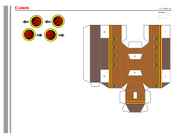 I had originally thought about having devices to throw Greek Fire on his shoulders, but the layout doesn't give much room for extras. After I build it, I will see what can be done |
|
|
|
Post by Vermin King on Apr 27, 2020 16:33:07 GMT -9
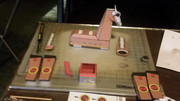
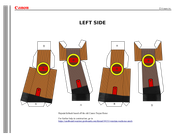
Printed and scored. And this has an odd resemblance to most of the old Canon models. Tabs placed in a way that there is no way to reach in and get them to be of any use. Instructions are odd, too.  1. Start by building the base we aren't using. 2. Legs. 3. Build all the little stick-on things 4. Build the body. 5. Stick on the stick-on things Since this is primarily a repaint of the Canon 'Troy' model, I decided to keep as much Canon on there as makes sense. EDIT -- While I am cutting out parts, I can see areas that can be more buildable, so I am moving tabs around. While at it, I am getting rid of the dashed lines and fixing some little artifacts that have crept in. |
|
|
|
Post by Vermin King on Apr 28, 2020 5:17:51 GMT -9
I guess I will need to lose most of the Canon graphics on the legs page. They really should have closed feet, right oldschooldm? 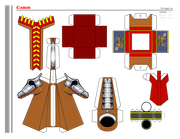 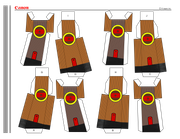 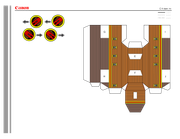 Keep in mind that these are not the final pages, but they do look better. Sitting down to lunch, I was planning on starting the build. Everything is cut out with the tab changes I saw were needed to start. And I see why they started with the legs. That's a lot of folded paper that takes up a lot of your work table. Getting them out of the way helps keep things organized. Once built, they will have the letters at the attach point so that they can be installed in the correct location. 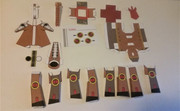 EDIT -- Built the legs over lunch and looked a bit at the leg page. None of the methods I tried to use on changing the Canon graphics gives me the room to re-orient the legs to fit on one page if I give these guys soles on their feet. I think I am going to make the legs fit two pages, left and right. Things won't be so squished that way. As far as build order, I am going to do the rest of the 'stick-on' parts next (tonight). I will then do the body and head, since I need to re-think tab placement on where they attach to each other. I considered doing it as shown, building the head and body separately and then attaching, but that will be a bear with the alternating tabs. At this point I am leaning towards having the neck/shoulder tabs all on the body, build the head onto those, then with the tabs for the throat/breast moved to the head side, gluing this piece on last. We'll see |
|
|
|
Post by Vermin King on Apr 29, 2020 4:36:33 GMT -9
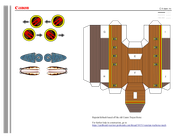
I got majorly side-tracked last night. Before I got knocked off course, I took a photo of the legs and next parts, the ones that glue on at the end 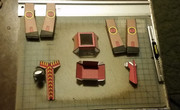 Started work on upgraded legs by splitting out to Left Legs and Right Legs. Haven't actually made the bottom plate yet, though Should get the parts built over lunch, and might have time to upgrade the legs during the day EDIT -- Having been on hold for 2 hours and 25 minutes, I decided to knock out the leg upgrade  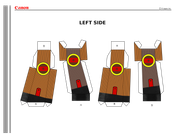 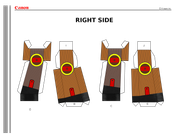  EDIT #2 -- Having been getting a lot of 'Call you back in five minutes' responses today, together with the 2 hour and 31 minute hold before being disconnected ( We are currently experiencing a system issue. Please try your call again tomorrow ), I spent time looking at the body and head. I think I will probably not print off a final version of this since most of the differences are tab placement. So I think I am going to do 'join strips' on my test build. Join strips are mirrored tabs that you glue inside one piece and form the tab to glue the adjacent piece. Not that much work, but will effectively test my idea of tab placement without having to build a second one |
|
|
|
Post by Vermin King on Apr 29, 2020 12:09:52 GMT -9
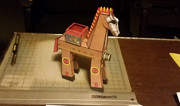
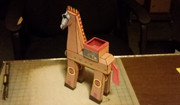
Well, first up is a photo of the head and body, with the strips not installed.  And then with them installed 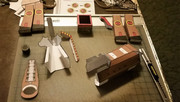 After gluing the head together and closing the tube of the body, I did a dry fit, and it all goes together well. By moving the tabs at the rear and front of the body, you actually have room to get your fingers in there and press things together. Time to change the tabs on the files. |
|
|
|
Post by Vermin King on Apr 29, 2020 16:36:16 GMT -9
|
|
shep
Eternal Member
Red Alert! Shields up! LENS FLARE!!!
Posts: 1,260
|
Post by shep on Apr 29, 2020 21:10:12 GMT -9
Description of a Renaissance flamethrower... ah, yes...
You would have some kind of long-ish pipe with kind of a snout, much like a trumpet ending in a dragon's head or something like that, attached to a hose that is attached to a barrel with some kind of flamable liquid (petroleum, oil, nafta). On top of the barrel would be a pump operated by at least two men, and in front of the snout would be a coal basin, most probably dangling from chains (so there's no stand that could catch fire).
I saw a contraption like this in a TV show about ancient, medieval, and Renaissance weaponry. I can't remember the title of the show, though. Perhaps something like "Ancient Armory"? I don't know...
|
|
|
|
Post by Vermin King on Apr 30, 2020 3:44:22 GMT -9
The Byzantines used this on siege towers and ships. Later used by the Ottomans and Crusaders. An illustration from a Byzantine military manual shows a rather plain tank and the 'siphon' (egress pipe) is surprisingly wider than I had expected. Venetians wouldn't do anything plain. I'm currently thinking of a filigreed tank and the siphon looking like a solomonic column. We'll see
I actually found a venetian window grill image and think I will darken the metalwork in the image and lay that over copper sheeting for the tank texture
|
|
|
|
Post by Vermin King on Apr 30, 2020 16:59:26 GMT -9
|
|
|
|
Post by Vermin King on May 1, 2020 11:08:54 GMT -9
|
|