|
|
Post by Vermin King on May 12, 2020 5:13:37 GMT -9
Well, I have hit a bit of a speed-bump on the Rialto Bridge, and even though I got rid of all those dashed lines on the Kuko industrial robot, I wanted to do something totally different.  I have been intrigued by the form of this since I first saw it. I don't think I was ever able to contort myself this way, but there are limited instructions, and the arms are really screwy. I first wanted to do it as a statue, playing around with a marble texture, then tried to figure out how to do it in bronze, but it is difficult to see on the parts how the alignment of highlights should go without having built it. I certainly did not want the purple or the ribbon stick. They also gave her too manly a face, so I took a face from one of the synchronized swimmers, and ended up with an off-white uniform. I worked according to parts order, which sometimes seems incorrect, but the webpage says it is a two-hour build, so I mistakenly trusted them. After four hours, I have the head, neck and body done, and am starting to work on the arms. I almost wish I'd attached the upper arms before closing the torso. An awful lot of wasted time trying to figure out the build order of just the left upper arm. But it is certainly different for me to do this. I'm hoping to clear my head a little before moving back over to the bridge EDIT --  Definitely shouldn't build in the order listed, but too late now |
|
|
|
Post by Vermin King on May 12, 2020 13:04:57 GMT -9
Scratching my head. Got the left upper arm installed, but trying to figure out how the right upper arm attaches. 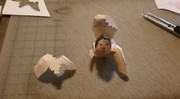 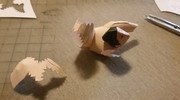 This isn't a whole lot of help 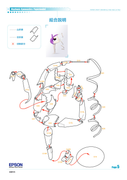 I think I missed an important step, pray for a miracle |
|
|
|
Post by creyates on May 12, 2020 15:40:42 GMT -9
talk about complicated... good luck!
|
|
|
|
Post by Vermin King on May 12, 2020 17:28:46 GMT -9
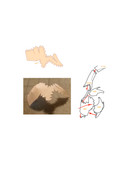
I'm going to start from the other end of that arm. If I attach the forearm to the hand, attaching the forearm to the upper arm may help to decipher things. This has given me a new appreciation of the Zio figures. Yes, there were some odd things in those, too, but they are straight-forward for the most part. But you have to admit, that is a very unique pose, which I was hoping to accomplish, sort of like the Nissan Pivo automobile I built, just because I wanted to see if I could build it. I have this feeling that Japanese paper modelers are probably used to building a little differently than I do. In general, most of the tabs connecting one part to the other are backwards in my head. For this upper arm piece, having tabs that go down into the shoulder hole that you can't glue to anything, makes no sense. If the tabs were valley folds around the shoulder hole, then the arm would wrap around those. I think I should have just built that robot arm Two hours?  |
|
|
|
Post by cowboyleland on May 12, 2020 19:00:50 GMT -9
It is clear to me that I have NO idea how that is supposed to go together.
|
|
shep
Eternal Member
Red Alert! Shields up! LENS FLARE!!!
Posts: 1,260
|
Post by shep on May 12, 2020 21:52:22 GMT -9
It is clear to me that I have NO idea how that is supposed to go together. My guess would be that the red arrows are the directions how you are supposed to wave your magic wand...  |
|
|
|
Post by Vermin King on May 13, 2020 5:22:28 GMT -9
 In the instruction diagram G10R looks like such an innocent-looking tube... |
|
|
|
Post by Vermin King on May 13, 2020 8:59:08 GMT -9
Got it figured out, but now I have to shape the part a bit better to obtain a better fit before gluing. 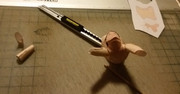 |
|
|
|
Post by Vermin King on May 13, 2020 15:34:08 GMT -9
Definitely won't be a front-of-the-shelf model 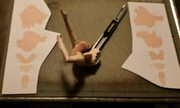 |
|
|
|
Post by Vermin King on May 14, 2020 7:19:32 GMT -9
My bad, my brain auto-corrected.  Maybe that's my problem |
|
|
|
Post by Vermin King on May 18, 2020 4:25:18 GMT -9
Was out of town over the weekend, but did start work on the legs last night. Having done the arms, I am a little more 'used to' the build method, so I worked on the curving of the parts before gluing the little notches this time. My problem on the arms was partially due to gluing the notches together before trying to shape the curved surface, hoping that gluing obvious things would make the rest more obvious. I don't know how many of you build from pdo files, but pdo's would have been very good on this. pdo's show which edges get glued to which tabs. Knowing that info would have made this much easier.
So much for having a simple build to clear my head
|
|
|
|
Post by Vermin King on May 18, 2020 9:13:43 GMT -9
Much more successful. One leg to go, then figure out a base to have her standing on. I think something in a wood texture to look like she is on top of a music box. 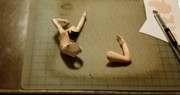 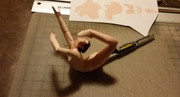 LOL, two hours ... EDIT -- Thought I should be able to finish her up tonight, only the guys working on the house next door are back. Scotty has a Honda Ridgeline and was wondering if there were any models of one out there, and I stuck my foot in my mouth. Three weeks later they are back to install windows, and I haven't even looked at making the model. I need to see about doing a rush job on it while they are around this week |
|
|
|
Post by Vermin King on May 18, 2020 13:12:36 GMT -9
|
|
|
|
Post by cowboyleland on May 18, 2020 13:25:17 GMT -9
The back of your shelf must look better than the front of mine and I'm sure you learned a thing or two.
|
|
|
|
Post by Vermin King on May 18, 2020 13:57:23 GMT -9
Learning experience.
At least I got that
But thanks
|
|
|
|
Post by Antohammer on Jun 6, 2020 12:09:27 GMT -9
Holy doody.... GREAT WORK MAN!!! how long did it take?
|
|
|
|
Post by Vermin King on Jun 7, 2020 14:31:44 GMT -9
Probably six hours of build time, but eight hours of having to figure things out
|
|


