|
|
Post by Vermin King on Jul 9, 2020 7:34:07 GMT -9
Rather than clutter the Hoard thread, I'm starting a new thread here. Dorado Motor Works is the file name I use for my ground vehicles. Been that way for years, but this is the first time (if I remember correctly) that I am posting a model as a DMW vehicle. During the Warmachines Hoard, I had a different concept that I was working on than the horse, but I could never come up with satisfactory legs for a mech. I just don't do those, so I don't 'see' how things should go together well. When I was researching what to do on the Scout, two vehicles stood out to me 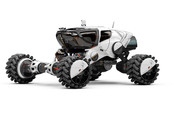  Both of which gave me better ideas on how to do the attenuated arms to which the wheels attach. And I really liked the pod aspect of the second one, only I really don't care for the one-man crew compartment. So, I wanted to do something fairly simple to build, so checked into the buggies to see if they could be modified, but that went nowhere, but it did give me an idea on how to handle the body of the vehicle. My first sketch in the Hoard thread has been tweaked a number of times, but I really like the direction this is going. This will end up with a body sandwiched between the fold-over legs. Optionally, 3d wheels can be added. My first sketch had lines that would be difficult to achieve geometrically without making it a very awkward build. My second version looked like a Pinto station wagon with the hood lopped off. So I went back to the drawing board. The current body will be slab-sided up to the shoulder crease and taper in to a fairly wide roof peak. I picture the batteries being under the floor and below the joints for the legs, but this profile allows for an access door at the back. So many Sci Fi recon scouts have no way to enter them when you look through images. I wanted a way to get in and some place for storing equipment and things picked up. So, I am fairly pleased with where this is going.  The pod at the top left was the version I did after I got rid of the Pinto wagon, so it is just clutter. The body profile to the left of the legs is where I am heading |
|
|
|
Post by Vermin King on Jul 9, 2020 11:25:36 GMT -9
My calls are done for the day, and I was working on my taxes. But this is more fun. Just to give more of an idea on my process, I am going to show how I develop the triangular top of the body side. I first work on the center. Having Show Grid turned on, I proceed around the body profile copying segments of the boundary and rotate them along a vertical grid line. Once lined up, I draw horizontal lines out from the furthest points of the segment. I clear everything out between these lines and draw a new vertical line along the grid line. In this case, I had to do that for the remaining five panels/segments. Once these are done, I decide how wide it should be. I went with 1 1/2 inches. For the greenhouse of the vehicle, I want it to be 1 inch across at the roof peak. I use 75 pixel grids at 300 dpi, so on the roof and windshield, I draw new lines to the next grid line in, along the roof peak line and erase the old lines. To make sure everything is symmetrical, I copy that half of the central body, flip it and paste to the other side. 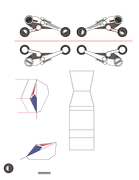 In the profile view we are looking at the greenhouse panel at an angle, so it needs to be taller than the distance from the shoulder to the peak. So, I rotated the side part so that the shoulder crease is vertical. On the triangle, this line remains the same length, so I build from there. I use different colors while I develop things so later I can delete colors. I drew horizontal lines in red showing the locations of both ends and the peak. From the central panels, the edge of the windshield is the same length as the windshield edge of the triangle, so I copy and paste it and rotate until one end is, well, at the end, and the other is on the peak line. Then I turned it blue. Repeat for the roof line. Hopefully, the ends will line up vertically, which they do. Then I say a little Thank You prayer. Now cut the triangle off the side and paste at the peak. Use the Scale Tool to expand the width of the triangle to fit those new lines and re-attach to the body side, after deleting the red lines. Voila. You have a panel that fits EDIT -- Important! Don't accidentally move on with the old one. Use the new one |
|
|
|
Post by Punkrabbitt on Jul 9, 2020 13:00:17 GMT -9
I am really really liking this one!
|
|
|
|
Post by Vermin King on Jul 9, 2020 16:20:09 GMT -9
Not 100% sure I like the access door, and I decided the tires needed to be more rugged, but unless someone sees something that requires changing, I think this is done. I will look over it with fresh eyes at lunch tomorrow. 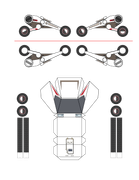 I guess I need to do Hoard formatting, too EDIT -- Cutter-friendly version 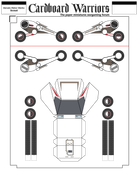 |
|
|
|
Post by Vermin King on Jul 10, 2020 5:09:19 GMT -9
So that I can glue things together over lunch, I glued the fold-over drive armatures so that they can dry under weight until lunchtime. And yes, I shouldn't have used a Sharpie to edge.  |
|
|
|
Post by Vermin King on Jul 10, 2020 7:45:21 GMT -9
Close, but no cigar. Started off gluing the roof tabs, back and sides. These need to be good joins because they are most visible. Then glued the tread rings. I much prefer round wheels rather than wheels with tabs.  Cut and edged the armatures, finished gluing the body and glued the wheel faces onto the tires 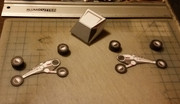 Glued the wheels onto the drive armatures and ran out of time  If I finish up work early enough, I might have time to finish before I go to the part-time job tonight |
|
|
|
Post by Vermin King on Jul 10, 2020 8:21:00 GMT -9
|
|
|
|
Post by vizenz on Jul 10, 2020 12:11:16 GMT -9
Looks great! ....buuuut, I think the axles are crying for getting strengthen. I'm sure I would destroy them very fast with my big fingers.
|
|
|
|
Post by Vermin King on Jul 10, 2020 13:08:30 GMT -9
There is a lot of room between the parts and the fold line. Stick another layer of card between the two sides
|
|
|
|
Post by Vermin King on Jul 10, 2020 17:02:58 GMT -9
Looks great! ....buuuut, I think the axles are crying for getting strengthen. I'm sure I would destroy them very fast with my big fingers. As I mentioned above, you can easily add a layer or two of card between for strength, but it is really pretty stout. That was one reason for wanting the lower body to be slab-sided (vertical ). Forces are pretty much up and down, without lateral stress. You can't expect it to survive if you stepped or sat on it, but I think it should hold up to normal game play well |
|
|
|
Post by Vermin King on Jul 10, 2020 18:07:00 GMT -9
And for Punkrabbitt, here's a quick and dirty blue version 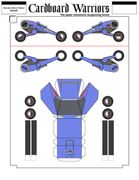 |
|
|
|
Post by Punkrabbitt on Jul 10, 2020 19:26:25 GMT -9
<3
|
|
|
|
Post by Punkrabbitt on Jul 12, 2020 15:04:11 GMT -9
Let me start by saying that I truly love this little vehicle. You even gave me a colored version so I could tweak the hue and texture as I pleased. And I did so! It's a beautiful little machine. However, it needed a few changes to really work out for me. First, I enlarged it by 15%. I started to build the original size and it seemed to small for any of my guys to fit into (unless it was going to be used by my Greys, but I'm not sure they're a hot-pink-scale-pattern kind of group.) This does mean that it is too big for the Forum Hoard frame, but I'm doing this just for me. And then there was this back half of the wheels that featured a blank white circle, which is great if we are going to do the full 3-D wheels, but not so much if I am going to do a simple foldover. Finally, I eliminated all of the black fold lines from everything that isn't an actual edge or flap hing and replaced them with red lines sticking out from the sides to indicate scoring. This is now my working template, I hope I don't run out of ink when I print it. 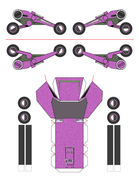 |
|
|
|
Post by Vermin King on Jul 12, 2020 15:30:29 GMT -9
I really didn't expect many people to build as-is. The original was designed to have about the same clearance inside as a small SUV, where you have to bend at the waist to get to the third row seats. It looks right with the guys from this photo from @glennwiliams' mule thread. I already gave it away or I would take a picture 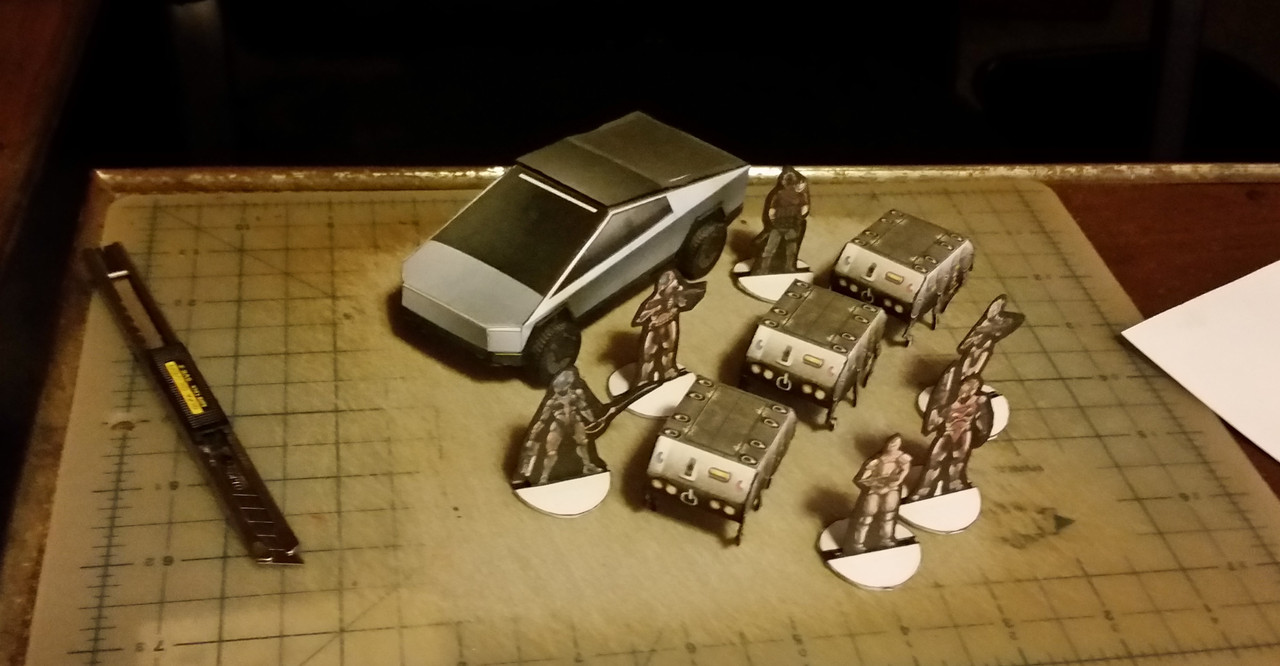 But I'm not as touchy as some folks about modifying my designs. I am actually happier to see a mod of one of my designs than to see it built straight. Modding it means they thought enough of it to invest their own time and effort to adjust it to their own needs |
|
|
|
Post by Punkrabbitt on Jul 12, 2020 20:51:51 GMT -9
But I'm not as touchy as some folks about modifying my designs. I am actually happier to see a mod of one of my designs than to see it built straight. Modding it means they thought enough of it to invest their own time and effort to adjust it to their own needs That's exactly how I feel lol! |
|
|
|
Post by Vermin King on Aug 13, 2020 4:57:26 GMT -9
As I am swamped with work, I know there is absolutely no chance of finishing the Rialto Bridge for Papercuts. I was trying to decide on whether the Dorado Scout or one of the Cybertruck models should be my model submission, and decided on this one. I did a lot more kitbashes over the last year than original models. In going through things, I have made a mistake, I've looked at several of the kitbashes and saw what should be done to make them MY models. Now, with no time, I have a lot more projects on my To-Do list...
I hope to build a very clean model of this on Sunday, with the extra layer in between the sides of the legs, and take my beauty shot
|
|
|
|
Post by Vermin King on Aug 14, 2020 6:36:30 GMT -9
Since I will only be able to do this in 'spits and spurts', I printed it last night, scored it while I was waiting on a call back from Tech Support, and broke it up at lunch. 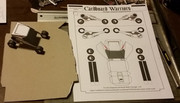  On this build, I will use the notepad backer board to reinforce the legs. On fold-overs, I always use a 5-pixel width line. On 110 lb cardstock, for a proper fold, there will be a solid red line on the crease when looking at the crease edge. It should yield a hint of a red line when looking at either side. I make a slit or notch in the paper to the end of the fold line, and since this was already scored, the line looks great. As a double check I always look for a place on the pieces where I can make a notch near the farthest point from the crease. Folding the pieces and holding up to the light, checking both sides of the page, everything lines up perfectly. So if something is messed up, it will be in my cutting. If things go well today, I should be able to glue my fold-over pieces before going to the part-time job tonight. Let them dry flattened under weights until morning and then proceed One of my goals with this is to have this second model so I can have a beauty shot with one model looking at the camera and the second looking away  |
|
|
|
Post by Vermin King on Aug 16, 2020 5:59:12 GMT -9
Material issues. Actual material. That backer board I used has not aged well since my last project. Fuzziness on cuts, delamination, and hunks falling out. And I honed the blade frequently and then changed it out. The material just won't cut well. If I still had my Fiskers cutter, I could cover the rough edges with strips of cardstock which could look really good, but I don't have it any more, so not a solution. I could fill the edges and sand, but that's an awful lot of work on a 'simple' build.
Best solution appears to be printing again and starting over. I think I will kitbash a bit on this. I don't need a new cabin or extra wheels, so I think I will just use an extra layer or two of scrap cardstock between the sides, and maybe try to create a figure to go with it.
|
|
|
|
Post by Vermin King on Aug 17, 2020 8:32:21 GMT -9
Well, I was on the phone with an agent that wanted to talk politics today, and while I was trying to figure out an acceptable way to get off the phone, I was looking at my ugly backer board version of this and used a Sharpie to edge the tires of the ugly pieces, and now I think I probably didn't have to go back and do my second print of some of the parts. 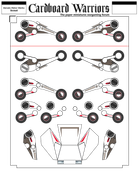 As should be evident from my kitbash page, I plan on lots of layer/lamination. I didn't take any photos yet, but the fold-overs are drying inside a heavy book. The fold-over sides each have a sheet of scrap card glued onto them, then things were folded and glued together, so four layers thick. Did some laminating on the cabin to give more perspective and the sides of the cabin have been laminated, as well, to give some space between the cabin and legs. If I don't go back and try my first thick legs, I have three detail layers to glue onto my fold-overs. I plan on cutting the legs out and gluing to the side laminations. Don't know when I will have my next opportunity to work on this, but between things today, I should at least be able to get a couple photos of where I am at EDIT -- 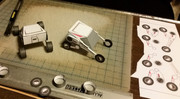 Yeah, I probably could have made this work, but I'm still going to go with the other parts |
|
|
|
Post by Vermin King on Aug 17, 2020 14:57:15 GMT -9
And I am back to trying to decide if I am going to use my original thick leg assembly or the new thick leg assembly. I assembled the wheels while I am trying to make up my mind 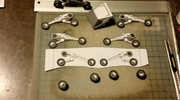 Once I cut out my detail lamination pieces in the middle there, I will have to decide if I attach them to the old legs (top) or new legs (bottom). Maybe I will go mow first |
|
|
|
Post by Vermin King on Aug 17, 2020 16:23:33 GMT -9
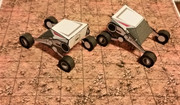 I think that qualifies as a beauty shot. I'll try to get to my Papercuts post later tonight |
|
|
|
Post by Vermin King on Aug 18, 2020 4:12:06 GMT -9
Sturdy enough? 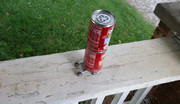 |
|
|
|
Post by Vermin King on Aug 24, 2020 5:20:15 GMT -9
Yesterday we had a little anniversary celebration for my folks. My son had to work, so it was just me, my daughter-in-law and Warren, but I thought I would see how this would hold up to a three year old, only he wasn't impressed with it at all. To the point where while I was asking him what he didn't like about this one, he threw it across the room. He didn't care for the Cybertruck Sport either, but he did like the Spinner Truck
|
|
|
|
Post by squirmydad on Aug 24, 2020 20:03:19 GMT -9
Wow, tough critic!  |
|


