


Giving 2-D Cavalry That Extra Half-Dimension
Oct 6, 2020 19:31:56 GMT -9
squirmydad, cowboyleland, and 5 more like this
Post by Patĉjo on Oct 6, 2020 19:31:56 GMT -9
Saluton interretaj amikoj!
Does your favorite artist make 2-D cavalry, but you're hoping for a little more oomph? Does your current hoard of mongols fall a little flat? Well look no further! I have an idea.
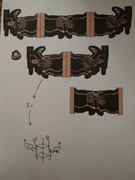
First I took my cavalry pieces (Mr. Antohammer's Desert Undead Cavalry F-0006) and I reorganized them a bit in GIMP. First I have to make the inners to the legs/ribcage. Largely this was just me copying then pasting some of the uncovered ribs over the ribs covered the rider's leg or weapons, remarkably easy really. Then I blacked out one pair of the horses legs on each side because that too is needed. (later I realized this step can be shortcut if you just slice off the extra leg later during cutting) I did leave a bit of junk way up at the horse's spine, but that is going to be glued together anyway.
Next comes manipulation of the model itself. In the first option, later to be dubbed the concertina method, I split the mini at its normal red fold line and re-attached it to the new red fold lines on the inner leg piece. In the second option, the insert method, I left the mini as is and just printed the inner legs on the side. See also my pen sketch for a second "normal" mini I later printed out on its own for comparison. Also there is a bonus head printed up to be explained later at the $.
ADDENDUM: After writing all this, I suspect the ease of it all rests primarily on the fact I'm doing it on a skeleton horse, which is practically just two, 2d horses put together. I'm not sure how well this would carry over to a living mount. I hope to revisit this topic with more info in the future.
Then I cut them out. Here too I was experimenting a bit. On the concertina method I cut super close to the black line from the get go, I didn't ultimately prefer this. On the insert method, I left plenty of white space open. Later when I was matching up the front and the back, I could hold the paper up to the light and make sure the black outlines matched up very well. I much prefer it. Also critical here in the insert method, is cutting the spare basing to exact size. This will allow the insert to match up more closely to the rest of the model.
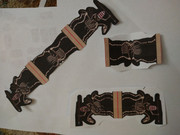
At this point I fold all the pieces. In the concertina method, simply fold along the red guide lines. For the insert method, fold the outer mini like you normally would, and I recommend you now glue the top portion of the mini together. Cut the outer mini along its red line. Then fold the insert along it's spine and line up the extra basing.
Finally line up the mini and glue down securely. The concertina method can be tricky, but I found doing each half first, then joining at the tops worked best; that is glue the left outer side to the left inner side, then the right outer side to the right inner side, then finally the tops together. I wasn't thrilled with the way this turned out but I couldn't be sure exactly where I went wrong; the too-tight cut out at the beginning, any mistakes in folds in the triple fold being amplified by the other two, or just the wiggly complexity of such an unwieldy model.
By contrast the insert was downright easy. Just put the insert in, spine first, blank side to blank side and line up your extra basing. Now you're done.
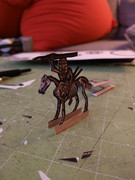
Cutting out the horses was done much the same way at this point. Bend a leg over the cutting surface and cut away. Put the top over the cutting surface and work. Then bend the other leg over the cutting surface and finish. Here are my results. Of note, I also tried to permanently bend the ribcage out then back in to give the model some volume. In my conclusion I find the Insert Method was easier and produced a cleaner mini. I highly recommend. [Normal mini offered for comparison]

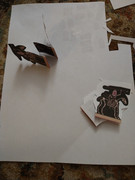
$ Hey, here's the extra bit. I was inspired by some paper zoo animals I saw in my digging and tried to make the head a bit more robust as well. I just mirrored the head onto itself and printed. Fold along the ridge and apply glue to the crease, then place the new head in position. Overall I'm happier with the outcome than just the flats, but there is still work afoot. It provides some nice volume at the oblique and looks fine from the side (one might consider removing the old, flat head in future trials) but straight on, my design looks simply wrong and does need some work there.

Does your favorite artist make 2-D cavalry, but you're hoping for a little more oomph? Does your current hoard of mongols fall a little flat? Well look no further! I have an idea.
First I took my cavalry pieces (Mr. Antohammer's Desert Undead Cavalry F-0006) and I reorganized them a bit in GIMP. First I have to make the inners to the legs/ribcage. Largely this was just me copying then pasting some of the uncovered ribs over the ribs covered the rider's leg or weapons, remarkably easy really. Then I blacked out one pair of the horses legs on each side because that too is needed. (later I realized this step can be shortcut if you just slice off the extra leg later during cutting) I did leave a bit of junk way up at the horse's spine, but that is going to be glued together anyway.
Next comes manipulation of the model itself. In the first option, later to be dubbed the concertina method, I split the mini at its normal red fold line and re-attached it to the new red fold lines on the inner leg piece. In the second option, the insert method, I left the mini as is and just printed the inner legs on the side. See also my pen sketch for a second "normal" mini I later printed out on its own for comparison. Also there is a bonus head printed up to be explained later at the $.
ADDENDUM: After writing all this, I suspect the ease of it all rests primarily on the fact I'm doing it on a skeleton horse, which is practically just two, 2d horses put together. I'm not sure how well this would carry over to a living mount. I hope to revisit this topic with more info in the future.
Then I cut them out. Here too I was experimenting a bit. On the concertina method I cut super close to the black line from the get go, I didn't ultimately prefer this. On the insert method, I left plenty of white space open. Later when I was matching up the front and the back, I could hold the paper up to the light and make sure the black outlines matched up very well. I much prefer it. Also critical here in the insert method, is cutting the spare basing to exact size. This will allow the insert to match up more closely to the rest of the model.
At this point I fold all the pieces. In the concertina method, simply fold along the red guide lines. For the insert method, fold the outer mini like you normally would, and I recommend you now glue the top portion of the mini together. Cut the outer mini along its red line. Then fold the insert along it's spine and line up the extra basing.
Finally line up the mini and glue down securely. The concertina method can be tricky, but I found doing each half first, then joining at the tops worked best; that is glue the left outer side to the left inner side, then the right outer side to the right inner side, then finally the tops together. I wasn't thrilled with the way this turned out but I couldn't be sure exactly where I went wrong; the too-tight cut out at the beginning, any mistakes in folds in the triple fold being amplified by the other two, or just the wiggly complexity of such an unwieldy model.
By contrast the insert was downright easy. Just put the insert in, spine first, blank side to blank side and line up your extra basing. Now you're done.
Cutting out the horses was done much the same way at this point. Bend a leg over the cutting surface and cut away. Put the top over the cutting surface and work. Then bend the other leg over the cutting surface and finish. Here are my results. Of note, I also tried to permanently bend the ribcage out then back in to give the model some volume. In my conclusion I find the Insert Method was easier and produced a cleaner mini. I highly recommend. [Normal mini offered for comparison]
$ Hey, here's the extra bit. I was inspired by some paper zoo animals I saw in my digging and tried to make the head a bit more robust as well. I just mirrored the head onto itself and printed. Fold along the ridge and apply glue to the crease, then place the new head in position. Overall I'm happier with the outcome than just the flats, but there is still work afoot. It provides some nice volume at the oblique and looks fine from the side (one might consider removing the old, flat head in future trials) but straight on, my design looks simply wrong and does need some work there.


 so much 2.5d. I must commit myself as a student! I dream of a whole "3d" paper army. I don't mind the effort, per se; but I don't think I have the artistic skill to make the textures from scratch.


 I dont have the patience to make such long trimming work


