|
|
Post by monstersbtm on Feb 7, 2021 22:43:32 GMT -9
If I recall correctly, ttcombat buildings have 17° slope, if it can help. Ca Dario is overly impressive, I can't wait to build mine!
|
|
|
|
Post by Vermin King on Feb 8, 2021 5:31:46 GMT -9
If I recall correctly, ttcombat buildings have 17° slope, if it can help. Ca Dario is overly impressive, I can't wait to build mine! The original Ca Dario roof is 20.34 degrees. The new one is 16.24. It's amazing to me that such a small change can make such a huge difference. I will print and build this at lunch today, unless something strange happens and then get onto the balcony. Although I am really wanting to get onto the rear wing. EDIT -- Got done with my east coast calls early, to did a bit of work on the balcony. Put my new texture on the middle sections and adjusted the supports. Added my new tile pattern to the floor. Should be able to finish up the sides and top piece over lunch. 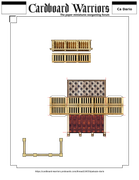 EDIT #2 -- Three chimney bases on page 7, so added three chimneys to the balcony page 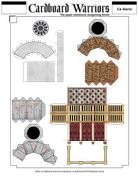 |
|
|
|
Post by monstersbtm on Feb 8, 2021 10:59:12 GMT -9
PDF! PDF! cannot wait! Question time: lurking on Google maps, the whole building is roughly rectangular with a logde protruding on the rear, where's a sort of garden. Have you got any advice on how to mod your creation to mimic the lodge? My bigger concern is actually the shape that the roof is going to take to fit on such a weird shape
|
|
|
|
Post by Vermin King on Feb 8, 2021 11:12:11 GMT -9
That wing sticking out the back is my next item after I build the latest version of the roof and the balcony and chimneys. The roof will have the same pitch as the main roof. I will probably need to take a photo of the new roof and do a line drawing over it to show my plan. In real life, it looks like this  I did populate my last build set up over lunch instead of building stuff  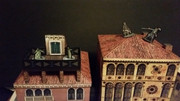 The ghosts of Ca Dario are visiting the altana next door. Shep's avatar mod is standing on the balcony EDIT -- Shep had modded one of okumarts's figures to Don Raffi di Miniaturico. I had flipped it and put Walter's face on it. I think I am going to use him as my 'scale figure' from now on for Venice designs. He'd probably be having a grin about that. |
|
|
|
Post by Vermin King on Feb 9, 2021 7:18:29 GMT -9
PDF! PDF! cannot wait! Question time: lurking on Google maps, the whole building is roughly rectangular with a logde protruding on the rear, where's a sort of garden. Have you got any advice on how to mod your creation to mimic the lodge? My bigger concern is actually the shape that the roof is going to take to fit on such a weird shape Threw this together while an agent on the phone was going on and on about politics 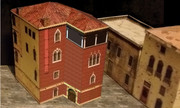 I still have to work out the inside of the terrace and the roof EDIT -- The actual building I plan to use paperclips top and bottom to attach to the main palazzo. Or I might glue it, but probably not. The roof will lift off to allow the terrace to be playable. If the roof design doesn't work well, I may just do a roof for the wing itself. But that would be a last resort situation. |
|
|
|
Post by monstersbtm on Feb 9, 2021 7:43:40 GMT -9
Ok, this last Version is exactly what I hoped for. Now I am sincerely curious about the lodge interior. Of course mine will use that feature.
Which one is the shep figure?
|
|
|
|
Post by Vermin King on Feb 9, 2021 7:46:18 GMT -9
He's standing on the Sotoportego building balcony Wow, when I scrolled up to the other pictures, I had a glimmer of an idea on making the roof more secure where it meets the main building. Hmmm I'm not saying that I will end up doing it, though I am tempted, but the door on the back is positioned because of the garden. Honored guests would either arrive by boat to the front door, or if they were very special, they would leave the boat at the garden entrance and then be taken inside through the garden door. The only entrance on the west side is that garden entrance. On the east side there is the narrow ramo between Ca Dario and Palazzo Barbaro. The small door I put on the east wall is a guess, but why would there be a gate between the garden wall and Palazzo Barbaro that is called Ramo de Ca' Dario, if there wasn't an entrance to Ca Dario along it. If you approach that gate and go right you will be on Ramo de Barbaro, which has a service entrance. So I may be adding two and two and getting five, but I have to assume there should be a service entrance on the east side EDIT -- Last night I built the new roof, the balcony, and two of the three chimneys. Finished the last one at lunch today. 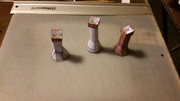 Wanted to show a comparison of the roofs. First up is the new roof, then the shallow roof, then the original Ca Dario roof, then the tall roof with altana, and lastly the new roof with chimneys 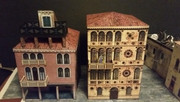 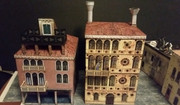 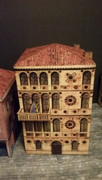   But I think I now have a roof pitch that looks good and will allow figures to stand on it |
|
|
|
Post by monstersbtm on Feb 9, 2021 10:12:53 GMT -9
Impressive 😱
|
|
|
|
Post by Vermin King on Feb 9, 2021 11:07:54 GMT -9
I don't know if this will even be possible, but looking at my work pages on that wing, its terrace and its roof, with the ideal being a playable terrace, I had an idea to cut off the columns at the bottom of the columns and include the columns and the roof bracing above them as part of the roof. These would then slide into the terrace walls, resting on the terrace floor when it is unoccupied. Could be an elegant solution.
However, with the roof off, the columns would be missing. I picture them as being rather important cover. This would give me two choices. I can separate at the tops of the columns with the roof bracing as part of the wing, or I can separate at the top of the columns with the bracing being part of the roof, leaving only the columns sticking up. Whichever way I go, I plan on taking a page from the tri-fold minis. By having a column face as the hypotenuse of a triangle,completing the columns as triangles should give more strength than having them doubled. Am I thinking this through correctly?
|
|
|
|
Post by monstersbtm on Feb 9, 2021 14:29:36 GMT -9
I'm not entirely sure I understood correctly, forgive me. I can only share my personal experience with Glenn's bell tower and my solution was an element ( chopstics, in my case) to slid inside the columns. The columns are affixed to the tower, just to grant a "visual" obstacle even if I decide to remove the roof.
|
|
|
|
Post by Vermin King on Feb 9, 2021 16:18:48 GMT -9
Took a while to find your images between three Facebook sites, but I got them.
In your tower build, you left the upper crosspieces in place, so leaving them on this build would be good, then?
So that is the way I will proceed. If I am not happy with it, I have a bit of time to change it
|
|
|
|
Post by Vermin King on Feb 11, 2021 5:28:52 GMT -9
I really do like the way glennwilliams did his roofs so that the buildings can fold flat. I hope you don't mind me stealing that idea. Took me three tries to get to a point where I had eaves for the wing that I considered acceptable. Got started on the roof parts, but didn't get too far. 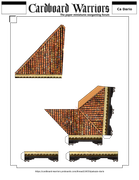 By having the two roofs done with the 'eaves', they can lift off, allowing the remainder to fold flat. For the main building, I printed off a square that fits inside. I glued that to a piece of corrugated cardboard (thanks kris). This sits inside holding the bottom square. The roof holds the top square. So, I will be gluing the wing onto the back of the main building, letting the roofs hold the top square, and fitting the cardboard into the bottom. If anyone has ideas on making removable chimneys, I would love to hear them |
|
|
|
Post by monstersbtm on Feb 11, 2021 7:41:39 GMT -9
To have removable chimneys (but with defined positions) my idea is to build a bottom for the roof piece and mark on the roof tiles the position of each chimney. Cut away the area of tiles and "slid" the chimney into position. Don't know if can work, just my 2 cents
|
|
|
|
Post by Vermin King on Feb 11, 2021 8:01:24 GMT -9
Actually, that should work well. You wouldn't have as much space available to store stuff in the roof when it is upside down, but it would work. Also, you wouldn't have to figure out the angles for the slope of the roof.
|
|
|
|
Post by Vermin King on Feb 11, 2021 9:28:35 GMT -9
Need to work out the tile caps for the roof top and the edges, but the wing roof is essentially done. 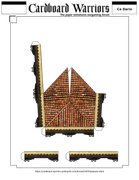 Will work those out during webinars this afternoon, and then I will work on the terrace. EDIT -- On the roofs I have been doing, I have had a row of tiles along the edges to fold over the piece glued underneath. I think this works well for covering seams and you don't have to worry about lining the tiles up. I am going to have tile caps going along the edge of the roof where it joins the main building, too. Originally, I had planned on having a blank triangle piece to glue inside the roof to help maintain shape, but I am not sure it is necessary. I will put off that decision until after the test build. And this is as good a time as any to mention how I intend to have the wing roof secured to the main roof. I plan on gluing a toothpick inside the roof peak that protrudes from the end 1/8 of an inch or so. As this roof and main roof have the same pitch, I should be able to put a hole in edge of the main roof at the proper height to hold things in place. |
|
|
|
Post by Vermin King on Feb 12, 2021 9:45:43 GMT -9
 Cap tiles are on, and the piece to maintain shape is added. Here is the template for my corrugated cardboard base plate  Actually, the inner terrace should finish this up |
|
|
|
Post by Vermin King on Feb 13, 2021 8:51:06 GMT -9
Yes, I know it isn't a primary concern, but I still  |
|
|
|
Post by Vermin King on Feb 13, 2021 9:38:37 GMT -9
To have removable chimneys (but with defined positions) my idea is to build a bottom for the roof piece and mark on the roof tiles the position of each chimney. Cut away the area of tiles and "slid" the chimney into position. Don't know if can work, just my 2 cents I can't do it with my template, since it is already glued to the corrugated cardboard. But it doesn't have to be glued to the cardboard. It can be used as a template and then it can be glued into the roof. It doesn't require covering the entire base of the roof, so I put a square cut-out area. If someone wants to try it.  |
|
|
|
Post by Vermin King on Feb 13, 2021 18:46:17 GMT -9
Spent too much time working on a fold-flat version with an open terrace. If the floor flips up for storage, a pop-up card mechanism could be fitted in opposite corners of the wing for the floor to drop onto. A corrugated cardboard base insert would hold the structure steady and sturdy. I think this could work.
|
|
|
|
Post by Vermin King on Feb 14, 2021 9:04:46 GMT -9
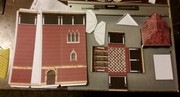
The inner terrace parts are there, so if one wanted to build Ca Dario as solid, these parts could be glued inside the top of the wing. So, here are the parts for the wing    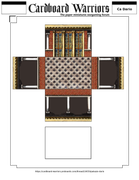 I still have to work out the pop-up corners, which shouldn't be too difficult. As I see the fold-flat version, one of the pop-up corners will be at the front right corner and the other at the rear left. The front and side inner walls will be cut off the page 10 part and glued to the inside of the 5-6 walls. This leaves the rear wall and floor. Rear wall gets glued in place and the floor folds up out of the way. When assembled, When the wing is opened, the base plate fits in the bottom, and the corners open to become the floor braces and the floor folds down. Roof slides over the top EDIT -- And I have the corner pieces and they fit on the page! Time to see if the Alchemy works 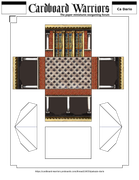 |
|
|
|
Post by Vermin King on Feb 14, 2021 13:47:31 GMT -9
  After cutting out the roof, I realized there are way too many detail cuts on the woodwork, still. I think I will increase the black border around the detail, so that it will be easier to cut out. And on the inner and outer terrace openings. But since this is the way I printed it, this is the way I will proceed. If you didn't want an open terrace and fold-flat, this would be an easy build. EDIT-- Adjusting borders around the trim took a whale of a lot longer than I planned. Luckily tomorrow is a holiday |
|
|
|
Post by Vermin King on Feb 14, 2021 22:49:13 GMT -9
|
|
|
|
Post by gothique on Feb 15, 2021 6:16:45 GMT -9
Two questions in regard to fitting it on my table. Firstly, what is the footprint (with and without the rear extension)? Secondly, What is the distance between the base and the upper trachite line (above and below the back door) I may have to adapt my layout to fit the building.
|
|
|
|
Post by Vermin King on Feb 15, 2021 6:44:02 GMT -9
Main building is 14.2 cm X 14.2 cm. It is 2 inches from the bottom to the top of the decorative band. The wing adds 2 inches ( 5.08 cm )to the depth of the building.
|
|
|
|
Post by monstersbtm on Feb 15, 2021 8:04:19 GMT -9
Woah! The overall look is great. I really hope to push some enemy models off that gorgeous tall roof 😉 have you already got an estimate date for the release of this beauty?
|
|
|
|
Post by Vermin King on Feb 15, 2021 8:45:40 GMT -9
cardboard-warriors.proboards.com/thread/10678/technical-difficulties-standI can get you an early copy, sir. As I mentioned above, I reworked the borders around the upper wood on the terrace. I tried my toothpick idea on the wing roof, and it works, sort of. My placement of the hole in the main roof put stress on the roof and one corner of the roof skewed. As the hole placement is going to be different, and some skewing may happen, I am going to widen the eaves on the roof parts to provide a better fit. Otherwise, I think it all works. Frankly, if you don't want fold-flat, this all works right now. But I just have to do it this way to see if I can...
|
|
|
|
Post by Vermin King on Feb 15, 2021 17:34:06 GMT -9
Here's how the wing roof goes together 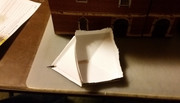 I dismantled it and now I am going to show how the fold-flat goes together. My corner pop-up braces should have been in the other corners to have the wing fold in towards the center of the building. oops 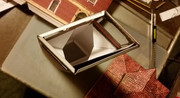 Place the corrugated cardboard base inside the bottom, square things up and fold the floor down 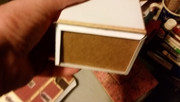 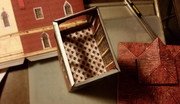 Put the corrugated cardboard base in the bottom of the main building and then add the roof   Eventually the wing will be be glued to the building, but not now. When glued to the back, only the lower half will be glued. That way there will be some wiggle room at the top for placing and removing the wing roof. 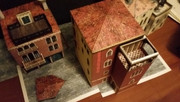  And then place the chimneys, if you don't have them glued down  |
|
|
|
Post by gothique on Feb 18, 2021 4:58:37 GMT -9
Any chance I can get an early copy? Without the fold flat option |
|
|
|
Post by Vermin King on Feb 18, 2021 5:12:56 GMT -9
Sure thing The only thing that is different parts-wise is the pop-up corner braces. Just ignore them. The templates for the corrugated cardboard bases are still useful. It really helps things turn out square. Even if you are doing a solid build, the terrace roof should still lift off to allow access. It is simply too awkward to place figures in there otherwise. I didn't get that new roof built yet. Was going through my shep list last night. Originally, he wanted me to do Ca d'Oro while he did Casa Rosata, but I did not see the sense in doing both, so we exchanged ideas back and forth (I wish he had shared files instead of ideas). I had planned on trying to recreate his Advanced build at some time,as close to his photos as possible. But to accomplish some things he was unhappy with, I think I need to do a combination of my idea for the build with some of his ideas. I think I can use the Ca Dario style roof to fix his too-steep roof, that he said he meant to correct. He also mentioned that his geometry didn't allow for the porches to be open. I think I have a fix for that. He also has the courtyard gate on the north wall, not the east, and omitted the small wing of the building where his gate is. Spent a lot of time on that last night, and I really want to do Ca d'Oro now. I was also working on the Ponte de le Tette. shep's plain short bridge is close to the proper form already. |
|
|
|
Post by Vermin King on Feb 18, 2021 11:59:37 GMT -9
I sometimes forget that folks don't build the same things I do, so they don't know the process for handling some elements of a model. Those cap tiles have given a couple folks issues. So even though I mentioned it once on the Sotoportego, I didn't have photos. Since I increased the width of the eaves strip for my final build of Ca Dario, I figured I would do a walk through on how to handle the overlay strips. Cut out the roof halves, leaving plenty of white along the strip 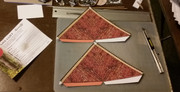 By having extra width, it is easier to make the fold. And, yes, pre-shape the parts at this stage. 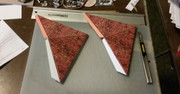 Then cut off the white and edge 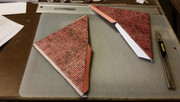 Glue the roof tab under the cap strip on one side, then the other side, then close up the eaves |
|


