|
|
Post by Vermin King on Nov 23, 2021 7:43:05 GMT -9
|
|
|
|
Post by Vermin King on Nov 23, 2021 7:51:21 GMT -9
Nov 12, 2018 at 10:23am I was curious. Does anyone know the reason that in later versions the hood is extended? Short -- 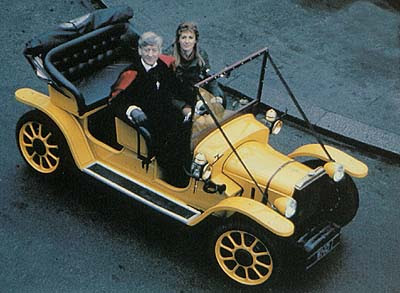  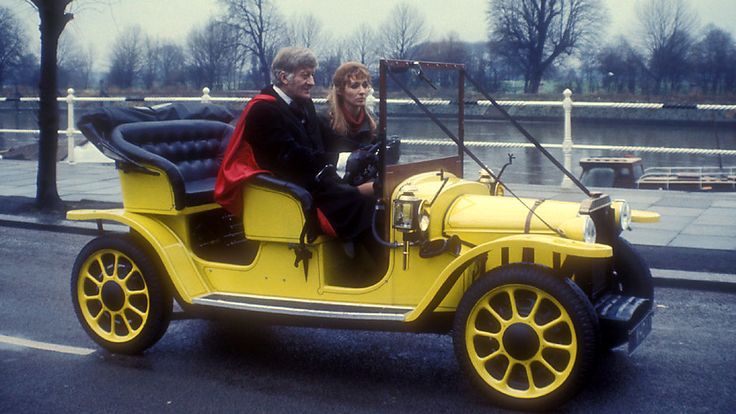 Long -- ![https://i.postimg.cc/tT1VzV9q/687b0e6304610e4c42d87871bd125f49.jpg]()   Of course, the Doctor was always fiddling with Bessie, but I was wondering what he installed that created the elongated nose |
|
|
|
Post by Vermin King on Nov 23, 2021 7:58:42 GMT -9
|
|
|
|
Post by Vermin King on Nov 23, 2021 8:03:37 GMT -9
Nov 12, 2018 at 4:28pm Thanks. I wonder if they gave a reason for the change in the actual show... Bessie certainly is popular enough that for a parade, they tried to make a copy  Not a great copy EDIT -- At lunch today, I did a little comparison between a side view of Bessie and that Sugar Smacks toy. This really shouldn't have been so bad, if they would have widened it cardboard-warriors.proboards.com/attachment/download/2661 |
|
|
|
Post by Vermin King on Nov 23, 2021 8:07:41 GMT -9
|
|
|
|
Post by Vermin King on Nov 23, 2021 8:12:22 GMT -9
Nov 13, 2018 at 12:46pm Although I haven't seen too many builds of grendelsmother64's Flivvers, they were enthusiastically received at the time. I worked out a test seat that looks pretty good. I missed him when he was on last and haven't heard a response on doing one of his Flivvers that will look enough like Bessie, so I went a different route, like the Kurogane and VW's. Not satisfactory. The Flivver Hearse in the Halloween Hoard was a mod of his Flivvers, but I see this proceeding similarly to the hearse in that I will have a chassis base plate and all gets built on it. There will be a lower body box that sits on base. I think I'll do a Print-on-the-Back page to make the inner cabin dark grey. The seats will sit on the body sides and back. The folded-down top will be a fold-over that glues onto the back of the rear seat. The windshield/firewall will either be a fold-over or print-on-back. There is a cowl that goes between the hood and windshield, and the hood glues in front of that. Then fenders similar to the flivvers get glued on and axles and wheels. Shouldn't be a difficult build ... if it works. I intend to increase the length by 10% over scale. Width is going to be increased by at least 25%, or no one would be able to use it. It's a stinking small vehicle. Wish me luck, and if anyone happens to see a dashboard for this, please let me know where to find it EDIT -- These should work 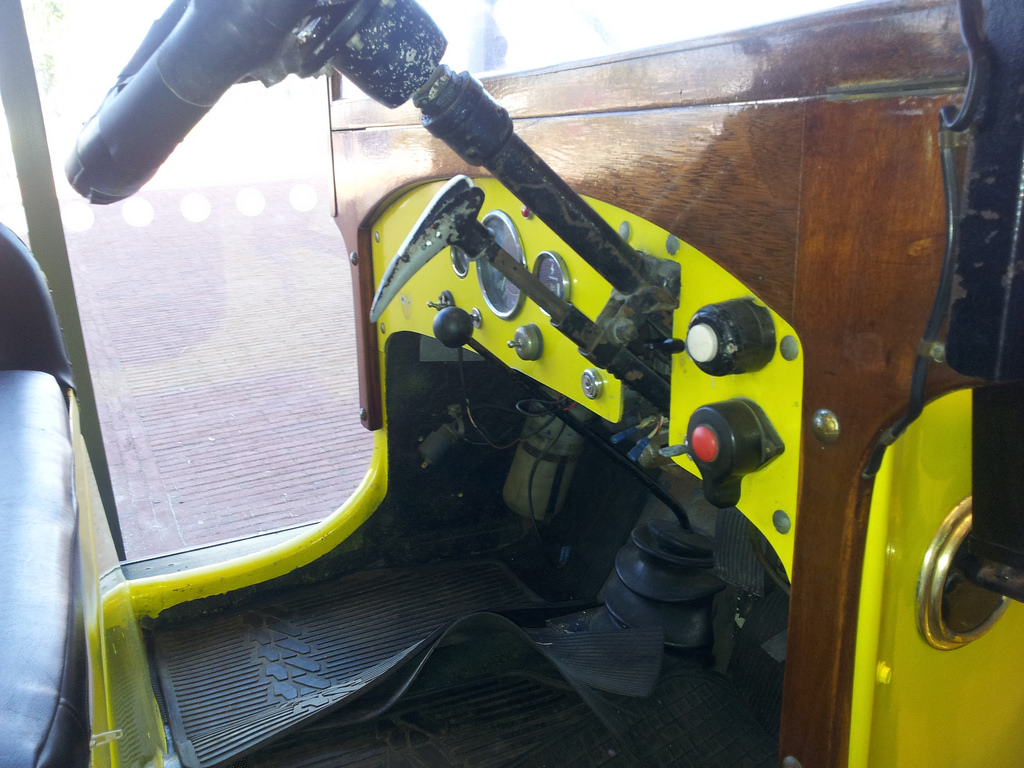 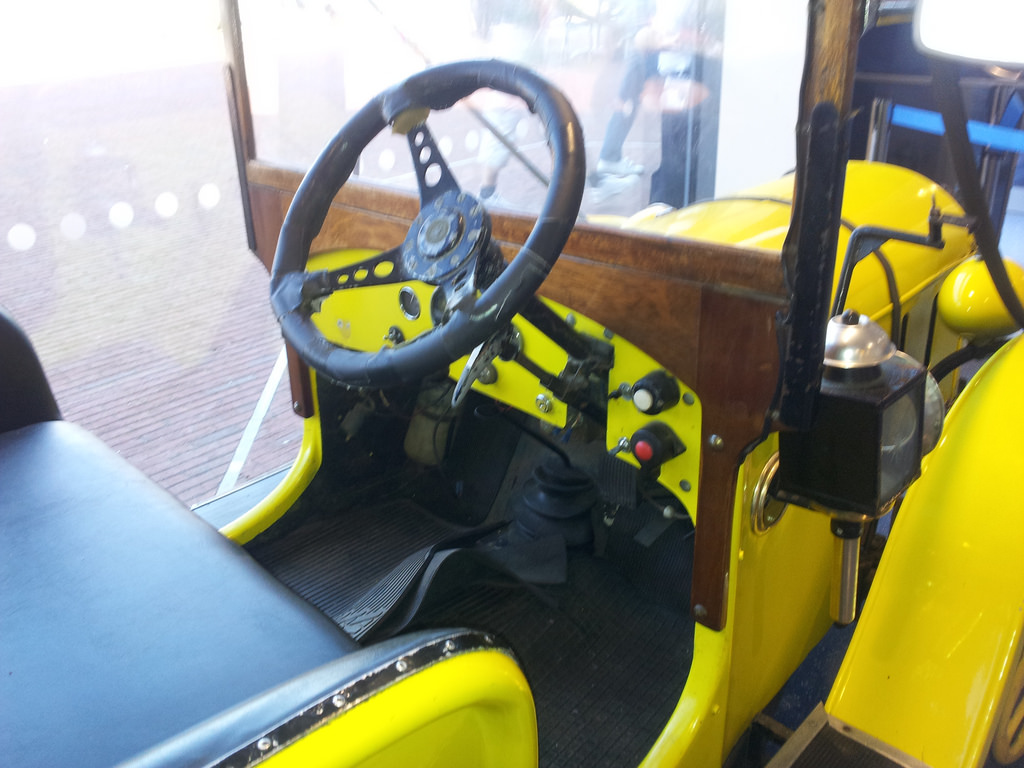 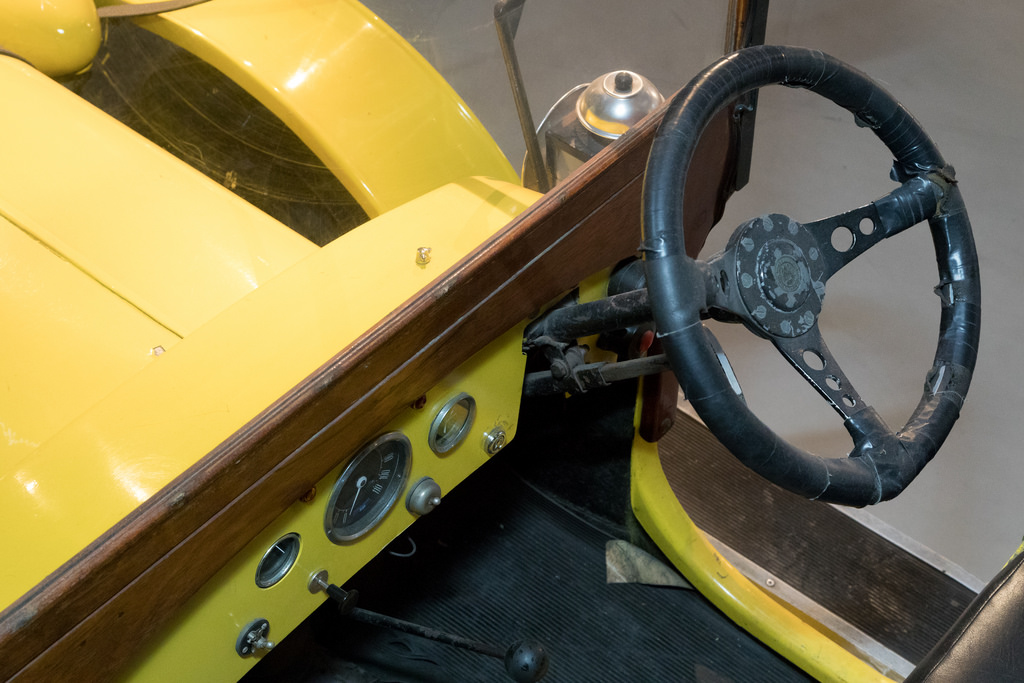 |
|
|
|
Post by Vermin King on Nov 23, 2021 8:44:37 GMT -9
Nov 15, 2018 at 5:05pm ______________________ Curious. I was working on this at lunch today, and as I was working on the bonnet and the cowl, I could swear I was saving repeatedly. I had left Gimp open in case I had a lull, then the database started acting up. I started to suspect a memory issue, so closed out the VPN and everything else and ran CCleaner. Yes, for some reason my computer started collecting Temporary Internet Files to the tune of 238 Mb. Then I couldn't get IE or Firefox to open. Rebooted. Still couldn't access IE or Firefox, and then the anti-virus informed me that it needed updating. Did that and had to restart. Well, I can get online, but not only did my updates on the Bessie files not save, but other work I had done since Sunday is also not in the file. I don't get it. Sometimes I think this project is jinxed. BTW, that cowl I mentioned is rather odd. If you look at the side, the cowl kicks forward near the bottom.  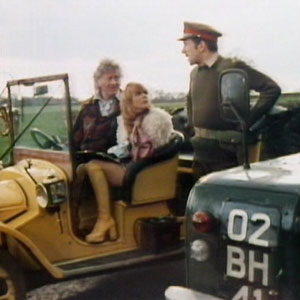 If you look at the interior photos, this seems to be the area where the pedals are. I just found it interesting Dangit! Some work files I downloaded today and yesterday are gone ... EDIT -- luckily, the files I generated were emailed to others, so between received files and sent files, I was able to recover them all through email review. However, the Bessie file reverted to before I did the seats, so I had to do that work all over again. At least I kinda remembered how I did them and what photos to use for the cushion textures |
|
|
|
Post by Vermin King on Nov 23, 2021 8:47:57 GMT -9
Nov 16, 2018 at 10:41am squirmydad__________________________________ |
|
|
|
Post by Vermin King on Nov 23, 2021 8:51:24 GMT -9
Nov 16, 2018 at 11:06am I actually should add a chassis base plate to the Jaguar series. I had the idea that they might be improved with it, but did not pursue it. I really like AirDave's KoolWheelz models, but some really benefitted from adding a chassis base. On the Jag's, there is plenty of room to add them And now I'm thinking I should have done Bessie as a Hearse mod, instead of the route I'm pursuing, so maybe the loss of file updates is a blessing _________________________ Nov 16, 2018 at 11:19am squirmydadTo paraphrase Bruce Lee, "A broken rice bowl is an opportunity for a new rice bowl." |
|
|
|
Post by Vermin King on Nov 23, 2021 8:56:18 GMT -9
Nov 17, 2018 at 1:23pm ______________________ Taking a break from this. Building the second version of the Shaguar, which I printed off along with the original Bessie. Needing fresh eyes. I've done too many versions of this, and because I was unhappy with the scale, I changed scales on each version, so my elements for Bessie are in different scales. I did more graphic clean-up, and started to put things together for the 'new rice bowl' Bessie, and discovered the scale issue. After I build the Shaguar, I'll look at it again with fresh eyes. _____________________________________________________________________________________________ Nov 18, 2018 at 12:59pm I threw the engine cowl and seat onto my print of the Daytime Augmented Sleigh to check for needed adjustments 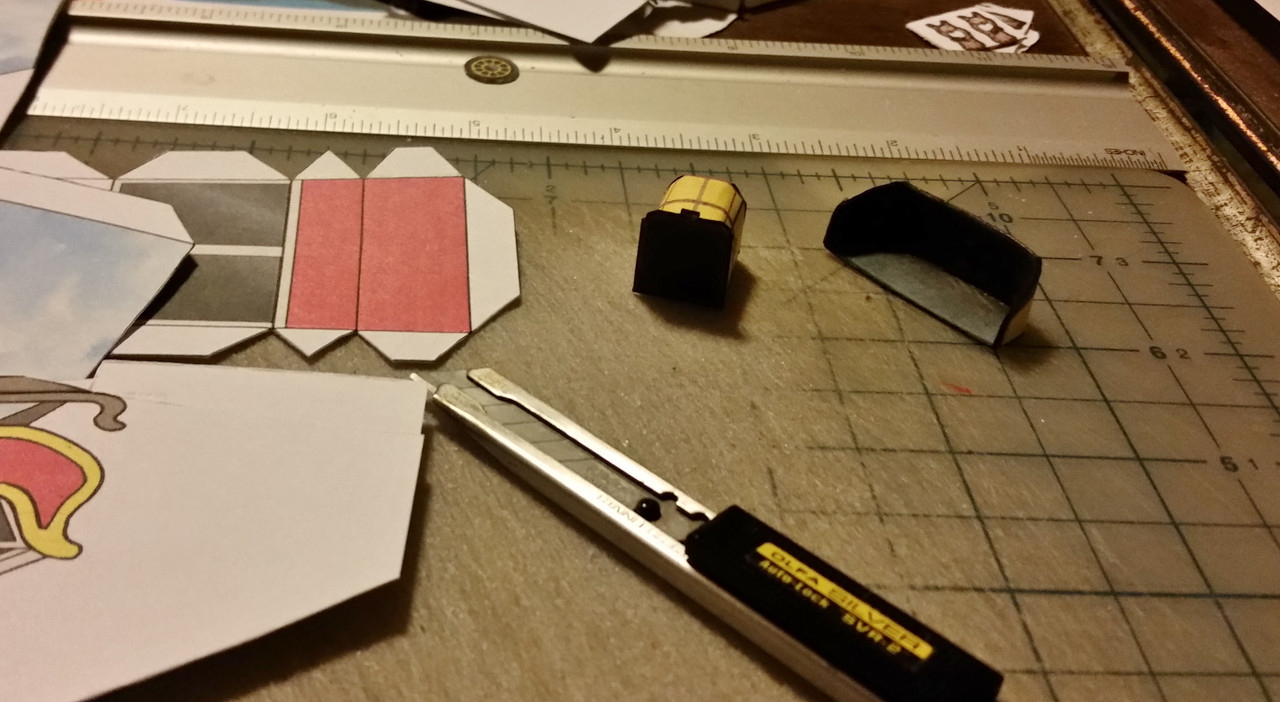 The seat needs to be narrower, and the dark textures need brightened all around __________________________________________ Nov 19, 2018 at 4:23pm Yes, I have grendelsmother64' permission to proceed with the Flivver base |
|
|
|
Post by Vermin King on Nov 24, 2021 4:58:28 GMT -9
Nov 21, 2018 at 6:26pm ______________________ I think Bessie must have been a cantankerous beast, besides the having to swap the engine modification. Going through the images by episode, the radiator will extend higher than the cowl and then be shorter and then be taller again. The radiator switches from black to copper to black with copper top and bottom to copper top and black bottom and then the extended hood versions. On the passenger side, the battery sits on the running board and switches from an oval emblem to square to all black, etc. BTW, I assumed from the side views that the pin stripe/crease on the seats wrap around the seats, but it only goes to the back and goes vertical. 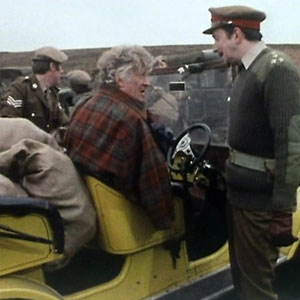 Pin stripe/crease. In some images, it is only a crease, only showing because of shadow and highlight. Others show a steel blue stripe and others light brown or tan. I guess what I'm getting at, is there can be no 'true model' of Bessie. You can't get enough views of any of the different variations. So, I guess I will base mine primarily off the top two images and wing it, trying to stay true to the spirit of the car. It will be slightly longer than the real car would be to scale and more than slightly wider. I finally got a good image, though small, of the back end. I think I will have to settle on that one, since views from the Doctor Who Experience obviously have different tail lights, no knobs that the spare sits on, and a gas filler not seen in the TV stills. Of course, going through the collected images, that's the only hint of the gas filler nozzle. Dunno But it is time and past time to get this thing done EDIT -- And now I've found two images with gas filler pipe, and six without ... |
|
|
|
Post by Vermin King on Nov 24, 2021 5:02:21 GMT -9
Nov 22, 2018 at 10:00pm _______________________ I did a bit more on this tonight. Mostly geometry checks on existing parts and cleaning up some of the parts to glue on, like the horn, lamps and brake handle. I plan on adding the gas nozzle similarly. I still need to tweak the sides again, since I really want to have that cowl between the windscreen and engine. Once I finally decided on a length and width, scaled vertically to the following photo, it is starting to come together. 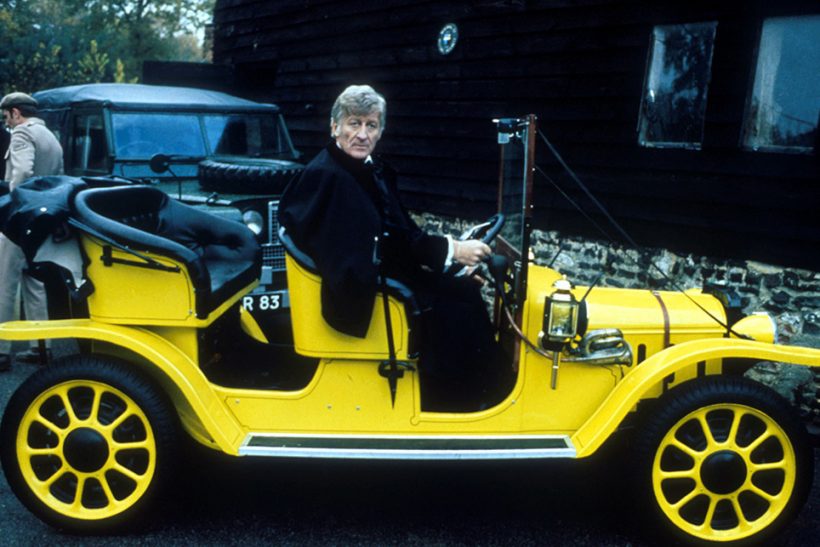 I'm not 100% sure about my headlights, but if I get to a test build this weekend, I'll know more ________________________________________________________________________________________________ Nov 23, 2018 at 8:46pm ______________________ I sure hope this can handle necessary tweaking. And I knew it was going to have to be tweaked, but this little guy is so narrow, it will look wrong doing it right. I already resigned myself to making it bigger than scale, and widening, but it will have to be wider still, which is awkward after getting it this far along. Some textures do not stretch well. I will also need to make the seat supports more sturdy. But I have a plan (famous last words) Silly me. I thought I'd be doing the test build tonight No wonder Brigadier Alistair Gordon Lethbridge-Stewart made fun of this cute little beast |
|
|
|
Post by Vermin King on Nov 24, 2021 5:06:12 GMT -9
Nov 24, 2018 at 5:00pm ______________________ I am getting closer to this being done, at least for the test build 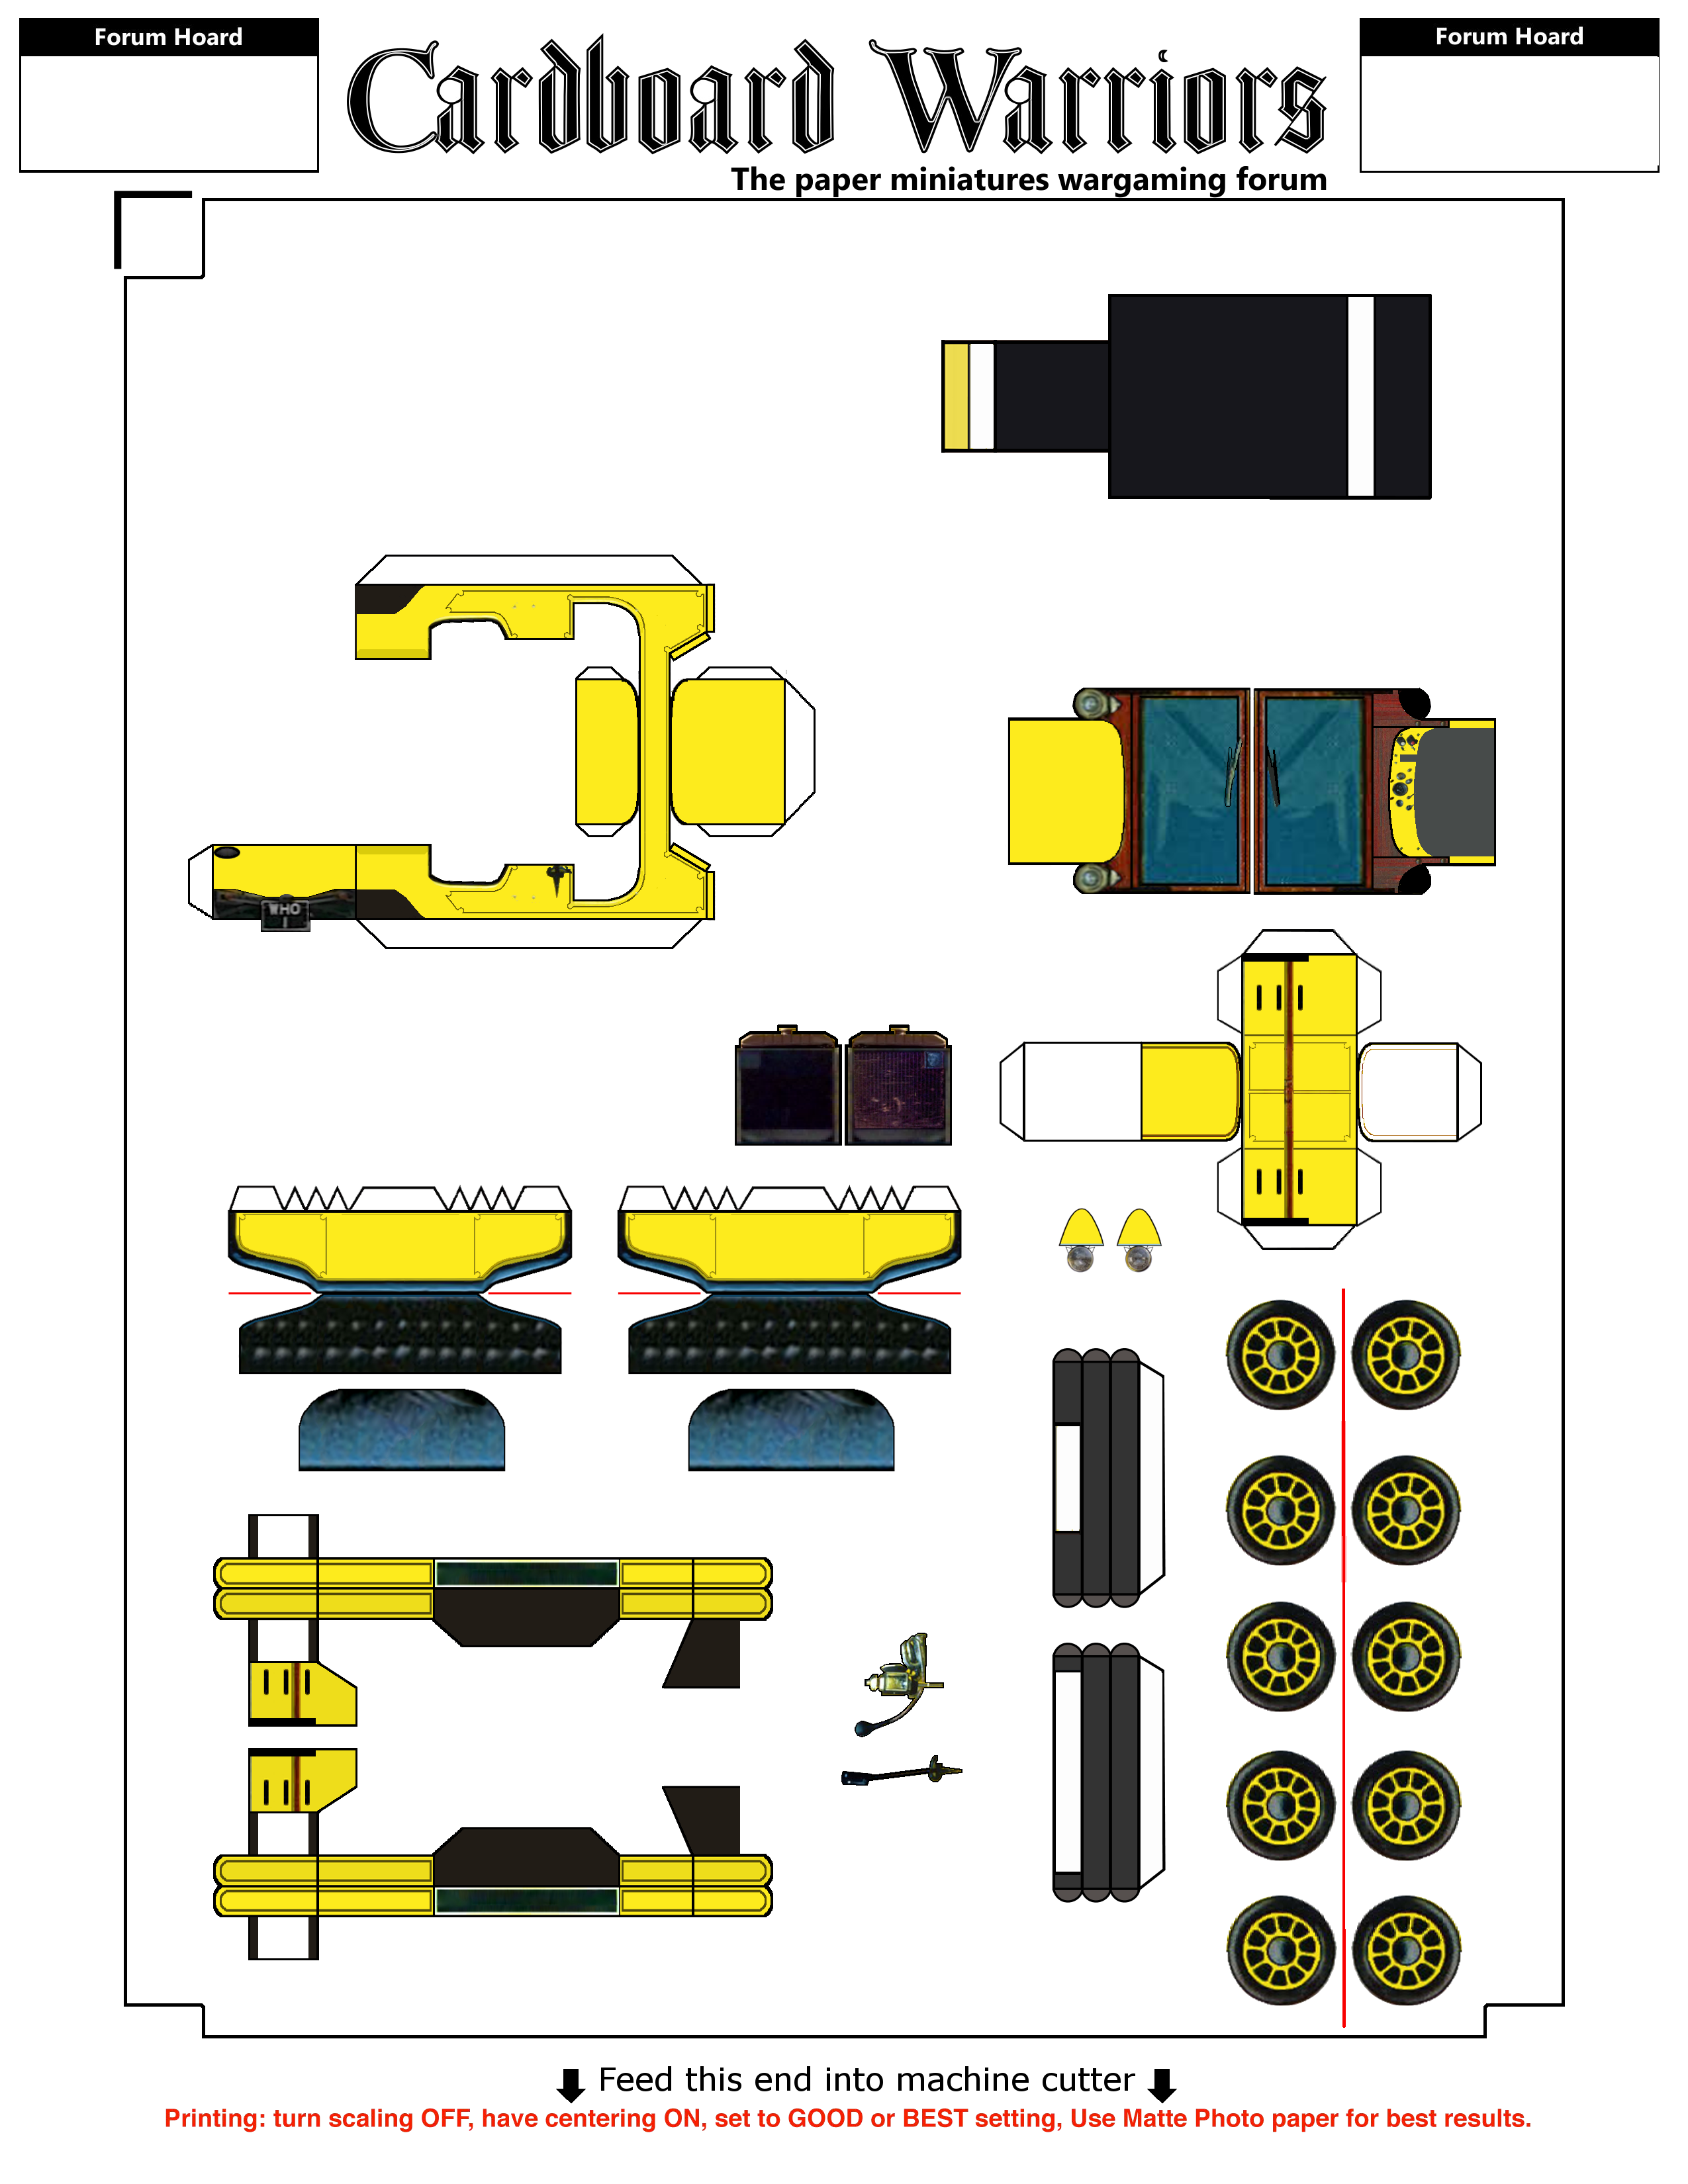 Still have to finalize the doo-hickeys, the base and the panels on the side piece (haven't widened yet). I realized I don't have the lamp for the passenger side or steering wheel. I am half tempted to do a piece with the steering column and primary emergency brake to attach the steering wheel. But it is nearing the finish line. I was going to do strips across the seat supports on the sides, but I'm not sure on that. I also need to do the roof piece in the down position _________________________________________________________________________________________________________________________ Nov 26, 2018 at 1:28pm ______________________ Well, I still have to adjust the length of the axles. Still need to do the roof-down piece. Still need to decide how to handle the steering wheel. Going to make this fairly solid with an interior base plate and an underneath base plate that glues onto it. As I was working on the upper base plate/front end/front license plate, I realized that where this thing usually (at least from the images I found) doesn't have a front bumper. But I found at least three different front bumpers that were used on it. I found two different versions of rear bumpers that were usually not on the car. About as much change to Bessie as we see in the Tardis |
|
|
|
Post by Vermin King on Nov 24, 2021 5:12:14 GMT -9
Nov 26, 2018 at 8:08pm ______________________ I'm almost done with the test version. I finish a step and check against the other parts and find things that need changed or adjusted. The latest string of changes came from the top-down part. I wanted to keep the back corners of the seats round, but almost gave up on it several times. I had the base plates done and the axles sized, and when I was working on the top-down part, it was on my work page, next to the axle base parts. I realized the bulk of the seats was wider than the combined width of the base and fenders, so widened the fenders again and slightly decreased the width of the seats. The steering wheel column was relatively easy, and now I am finishing off the steering wheel, which came out very nice especially with the images I had to work with. Granted it is just the test build and will need tweaked, but I think it will yield a decent model 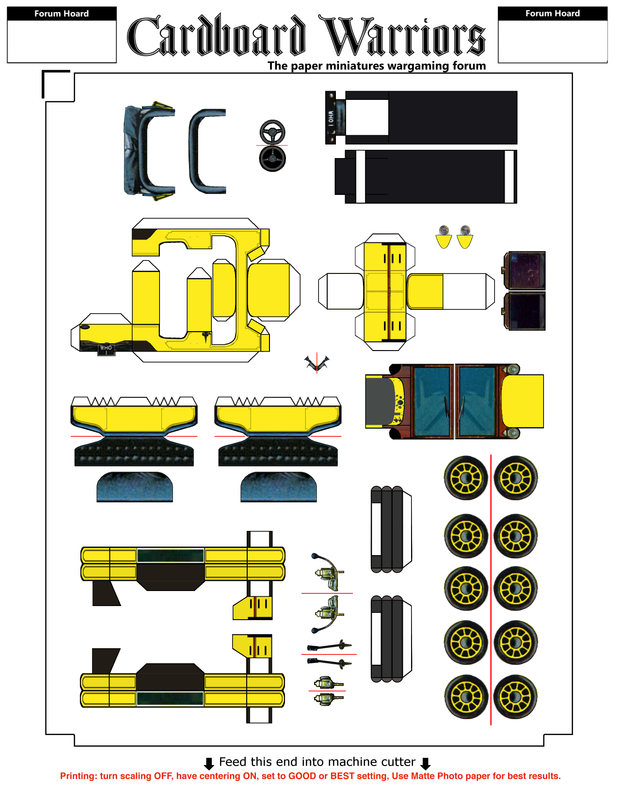 Wish me luck. I'll print off tonight, but probably won't start building until tomorrow night. _______________________________________________________________________________________________ Nov 27, 2018 at 1:13pm ______________________ Worked on over lunch and shouldn't have worked on it while I was on hold 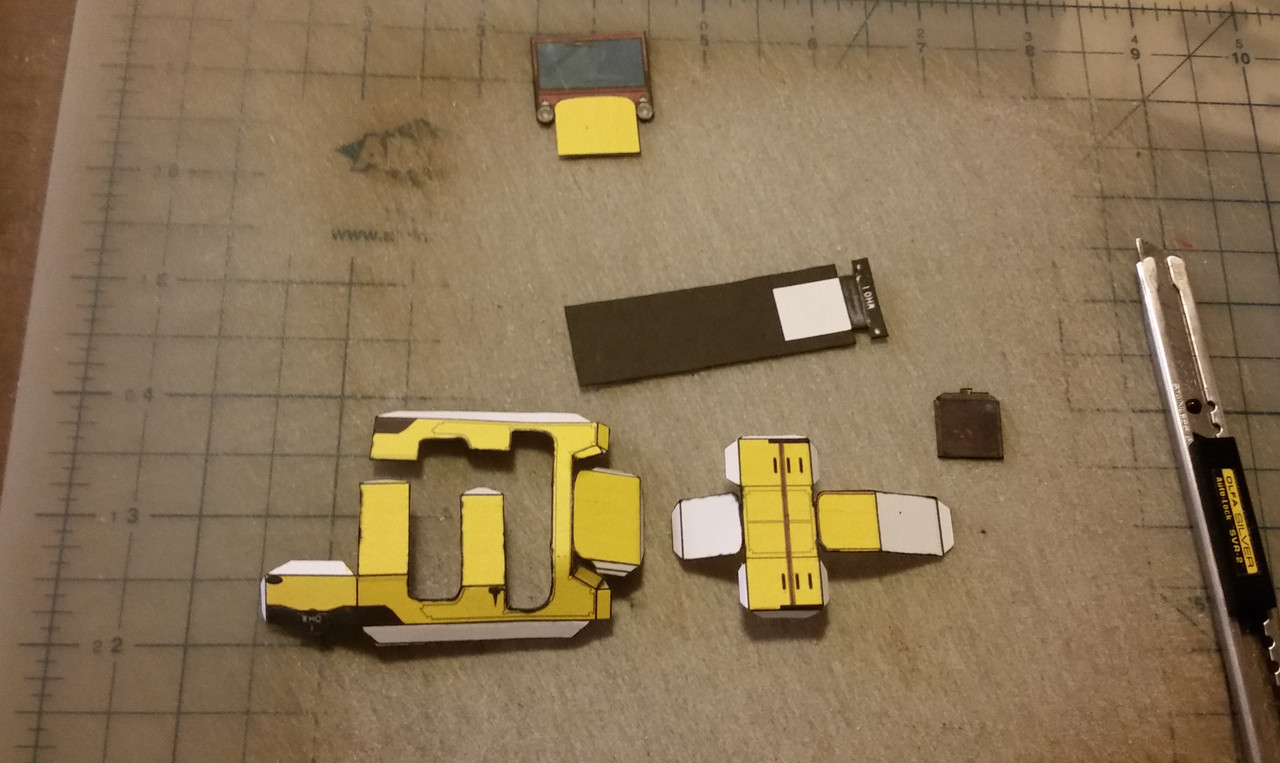 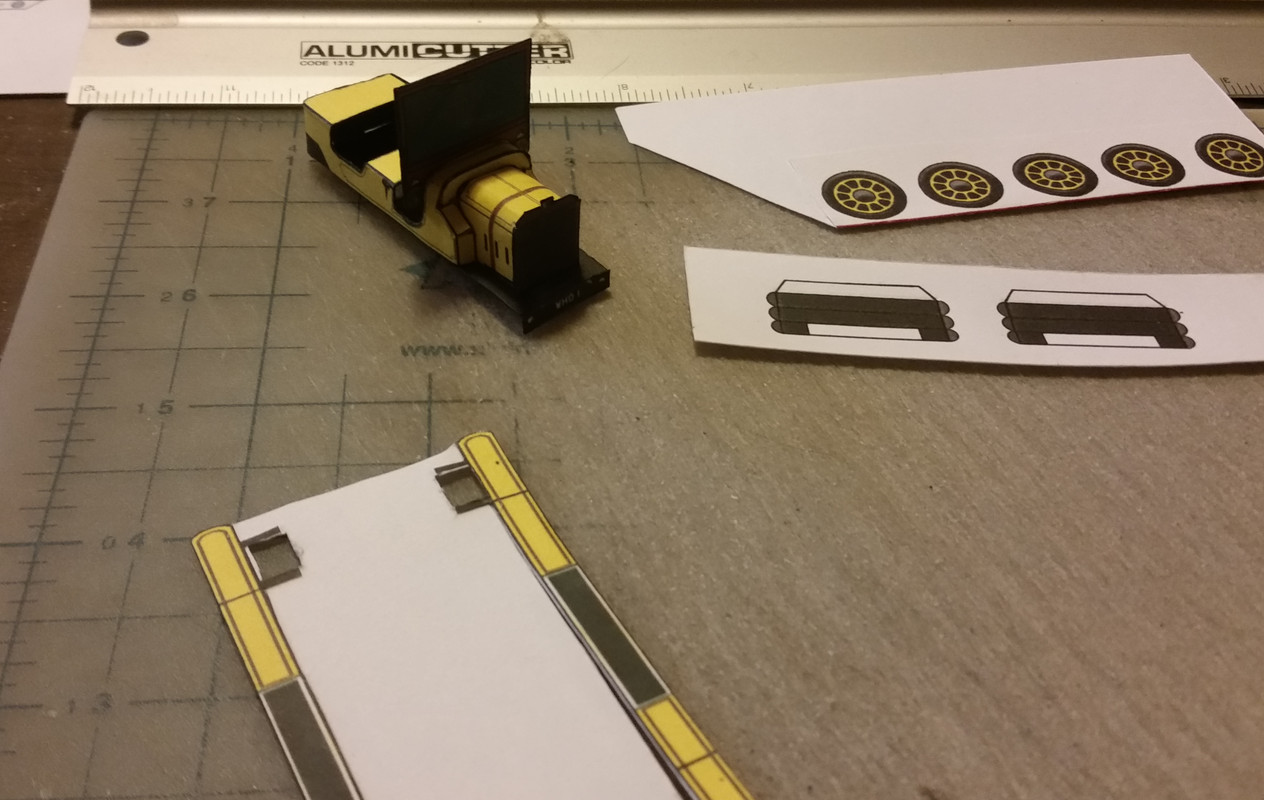 While balancing the phone on my shoulder, started cutting out the running boards, but they were top up, so I ended up cutting off the back fender well tab and the glue tab for underneath. Dangit! EDIT -- March 21,2022 at 10:15am ________________________ These photos were from my original test build. On my final build, I sandwiched note pad backing between the wheel sides and the grill sides. I also glued the chassis base onto the note pad backing to help keep everything square. |
|
|
|
Post by Vermin King on Nov 24, 2021 5:15:33 GMT -9
|
|
|
|
Post by Vermin King on Dec 6, 2021 6:10:04 GMT -9
I know it has been a while, but after tomorrow, I should be able to get back to this
|
|
|
|
Post by Vermin King on Dec 12, 2021 11:10:44 GMT -9
Nov 27, 2018 at 5:57pm _______________________ Edge glued the tabs back on and proceeded 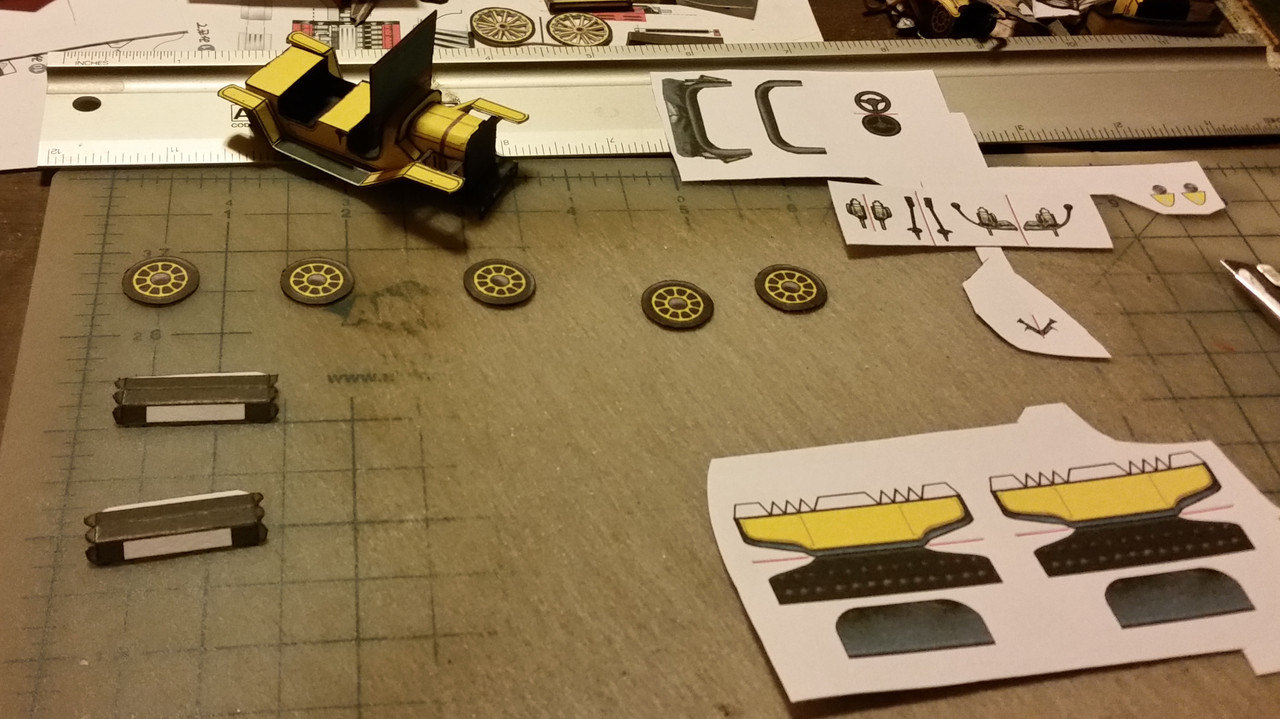 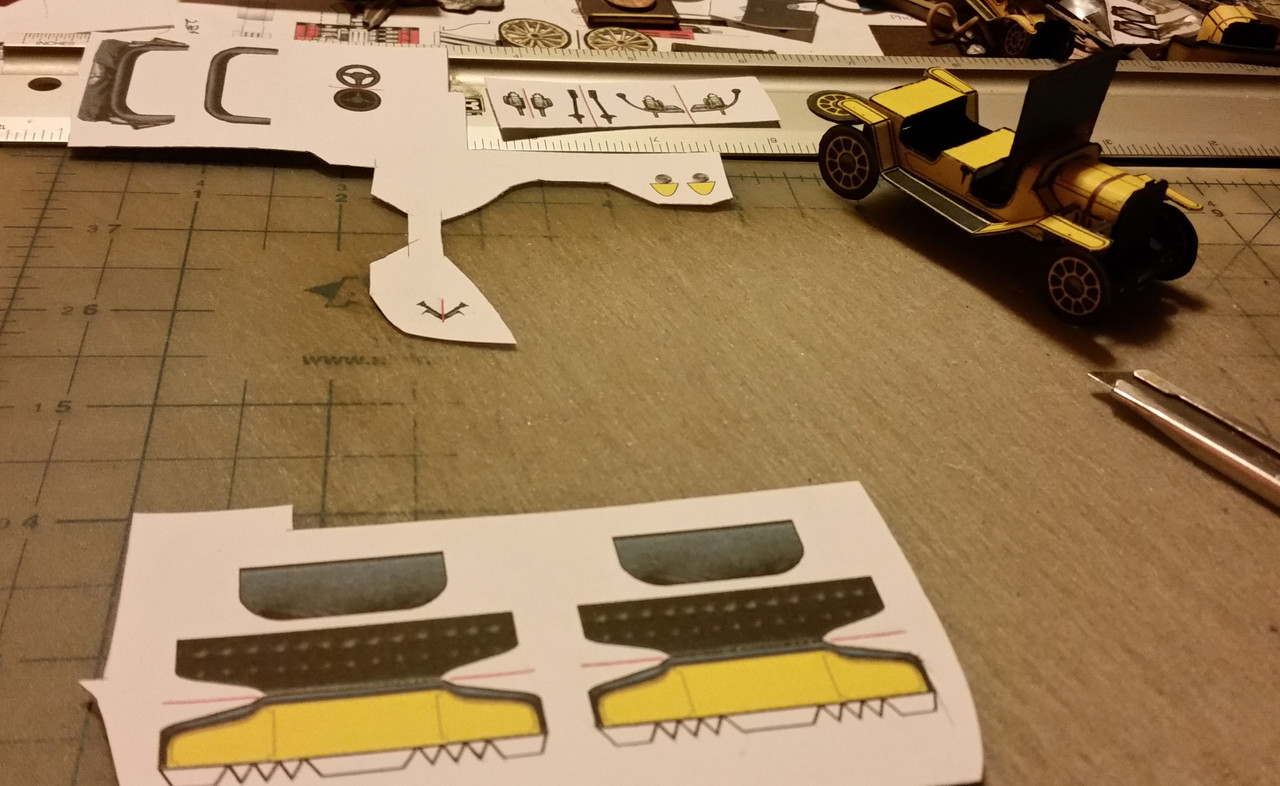 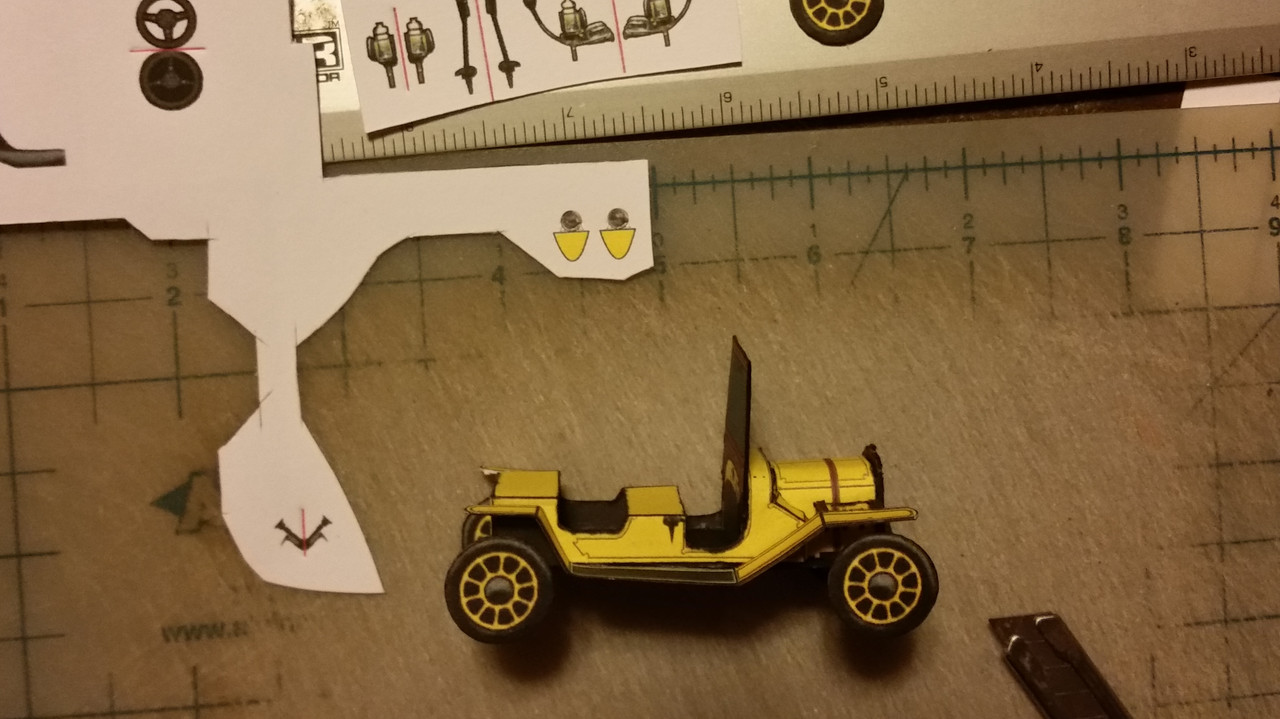 The biggest error was the brackets holding the front bumpers. Too long, so they were reduced on the templates. Otherwise, it is going together well. |
|
|
|
Post by Vermin King on Dec 12, 2021 11:31:50 GMT -9
Nov 28, 2018 at 7:14pm ______________________ 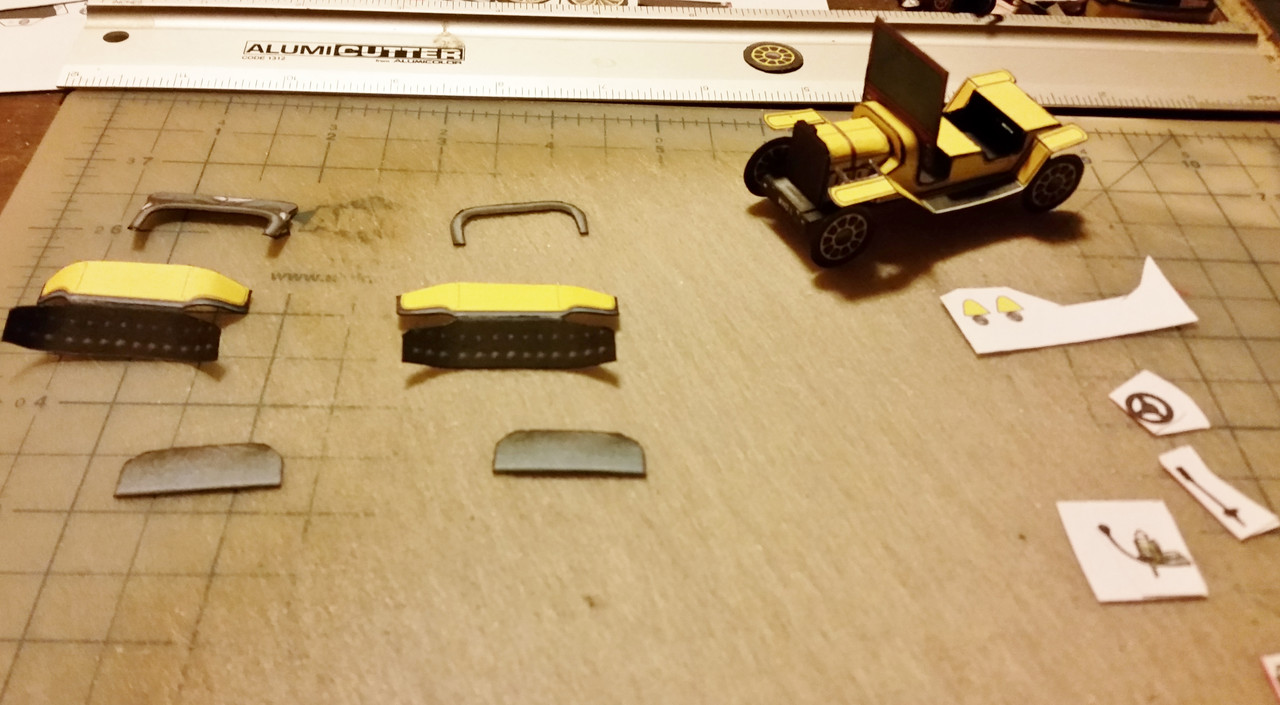 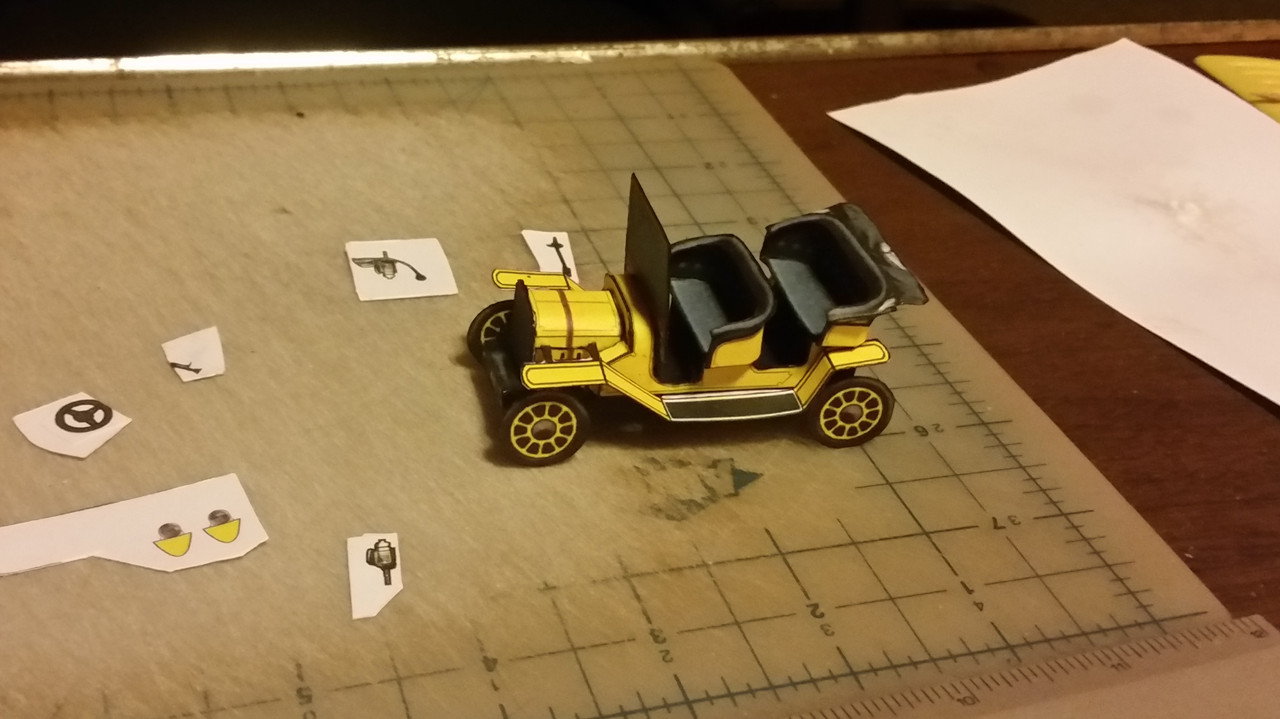 Before putting them together, I was worried about the seats, but I think they look pretty good. I haven't glued them down yet until I get the steering wheel in place. I could swear that I adjusted the height of the windshield from that photo, matching the height from floor to top, but it looks tall. Gotta re-check _______________________________________________________________________________________________ Nov 29, 2018 at 6:58am ______________________ Got to do a little tweaking before I do the next WIP, but as a first build, not too bad 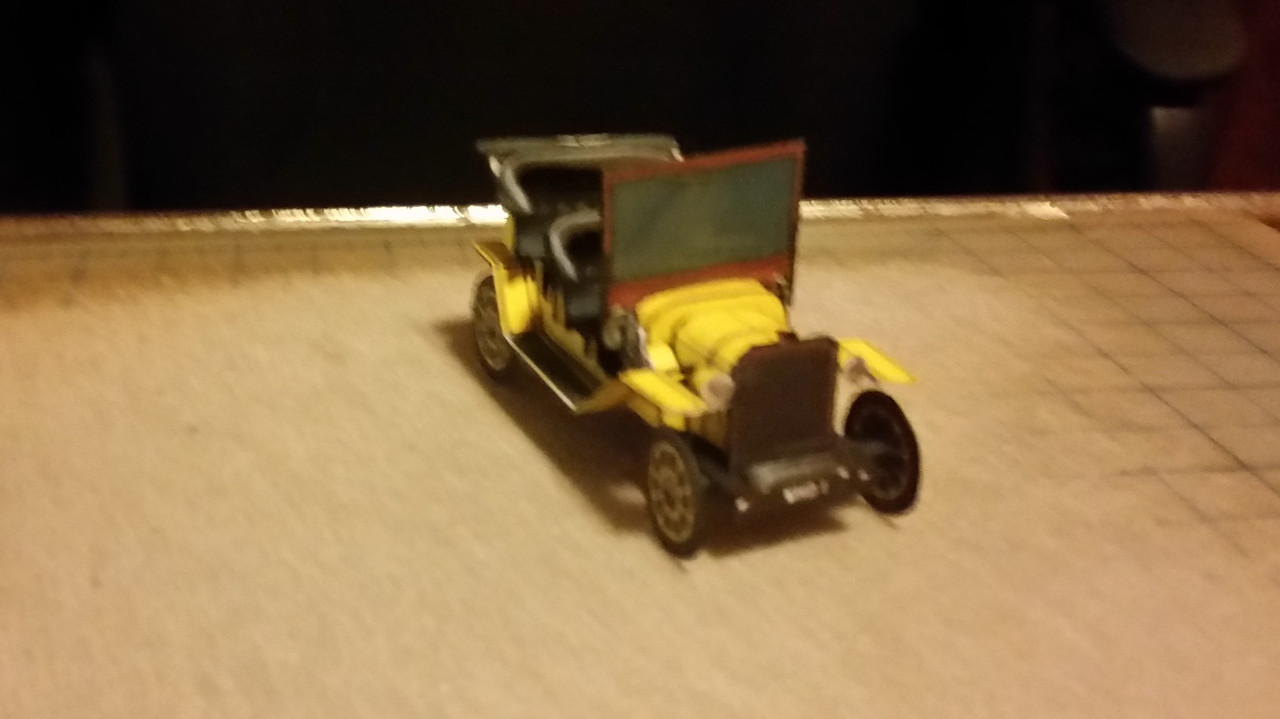   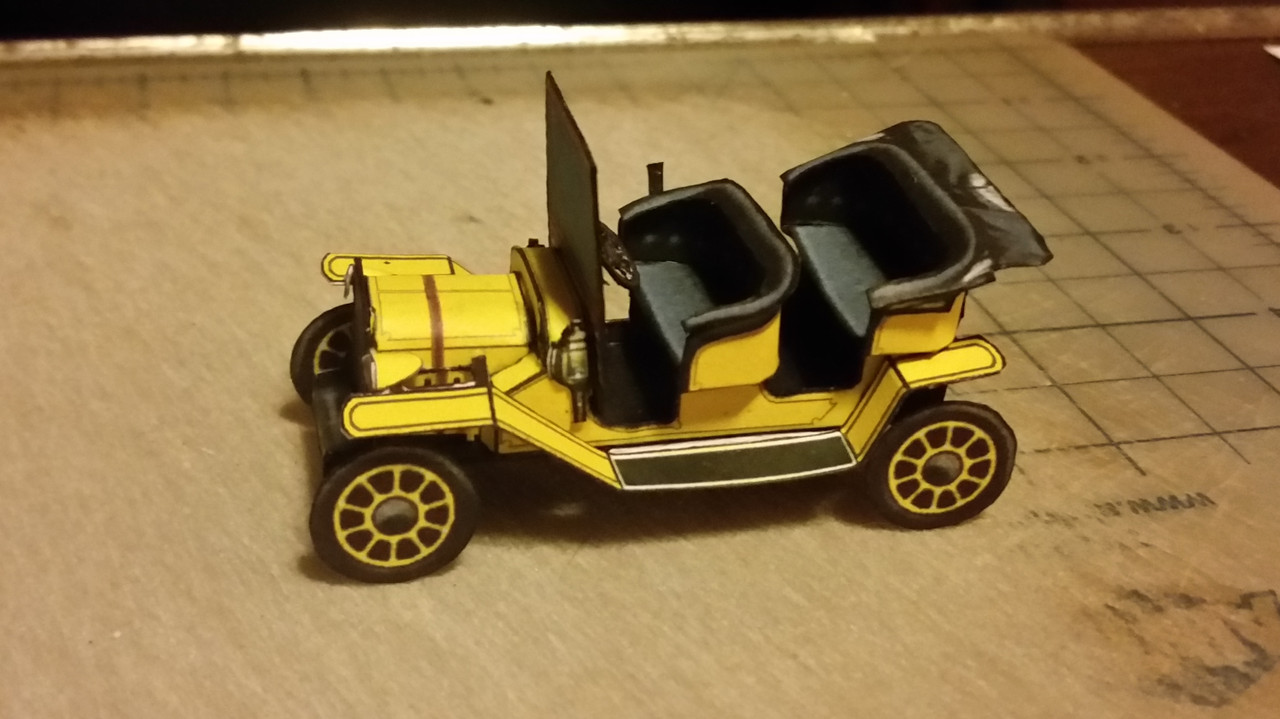 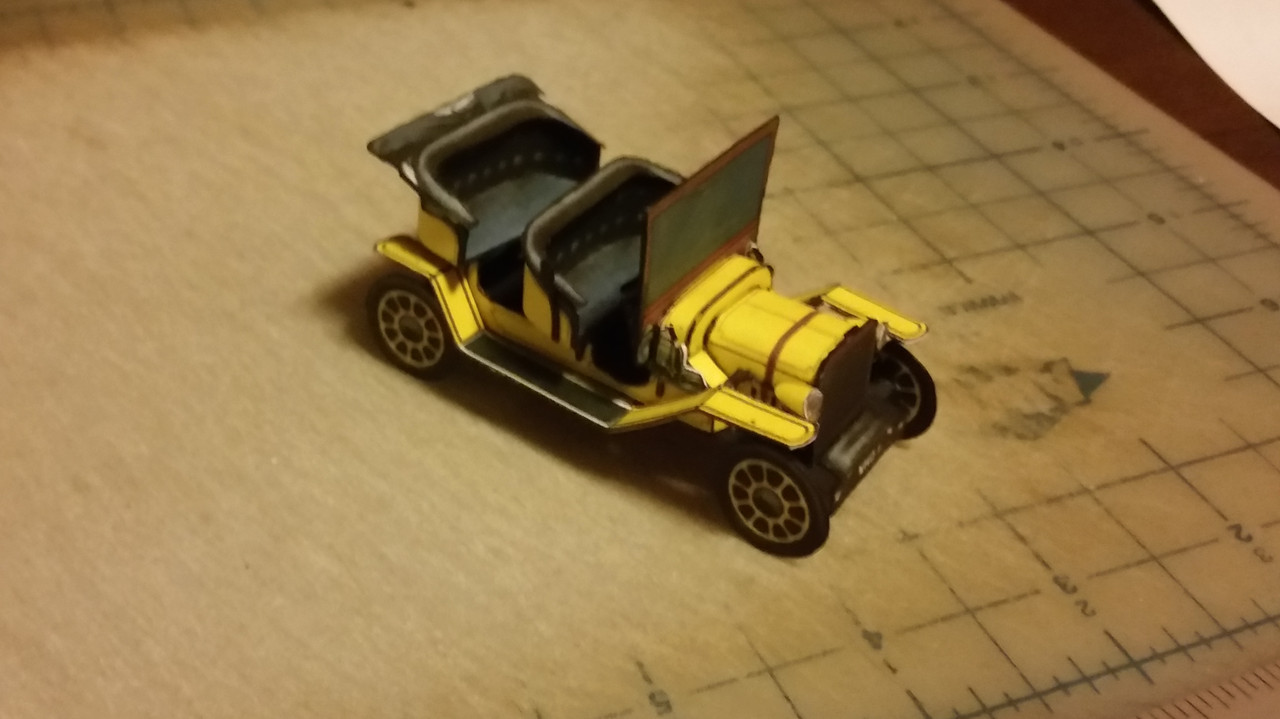 __________________________________________________________________________________________________ |
|
|
|
Post by Vermin King on Dec 12, 2021 11:39:42 GMT -9
Dec 5, 2018 at 10:16pm
______________________
I almost worked on it tonight, but there were some obvious things to fix on the Egyptian Temple. Too many long days, and this will require a clear head for the next changes. I plan on getting this to the build point for this weekend. I'm still working on certifications for a second job, and was hired for a third today. But I know that this needs done this weekend, or else I'll forget what needs done
__________________________________________________________________________________________
Dec 7, 2018 at 12:50pm
______________________
After work today, Bessie is first priority. Then back to the Temple Pylon
__________________________________________________________________________________________
Post by Punkrabbitt on Dec 7, 2018 at 9:34pm
__________________________________________________________________________________________
Dec 7, 2018 at 11:07pm
______________________
Well, tonight I did some shopping ($5 off $20 purchase that expires today, and then I needed to go to Walmart for cat food).
Not clear headed for this tonight, but there is always tomorrow. I also have to finish my certifications this weekend, but this will be a good break
The curve on the seat backs is too round. I want to sharpen the curve a bit, but that will require regenerating the textures to the new shape. Many of the doo-dads can be done as artwork on the main pieces instead of being separate. The windscreen needs a total re-work, and even though the fenders are a nod to the Flivvers, I think it would be a more satisfying representation to keep the curved fenders. Which I mostly have worked out, but there may be additional tweaks after I try the ideas. And the headlights were scaled for the old front fender brackets, so they need re-sized.
None of this is a huge change, but that's quite a few things, and I want to be confident that I won't be needing to do many more changes after this version. This one was already my third version. I'm hoping four is my lucky number
|
|
|
|
Post by Vermin King on Dec 12, 2021 11:44:16 GMT -9
Punkrabbitt
Master-Builder
*******
Dec 8, 2018 at 10:12am via mobile
____________________________________________________________________________
Dec 8, 2018 at 10:48am
______________________
Bessie is a kit car built on a Ford frame, Siva Edwardian is the kit
The doo-dads have to remain separate pieces, sorry.
Well, got a bit done on Bessie v4. Just need to re-work the curve on the seats.
|
|
|
|
Post by Vermin King on Dec 12, 2021 11:48:22 GMT -9
In the Wayback Machine capture of the thread, it evidently did not capture the second page of posts ... Razzum frazzum
|
|
|
|
Post by Vermin King on Dec 12, 2021 13:32:32 GMT -9
I made my first pass through the remaining build photos. I really don't have a clue about my verbage, but I think I can 'improvise'
As the photos are date stamped, I will post them based on the dates
|
|
|
|
Post by Vermin King on Dec 12, 2021 16:25:29 GMT -9
Dec. 9, 2018 _____________ The radiator, chassis and wheels needed extra thickness, so I added them onto the winged reindeer page and printed off 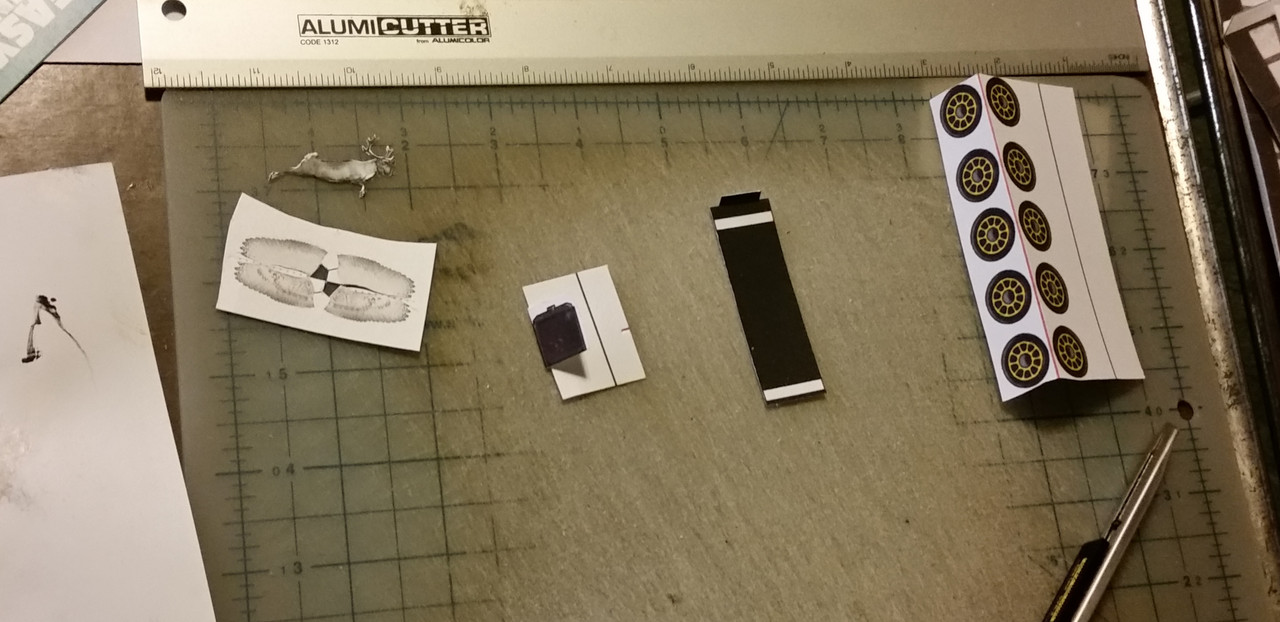 I glued these onto notepad backer _____________________________________________________________________________ Dec. 10, 2018, before the disaster Started with some of the fold-overs: the windshield and the fender/running board parts 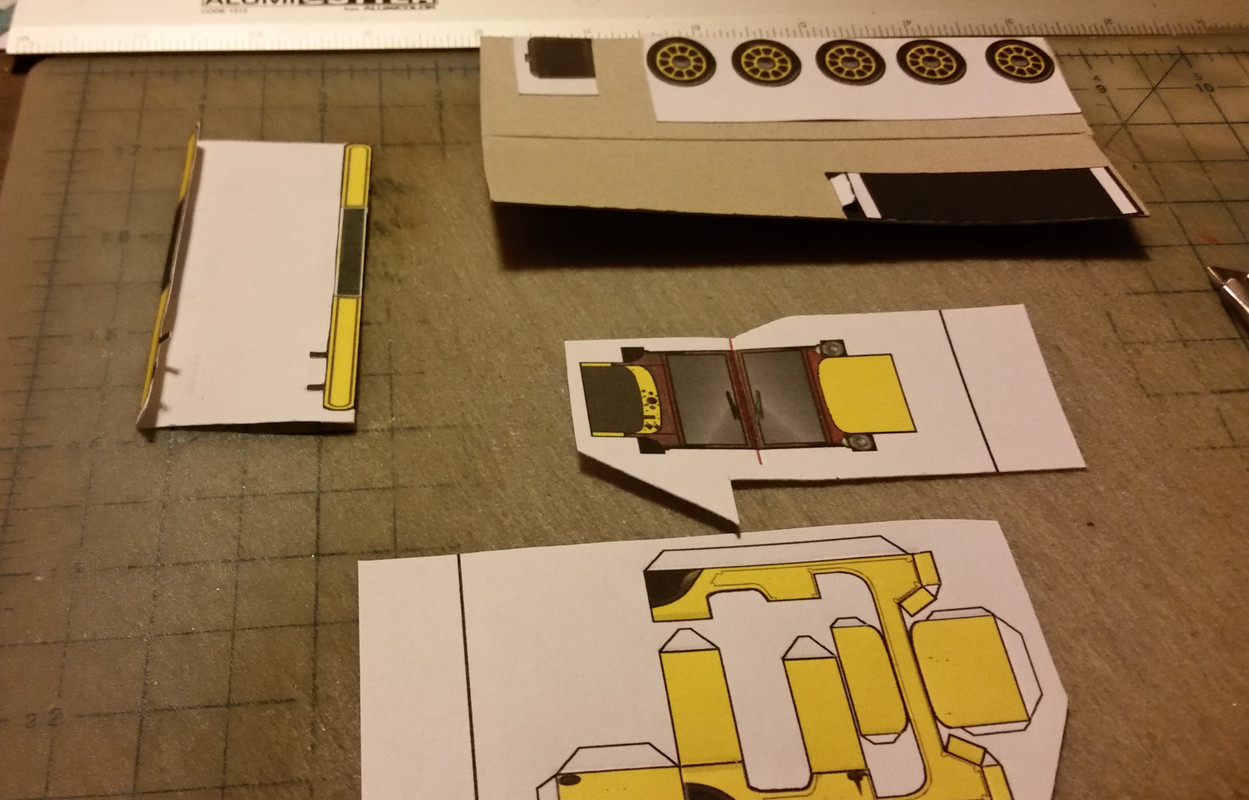 While those were drying, I cut out the floorboard, and started work on the hood and body 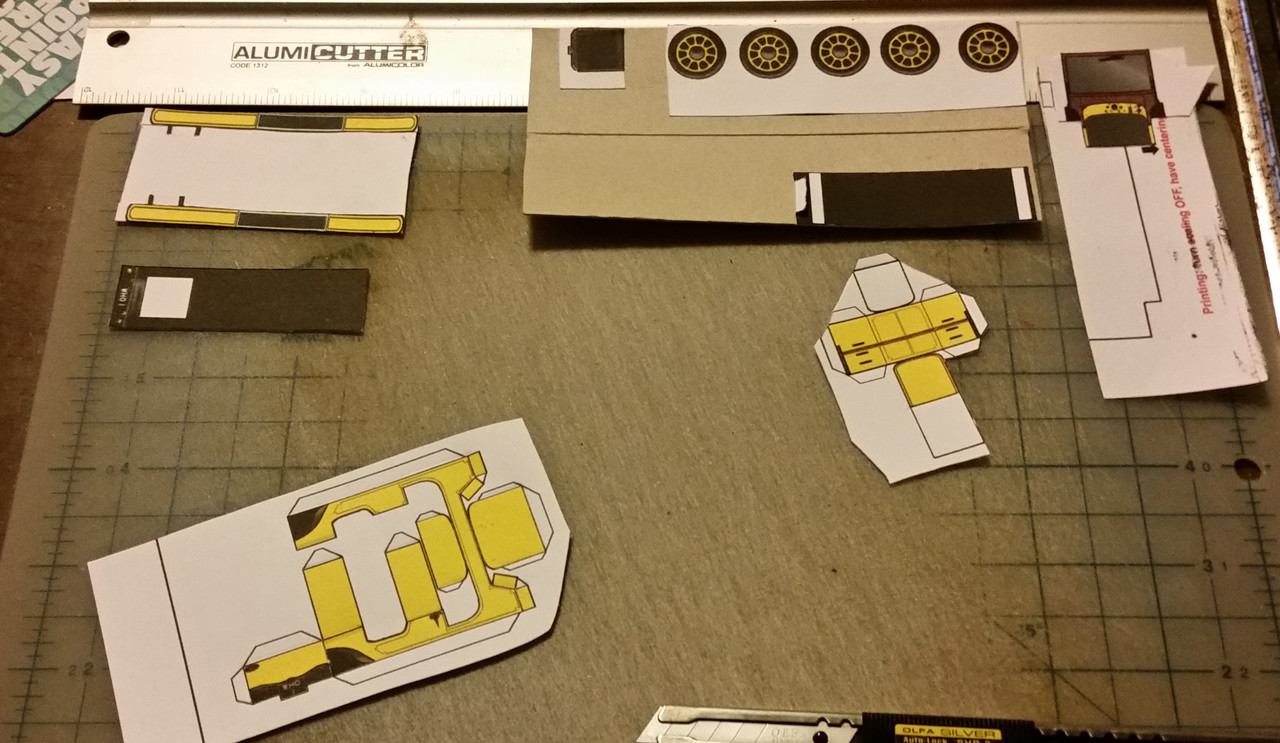 Here is the windshield, floorboard, hood and body cut out 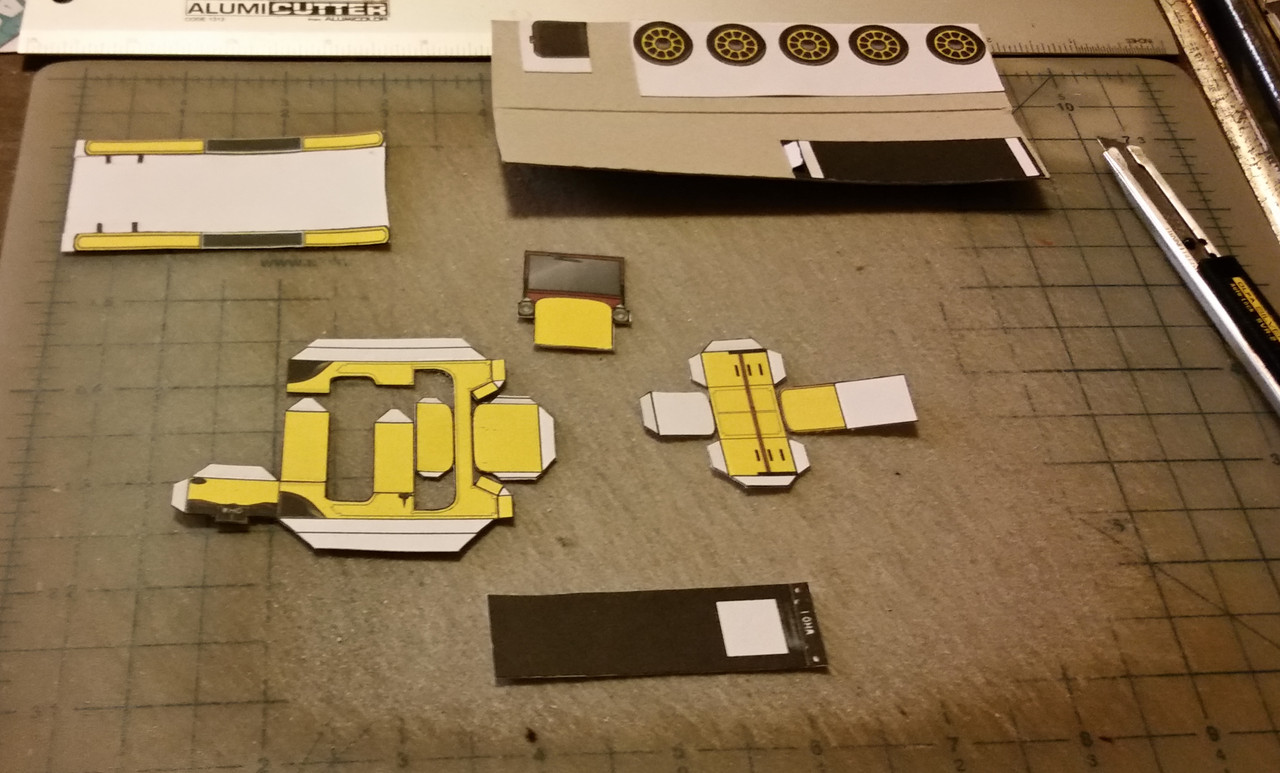 Flipped over the fenders and cut them out 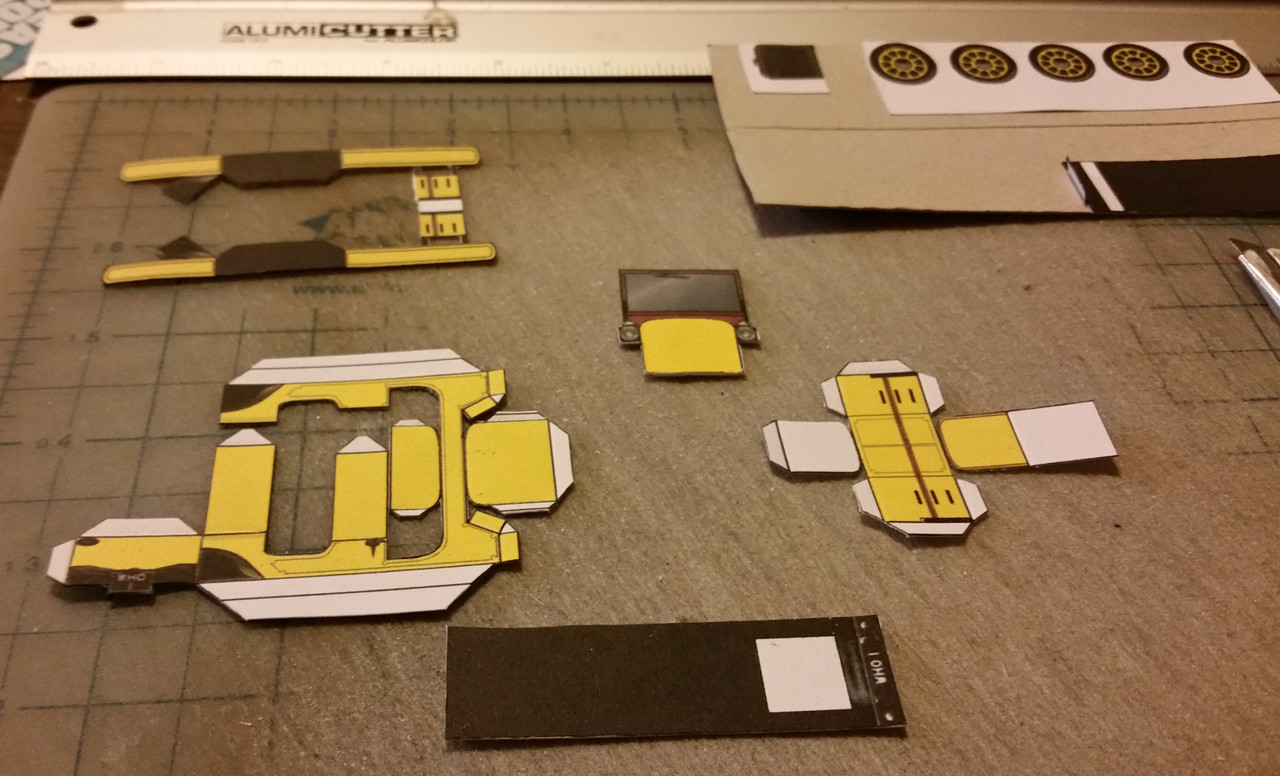 |
|
|
|
Post by Vermin King on Dec 12, 2021 16:43:21 GMT -9
Dec. 10, 2018 _____________ The 7 PM GrayC disaster. She got on the TV tray I use as my work station, and when she jumped off, she tipped it over 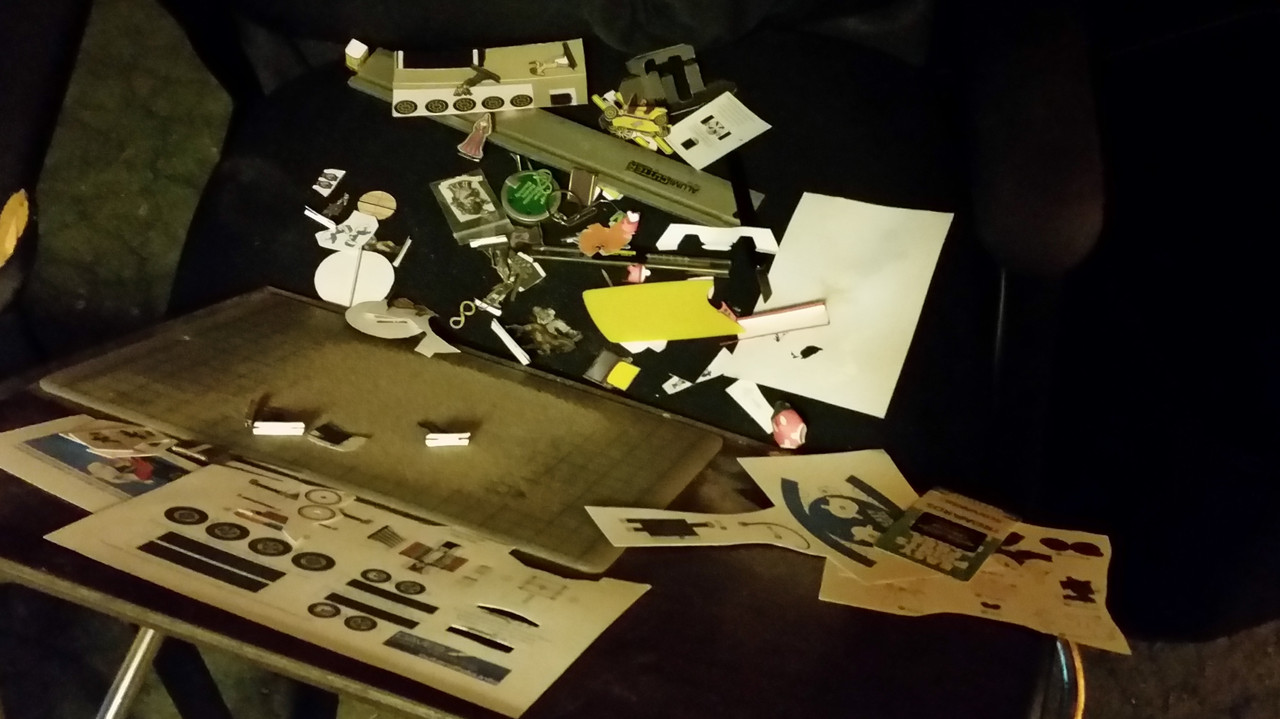 By the time I got everything picked up and reorganized, it was almost 9 PM Scoring, edging, and curving fenders  Glued the body and hood and added a bit more curve to the fenders. I glued from the back forwards. The firewall is folded down and the angled extensions are glued together, and then glued to the firewall. 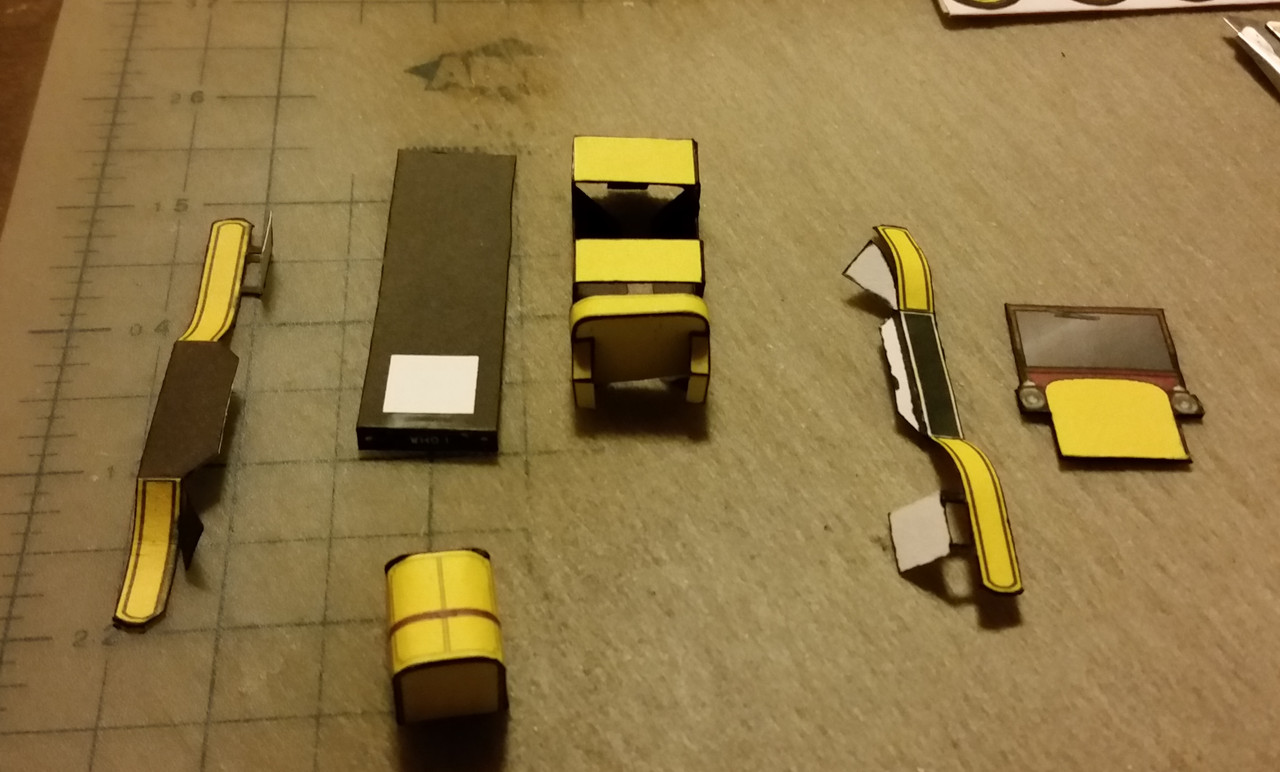 Glued the body to the floor, and I think I glued the chassis underneath. Also prepped the radiator 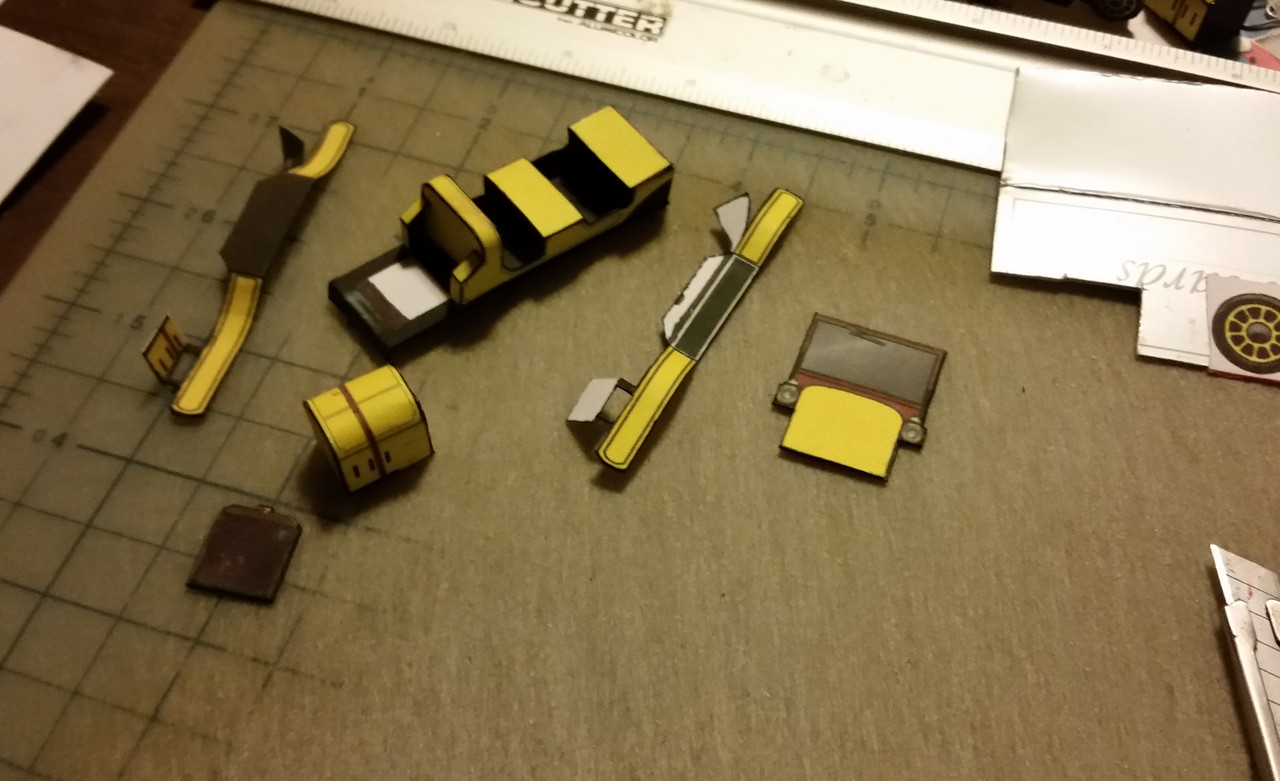 |
|
|
|
Post by Vermin King on Dec 12, 2021 18:01:36 GMT -9
Dec. 11, 2018 ______________ There is a lot of little stuff to see in this first photo. Windshield glued in place (headlights forward). The fender on left is the right fender bottom view. The fenders on the right are the left side top. Note the rear tab that glues to the side and acts as a guide for the curve of the rear fender that gets glued in the valley between the tab and the side of the body. Gluing the front tab to the engine also helps the front fender to hold its shape. Whether or not the bottom of the car was glued below the floorboard above, it definitely is glued in place here, as you can see the white where the axles get glued. Also note that there is no scoring on the running board tab extending under the car 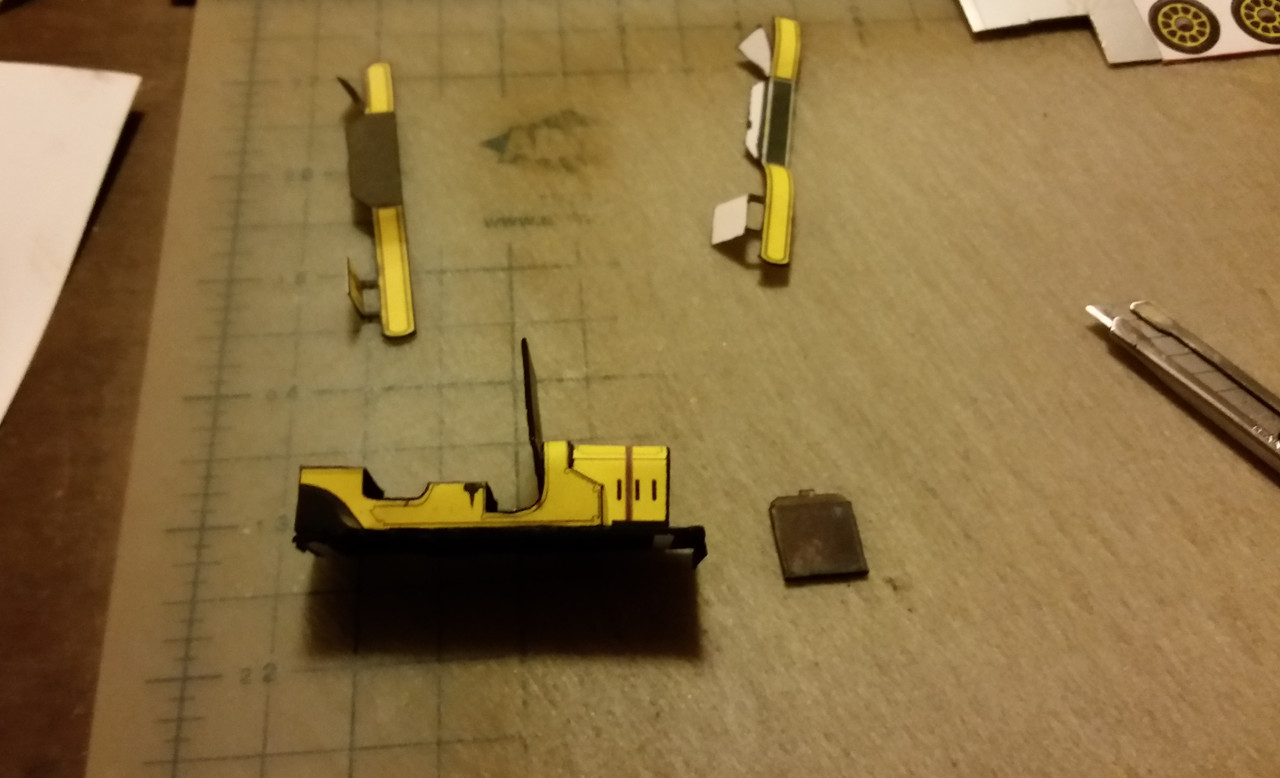 The radiator gets glued into place and then the fenders are glued as described above. Finally the tab that extends from the running board gets glued underneath. 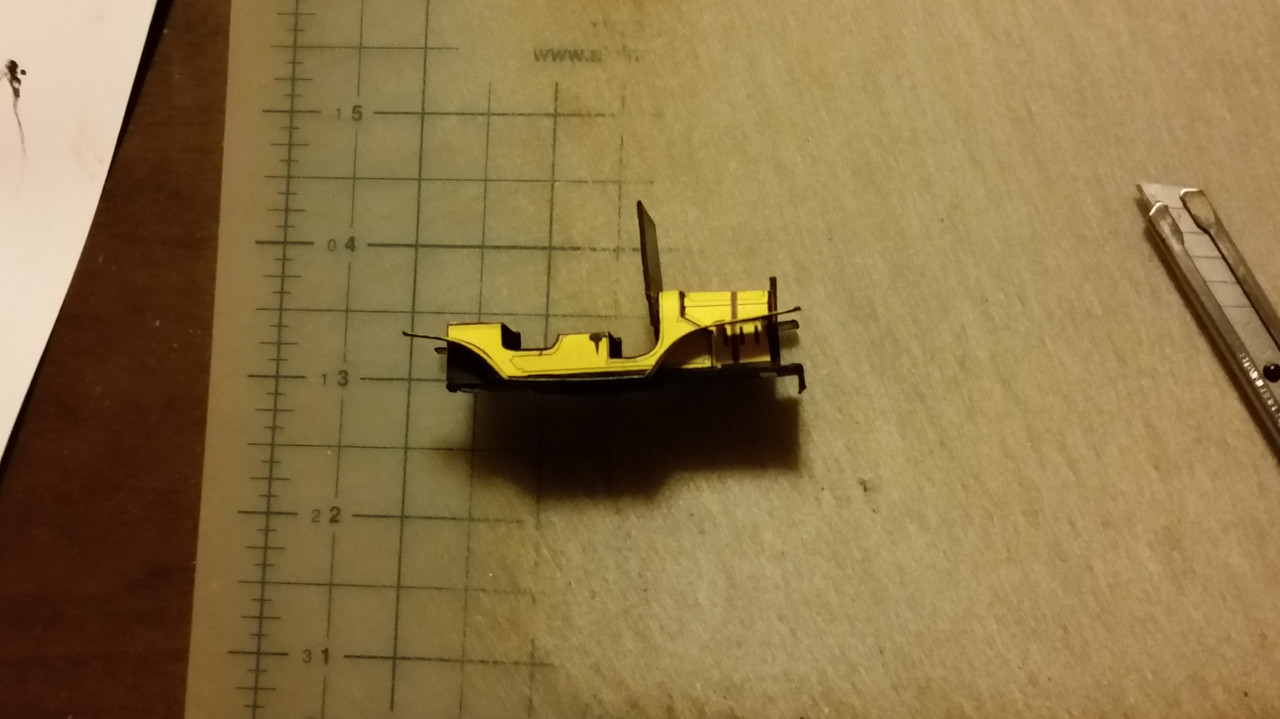 Turning over, verify everything is 'square' and continue massaging the fenders to a curve that looks right 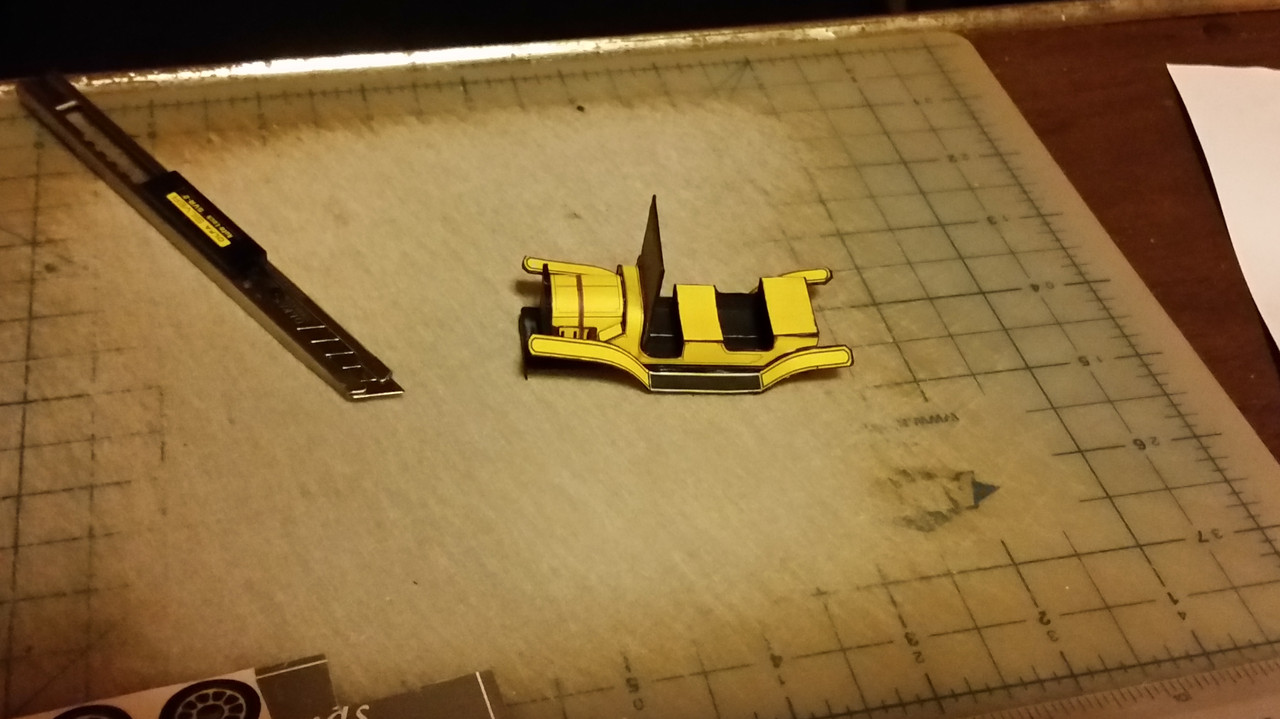 We have to get the fold-over details working -- the steering wheel, steering column, brake handle and the left and right lamps (the right one has the horn). Also time to start working on the seat parts 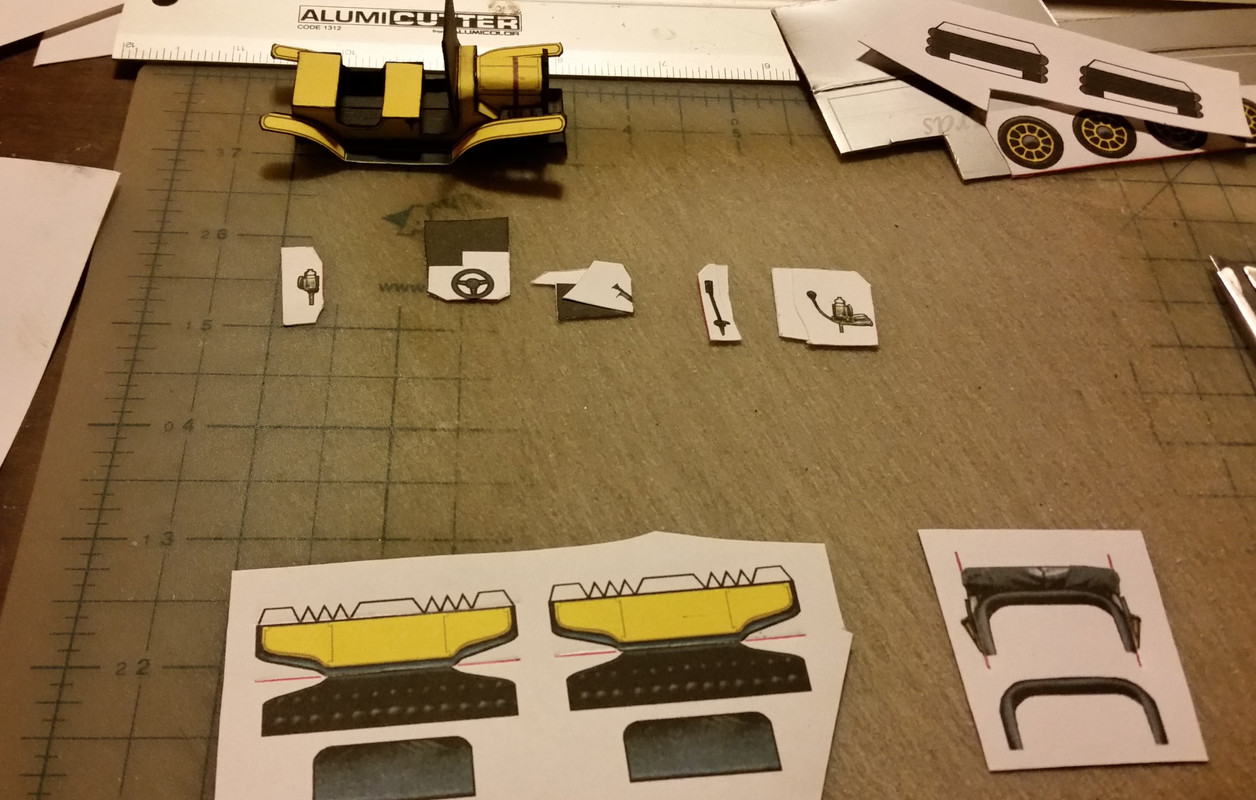 The seats are the same except for the caps. You score, cut out and edge. Another place where you pre-shape the seat walls. On one seat, I glued the seat inner wall to the exterior, followed by gluing in the seat seat. On the other, I glued the seat into the exterior walls, followed by folding down and gluing the inner wall in place. I didn't really see that one method was better than the other. Note that I blackened the reverse side of the caps before installing. The roof hinges get bent sharply down before installation 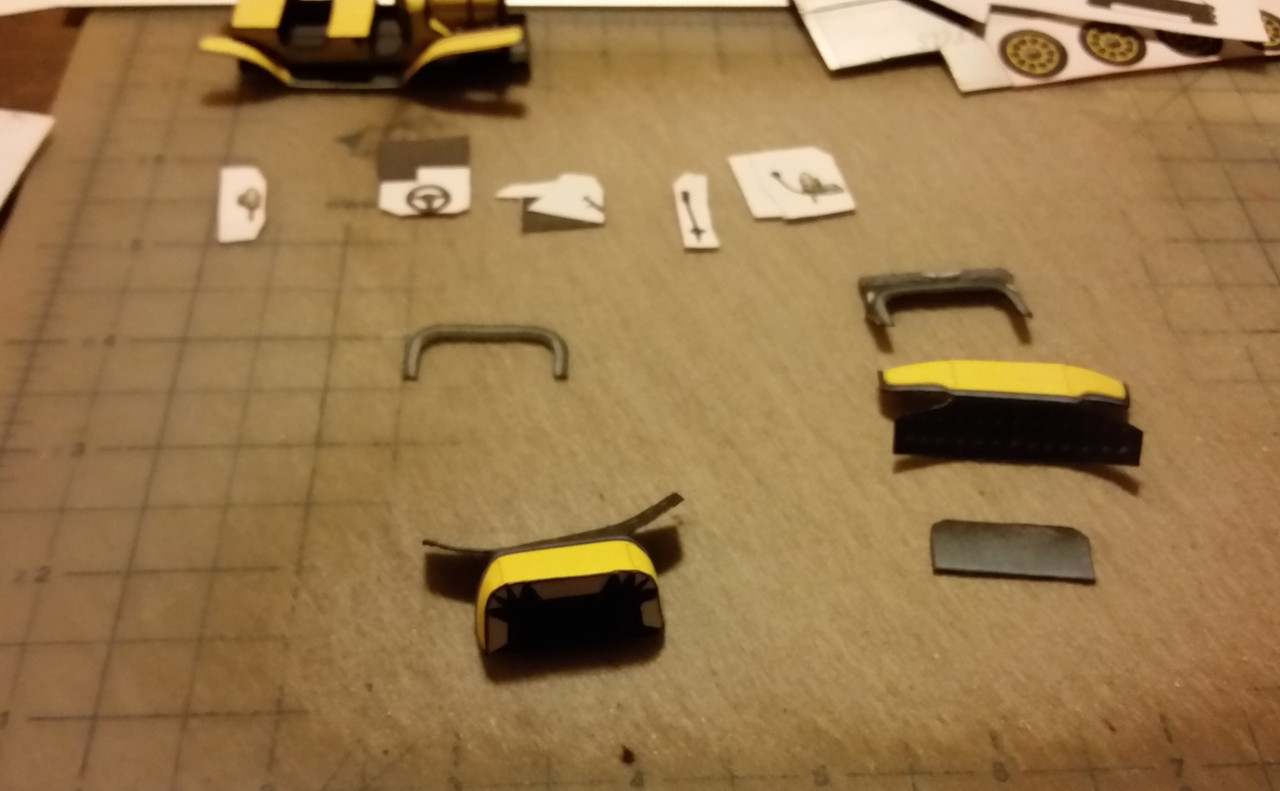 Glue the seats in place, then glue the steering column and wheel together and glue under the instrument cluster on the dash. Then glue the brake handle and lamps in place 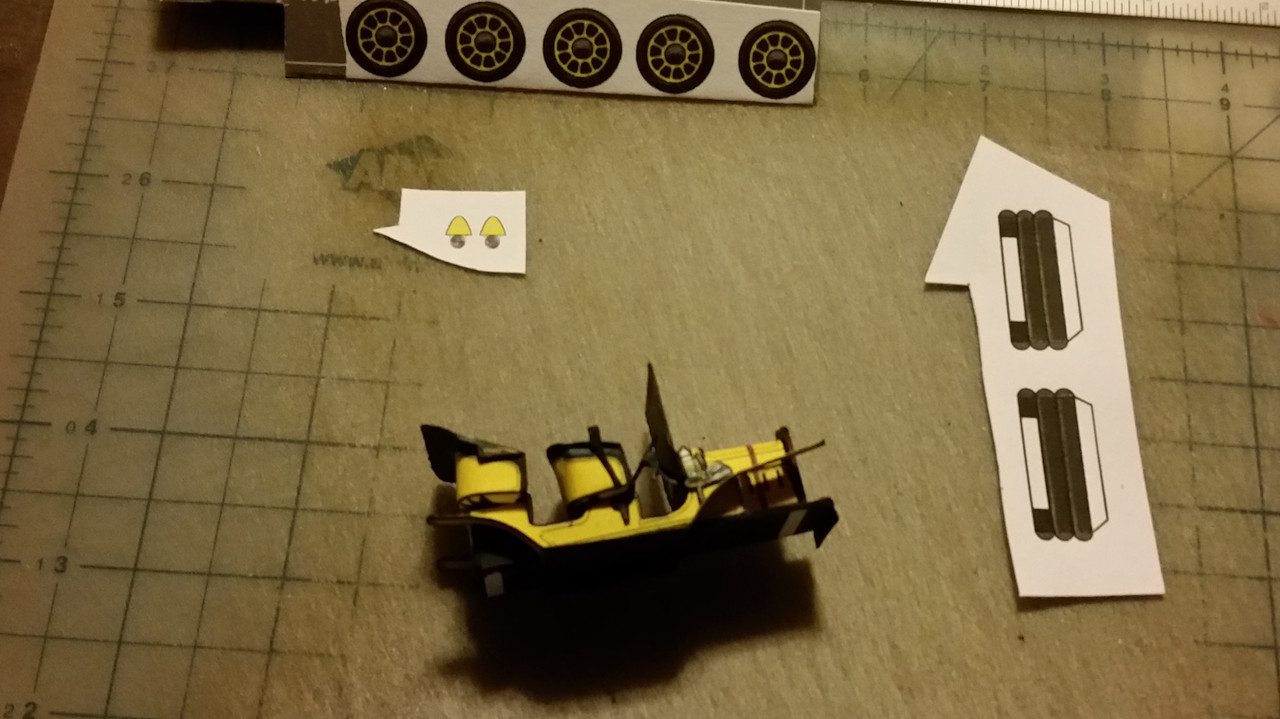 It should look like this. Time to start thinking about the headlights, axles and wheels  |
|
|
|
Post by Vermin King on Dec 14, 2021 16:13:34 GMT -9
Dec. 12, 2018 _____________ Note -- the wheels should be aligned to have the light part of the hubs facing upwards. The axles are triangular tubes and the end flanges are bent outward to glue to the wheels. The axles have a white rectangle that glues to the white rectangle under the vehicle 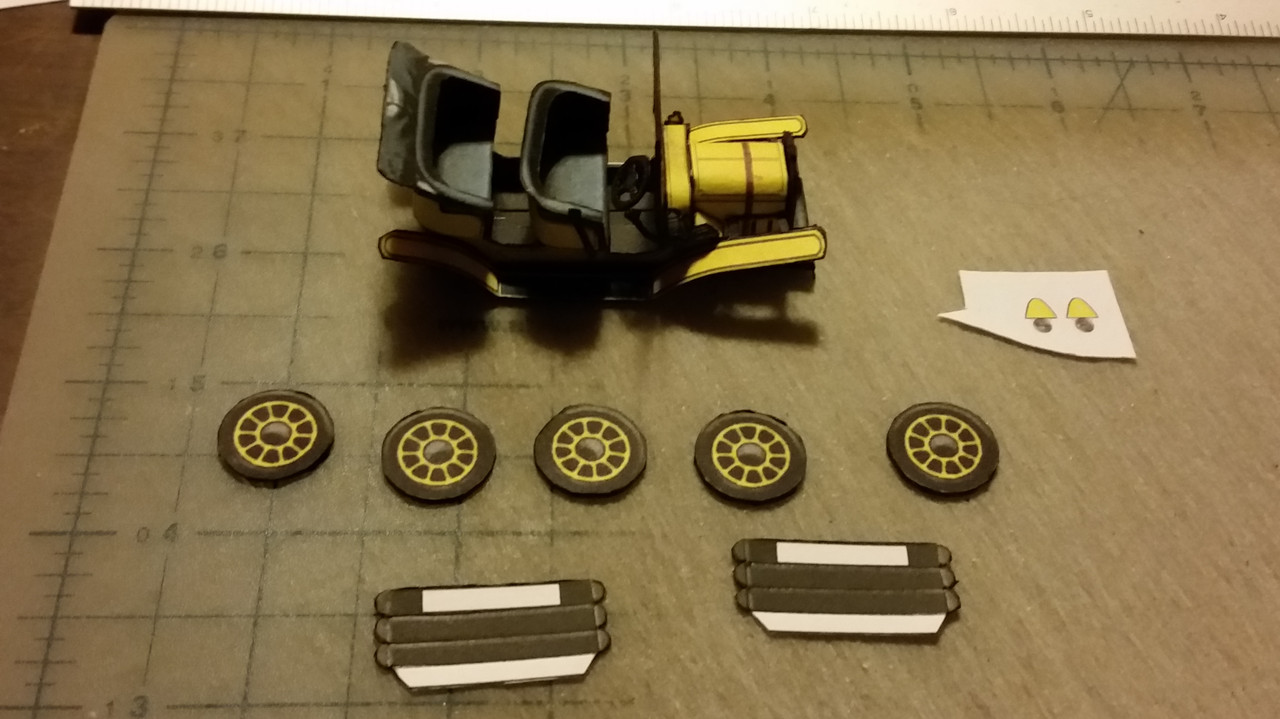 Then the headlights get shaped and glued. Once dry they will go on the front bracket between the fender and radiator 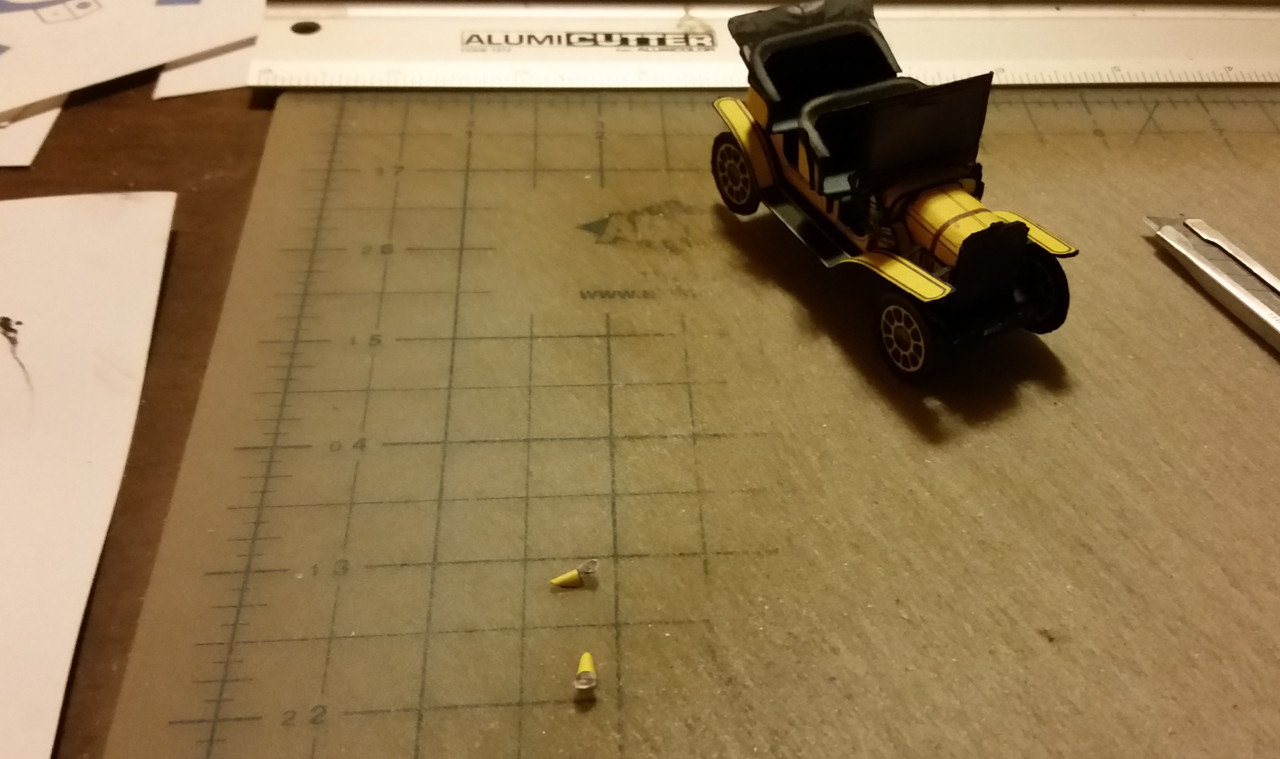 Try to get the headlight housings very round before gluing to the headlight face 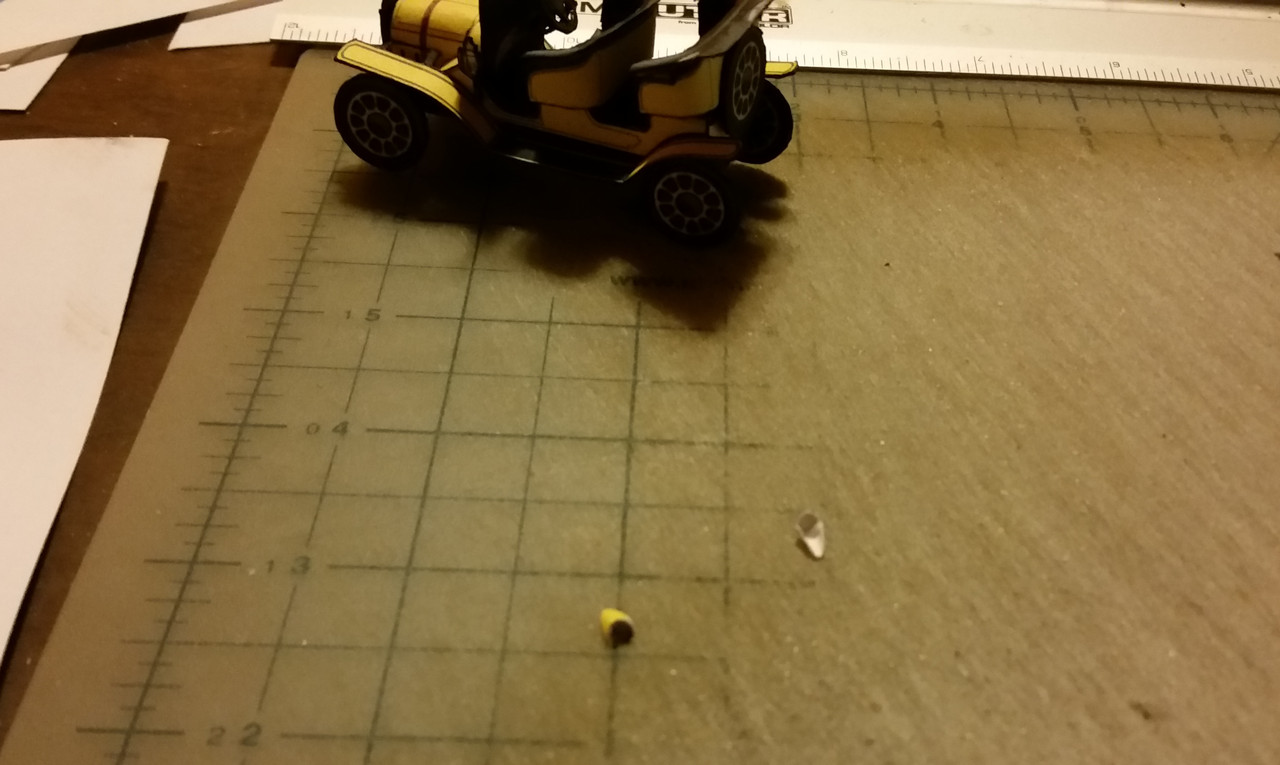 When glued in place, you are done 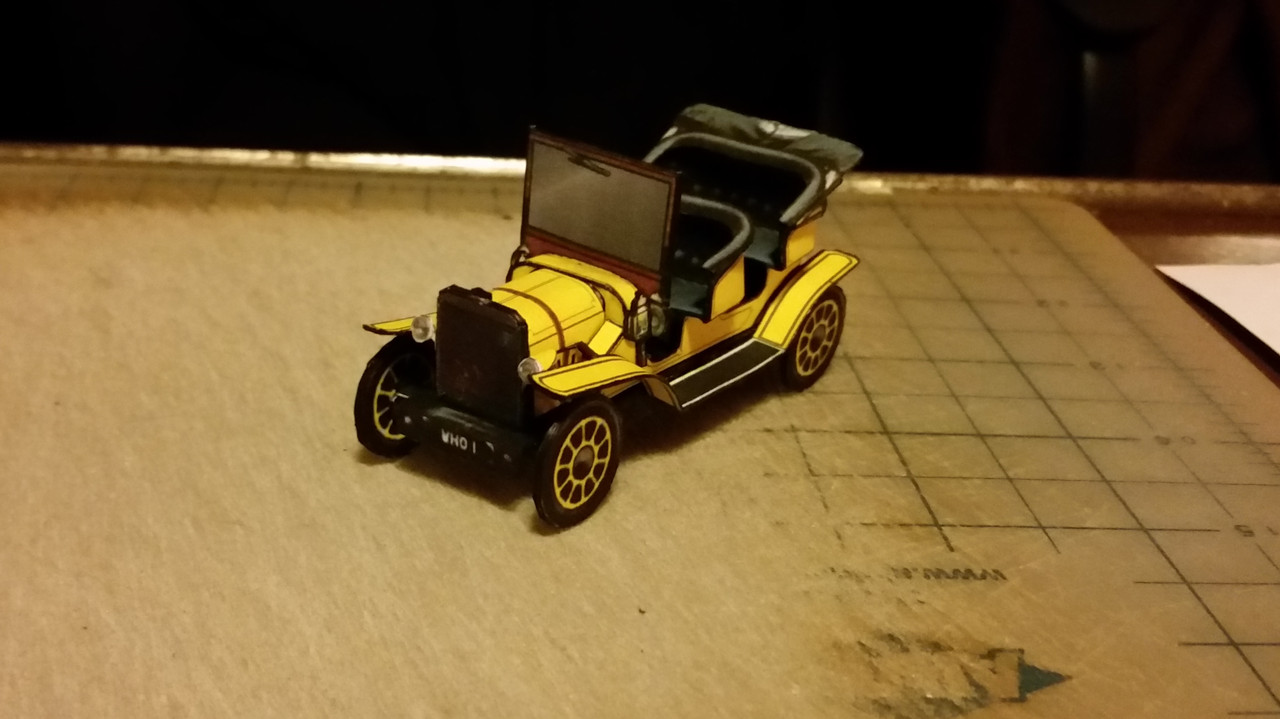 |
|
|
|
Post by mesper on Dec 14, 2021 16:35:54 GMT -9
Wow I'm impresssed!
BTW why don't you put a transparent foil/film into the windshield frame?
|
|
|
|
Post by Vermin King on Dec 14, 2021 16:54:11 GMT -9
When I was originally doing the build thread, I wanted this to be a build thread of the kit, as designed. If I were to build another one, I would probably do that, and hopefully take more care in having the wheels more round. Here are the final pics from December 12, 2018 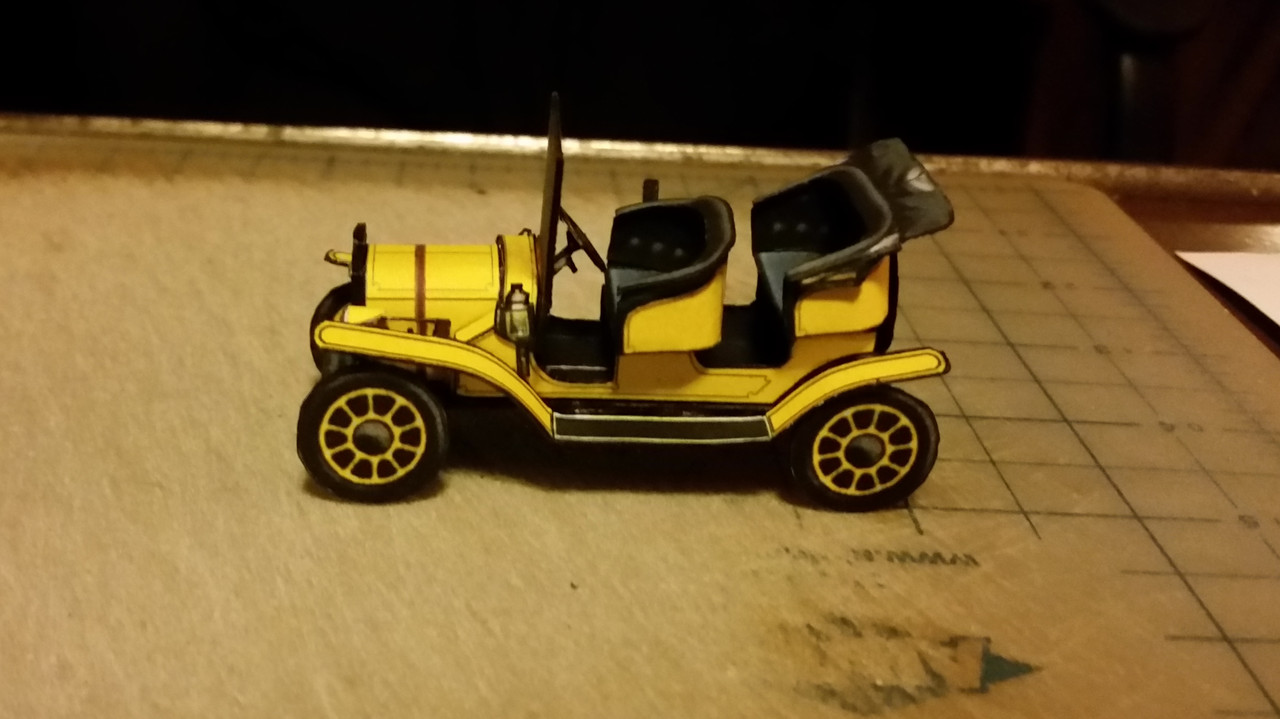 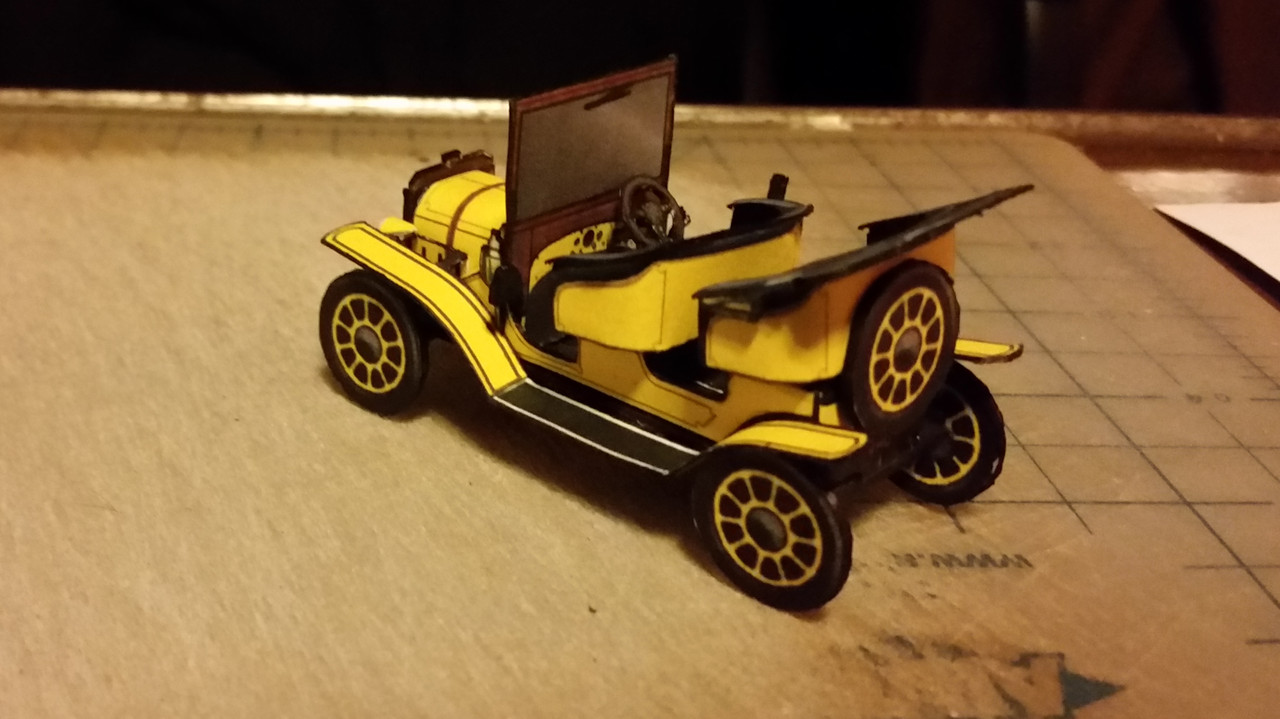 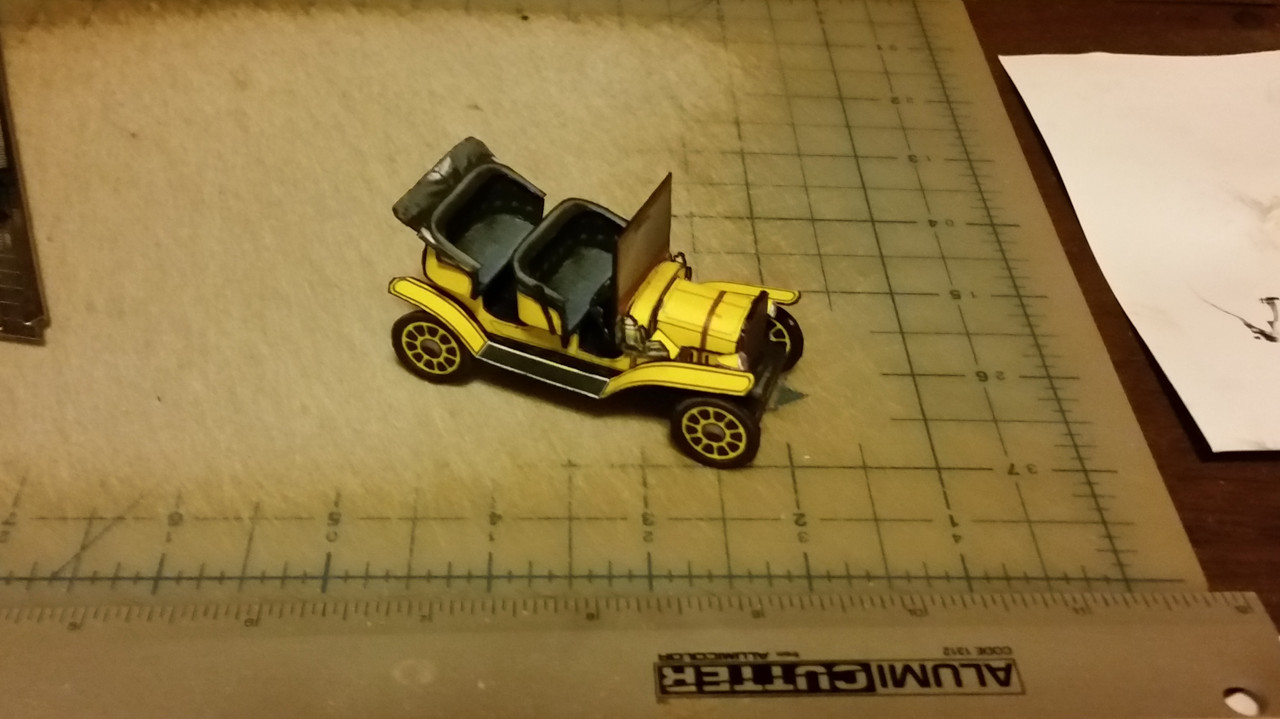 It can be downloaded from onemonk.com/verminkinglabs.html |
|